Fix: INET_E_RESOURCE_NOT_FOUND on Windows 10
There’s no doubt that Windows 10 is delivering updates on a regular basis. These updates, although improves the overall experience of Windows 10, sometimes cause unwanted behavior in a lot of built-in apps. One of those apps is Microsoft Edge or Internet Explorer. One of the latest Windows 10 updates is known to cause issues with Windows’ own browsers.
The issue will prevent you from accessing any webpage using the Microsoft Edge or Internet Explorer. You will most likely see a message saying “Hmm… cannot reach this page” with a button “Details”. Once you click the “Details” button you will see an error code “The DNS server might be having problems. Error Code: INET_E_RESOURCE_NOT_FOUND”. Sometimes your page might load but it won’t work. For example, you might not be able to upload any documents. Most of the users have mentioned experiencing this issue while connecting to Google pages. The issue is actually random which means that it will come and go without any pattern. So, sometimes your Edge might work fine while sometimes it might give this error. Also, keep in mind that this error only affects Microsoft Edge and Internet Explorer. So, you will be able to use other browsers like Mozilla Firefox and Google Chrome.
The issue, as mentioned above, is mainly seen after the Windows 10 latest update. So the culprit behind it is the Windows update. This means that this will most likely get fixed in the upcoming updates. So, all you have to do is wait for the next updates from Microsoft and in the meanwhile, you can go through the methods given below to get around the issue.
So here are a few methods to get around this problem.
Method 1: netsh Reset
This method was suggested by Kyle in the comments below. If you have a static IP please not that doing the procedure below will reset all IP settings, if static IP is not a concern then just go ahead with this method otherwise (save your IP Configuration). The method to save the configuration is listed below along with the “netsh” reset steps.
- Hold the Windows Key and Press X.
- Choose Powershell (Admin).
- Type
ipconfig /all > C:\ipconfiguration.txt
This will save your IP configuration into the ipconfiguration.txt file in C:\
- Then type,
netsh int ip reset c:\resetlog.txt
and PRESS ENTER
- Then type,
netsh winsock reset
and PRESS ENTER
- Reboot your PC and test.
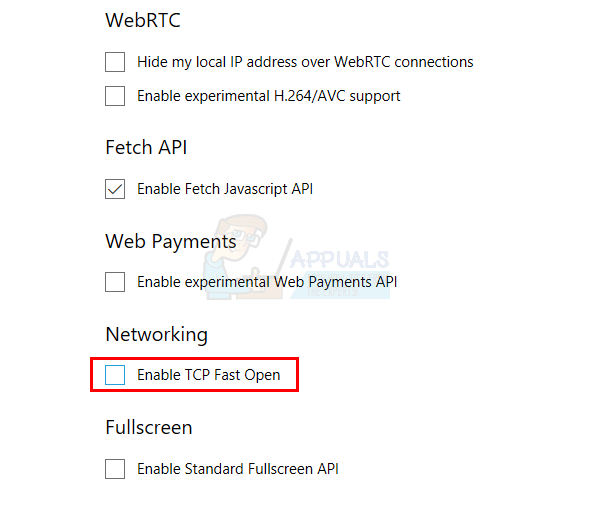
Method 2: Uncheck Enable TCP Fast Open
This workaround has been provided by the Microsoft officials and it works smoothly. Basically, you have to turn off the option TCP fast open from your Microsoft Edge browser which will solve this issue. If you don’t know, TCP Fast Open is a feature introduced by Microsoft that improves the performance and security of Microsoft Edge. So, disabling it won’t have any ill effect on your computing or browsing.
Follow these steps to turn off TCP Fast Open
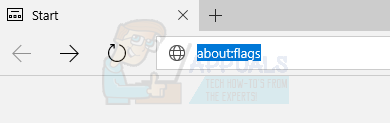
- Open Microsoft Edge
- Type the following in the address bar
about:flags
- Scroll down until you see a Network section. If you are using newer Edge, you need to press Ctrl + Shift + D to display all the preferences.
- Uncheck the option named TCP Fast Open. In case of newer Edge, set the option to Always off.
- Restart your browser
This should solve your problem.
Method 3: Use InPrivate Browsing
Another workaround provided by Microsoft Officials is to use InPrivate Browsing. InPrivate Browsing, if you don’t know already, is a method of browsing privately. In this mode of browsing, the browser doesn’t record your history.
You can do InPrivate Browsing by the following way
- Open Microsoft Edge
- Click on the 3 dots on the top right corner
- Select New InPrivate Window
- Now browse as you normally would.
As long as you are in this InPrivate Window, your browser should work fine.
Method 4: Changing UAC Settings
Changing the settings of the UAC (User Account Control) has also proven to work for users. If you have disabled UAC, Microsoft Edge won’t work. Any other settings will make Edge work again. So, changing the settings to something else will solve the problem.
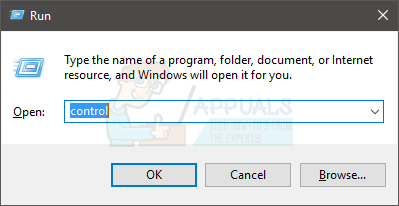
- Hold Windows key and press R
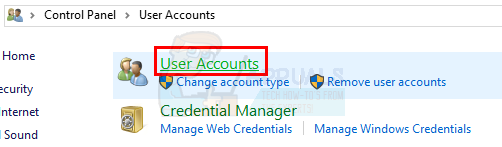
- Type control and press Enter
- Click User Accounts
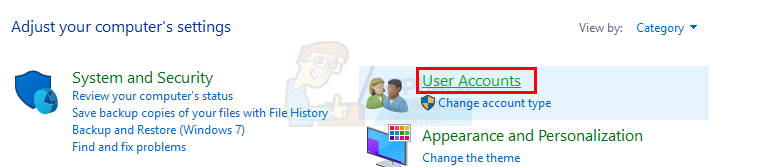
- Click User Accounts again
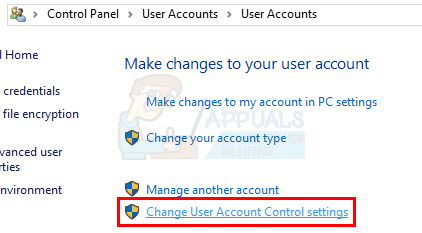
- Click Change User Account Control settings
- Slide the bar up and down to change the settings. If it is set to Never Notify, change to whatever you want. It is better to pick the second option from the top.
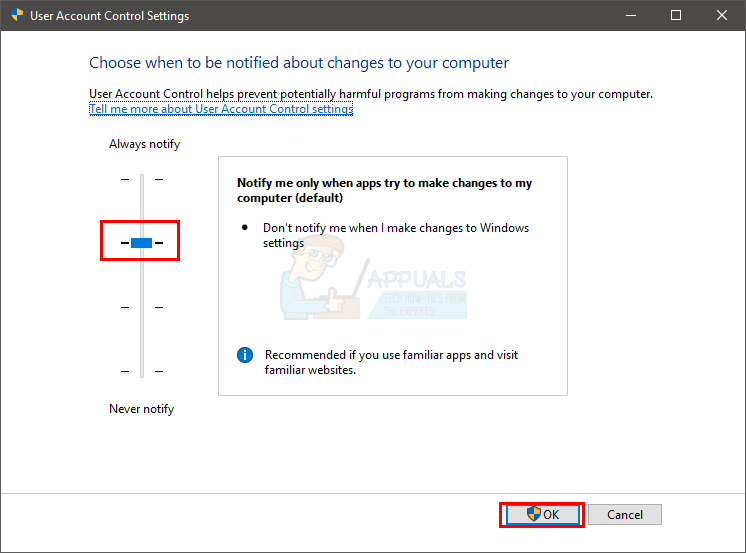
- Click Ok
Now check if the Microsoft Edge is still giving the error or not.
Method 5: Reinstall Edge
If the above 2 methods didn’t work for you then it’s time to reinstall Microsoft Edge. Reinstalling Edge solves the problem for a lot of users. So, if nothing else works then it is time to reinstall Microsoft Edge which solves this problem.
Note: This method will remove any of your favorites so don’t forget to backup your favorites before resetting Microsoft Edge.
Back up your favorites:
Follow the steps given below if you want to backup your Microsoft Edge favorites
- Hold Windows key and press R
- Type
%LocalAppData%\Packages\Microsoft.MicrosoftEdge_8wekyb3d8bbwe\AC\MicrosoftEdge\User\Default
and press Enter

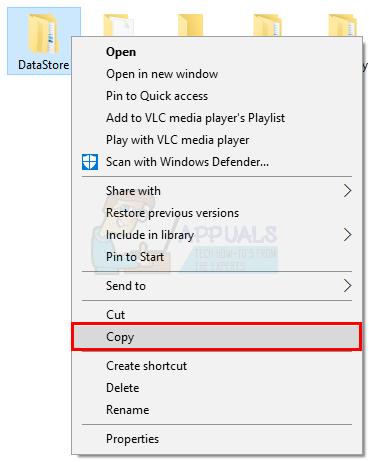
- Now right-click the folder named DataStore and select Copy
- Now go to Desktop or anywhere where you can find the file easily. Right-click and select Paste.
That’s it. Now you have a backup of your favorites. The instruction to importing these favorites back to the fresh Microsoft Edge will be given at the end of this method.
Reinstall Edge:
Now follow the steps given below to reset Microsoft Edge
- Go here and download the zip file
- Extract the contents of the file using Winrar or Winzip
- Right-click the extracted file (it should be named ps1) and select Properties
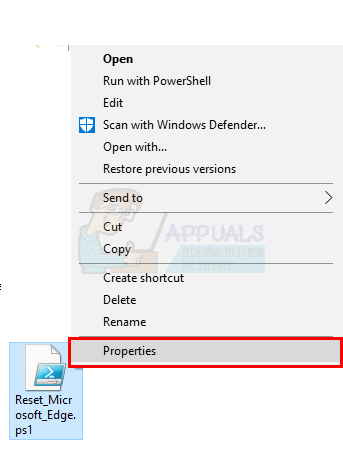
- Select the General tab
- Check the option that says Unblock
- Click Apply then select Ok.
- Make sure the Microsoft Edge is closed and there is no instance of it running
- Right-click the ps1 file and select Run with PowerShell
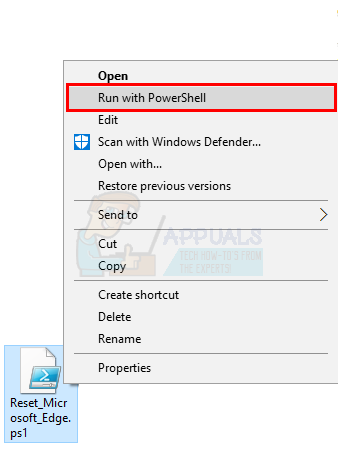
- Now your PowerShell will open and then close. Wait for it to close
- Once it is done, your Microsoft Edge should be reset.
Note: If you are not seeing the ‘unblock’ feature in the properties tab, do not worry. Jump to step 8 and launch the script with PowerShell. When you do, you will be asked whether you want to run this instance of the program on your computer or not. Press Y to continue.
In case of problems:
If the reinstalling of Microsoft Edge doesn’t solve your problem then follow these steps.
Note: You are required to know your account’s password before proceeding with this fix. Furthermore, you may also require administrator privileges to perform some fixes.
- Hold Windows key and press R
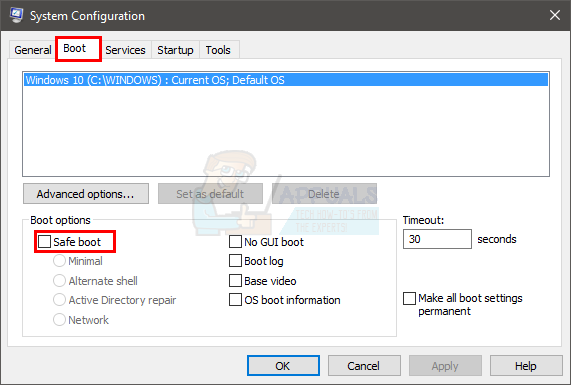
- Type “msconfig” and press Enter

- Select the Boot tab
- Check the option named Safe Boot
- Click the option Minimal under the Safe Boot section
- Click Ok
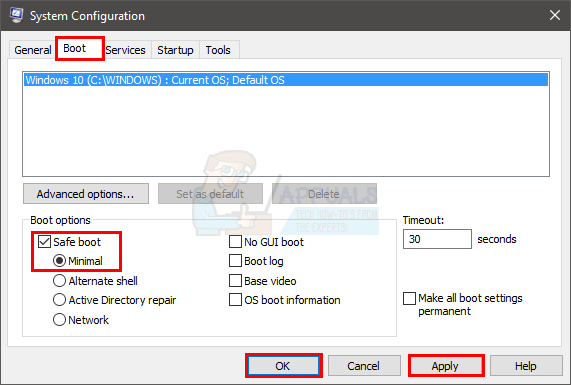
- Click Restart when it asks you to restart
- Once restarted, Hold Windows key and press R
- Type C:\Users\%username%\AppData\Local\Packages\ and press Enter
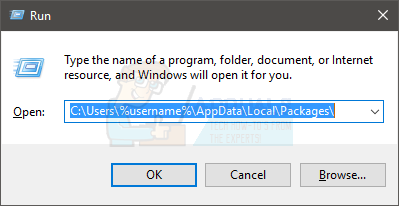
- Click View then check the option named Hidden Items (to make sure that folder isn’t hidden)

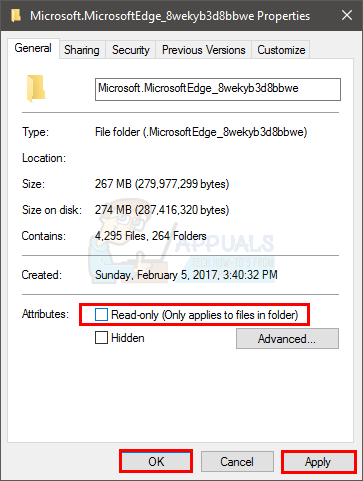
- Right-click the folder MicrosoftEdge_8wekyb3d8bbwe and select Properties
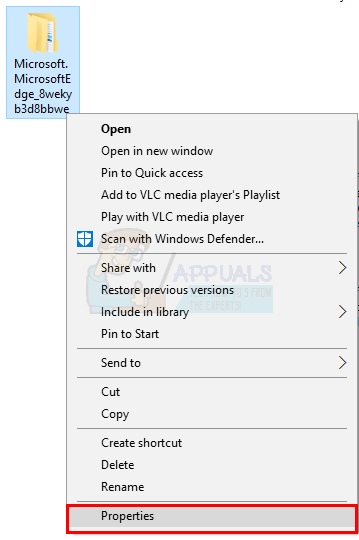
- Uncheck the option Read-only
- Click Apply then click Ok
- Right-click the folder MicrosoftEdge_8wekyb3d8bbwe and select Delete
- Reboot your computer
- Hold Windows key and press R
- Type “msconfig” and press Enter

- Select the Boot tab
- Uncheck the option named Safe Boot
Now repeat the steps given in the section Reinstall Edge (above)
Restore your favorites:
Once you have reset you Microsoft Edge, you can restore your old favorites and settings by following the steps given below
- Go to the location where you copied DataStore folder (from backup your favorites section)
- Right-click DataStore and select Copy
- Hold Windows key and press R
- Type
%LocalAppData%\Packages\Microsoft.MicrosoftEdge_8wekyb3d8bbwe\AC\MicrosoftEdge\User\Default
and press Enter
- Right-click anywhere in the folder and select Paste
- If it asks, select Replace the files in the destination
- Click yes to any other prompts that might appear
Once it is done, your old settings and favorites should be back now.
Method 6: Flush DNS
Flushing the DNS and retrying works for a lot of users as well. So, follow the steps given below and then try Microsoft Edge again.
- Press Windows key once
- Type Command Prompt in the Start Search
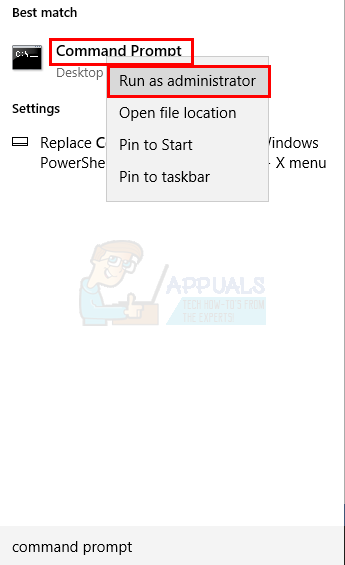
- Right-click Command Prompt from the search results and select Run as administrator
- Type the following in cmd and press “Enter”.
ipconfig /flushdns
- You should see a message Windows IP configuration successfully flushed the DNS Resolver Cache
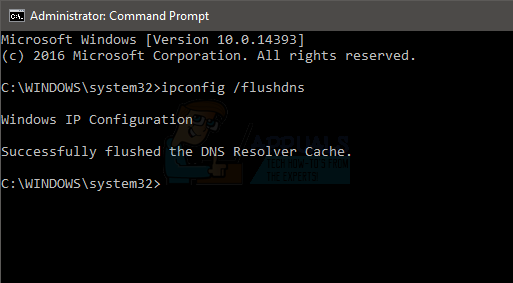
- Type exit and press Enter
Now try to run Microsoft Edge again and see if the problem is solved.
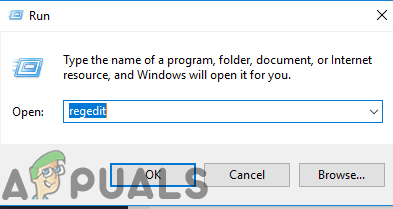
Method 7: Renaming Connections Folder
Sometimes, making certain adjustments in the registry fixes the error. Therefore, in this step, we will be renaming the connections folder. For that:
- Press the “Windows” + “R” keys simultaneously to open the run prompt.
- Type in “regedit” and press “Enter“.
Typing “Regedit” in the Run prompt and pressing Enter - Open the folders in the following order
HKEY_LOCAL_MACHINE > Software > Microsoft > Windows > CurrentVersion > Internet Settings
- Right–click on the “Connections” folder and select “rename“.

Right-clicking on the connections folder and selecting “Rename”. - Type in “ConnectionsX” and press enter.
- Restart your computer and check to see if the issue persists.
Method 8: Reboot Router
There have been many reports from users that have been able to fix the INET_E_RESOURCE_ERROR by simply rebooting their routers but we will be conducting a proper router reboot to make sure that the DNS and internet configurations are also reset and that the router goes through a complete power cycle during this process. In order to do that:
- Launch your browser and type in your IP address in the address bar.
- In order to find our IP address, press “Windows” + ” “R” to launch the run prompt. Type in “CMD” and press “Shift” + “Ctrl” + “Enter” to provide admin permissions. Also, type in “ipconfig/all” in the cmd and press “Enter”. The IP Address that you have to enter should be listed in front of the “Default Gateway” option and should look something like “192.xxx.x.x”.
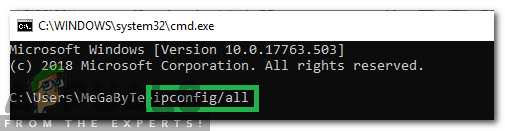
Typing in “ipconfig/all” - After entering the IP Address, press “Enter” to open the Router login page.
- Enter the username and password in the respective categories on the router’s login page both of which should be written on the back of your router. If they aren’t, the default values should be “Admin” and “admin” for both the password and the username.

Logging in to the Router - After logging in to the router, click on the “Reboot” button that should be present in one of the options in the menu.
- After clicking on the Reboot button, wait for the rebooting process to be completed.
- After rebooting, check to see if the issue still persists.
Method 9: Network Reset
In some cases, there might be corruption or glitches in the default Windows Network adapters and adapter configurations. This corruption can occur due to a number of reasons including manual reconfiguration of these settings. However, it isn’t only limited to that, the INET_E_RESOURCE_ERROR can also occur on your computer if you have installed a rogue third-party application.
Therefore, in this process, we will make sure to completely reset all the network configurations present ton our computer and we will also be getting rid of any bad cache or stored data for the DNS settings. This should get our network connection back up and running and get rid fo this error as well. In order to do so, follow the steps listed below.
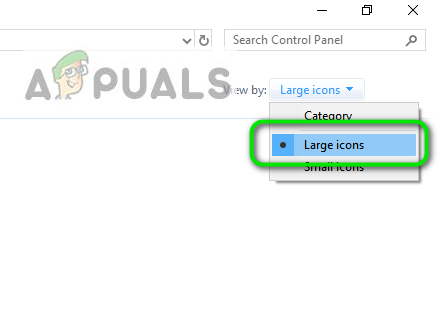
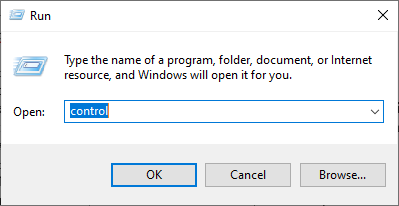
- Press “Windows” + “R” to open the Run prompt.
- Type in “Control panel” and press “Enter” to launch the classical control panel interface.
- Inside the Control Panel, click on the “View By:” option and select the “Large Icons” from the list of available options.
Viewing Control Panel using Large Icons - After selecting the Large Icons, click on the “Network and Sharing Centre” option.
- In the Network and Sharing Centre, select the “Internet Options” option and from the left navigation pane at the bottom.

Internet Options in Control Panel - In the new window that opens up, click on the “Advanced” tab, and then select the “Restore Advanced Settings” option to reset the advanced network settings.
- After this, press “Windows’ + “I” to open the Windows Settings.
- In the settings, click on the “Network and Internet” option and select the “Status” button on the left side of the next screen.

Selecting “Network and Internet” Options - Scroll down on the next screen until you reach the “Network Reset” option.
- Click on the “Network Reset” option to prompt the computer to initiate the reset request and select the “Reset Now” button on the next screen.

Press Reset Network Button - Confirm any prompts that ask you if you really want to initiate a network reset and prepare to restart your computer.
- The automatic prompt should wait for some time before initiating a restart so you should have some time to back up or save any work that you have unsaved.
- When the computer restarts, you’ll notice that your network connection isn’t active. This is because your network card is firstly reset and then released its previous connection. Just select the network icon, pick the network you want to reconnect to, and choose “Connect”.
- If your TCP/IP settings are set to automatically detect, your network connection should detect the appropriate network settings and connect to the internet without any problems.
Method 10: Change DNS Server
Sometimes, your internet connection’s DNS servers that it is configured to use by default might be done or they might’ve been configured incorrectly due to which you are getting this error while trying to connect to a website. The computer is unable to generate a DNS server configuration on its own and this error shows up repeatedly on your screen.
Therefore, in this step, we will be reconfiguring the DNS setting and selecting our own network of DNS servers manually. We will make sure to point the DNS server to the Google DNS address which should work immaculately with most websites and you should be able to rid yourself of this error. For that:
- Press “Windows” + “I” to open the Windows Settings.
- In the settings, click on the “Network and Internet” tab and then select the “Ethernet” tab from the left side of the window.
Selecting “Network and Internet” Options - Click on the “Change Adapter Options” to launch the advanced adapter options screen.
- There should be a list of available internet connections on the next screen, right-click on your internet connection and select the “Properties” option.
- Double-click on the “Internet Protocol Version 4 (TCP/IPv4)” option in the window to open the manual configuration panel.
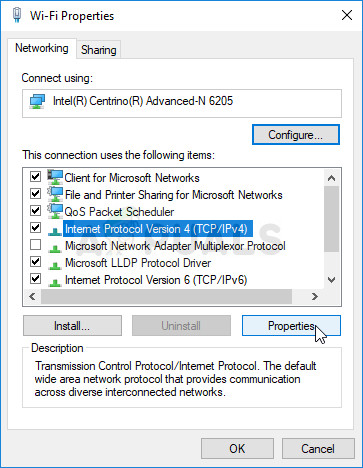
Opening Properties of Internet Protocol version 4 - Check the “Use the Following DNS Servers” option to be able to manually identify the servers that you want to use.
- Make sure to enter the “8.8.8.8” and “8.8.4.4” as the primary and the secondary DNS server addresses.
- Save your changes and click on “OK” to exit out of the window.
- Once you have successfully changed this setting, check to see if the error message still persists.
Method 11: Use a VPN
Using a trustworthy VPN can help you solve INET_E_RESOURCE_NOT_FOUND error instantly. Typical VPNs connect to a new DNS server, bypassing the issue on your computer. It can also help you to bypass geolocation-restricted content, such as Amazon Video or others.
However, we want to point out why is it important to use a trustworthy and powerful VPN, usually one that costs money, over a free one. Keep in mind that free VPNs often are used by bad people and for various purposes, therefore IPs offered by such services are often blacklisted by the majority of websites. In other words, using a free VPN might even CAUSE the INET E RESOURCE NOT FOUND error to occur:
- Download your preferred VPN.
- Run it and open it.
- Connect to a server in the chosen location.
- Try connecting to the website you couldn’t access earlier and check if the error is now solved.
Method 12: Reinstall Wi-Fi Driver
In some situations, the Wifi Driver that your computer is configured to use by default might be causing this issue on your computer. The Wifi Driver is one of the most important components in the process of establishing a secure connection and in this step, we will be reinstalling the default Windows Wifi Driver instead of the one that your computer is currently using.
In order to so, you will have to first uninstall the already installed driver and then replace it with the default one. We have compiled the steps below to help you in doing so.
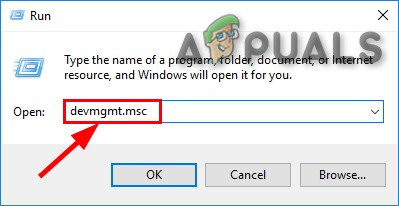
- Press “Windows” + “R’ to open the Run prompt.
- Type in “Devmgmt.msc” and press “Enter” to launch the device manager.
Run devmgmt.msc - Inside the device manager, expand the “Network Adapters” folder and it should contain the currently installed Wifi Drivers.
- Find the driver that your internet connection is currently using and right-click on it.
- Select the “Uninstall Device” option from the list and follow the on-screen instructions to completely remove it from your computer.
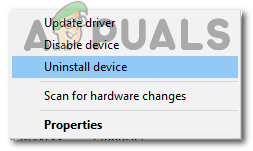
Clicking on the “Uninstall Device” option - Now, restart your computer and WIndows should be prompted to automatically replace this driver with the default one.
- Check to see if the default driver works on your computer and is able to get rid of this error.
Method 13: Turn OFF Antivirus Scanning
In some cases, the issue might be getting triggered because your Windows Defender Antivirus is preventing the connection from being established. Therefore, in this step, we will be temporarily turning off the Windows Firewall and we will also be disabling the Realtime Protection to check if that is the case. In order to do so, follow the steps listed below.
- Press “Windows” + “R” to open the Run prompt.
- Type in “Control Panel” and press “Enter” to launch the classical Control Panel interface.
Accessing the Classic Control Panel interface - In the Control Panel, click on the “View By:” option and select the “Large Icons” button.
Viewing Control Panel using Large Icons - After making this selection, click on the “Windows Defender Firewall” option to launch the Firewall and then select the “Turn Windows Defender Firewall On or Off”.

Opening Windows Defender Firewall from Control Panel - Make sure to uncheck the “Turn On Windows Defender Firewall” for both the available options to turn the Firewall Off.
- After making this selection, save your changes and close out of the Window.
- Press “Windows” + “I” to open the windows Settings.
- Inside the settings, click on the “Update and Security” option and select the “Windows Security” button from the left side.

Update and Security in Windows Settings - On the next screen, click on the “Virus and Threat Protection” option and click on the “Manage Settings” option below the “Virus and Threat protection settings” heading.
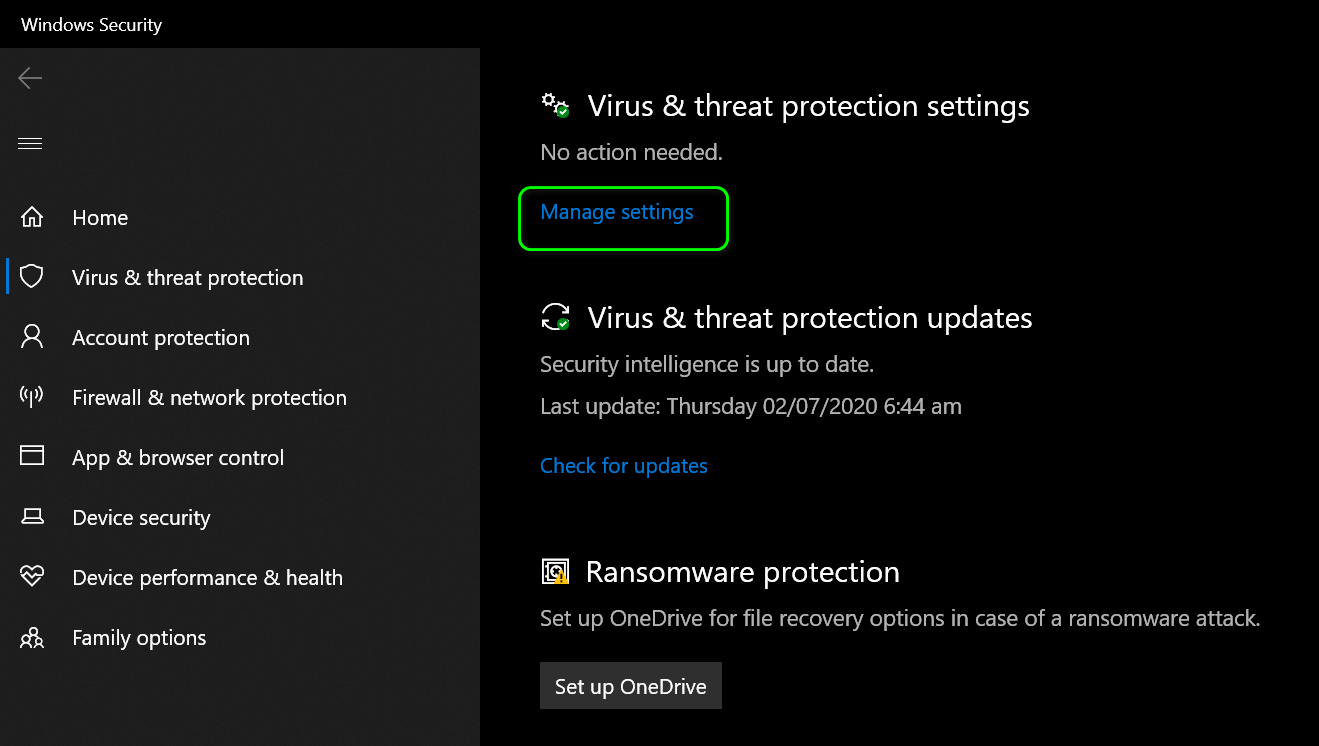
Click on Manage Settings Under Virus & Protection Settings of Windows Defender - After clicking on this option, turn the toggle off for “Realtime Protection”, “Cloud-Delivered Protection”, “Automatic Sample Submission” and “Tamper Protection”.
- After disabling all of these, navigate back to the desktop and check to see if the issue still persists.
Method 14: Implementing Registry Fix
In some cases, you might have messed up the registry settings due to which this issue is being triggered on your computer. Therefore, in this step, we will be implementing a registry fix on our computer which involves actually tampering some entries inside the registry. In order to do that:
- Download the “regfix.zip” file in your downloads folder, right-click on it and extract it in the same folder using Winrar or default Windows extractor.
- After extraction make sure that both FixTcpipACL.ps1 and TcpipAclData.xml are in the following folder.
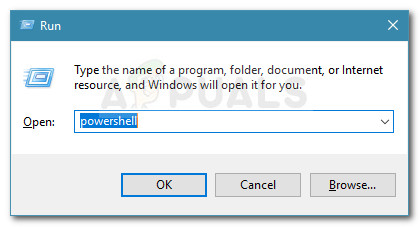
C:\Users\”Your UserName”\Downloads - Press “Windows” + “R” to open the Run prompt, type in “Powershell” and press “Shift’ + “Ctrl” + “Enter” to open it as an administrator.
Run dialog: PowerShell Then press Ctrl + Shift + Enter - Use the following command to move your directory to the downloads folder.
CD C:\Users\Your Username\Downloads
- After that execute the following command:
Set-executionpolicy unrestricted
- When prompted choose ‘A’ and hit Enter.
- Now, run the following command:
.\FixTcpipACL.ps1
- Finally, restart your system and check to see if the issue still persists on your computer.
Hi, I’m having big problems with the Fix: INET_E_RESOURCE_NOT_FOUND on Windows 10 issue described above. Nothing seems to be working, so I’m trying your fixes above. Under the Reinstall Edge option, your step #5 appears incomplete. It reads, “5. Check the option that says.” What option am I supposed to check?