Fix: Windows 10 Loses Internet Connection
After the launch of Windows 10, a majority of Windows users began shifting their operating systems to the latest version. Users have reported losing internet connection after installing Windows 10. This is quite interesting, as Windows 10 is the successor of all previous Windows versions and should be the best of all. We know that this issue will be resolved over time, but it is quite a headache for those users who need to be connected throughout the day.
Although sometimes Windows indicates that the system is connected to the internet, it does not function properly. Attempting to fix this issue automatically proves unsuccessful, leaving the problem unresolved. In this guide, we will attempt to resolve this issue
Reason behind the problem: ‘Losing internet connection after installing Windows 10.’
One of the common causes of this problem is the absence or corruption of the Windows Socket API (Winsock) within the Windows registry. Sometimes, a registry key related to Winsock might become corrupted due to certain viruses. As a result, it causes the internet to shut down. The TCP/IP configuration can also be one of the main culprits behind this issue.
Another factor that may contribute to this problem could be the corruption or improper installation of network card drivers.
Solutions to Fix the Problem of Losing Internet Connection after Installing Windows 10.
There are multiple causes behind this problem; therefore, there might be multiple solutions to fix it. Follow these methods to get your internet working again on Windows 10.
Method #1: Resetting Winsock and TCP/IP.
Resetting the Windows Socket API can do the trick in a majority of cases. You will also be required to reset the IPv4 and IPv6 protocols to regain your internet connection. To accomplish all of this, follow the steps below.
1. Open the Command Prompt (Admin) by right-clicking on the Start menu and selecting it from the list. Alternatively, you can use the Win + X keys on the keyboard and choose it from the list.
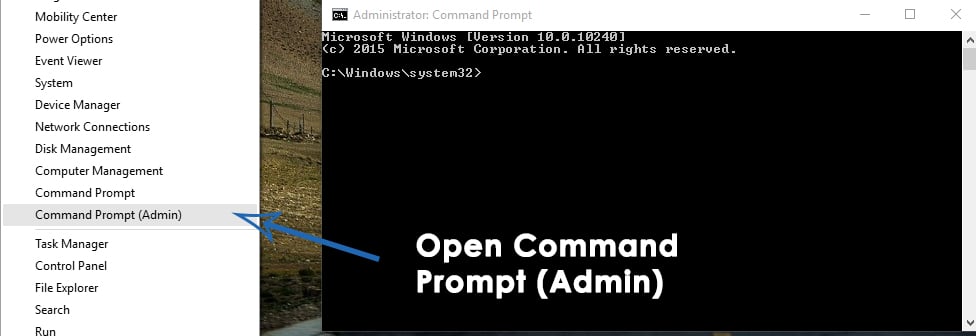
2. Type the following commands inside the Command Prompt, pressing the Enter key after typing each one. You can also copy and paste the commands by right-clicking inside the Command Prompt and selecting “Paste.
Commands:
Netsh winsock reset catalog.
netsh int ipv4 reset reset.log
netsh int ipv6 reset reset.log
Reminder: Press ‘Enter‘ after typing each line.

3. After the process is complete, reboot your computer and check if your internet connection is working properly.
Method #2: Updating Network Adapter Drivers.
Sometimes, after the installation of Windows, compatible drivers are not installed by the system due to a lack of support for that particular adapter. Therefore, downloading and updating your adapter drivers manually from the manufacturer’s website can solve the problem.
1. Download the latest drivers from the manufacturer’s website.
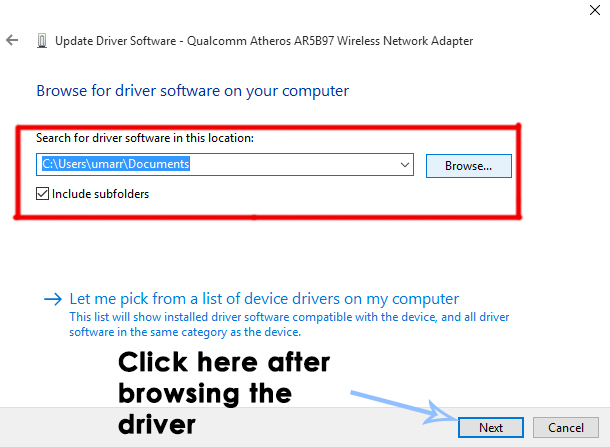
2. After the drivers have been downloaded, navigate to your Device Manager > Network adapters and right-click on the one you are using for your internet connectivity. Select “Update Driver Software” from the top menu.

3. Inside the update window, click on ‘Browse my computer for driver software‘ and select the appropriate driver you downloaded onto the hard drive. Then, click the ‘Next‘ button. After the process is complete, reboot your PC and check for any issues.
Method #3: Uninstall the App.
It is possible that a third-party application may be preventing you from connecting properly. Therefore, it is recommended that you uninstall the Intel PROSet/Wireless Software application if it has been installed on your computer.
Window 10 security update yesterday..no problems previously. We have Internet..problem states network protocols are missing, Windows sockets registry is missing?????