Choosing The Best Wall Mount PC Case In 2025
Mounting your PC case on the wall is a unique way to elevate the aesthetics of your setup, but which is the best wall mount PC case?
Not every case is fit to be mounted on the wall. In fact, most PC cases out there do not offer any such functionality. You will have to select one of the specialized PC cases that are designed to be mounted on the wall.
There are relatively limited options in this category, and the majority of the options do seem to be offered by one company. Nevertheless, it is important to do your research and find the very best wall mount PC case you can for your particular setup.
You can also check out our selection of the best open air PC cases, as some of those cases can be mounted on the wall as well.
Without further ado, here are our picks for the very finest wall mount PC cases out there.
The Best Wall Mount PC Case – Our Picks
| # | Preview | Product Name | Award | Details |
|---|---|---|---|---|
| 1 | 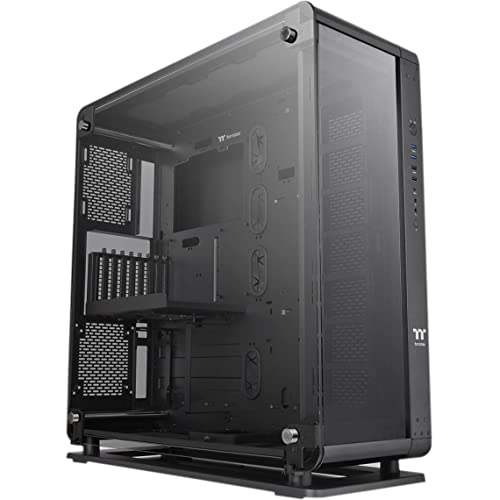 | Thermaltake Core P8 | Best Overall Wall Mount PC Case | Check Price |
| 2 | 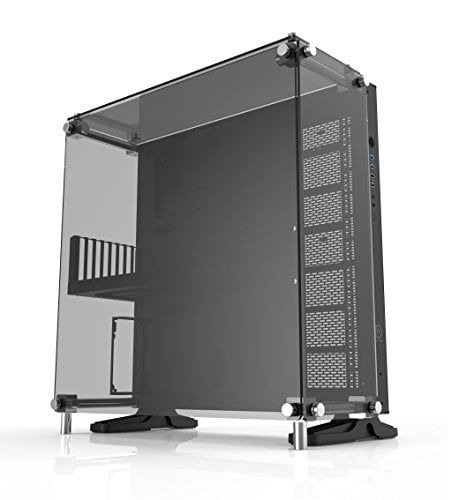 | Thermaltake Core P5 Open Air | Best Open Air Wall Mount PC Case | Check Price |
| 3 | 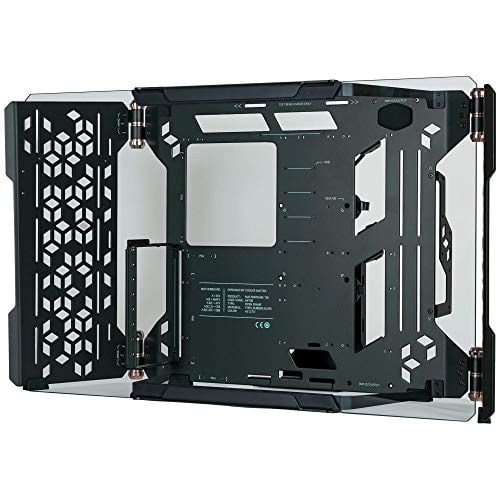 | Cooler Master MasterFrame 700 | Most Unique Wall Mount PC Case | Check Price |
| 4 | 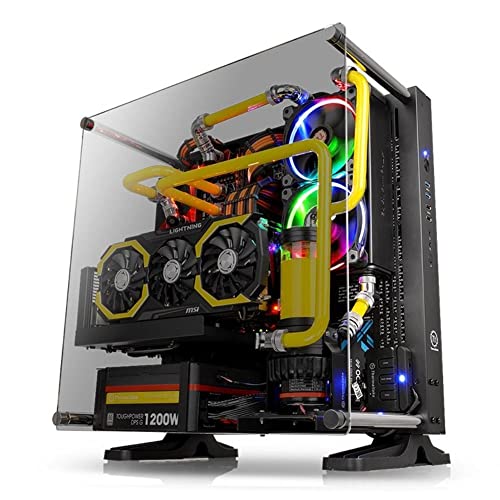 | Thermaltake Core P3 Open Air | Best Mid Tower Wall Mount PC Case | Check Price |
| 5 |  | Thermaltake Core P1 Open Air | Best Mini ITX Wall Mount PC Case | Check Price |
| # | 1 |
| Preview |  |
| Product Name | Thermaltake Core P8 |
| Award | Best Overall Wall Mount PC Case |
| Details | Check Price |
| # | 2 |
| Preview |  |
| Product Name | Thermaltake Core P5 Open Air |
| Award | Best Open Air Wall Mount PC Case |
| Details | Check Price |
| # | 3 |
| Preview |  |
| Product Name | Cooler Master MasterFrame 700 |
| Award | Most Unique Wall Mount PC Case |
| Details | Check Price |
| # | 4 |
| Preview |  |
| Product Name | Thermaltake Core P3 Open Air |
| Award | Best Mid Tower Wall Mount PC Case |
| Details | Check Price |
| # | 5 |
| Preview |  |
| Product Name | Thermaltake Core P1 Open Air |
| Award | Best Mini ITX Wall Mount PC Case |
| Details | Check Price |
Last Update on 2026-01-30 at 14:22 / Affiliate links / Images from Amazon Product Advertising API
Why you should trust us
At appuals.com, we love to test out PC cases. Our highly enthusiastic team is well-versed in the intricacies of PC cases and we look forward to upcoming innovations in this field. We’ve been doing these reviews for a long time, and it shows in how thorough and insightful they are. Hassam Nasir, our resident PC hardware guru, has been writing case reviews since the time of side-panel case fans.
You might say that he enjoys delving into the finer points of PC hardware, such as airflow testing, thermal evaluation, acoustic testing, cooling potentials of AIOs, and so on. Since he has been fixated on PC technology since the days of the Antec Lanboy, his knowledge should come as no surprise.
In spite of this, we don’t only depend on our past knowledge; we test each PC case thoroughly before reporting about it. We check for issues with airflow, thermal competence, and acoustic profiles among other aspects. Quality and durability testing of cases is where our team really shines. When writing our reviews, we always keep the user’s perspective in mind. We can help you in your search for a suitable PC case, whether you require a cheap alternative or the best one available.
1. Thermaltake Core P8
Best Overall Wall Mount PC Case
Pros
- Extremely Spacious
- Can Support 20 Fans
- Excellent Build Quality
- Space for four 480mm Radiators
Cons
- Very Expensive
Form Factor: Full Tower | Dimensions: 660 x 260 x 626mm | Weight: 22.6 kg | Fan Mounts: 20 | Motherboard Support: E-ATX, ATX, Micro-ATX, mini-ITX
In our roundup of the finest wall mount PC cases, the Thermaltake Core P8 stands out as one of the most audacious solutions. In this case, the only sort of cooling that will be optimal is custom loop water cooling; any other method will not be enough. The Core P8 is one of the most stunning cases on the market; but, in order to get one, you will need to be committed to using a custom water cooling system.
The Core P8 is another massive full-tower case, measuring in at 660 x 260 x 626 mm and weighing in at over 22.6 kg. To be fair, this case is quite large and heavy for something that is supposed to be hung on your wall. However, it is also a unique case thanks to its loads of features and unique design elements. A fully loaded Thermaltake Core P8 build can elevate the aesthetics of any wall.
You can also explore our selection of the best dual PC cases for more options in that category.
Your spectacular water-cooling setup may be observed in all of its grandeur since this case’s front panel, both side panels, and both of the case’s panels are made of tempered glass. The Core P8 is a really appealing case, in spite of the fact that it is relatively large and that there is a wide variety of various fan mounts available. When this case is fully loaded with fans and lit up with RGB lights, it is one of the most impressive sights in the world of PC gaming.
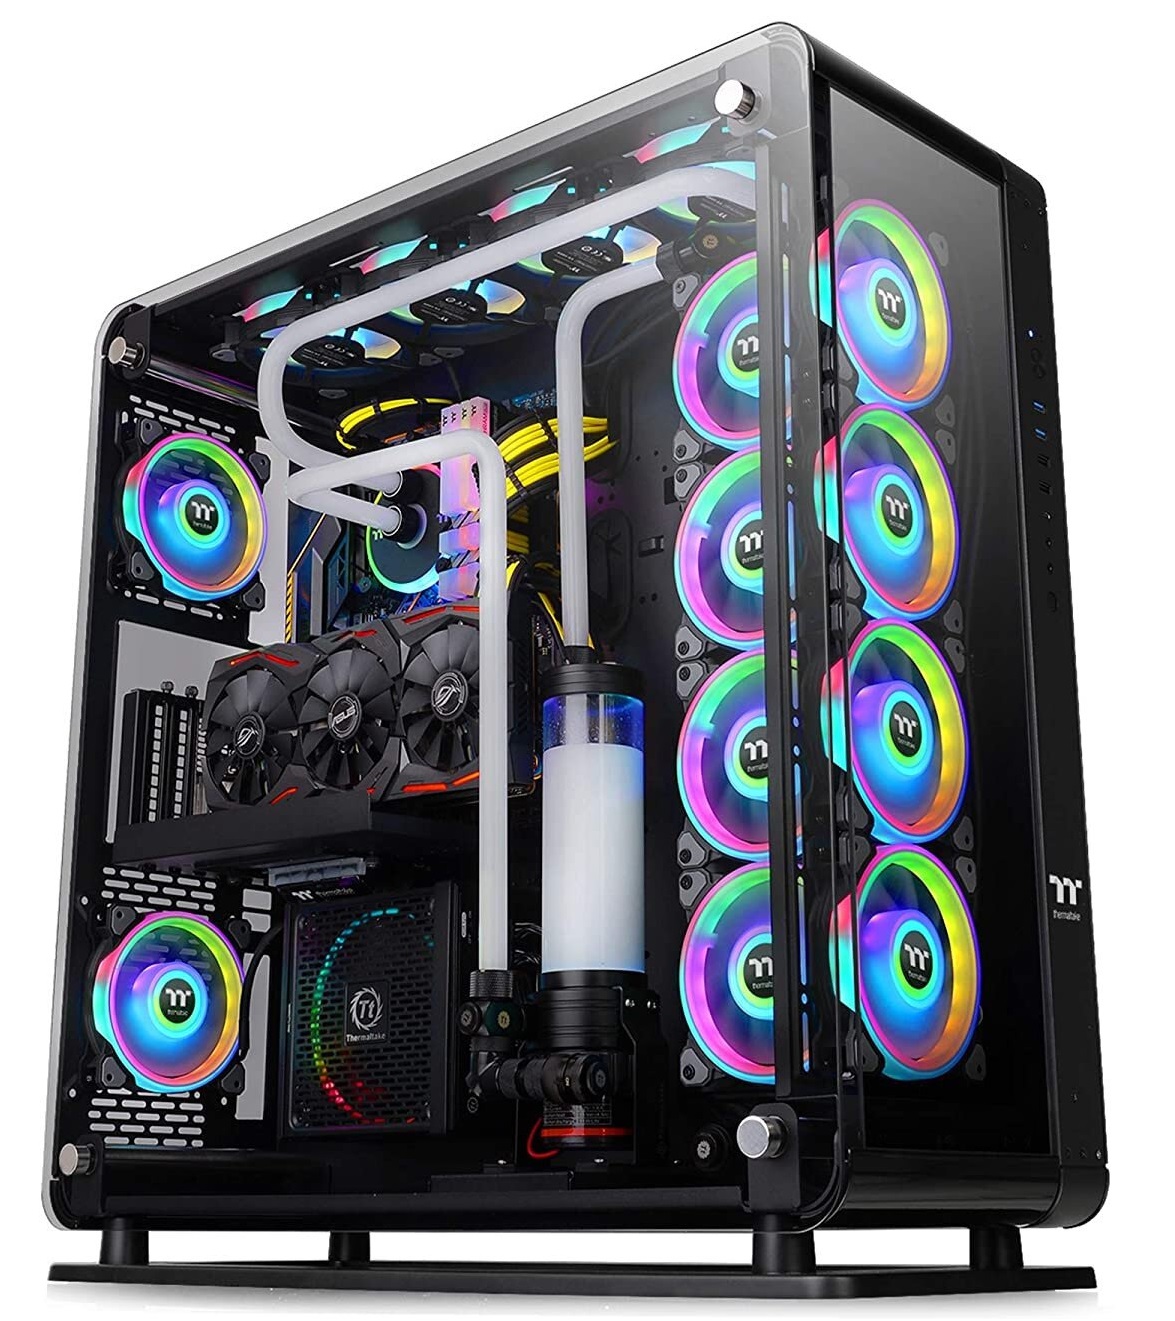
Furthermore, the design of the Core P8 is modular, which enables you to change out individual frame components to better match your build plan and the specific requirements of your custom water cooling system. This is made possible by the Core P8’s modular internal design. By extension, the front and top tempered glass panels can be removed to completely transform this case into a wall mount PC case.
The P8’s spacious interior allows it to handle motherboards with a variety of form factors, including ATX, micro ATX, and mini ITX, in addition to the larger E-ATX form factor. The generous proportions of the P8 make this a realistic possibility. It is possible to put a water-cooling distribution plate in the P8, which is helpful for organizing the tubing runs that make up the loop.
This approach becomes a more interesting choice if we take into consideration the available water-cooling options. Radiators with dimensions of 120mm, 140mm, 240mm, 280mm, 360mm, 420mm, and 480mm may be installed in any of the available slots on the Core P8. On top of all that, the case comes with a wealth of mounting options that allow you to attach anywhere from one to twenty 120mm radiators or case fans.
Also, due to the fact that it was designed from the ground up with water cooling in mind, the Core P8 is widely regarded as being among the best water cooling cases as well. The potential buyer will have to put in a significant amount of time and effort, both financially and physically, in order to purchase this case; nevertheless, the end result will undoubtedly be worth it.
Strictly for the purpose of wall-mounting, this case might be a bit too heavy and a bit too expensive. There are some affordable alternatives available, notably from Thermaltake, however, they do not provide the same level of flexibility or features that are present in this case. If you are willing to go all the way, this case is the best overall wall mount PC case you can buy.
2. Thermaltake Core P5 Open Air
Best Open Air Wall Mount PC Case
Pros
- Minimalistic Design Language
- Premium Build Quality
- Ideal for Water Cooling
- Integrated VESA Mount
Cons
- Relatively Pricy
Form Factor: Full Tower | Dimensions: 607 x 333 x 569mm | Weight: 12.2 kg | Fan Mounts: 4 | Motherboard Support: ATX, Micro-ATX, mini-ITX
By a wide margin, the most ambitious implementation of an open-air enclosure is seen in the Thermaltake Core P5 TG. It is the ideal combination of a high-quality design, a thoughtfully laid out framework, and customization options. This is a dream come true for every passionate builder out there.
As a happy coincidence, it also happens to be one of the best cases available on the market for creating a complete custom loop. The brilliant design is responsible for all of these unique features. More full tower options can also be found in our selection of the best full tower cases.
Thermaltake made an effort to make the difficult task of putting up an open-air PC case a little less painful. After opening the packaging, the first item that will be visible to you is the main chassis. It is surrounded by all of the mountable trays and accessories that are offered.
Included in the package are brackets for the power supply unit (PSU) and expansion slots, mounting hardware for a custom loop, and even a PCIe ribbon cable.
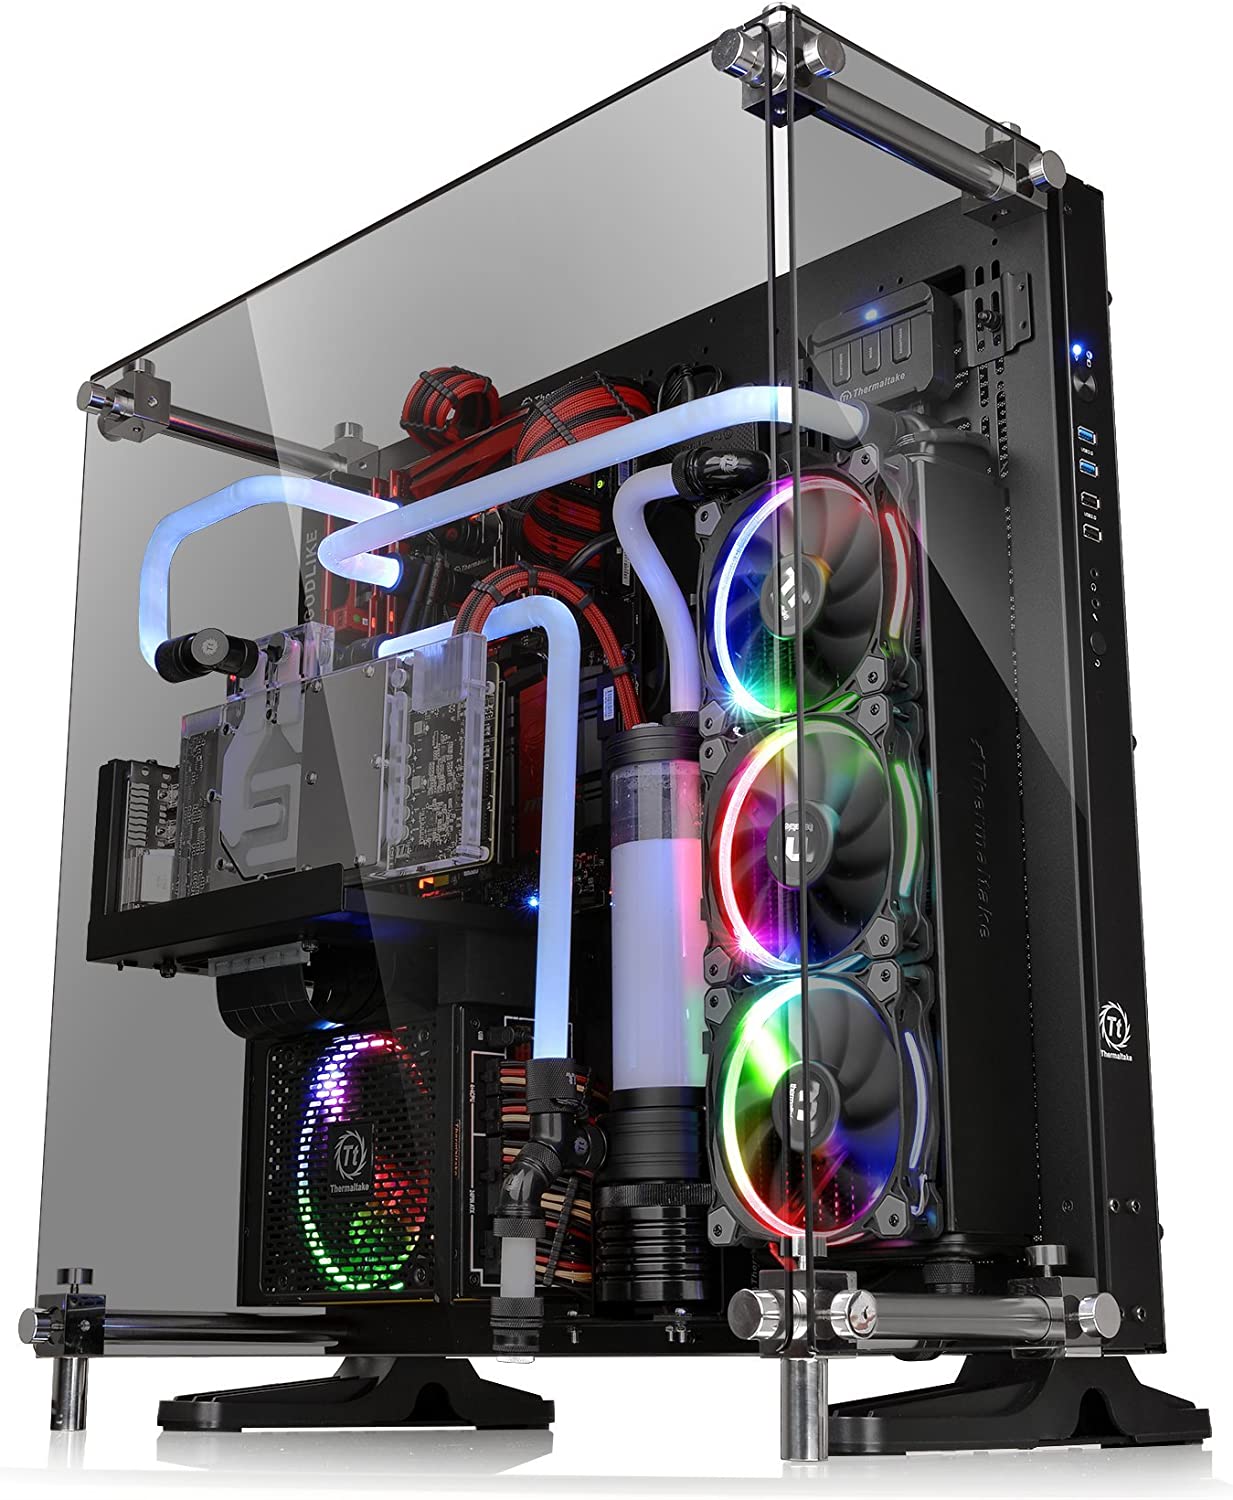
At the rear, there is a VESA mount that can be used to place it on the wall, which is really convenient. If you aren’t feeling particularly adventurous, you may always use the robust feet that are supplied in the package instead.
The motherboard tray is quite conventional, and overall, the chassis is relatively analogous to a typical one. Nevertheless, you have the option of installing a vertical PCIe mount for the GPU or even rotating the entire motherboard via a 90-degree angle.
Speaking of the motherboard, the Thermaltake Core P5 is compatible with a motherboard that is either ATX, Micro ATX, or mini-ITX, all of which are common for a full tower PC case. Because of the adjustable PCIe slots, the graphics card may be installed in either the horizontal or the vertical orientation.
The clearance for the GPU is 570mm when the water reservoir is not present, which is sufficient for housing even the most powerful GPUs currently on the market. However, after adding a reservoir to the construction, the clearance for the GPU does not go beyond 280 millimeters, which can create compatibility difficulties with a variety of recent and powerful GPUs.
Therefore, you might have to make a compromise with either the reservoir or the GPU. You may use water cooling or air cooling with the Core P5; it supports up to a 480mm radiator on the left side or 4x 120mm fans, or you can fit 3x 140mm fans in it. Be sure to check out our selection of the best high CFM case fans to fill out your Core P5 build.
The Core P5 was built primarily for water cooling systems, but you can also use air cooling with it. It is possible to utilize an air cooler with a height of up to 180mm, which is more than enough for a good number of CPU coolers.
One of the exterior sides is totally solid and does not have any ports on it. On the right side of the case is where you’ll find all of the ports, the power button, the audio connector, and a Thermaltake logo. The rear of the device is where you’ll find the trays for the SSDs and hard drives. In addition to it, a hard drive cage is provided.
In general, this is an exceptionally great case. It would be nice if there were a few more cable routing holes, and a front USB-C port would have elevated the feature set a bit as well. As a whole, the Core P5 is a strong contender in this roundup and is our pick for the best open air wall mount PC case.
3. Cooler Master MasterFrame 700
Most Unique Wall Mount PC Case
Form Factor: Full Tower | Dimensions: 702 x 306 x 410mm | Weight: 11.8 kg | Fan Mounts: 6 | Motherboard Support: SSI EEB, SSI CEB, XL-ATX, E-ATX, ATX, Micro ATX, Mini ITX
The Cooler Master MasterFrame 700 is an open-air case that can be mounted on the wall and features a one-of-a-kind “double-wing” design. It also features an enormous tempered glass panel. Due to the way the wings are laid out, it has exceptional compatibility with other components, and it can accommodate practically any piece of hardware.
In our Cooler Master MB511 RGB Review, we also looked at yet another model of the company’s popular computer cases.
The majority of your components should be installed in the primary motherboard tray that has enough space for two full-sized power supply units and should be able to accommodate a broad variety of motherboard form factors. You can install motherboards ranging from the very large (SSI EEB) to the tiny (mini ITX) form factors. This is one of the few cases that will allow you to mount a dual-CPU workstation on the wall. If you intend to do so, you should invest in this case.
The Cooler Master MasterFrame 700 only has 100×100 VESA mount holes, which may restrict the type of setup that can be built inside of it. The maximum weight that can be supported by a 100×100 construction is rather low, and Cooler Master suggests that only projects weighing less than 14 kg be mounted on the wall.
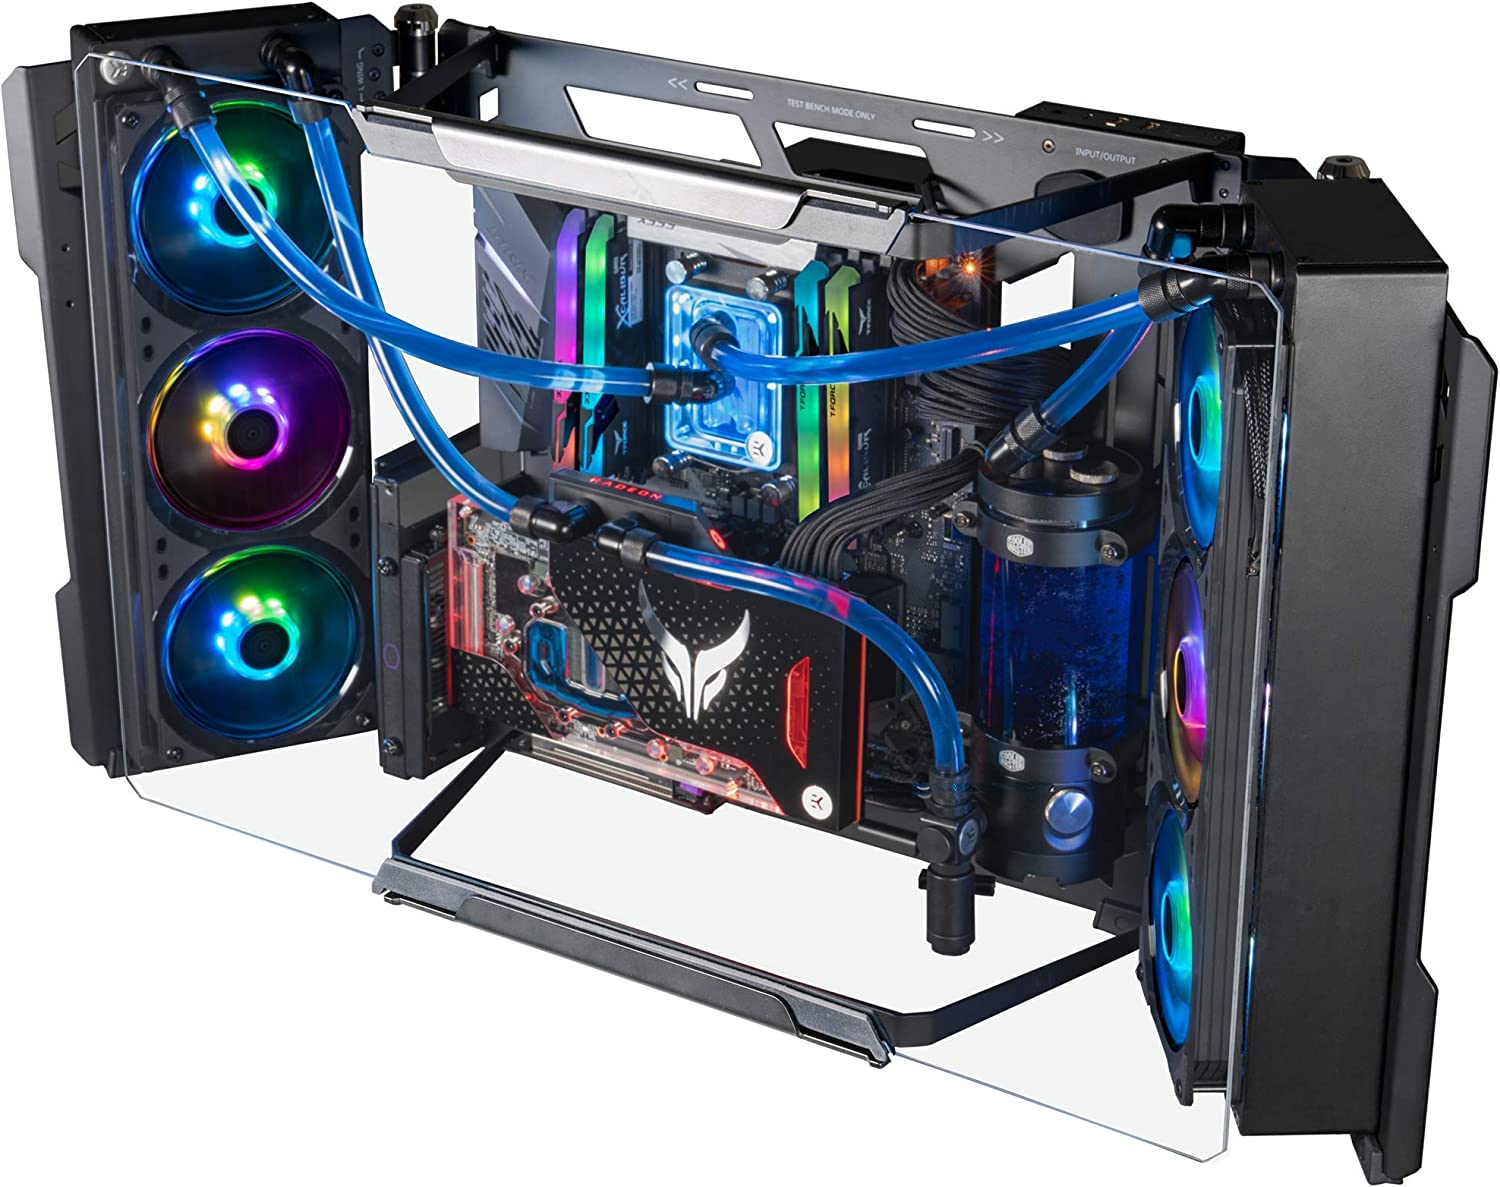
That ought to be plenty for a rudimentary gaming rig, but there isn’t much room for expansion here. Having said that, complex builds with custom loop water cooling will almost certainly exceed that, which means that you may need to experiment with some DIY solutions here, provided that you use a sturdy wall bracket of a good grade.
The wings of the MasterFrame 700 are ideal for mounting radiators since each wing has enough space for a 360mm radiator. A 360mm radiator is more than enough for most general consumers, so we see the radiator support of this case as adequate. Even our selection of the best CPU coolers for i9 13900K tops out at 360mm. Since they are attached to the main motherboard tray by means of high-quality hinges, the wings are free to be repositioned in accordance with the configuration of your system.
For cooling purposes, you are going to have to go with soft tubes since it is highly unlikely that a hardline water-cooled construction would work in this setting. On the motherboard tray, there is also a mount for a third 420 mm radiator; however, this mount cannot be accessed until the MasterFrame 700 is being used as a test bench.
Speaking of the test bench, you can convert the MasterFrame 700 into a high-end test bench by turning it over onto its two support rails. This bench setting lays the wings at an angle, and those may be used to attach fans or radiators. It is quite unlikely that the majority of people would make use of this feature, but having it available is nevertheless a fascinating alternative to have.
Thanks to its open-air design, this case can also be considered as one of the best airflow PC cases out there.
The Cooler Master MasterFrame 700 is an impressive computer case that brings a range of unique features thanks to its distinctive design. It is an excellent choice for use with numerous radiators and huge motherboards. Of course, it is expensive, and owing to its unconventional structure, it is rather difficult to build in; nonetheless, there are not many rivals who offer the same things that it offers.
At the end of the day, there are not a lot of cases that offer the functionality of the MasterFrame 700. We have picked this case as the most unique wall mount PC case on our list.
The Thermaltake Core P3 is an open-air case that falls in the mid-tower category, and it is one that we recommend to the majority of potential buyers. You may use the case either horizontally or vertically, or you can mount it on the wall using the VESA mounts that are provided.
As evidenced by the other choices on this list, it is not the only wall-mountable mid-tower PC case offered by Thermaltake, we believe that due to its competitive cost and extensive feature set, it is the most optimal wall-mount PC case for the vast majority of customers.
The Core P3 is an adaptable enclosure that provides users with the choice of horizontal or vertical placement for their graphics card. You can get away with a longer GPU if you’re only using an AIO liquid cooler instead of a reservoir and radiator, despite Thermaltake’s assertion that the maximum length of a GPU with a reservoir and radiator is just 280mm. Having said that, you probably don’t want to go up to the 450mm maximum that Thermaltake claims is possible, mostly to prevent obstructing the AIO.
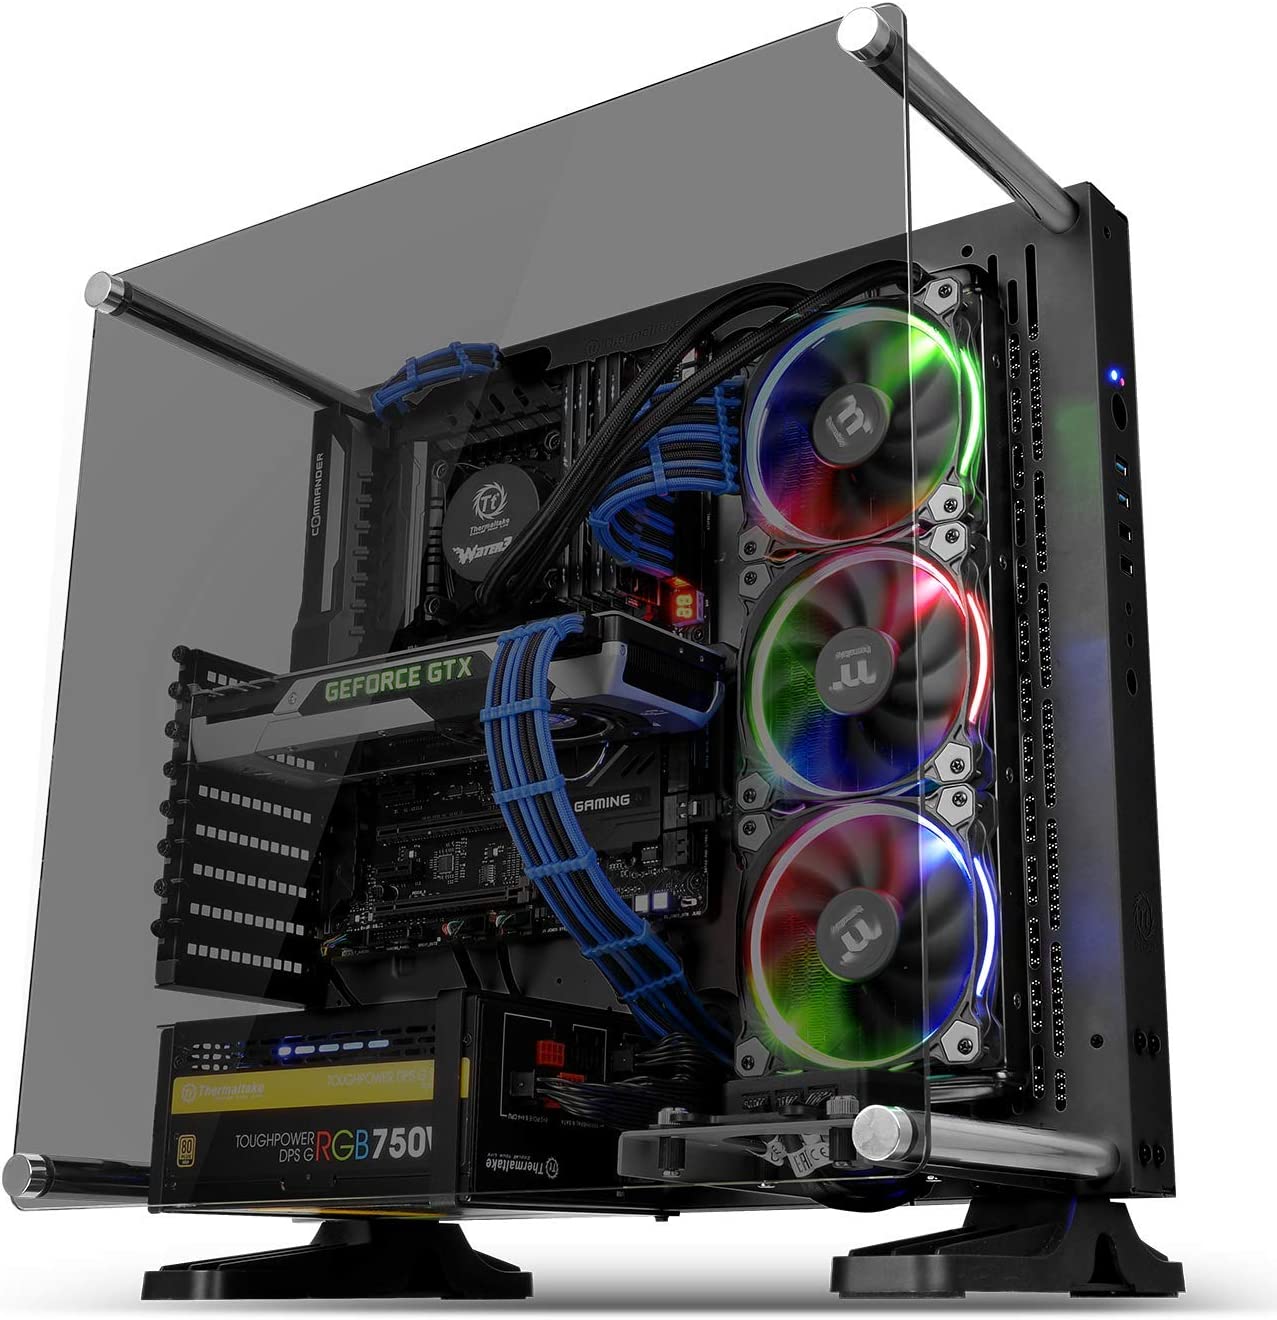
It is clear that Thermaltake put considerable effort into the design of its wall-mounted cases, as seen by the fact that the Core P3 is compatible with a variety of VESA mounting schemes. Mounting holes of VESA 75×75, 100×100, and 200×200 mean that the Core P3 may be attached to virtually any kind of hardware available on the market today.
The Core P3 is designed to support both horizontal and vertical installation of the GPU, and a PCIe riser cable is supplied for the latter option. If you want to install a mini ITX motherboard, the Core P3 also offers support for a vertical power supply installation. This is a nice touch that should provide some aesthetic flare and help compensate for the Core P3’s reduced size.
Speaking of aesthetics, the Core P3 carries forward the same design language as the other excellent cases in the Core family. This case is a sight to behold when it is filled with high-end hardware and hung on the wall. The placement of the radiator is particularly interesting from an aesthetic point of view since the RGB fans are facing the front and can disperse their lighting in a more pleasing manner.
The RGB lighting is very well-implemented and is one of the best PC case lighting solutions we have yet seen.
In general, the Thermaltake Core P3 is an excellent case that stands out due to the adaptability of its architecture and mounting options, as well as its amazing appearance and reasonable pricing. This wall-mount computer case is the one you should look into purchasing initially if you do not require space for a large motherboard or dual radiators. In addition to black, the Core P3 may also be purchased in red and white.
The white version of the Core P3 can also be considered one of the best white PC cases on the market.
You can go for the more expensive and larger Core P5 as it will include support for two more drive mounts, as well as support for additional fans and larger radiators. The vast majority of consumers, in our opinion, will not see a return on investment from spending the additional money, but the option is available for those who require the additional features.
All in all, the Core P5 is our pick for the best mid tower wall mount PC case on the market.
Consider the Thermaltake Core P1 to be the youngest sibling of the Core P cases that were previously mentioned. It is an adaptation of the Core P5 for the mini ITX form factor and maintains the majority of its counterpart’s design language. Obviously, in order to create a more compact version, certain concessions will need to be made. Fortunately, it maintains most of the redeeming features of a larger case, while only having a few minor downsides to speak of.
Like the rest of the Core P series, the Core P1 is characterized by a basic yet distinctive design. It has a robust metal construction and an open-air design with no canopy. The primary metal chassis has a sturdy feel to it, which will inspire confidence as you assemble components inside of it. The overall build quality is top-notch, as we have come to expect from this line of cases from Thermaltake.
The Thermaltake Core P1 is only compatible with a motherboard that has a mini-ITX form factor since it is a fairly compact case. The Core P1 offers a GPU clearance of 380mm, which is sufficient to accommodate the majority of the fastest GPUs currently available on the market. As a result, you don’t need to worry about GPU dimensions despite the Core P1’s compact size.
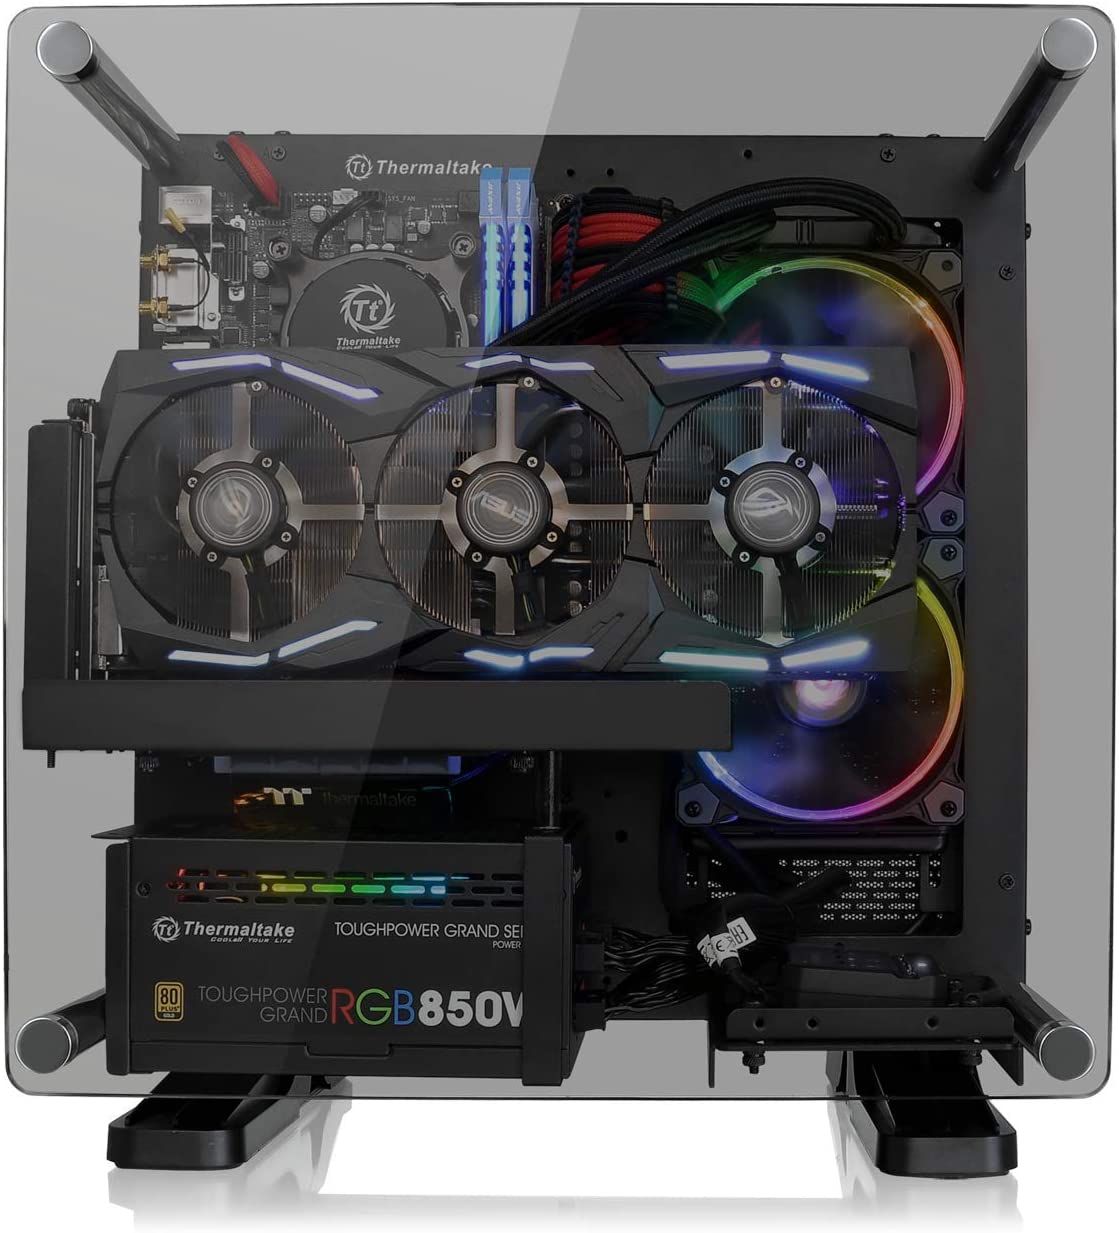
In addition to that, the PCIe slots are adaptable, which means that the GPU may be installed in either the horizontal or the vertical orientation. The Core P1 is primarily designed around all-in-one (AIO) and do-it-yourself (DIY) water and liquid cooling solutions. The radiator support on the side can go up to 240 millimeters, and there is room for two 120-millimeter fans on the left side of the case. However, the fans can be removed if a thicker radiator is desired.
In line with the mini ITX theme, building in this chassis is somewhat more difficult than usual due to its diminutive size. On the other hand, you won’t have any problems if you’ve ever built a computer in an ITX chassis previously. Just keep in mind that this was designed for a special use case, and may not be ideal for someone who is just starting out as a PC builder.
Once you have a clear idea of your build plan, it can be fairly straightforward to assemble it in this case. The working surface is useable despite being a bit cramped, and you also get several excellent cable management paths. You can even fit a whole custom water-cooling loop within the chassis, which is something that isn’t usually possible to do in an ITX case.
On the other hand, there are a few drawbacks that can discourage you from proceeding. The screws that secure the motherboard spacers are a little bit loose and don’t inspire a lot of trust in the user. In addition, there are some radiators that might be challenging to install due to the limited width of the mounting area. The riser cable that is given for the GPU is also not of very high quality.
Due to its relatively modest price point, you can also consider this case to be among the best budget PC cases when it comes to wall mounting.
Taking everything into consideration, the case is not terrible for the price, and it is particularly noteworthy in that regard. This particular case is actually an easier recommendation for wall mounting due to its compact size, and it can elevate the look of your PC setup without taking up a lot of space.
In essence, the Core P1 is our pick for the best mini ITX wall mount PC case on the market.
How we picked and tested
Adding wall mounting to the process of selecting a PC case ultimately adds complexity. Even a minor error in the calculation might cause incompatibility, necessitating an overhaul or even a rebuild in a new case.
In light of this, we were careful to establish strict criteria for the selection of the cases included in this overview.
Our key consideration while choosing wall mounting PC cases was the size. Generally, wall mount PC cases take up a lot of area, and it’s always a good idea to leave some headroom in case you decide to expand. In light of this, our featured collection consists mostly of full tower cases, but we decided to throw in some compact examples as well for the sake of completion.
In the second step, we chose enclosures that were the most suitable for use in a wall mounting application. This entails having exclusive wall mounting hardware, being modular, and having enough space for large custom water cooling loops. The inclusion of additional wall mounting provided by cases was also taken into account.
Aesthetic considerations were also important in narrowing down the options for this list. Incorporating a wall mounted PC into your setup may greatly improve its aesthetic value, and the PC case plays a significant role in this. So, the cases’ layout and lighting were thoughtfully deliberated.
We also paid close attention to the numerous quality-of-life aspects that might influence the overall value of a case. We paid special attention to things like a case’s weight and construction quality.
Pricing and value for money were definitely taken into account while selecting the finalized cases. Despite the fact that most wall mounting cases are somewhat pricey, we gave preference to those that provided the best value for money in terms of features and compatibility.
Nothing was overlooked by our elite testing crew when it came to the hardware we were evaluating. Each candidate was thoroughly examined by subjecting it to a collection of tests developed to gauge its thermal and airflow efficiency.
Since the airflow of the casing is also utilized to cool the radiators, thermal testing is essential for water cooling systems as well. The empirical and objective data from these tests was invaluable in the process of compiling this analysis.
As a result, the editorial team has a much clearer picture of the range of case quality and thermal performance available to them.
We have compiled a list of the top wall mount PC cases currently available by combining the results of our tests with an impartial examination of the features and costs offered by the cases.
Air Cooling vs. Water Cooling
When searching for a cooling solution for your PC, the first decision you will need to make is whether you want liquid cooling or air cooling. This decision between water cooling and air cooling is an important one since it may have an effect on the type of case you go with and other parts of your new build.
When compared to air coolers, all-in-one liquid coolers, which are more commonly referred to as AiOs, have an inherent performance advantage when it comes to cooling. This pattern holds true across all price points: the very best liquid coolers are often a significant step beyond even the very best air coolers in terms of performance and efficiency. On the other hand, liquid coolers are noticeably more costly and offer a worse return on investment than air coolers that are functionally equivalent.
The ability of water (or the liquid mixture contained within the AiO coolers) to hold heat is noticeably higher than that of air. This indicates that it has the capacity to take in a significant amount of heat energy for every degree Celsius that its temperature rises. Due to this process, water is able to become a conductor of heat away from hot components such as CPUs in a manner that is far more effective.
On the other hand, air is infamous for being an extremely poor conductor of heat. Due to the fact that it may, in some circumstances, perform the role of an insulator, air is one of the least desirable transfer mediums there is. This means that the ceiling for air cooling is naturally lower than the ceiling for water cooling.
In the majority of cases, cooling using air rather than water is not only more efficient but also more cost-effective. Even while air coolers offer a superior value proposition, their overall performance is not as strong as that of top-tier all-in-one (AiO) liquid coolers. In addition, they frequently have inferior aesthetics and might have worse acoustic performance.
For modern flagship CPUs and CPUs with a high power budget, we recommend using liquid coolers rather than air coolers. However, you can get away with air coolers on basically anything else, and save a bit of money while doing so.
How to Optimize your Case Airflow
Improving the flow of air within the computer’s chassis is a crucial step in designing a custom PC. Users on a more casual basis, as well as enthusiasts, should give this method a shot. This will reduce the likelihood of your computer’s components overheating, reduce the likelihood of dust building up in the chassis, and extend the life of your computer’s components.
Initially, we’ll focus on increasing the pressure inside the chassis. To have positive airflow, it is necessary that the interior fans draw in more cool air than they exhaust as warm air. This results in a positive cooling cycle, which is what you want to achieve.
Negative air pressure occurs when more air is being expelled than is being sucked in. As a result, a vacuum is created, which has the ability to begin sucking air from the cracks and crevices of the chassis, leading to a massive buildup of dust. In a system where air pressure is maintained throughout, the intake and exhaust cycles cancel each other out.
You may further lower CPU and GPU temperatures by moving the system to a cooler location, where cooler air can be drawn in. In this whole process, fans are the key players, and their size, speed, alignment, and kind may make or break the effectiveness of air circulation.
If situated properly, radiators can also serve as efficient fans. In addition to ensuring that your system cools appropriately and that its circulation is not interrupted by unwelcome foreign bodies, two of the most essential things you can do are to keep your system clean on a regular basis and to take preventative measures to keep dust and other particles out of your setup.
Finally, if your chassis is still overheating, you may want to check out our suggestions for the best airflow PC case alternatives and consider switching it. Perhaps our extensive PC case buying guide will be useful here.
Buyer’s Guide
Wall mounting a PC case is a fun idea that can spruce up your setup and take it to the next level. However, there are a lot of things that can go wrong when picking out the best wall mounting case.
Here are some of the factors that you should keep in mind when shopping for a wall mount PC case. Some of these are specific to this category, but most of them can be applied to general PC case shopping as well.
Form Factor
In wall mount PC cases, the form factor and size hold a lot of importance. Of course, you don’t want a gigantic case taking up all your wall space, and on the flip side, you don’t want a tiny enclosure either. It is important to consider the form factor and size of the wall mount PC case in question before making your decision.
A case’s available area is also crucial for achieving optimal ventilation. The cooling system consists of the fans and other cooling components, which must be kept at an appropriate distance from the motherboard and given adequate room to breathe in order to perform optimally.
The case must be able to guarantee that all components are maintained at temperatures that are appropriate for them, or as low as is reasonably possible, even if you are able to fit all of your components within the case. It may be challenging to accomplish this in smaller cases, but it becomes much easier to do so with bigger ones.
As a result, full tower cases provide superior ventilation compared to alternative case designs. While a mid-tower chassis may suffice, airflow quality often diminishes with decreasing case size. For this reason, mini ITX enclosures typically have poor ventilation.
The extra room is also important since it allows you to install water cooling loops and any other specialized cooling accessories that may be required to properly cool specific components. A larger case gives you more room to install custom cooling for individual components.
Compatibility
Compatibility ought to be your number one concern if you are selecting a new computer case, just because it is so critical. Even though the vast majority of the accessible cases are really diverse in terms of the components they are compatible with, you must still make sure that the components you select are intended to be used with the case you want to utilize.
When choosing a computer case, double-check that it has enough space for your motherboard and other components like the power supply and graphics cards. It is very crucial to take into account the length of the graphics card while making your decision.
The case should be big enough to fit all of the components of your cooling system, have enough space to arrange all of the cable connections in an orderly fashion, and have an airflow architecture that is beneficial for your components.
In addition, expansion slots and modular brackets are both wonderful additions to any computer case; nevertheless, it is not necessary for a PC case to include any of these features. Your first order of business should be finding fans and other components for your radiators that are of a size and shape that is suitable for the ones you wish to install. It is important to evaluate whether or not the casing is compatible with the radiator sizes that are to be employed.
It is in your best interest to double check that all of your components are compatible with the case that you have chosen if you want to spare yourself problems in the future. The case that you have chosen should be compatible with all of your components.
Airflow
An excellent computer case is one that provides adequate ventilation for the variety of components it can hold. Furthermore, it is preferable to have a case that is already tuned for airflow from the manufacturer, since this will reduce the amount of tweaking required. It’s not always as easy as just adding extra fans to fix the problem of inadequate ventilation.
As a consequence of this, you want to give top priority to selecting a case that not only offers sufficient space for effective ventilation but also is designed to improve the performance of such a feature.
As of right now, there are so many different computer cases available for purchase that you have a vast array of possibilities from which to select. Some of these solutions are too ambitious, while others are deceptively simple but nevertheless manage to achieve remarkable levels of effectiveness.
Look for unrestricted front panels, ideally made of mesh with big holes. The front panels of some modern cases are very clever, providing enough ventilation without sacrificing style.
That’s why it’s important to look for features like dust filters and mesh panels when deciding on a computer case. Having enough airflow is important even if you plan on using water cooling for your components since you’ll need to cool the radiators in addition to the graphics card and other devices.
It won’t be difficult to maintain perfect airflow conditions in your PC case with the help of our comprehensive tutorial that explains how to optimize your system’s airflow.
Aesthetics
At the end of the day, wall mount PC cases are all about aesthetics. There is no functional benefit in hanging your PC up on the wall, in fact, it can lead to a few issues in the day-to-day operation of the case. On the flip side, however, a wall mounted PC case is one of the most beautiful sights in PC building, if it is done right.
This is why the design and aesthetics of the PC case are so important. First of all, it has to match your entire setup. This can range from something as basic as color to more complicated design elements like minimalistic aesthetics and RGB lighting. On the subject of RGB lighting, you should make sure that the lighting of your selected case can synchronize with the various RGB lighting ecosystems out there.
Of course, tempered glass panels are an integral part of most PC cases, and the same holds true for wall mount PC cases. What is unique about wall mount cases is that most of them take a modular approach. You can remove or change the positioning of the various panels in order to give your build a customized look.
All in all, it is vital that you consider the overall aesthetics of your build when buying a wall mount PC case. It may even be helpful to design and plan your build in software before you finalize your purchase decision.
Mounting Capability
It should be self-evident from the name that a wall mount PC case should be able to be mounted on a wall without the need for additional mounts purchased from a third party. Wall mount cases often have holes cut into them to accommodate a variety of various VESA mount sizes.
In addition, it is preferable if the mounts were included in the packaging by the makers of the product. It is impossible for a case to be included in this category if it does not include built-in support for wall mounting.
You should also make sure that the case is feasible for wall-mounting in your particular setup. Some cases might be too heavy or too large for certain setups, which is why you may need to purchase third-party mounts.
Best Wall Mount PC Case - FAQs
Not every PC case can be mounted on the wall. Most PC cases are not designed to be hung on walls, and thus they do not have mounting hardware or capabilities. You will need specially designed wall mount PC cases for this purpose. They have specific mounting designs on their panels and usually come with compatible hardware.
Wall mount PC cases are worth it if you are committed to the idea of wall mounting your PC. They can provide a fresh new look to your gaming setup, and make it stand out from the crowd. They can also protect the components from dust and debris which is an added benefit.
Wall mount PC cases are completely safe if you follow the instructions and carefully secure the mount. You have to make sure that you stay within the maximum load-bearing capacity of the mount. This information can be usually found in the user’s manual of the PC case.
You can also use wall mount PC cases on a desk. Most wall mount cases also come with standard rubber or metal feet just like other PC cases, so you can place them on the desk and use them normally. Just make sure you don’t forget to attach the feet before you place them on a desk.
You should look for compatibility and size when selecting a wall mount PC case. It should be big enough to hold all your components, and should also have the correct mounting slots for your devices. Moreover, you should consider aesthetics and looks as that is a major selling point of a wall mount PC case.
 Check Price


