How to Auto-Delete Your Browsing History
 Reviewed by Huzaifa Haroon
Most browsers store information about the websites we visit. This is called “Browsing History.” It helps browsers suggest frequently visited sites, auto-complete web addresses, and generally makes your web experience more convenient.

However, these digital footprints can sometimes put your personal information at risk or expose you to privacy issues. That’s where “Auto History Wipe” becomes very valuable.
In this article, we’ll walk you through everything you need to know about Auto History Wipe, and show you how to secure your internet usage. Whether you want to protect your data or simply avoid the awkwardness of someone seeing your browsing history, Auto History Wipe can help you out.
What is Auto History Wipe?
Auto History Wipe refers to the process of automatically deleting your browsing history to help you have a safer and more private experience online. With this feature, you can instantly clear your history and start fresh every time you use your browser.
Auto History Wipe lets users remove their browsing history and other unnecessary data by setting up tasks that run on a schedule. You can decide exactly what data you want to be deleted, and how often it should be cleared—making it simple to protect your privacy.

Besides privacy, Auto History Wipe also helps keep your browser running smoothly by deleting cache data, cookies, and other digital clutter that can slow down your browser.
Manually clearing your computer’s history and temporary files can be repetitive and time-consuming. Automating this process gives you several benefits:
- Auto History Wipe keeps your privacy protected by regularly erasing your browsing history.
- By removing unnecessary browser data, you can enjoy faster and smoother browsing sessions.
- Clearing cache and cookies regularly keeps your personalized ads and recommendations private and secure.
How Does Auto History Wipe Work?
Auto History Wipe is easy to use. It generally involves just three simple steps:
- Add a new automatic task
- Select how often the task should run
- Choose which types of data you want to delete
That’s really all it takes. You can install extensions like “Ultimate Auto History Cleaner” or “Auto Clear Browsing Data” to get started with Auto History Wipe in your browser.
There are minor differences between these two extensions. Ultimate Auto History Cleaner clears your history every time Chrome starts, which can help stop background processes. Auto Clear Browsing Data gives you more control, allowing you to customize when and how your data is cleared.
These extensions are lightweight and won’t noticeably slow down your browser, but it’s always good to pick the one that matches your needs best.
How to Set Up Auto History Wipe Extensions?
Installing Chrome extensions is easy. Just visit the Chrome Web Store, where you’ll find plenty of add-ons that can boost your online privacy and browsing experience.
- Open Chrome and go to the Chrome Web Store.
- In the top-left search bar, type in the name of the extension you want.

Use the search bar - Download either “Ultimate Auto History Cleaner” or “Auto Clear Browsing Data”, depending on your preference. We recommend “Auto Clear Browsing Data” for its extra flexibility.
- Click on the extension you want. You’ll see more information, including user reviews and screenshots.

Overview of the extension - Click the “Add to Chrome” button to start the installation.

Press Add to Chrome - A pop-up will ask you to confirm. Click “Add extension”, and you’re done!
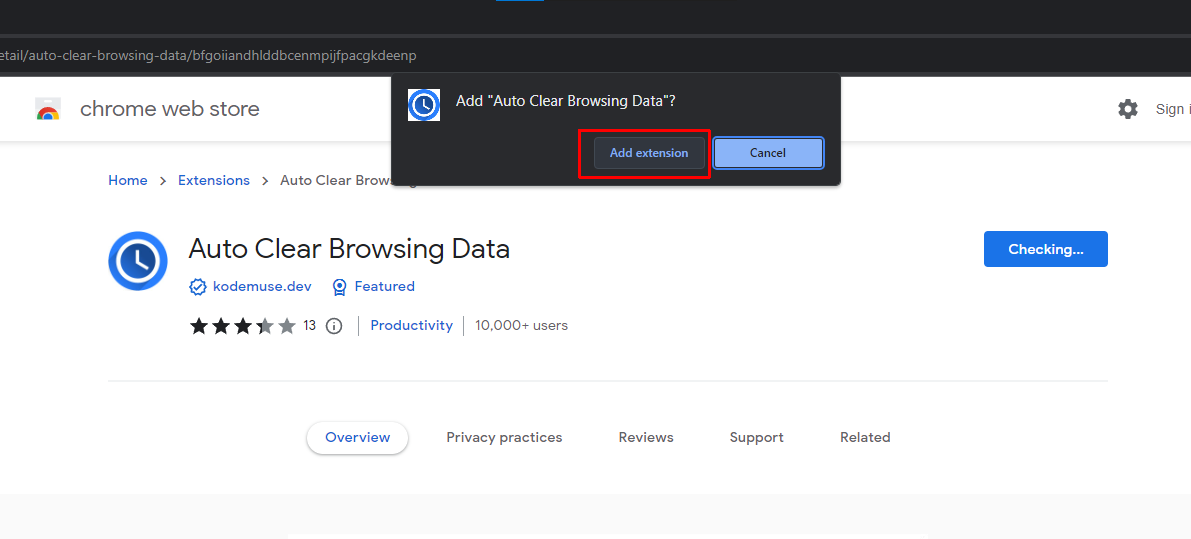
Click Add extension
You can find your new extension by clicking the “Puzzle” icon in the top right corner of Chrome and selecting your add-on from the list.

To set up Auto Clear Browsing Data, follow these steps:
- Click the “Add A New Task” button to start setting up your automated task.

Add A New Task - Fill in the details, like the task name, time interval, and what data (like browsing history, cookies, cache, etc.) you want it to delete.

Specify your task - Your task will now appear at the top of the list, where you can enable, disable, edit, or delete it anytime.

Task listed properly
If you prefer “Ultimate Auto History Cleaner”, simply open the extension, click on the “Settings” icon, and adjust your preferences to fit your needs.

1. Browsers with Auto History Deletion
Chrome doesn’t natively offer automatic history deletion, but browsers like Firefox, Microsoft Edge, and Safari do. These browsers let you set your history to delete automatically at certain intervals.
Most browsers clear history when you close them, but Safari gives you more control—for example, you can delete history after a day, a week, a month, or even a year.
1.1. Microsoft Edge:
- Open Microsoft Edge and click the “three dots” in the top right corner.

Press the three dots - Select “Settings”.

Select the settings tab - Go to “Privacy, search, and services”.

Privacy, search, and services tab - Under “Clear Browsing Data,” choose the second option.

Choose the second option - Pick what you want to clear every time you close the browser.
- You can select browsing history, cookies, cached data, and more.
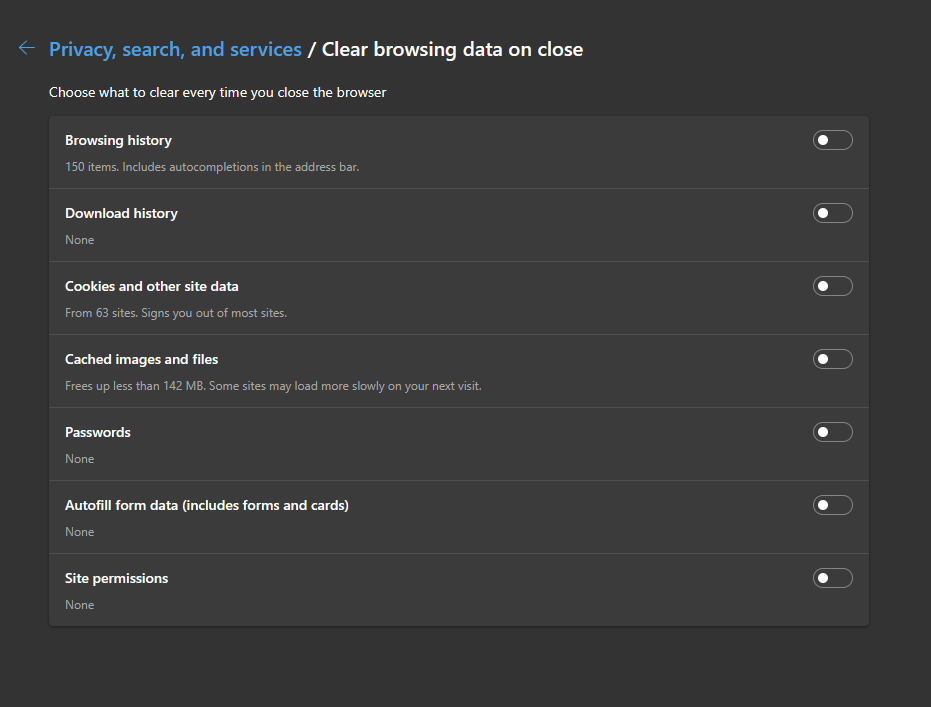
Select the data to be removed
For other browsers, the process is similar. For Firefox, click the three bars at the top right, go to Settings, and look for the “Privacy & Security” section.
Scroll to the “Cookies and Site Data” settings and check the box that lets Firefox delete cookies and history every time it’s closed.

1.2. On macOS (Safari)
If you’re on macOS using Safari, click on Safari in the menu bar and choose “Settings.” Under the “General” tab, you’ll see options for choosing how often your browsing history is deleted—after a day, week, month, or year.

2. Use Private Browsing Mode
Private browsing, also known as “Incognito Mode,” prevents browsers from saving your browsing history in the first place. When you use private browsing, cookies or cache aren’t saved either, meaning your online activity stays private.
To enter Incognito Mode (or InPrivate Browsing in Edge), press Ctrl+Shift+N. If you’re using a Mac, use the Command key instead of Ctrl.

Do note, though, that while Incognito Mode keeps your local device from recording your browsing data, your internet provider and the websites you visit can still see your activity.
Still, private browsing is a great solution if you just want to keep your browsing private from anyone who might use your computer.
3. Scheduled Task
Another way to make sure your browsing history is cleared automatically is to use Scheduled Tasks. Task Scheduler is a built-in Windows feature that lets you automate different actions on your computer, such as running system management tools, updating software, sending emails, and much more.
- Press Win + S, type “Task Scheduler,” and press Enter.

Open Task Scheduler - In Task Scheduler, click “Create Basic Task” on the right.
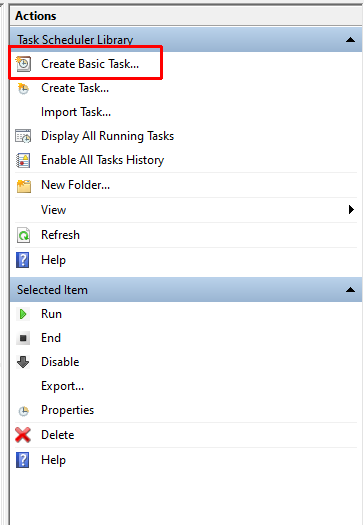
Create basic task - Give your task a name, and add a description if you want.

Add a name - Choose how often the task should run—Daily or Weekly is common for history cleaning.

Select time interval - Pick the date and time for the task to start.

Specify the time and date - Select “Start a program” for the action.

Start a program - In the “Program/script” box, enter the path to your history cleaning tool. You can use Windows’ built-in Disk Cleanup, or a third-party program like CCleaner. Make sure any third-party tool is installed first.

Select your cleaning tool For Disk Cleanup, the path is:
C:\ProgramData\Microsoft\Windows\Start Menu\Programs\Administrative Tools. If Windows is on a different drive, use that drive letter instead of “C”. - Click “Finish” to complete the task.

Press Finish - Right-click your new task in Task Scheduler and select “Run” to test it and confirm it works.

Hit run to test
Although this method might require some third-party software, Scheduled Tasks let you “set it and forget it.” Your PC will automatically keep itself clean on the schedule you set.
Reviewed by Huzaifa Haroon


