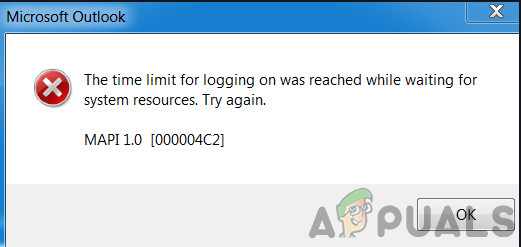
Fix: The Time Limit for Logging on was Reached in Outlook
The time limit for logging on was reached in Outlook error occurs because of Outlook running in compatibility mode, connection issues in cached mode, corrupted/conflicting temp folder contents, wrongly configured proxy settings, conflicting ISPs’ restrictions, wrongly configured network settings, conflict with 2-factor verification, and other internal Outlook related problems.
This is a very frequent issue which users face in both cases; when they are logged in Outlook and when they trying to login using their credentials. Here in this article, we will discuss all the different causes and then go through the solutions on how to fix the problem.
What causes the Time Limit for Logging on Was Reached Outlook Error?
- Outlook running in Compatibility Mode: Compatibility mode is used to run applications that cannot be run in the current OS. If your Outlook version is running in compatibility mode then it can cause the error message.
- Cached Mode: In cached connection mode, Outlook keeps an offline copy of the user’s exchange data. If Outlook is using cached connection mode to the Microsoft Exchange server and is having connection issues, then it can prevent the user from logging into the system.
- Corrupted/Conflicting Temp Folder Contents: Like any other Windows application, Outlook uses the Windows Temp folder to store its temporary files. If this folder has contents that are corrupt or conflict with Outlook, then it can be the reason why you are having problems logging in.
- Wrongly Configure Proxy Settings: Proxy settings are used to allow client computers to use indirect network connections to other network services. If your system is using a proxy to connect to the network which is not configured properly, then it can force the current Outlook error.
- Network Restrictions: ISPs deploy different techniques to keep things under check and control but these restrictions can sometimes restrict access to your Outlook account.
- Wrongly Configured Network Settings: Outlook works best with the default TCP/IP settings of the network. If your network settings are not configured properly or are different than the default settings, then Outlook may show the current error.
- Multi-Factor Authentication: Multi-Factor Authentication is an added layer of security for your Microsoft Account. Sometimes this 2-factor authentication conflicts with communications of Outlook and can cause issues while accessing your account.
- Anti-Virus False Positive: Outlook has a known history of conflicts with Anti-virus applications like Kaspersky which mark Outlook as a false positive and restrict its access to resources and system modules.
- Corrupted MAPI32.dll File: Mapi32.dll enables Windows to perform various email functions and launch messaging programs like Microsoft Outlook. If MAPI32.dll file is corrupt, it can have adverse affects in Outlook.
- Corrupted Outlook Navigation Pane Settings File: Outlook holds user shortcut customization in the Navigation Pane settings file. If there is some bug or issue with this pane and Outlook cannot handle it properly, you will recieve the error message under discussion.
- Corrupted Non-Exchange Data Files: Outlook uses different files to hold different types of data for email accounts like calendars etc. These are called ‘non-exhange’ data files. Even though these have no link with the account module in Outlook, they may sometimes cause the user issues when logging in.
- Conflicting Applications: If there are applications present on your system that conflict with Outlook’s legitimate operation, then they can conflict with Outlook and cause the error message.
- Corrupted/Conflicting Outlook Add-ins: Outlook add-ins improve Outlook’s functionality a lot but if any of these add-ins have corrupt or are conflicting with operations of Outlook, then Outlook can have issues when the user logs in.
- Corrupted PST File: Outlook’s PST file is the backbone of its communications and if this file has corrupted then it can cause many issues for the Outlook including the current one.
- Corrupted Outlook Profile: If the user’s Outlook profile is corrupt, then this corruption can lead to the current Outlook issue.
- Corrupted Windows Local User Profile: Corrupt user profiles are also known to cause issues when logging into Outlook.
Things to Consider Before Trying the Solutions:
Before trying any of the solutions,
- Make sure that the user has local administrator access to his computer.
- Create a system restore point before trying any solution.
- Run SFC command to rule out any corruption of system files.
- Update Windows to its latest build.
- Update device drivers especially video drivers
- Remove any external monitors.
- Make sure that your system’s Date and Time are accurate.
- Make sure that you are using DHCP IP Configuration
- Log out the user from all email interfaces (Outlook, SWA, IMAP, POP3, SMTP, OWA, etc) and then log back in.
- Make sure that you are using the updated version of Dotnet Framework
- If you are using a 64-bit version of Windows, make sure that the MAPI version in the following folders is same
c:\windows\system32
and
c:\windows\sysWow64
and if not then delete the MAPI files as mentioned in Solution 9 of fix MAPI and use Solution 16 to repair office.
- Make sure there is no other Microsoft applications like Skype For Business is having sign-in problem or is stuck in operation.
How to Fix the Time Limit for Logging on Was Reached?
1. Launching Outlook in Normal Mode (Non-Compatibility Mode)
Applications are used in compatibility mode when these applications are not compatible with the current OS. If Outlook is launched in compatibility mode then you can suffer from the time limit error in Outlook (even though these two mechanisms have no direct link). Launching Outlook in normal mode (non- compatibility mode) may solve the problem.
- Exit Outlook.
- On your Desktop, right-click an Outlook icon and select Properties.
- Click on the Compatibility tab.
- Find the Option Run this program in compatibility mode and uncheck it if selected.
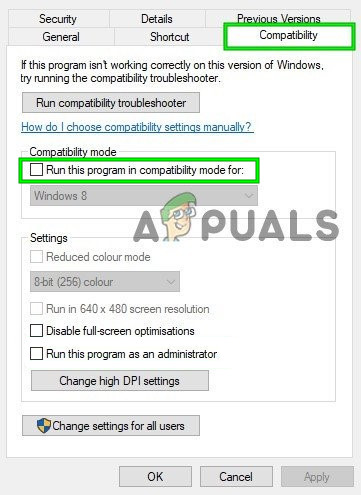
Uncheck Run this Program in Compatibility Mode - Click Apply and then OK.
- Open Outlook and check if it is operating normally.
2. Use Online Mode of Outlook
Outlook uses either Online Mode or Cached Mode to connect with a Microsoft Exchange Server. In the cached mode, Outlook keeps a local copy of the user’s data. So, if Outlook is having connection problems in the cached mode then it can cause timeout problems in the application. In that case, changing the connection mode from Cached to Online may solve the problem.
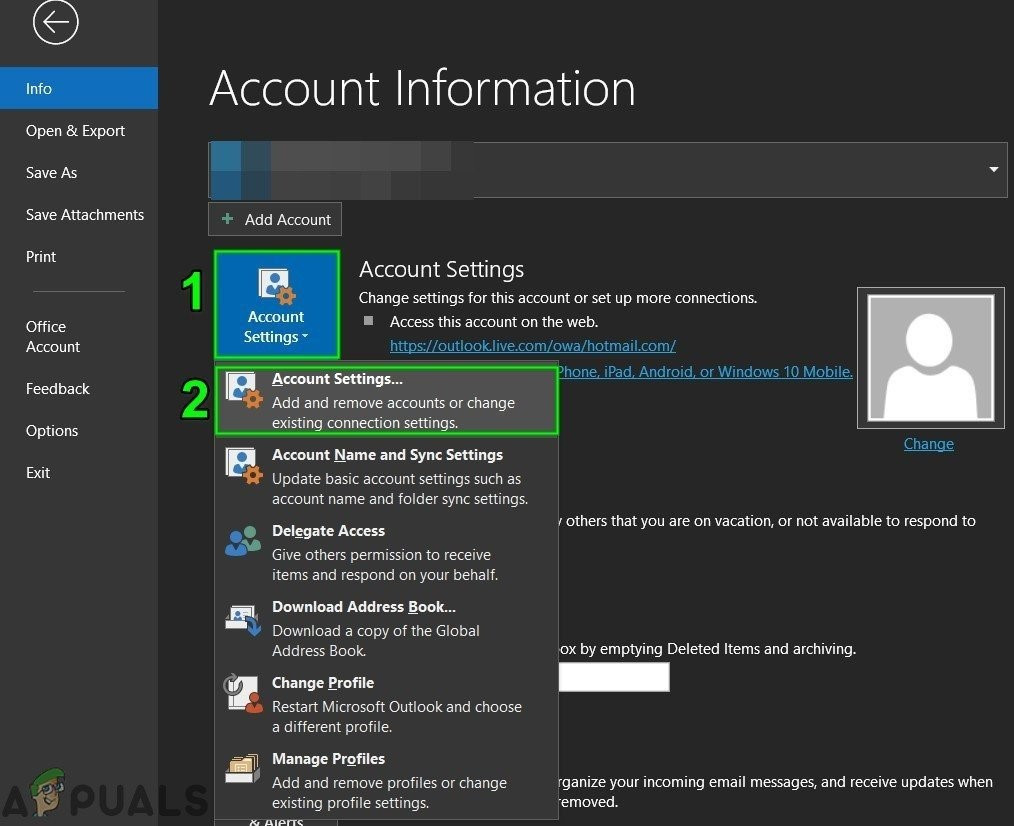
- Open Outlook and then click on the File tab.
- Now in the right pane of the window, click on the Account Settings and in the drop-down list, click on Account Settings.
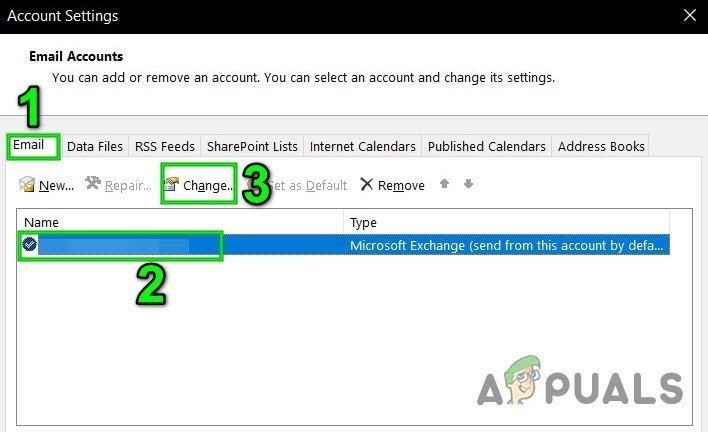
open Account Settings of Outlook - Now in the Email tab of Account Settings, select the user account and then click on Change.
Change Email Account Settings - Now click on More Settings.
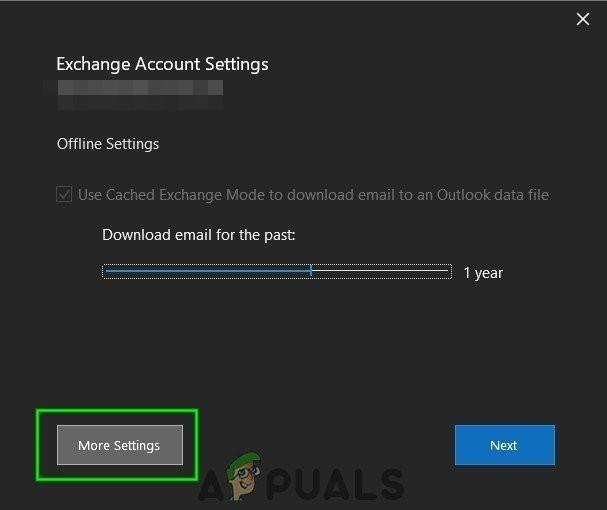
Open More Settings of Outlook - Now in the Microsoft Exchange setting window, go to the Advanced tab and then Uncheck the checkbox of “Use Cached Exchange Mode”.
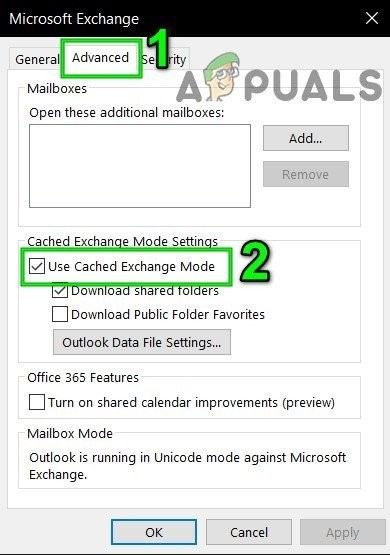
Uncheck Use Cached Exchange Mode - Click Apply and then click Ok.
- Now restart Outlook and check if it is functioning without any issue.
3. Delete Temp Windows Folder Contents
Temp files are stored in the Temp Windows folder and are used by Windows applications. Outlook also uses a temp Windows folder. If there are conflicting or corrupted files in the Windows Temp folder then it can cause the timeout error under discussion. In that case, deleting the contents of the Windows Temp folder may solve the problem.
- Exit Outlook.
- Press Windows+E to open File Explorer.
- Navigate to the following path
c:\windows\temp
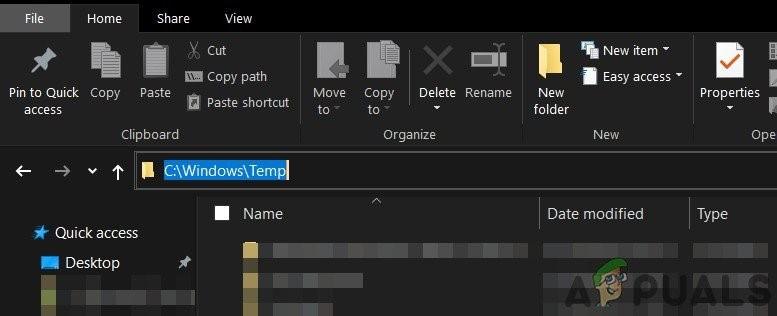
Open Windows Temp Folder - Press Ctrl+A to select all the items of the folder and press Shift+Delete to delete all the items (do not worry! You will not be able to delete some of the items, ignore them).
- Restart the system and then launch Outlook and check if it is operating fine.
4. Turn Off Proxy
If you are using Proxy on your system to connect to the server, then the wrong configuration of proxy can cause connection issues which can in turn cause timeout problems with Outlook. In that case, turning off the proxy may solve the problem.
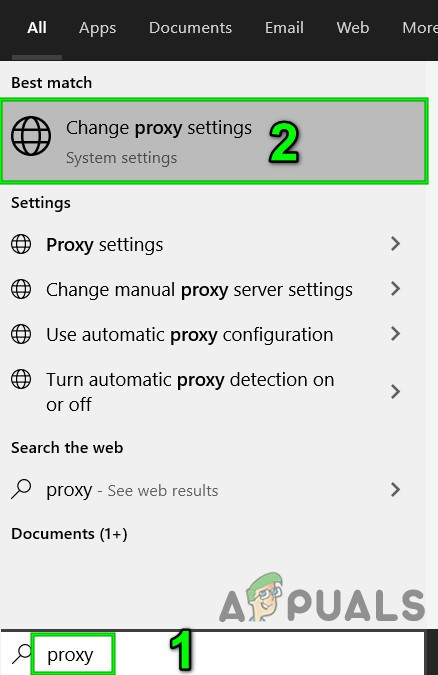
- Exit Outlook.
- Press Windows key and type “proxy” and in the resulting list click on “Change Proxy Settings”.
Open Change Proxy Settings - In the proxy settings, toggle the “Automatically detect settings” to off.
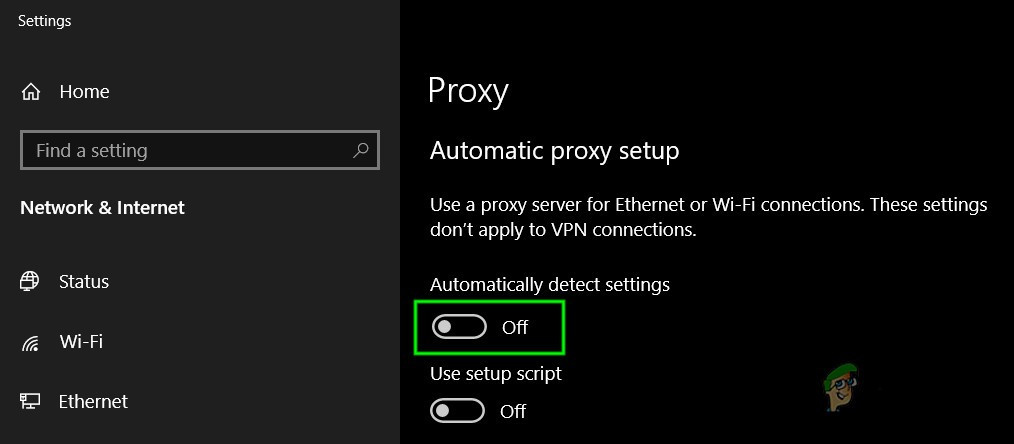
Turn Off Automatically Detect Settings of Proxy - Now in the Manual Proxy section, toggle the switch “Use a proxy server” to off.

Turn Off Use a Proxy Server in Manual Proxy Setup - If you are using proxy settings just in your browser, even turn that off.
- Now restart the system and launch Outlook and check if it has started to function normally.
5. Switch to Another Network
ISPs deploy different protocols and technologies to keep things under control and check, and this deployment may sometimes restrict the access of Outlook to connect to its servers. Using another Network may solve the problem.
- Connect to another network. You can use your mobile hotspot. You may use a VPN.
- Now launch Outlook and check if it has started to function normally.
6. Reset Network Settings (Reset Winsock)
Outlook works best with the default TCP/IP settings of your network. So, if the settings of your system are different than the default settings, Outlook may show the time limit for logging on was reached error. In that case, resetting Winsock to default which will reset TCP/IP settings to their default may solve the problem.
- Press the Windows key and type “command prompt” and in the resulting list Right-click on the “command prompt” and click on “Run as Administrator”.
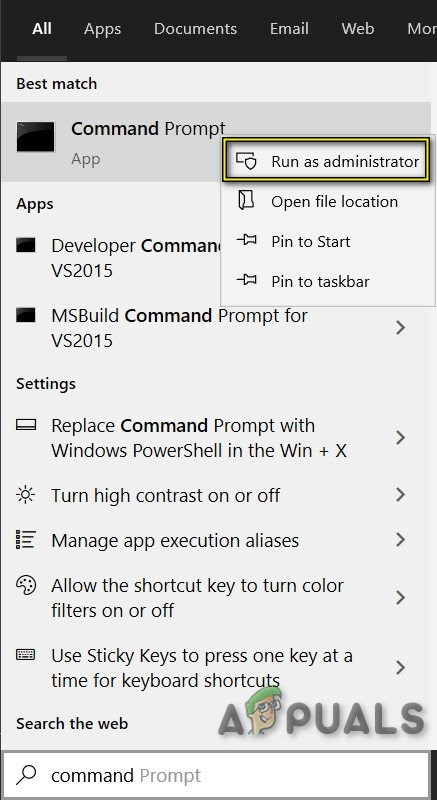
Open Command Prompt as Administrator - Enter the following command in the elevated command prompt:
netsh winsock reset
and press Enter
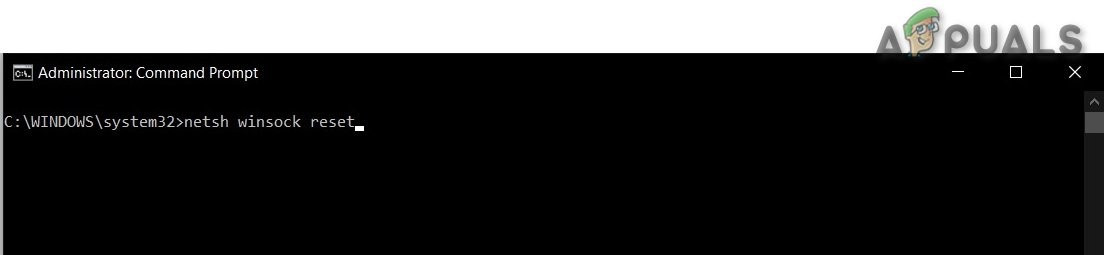
3. After Winsock is reset, Restart the system.
4. Launch Outlook and check if it has started to function properly.
7. Turn Microsoft Multi-factor Authentication Off
Two Factor Authentication is a great layer of security for your Microsoft Account. But sometimes this added layer of security creates issues with Outlook. In that case, temporarily disabling Multi-factor authentication may solve the problem.
- Exit Outlook.
- Open your web browser and then visit the Security section of your Microsoft Account.
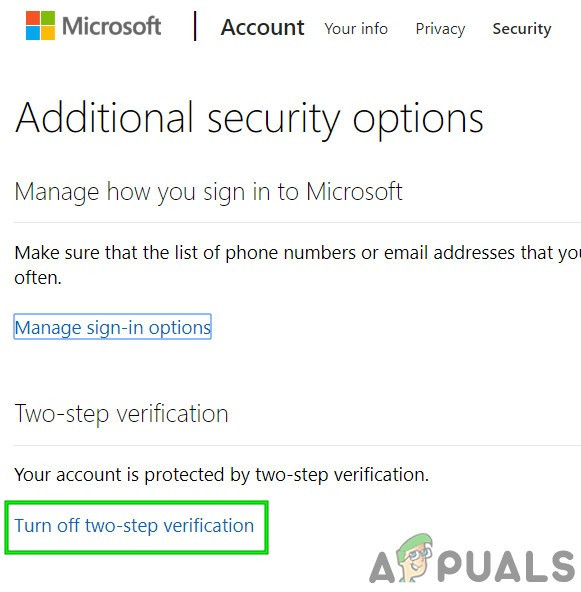
- Under Two-step verification, click on Manage.
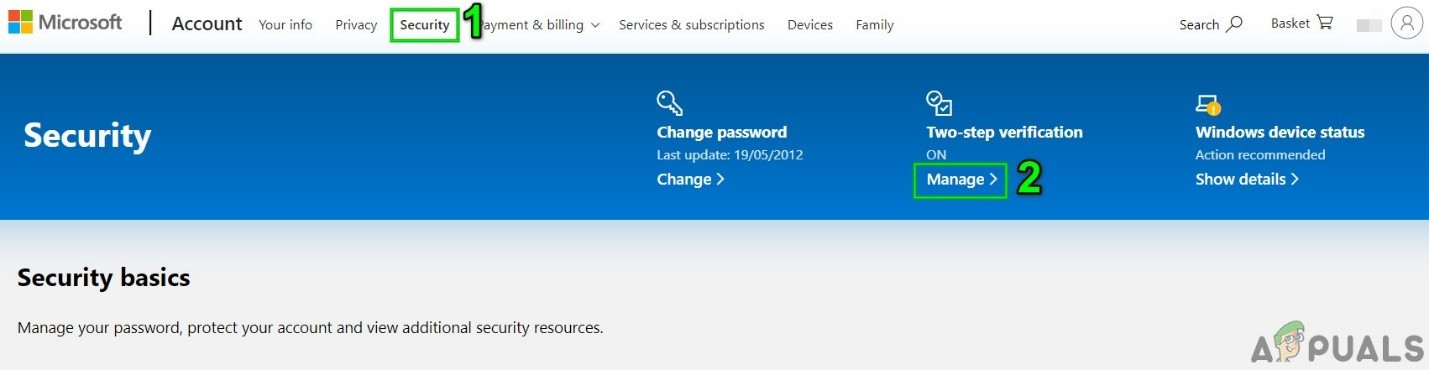
Manage 2 Step Verification of Microsoft Account - Click Turn off two-step verification.
Turn Off Two-Step Verification of Microsoft Account - Now close the browser.
- Launch Outlook and check if it has started to function properly.
8. Tweaks with the Antivirus Application
Anti-virus applications are known to have issues with Microsoft Outlook by detecting it or any of its add-ins as a malware (false positive). In that case, disabling anti-virus temporarily may solve the problem.
Warning: Use this solution at your own risk as changing your antivirus settings makes your system more vulnerable to fraudulent, viral or malicious attacks. This step is not recommended by us.
- Turn off your Anti-virus.
- Launch Microsoft Outlook and check if it has started to work properly.
- If it is working fine then you have to create an exception for the Outlook or otherwise replace your antivirus with a non-conflicting antivirus application.
- Moreover, excluding the local user’s temp directory from the antivirus client can also solve the problem. The temp directory is usually located at :
C:\Windows\Temp
9. Delete and Fix the MAPI32.dll File
Mapi32.dll is a Windows Messaging (API) which Windows uses to perform many email-based functions & launch messaging programs like Microsoft Outlook. If the MAPI32.dll file is corrupt or has compatibility issues, then it may cause the current Outlook error message. In that case, using the Built-in Windows utility FixMAPI.exe may solve the problem.
- Exit Outlook.
- Press Windows+E to open File Explorer.
- In File Explorer, navigate to
C:\Windows\System32\
- Find MAPI32.dll and Right-click on it and click on Rename.
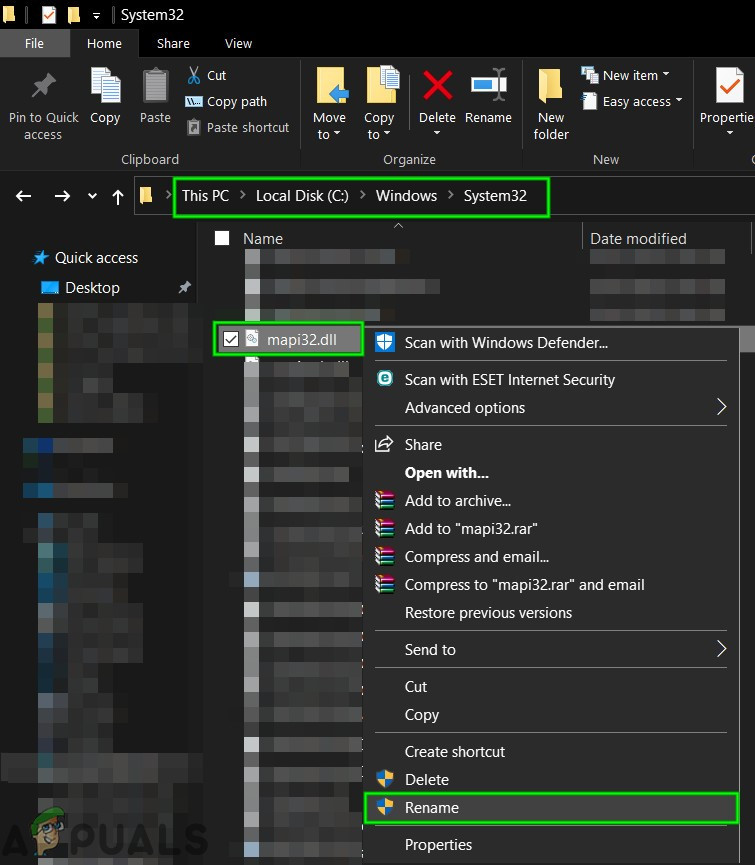
Rename MAPI32 - Now Enter the name MAPI32.old.
- Now restart your system and launch Outlook.
- Check if Outlook has started to operate normally.
- If not, then exit Outlook.
- Press Windows+E to open File Explorer.
- In File Explorer, navigate to
C:\Windows\System32\
- Now locate FixMAPI.exe and right-click on it and then click on Run as Administrator.

Run FixMAPI as Administrator - Click yes if UAC prompts.
- Now restart the system and launch Outlook and check if it has started to function normally.
10. Reset the Outlook Navigation Pane
The Navigation Pane in Outlook lets you access various helpful shortcut icons for easy access to the emails, calendar, tasks, etc. And if the Navigation Pane settings file is corrupt, it can cause problems with the launching of account module in Outlook. In that case, we can use Outlook’s built-in command to remove the customization of the Navigation Pane and see if this solves the problem.
- Exit Outlook.
- Press Windows key and then type Run and in the resulting list click on Run.
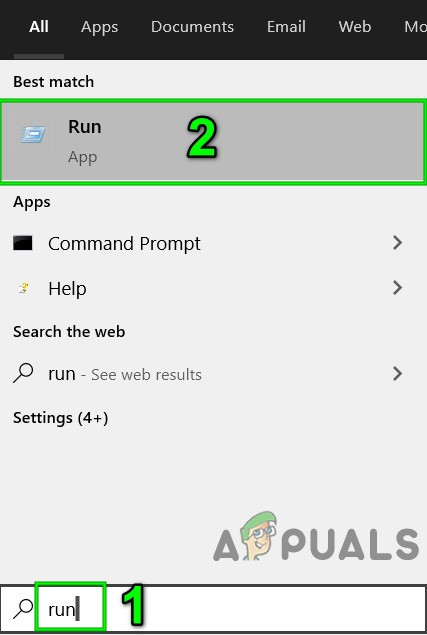
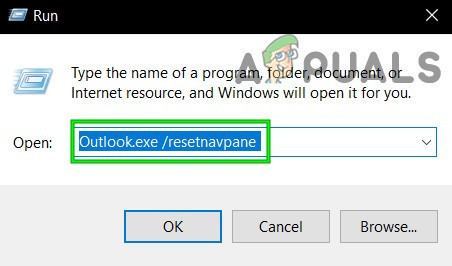
Open Run Command - Now in the run box, type
Outlook.exe /resetnavpane
and press enter.
Run Reset Outlook Navigation Pane - Launch Outlook and check if Outlook has started to function properly.
- If not, then Exit the Outlook.
- Navigate to the following location as per your Windows version
- Windows 10
C:\Users\%USERNAME%\AppData\Roaming\Microsoft\Outlook\
- Older versions of Windows
drive:\Documents and Settings\user\Application Data\Microsoft\Outlook\
- In the folder find file Outlook.xml and press Shift+Delete to delete the file.
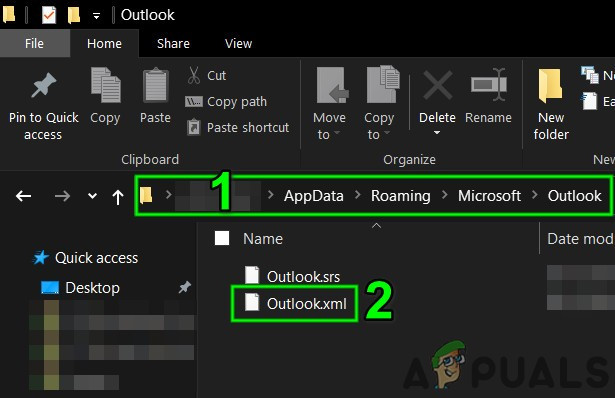
Delete Outlook XML File - Launch Outlook and check if it has started to operate normally.
11. Remove Non-Exchange Data Files
Outlook uses different data files for different user accounts. It also uses different files for SharePoint Lists, Internet Calendars, Published Calendars and Address Books. There is a known bug where if these files are corrupt, Outlook may start throwing the time out error message. In that case, just keeping the Exchange Account and removing all others may solve the problem.
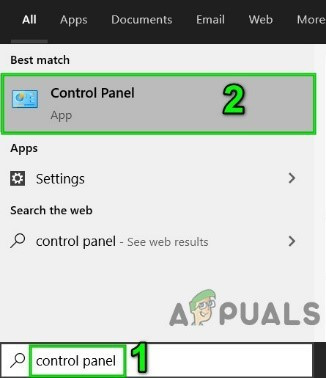
- Exit Outlook.
- Press Windows key and type Control Panel and in the results click on Control Panel.
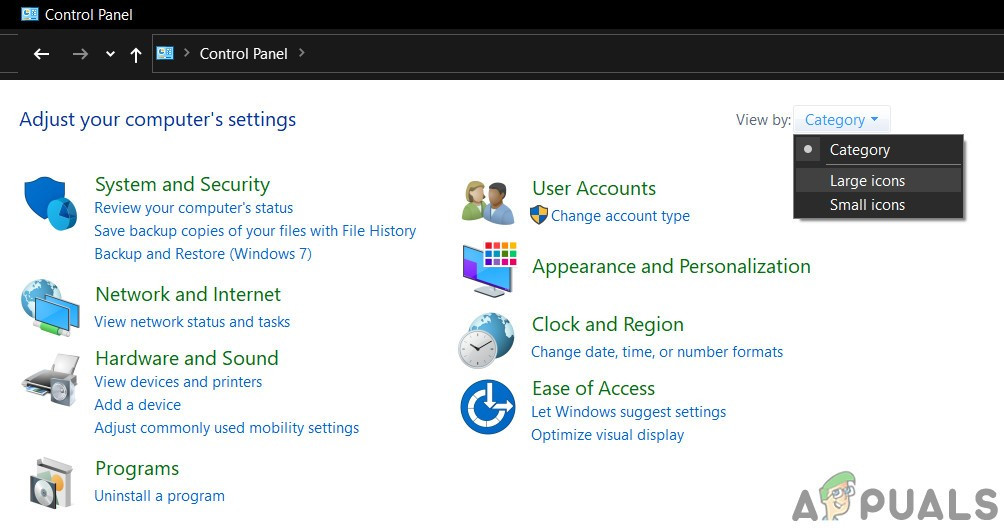
Open Control Panel - Now near the top right of the control panel windows, change View by from Category to Large Icons.
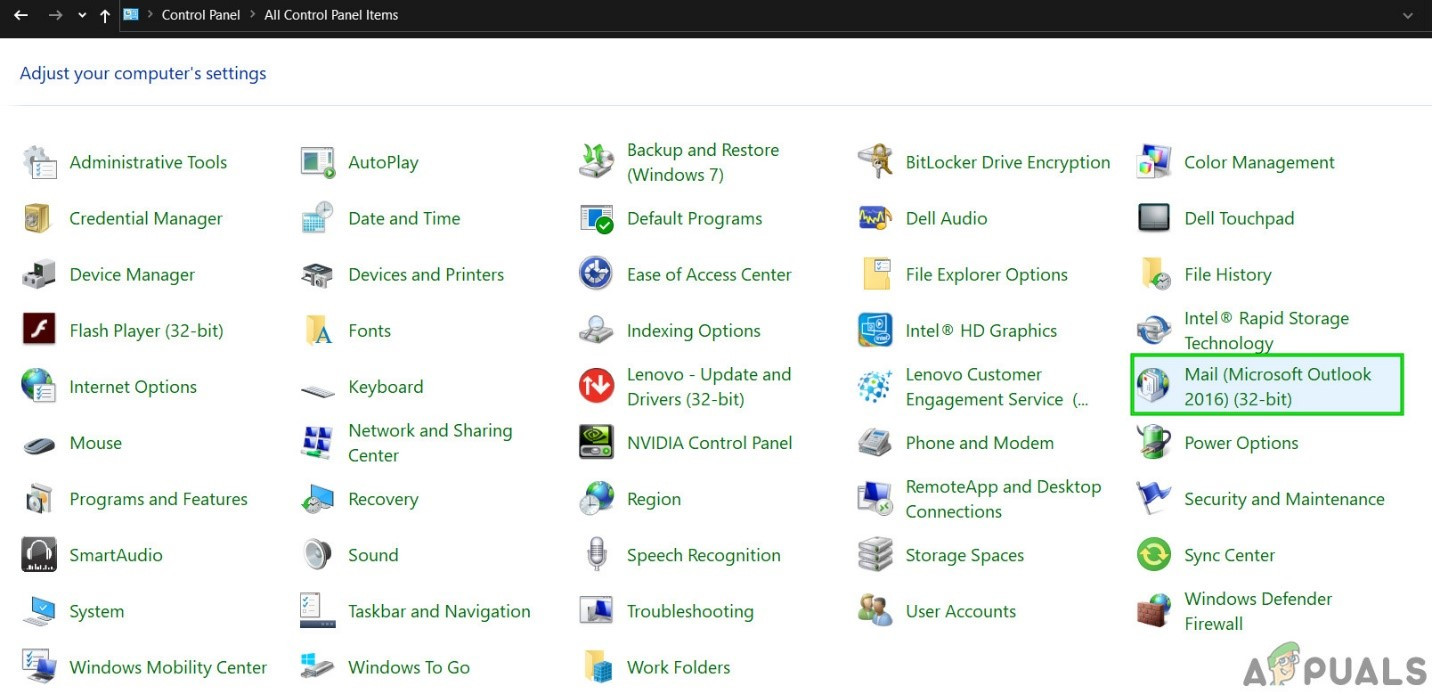
Change View of Control Panel From Category to Large Icons - Now click on Mail.

Open Mail from Control Panel - In the Mail window, click on E-Mail accounts.
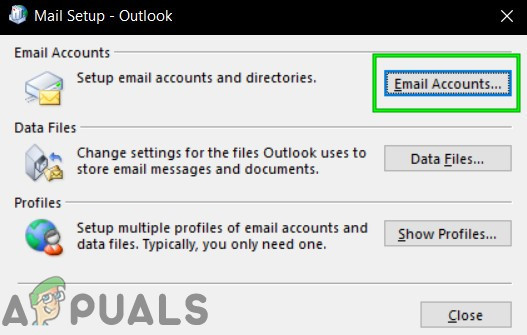
Open Email Accounts from Mail Setup - Now click on Data Files and select all other files one by one except your Exchange Account file and then click on Remove to remove these files one by one.
- Now repeat the same process on the tabs of RSS Feeds, SharePoint Lists, Internet Calendars, Published Calendars and Address Books.

Remove Non-Exchange Items From Tabs of Account Settings - Restart the system.
- Launch Outlook and check if Outlook has started to function normally.
12. Clean Boot Windows or Use Windows Safe Mode with Networking
The timeout error in Outlook can also be caused due to conflicting applications like Skype For Business etc. To check this you can either clean boot Windows or use Windows Safe Mode, which can solve the problem.
- Clean Boot Windows or Boot Windows in Safe Mode with Networking.
- Launch Outlook and check if it has started to function properly, and if so, then try to identify the problematic application and sort out the issue between that application and Outlook.
To find the problematic applications keep in mind the following steps.
- Boot Windows in normal mode.
- Press Windows and type Task Manager and in the resulting list, click on Task Manager.
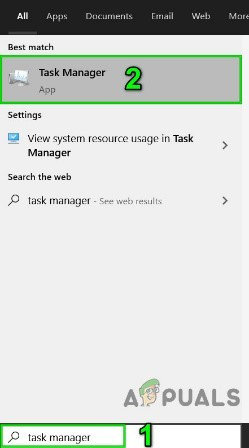
Open Task Manager - Now find if there is more than one Outlook process then right click on that process and click on “End Process”.
- Also, look for Skype For Business or Lync running. If they are running then right-click on each one of them and click on “End Process”.
- Moreover, look for UCMapi.exe and if it is running then also end process it.
13. Open Outlook in Safe Mode and Disable Outlook Add-ins
Add-ins help you to get things done right from your inbox. But sometimes these Add-ins start to conflict with the legitimate operation of Outlook. Salesforce (Standard Salesforce plug-in is discontinued for new users in the winter of 2019, therefore, ensure that you have succeeding tools installed), Skype For Business and iTunes add-ins are known to create the current issue for Outlook. Outlook has a built-in Safe Mode, in which Outlook Runs without these add-ins. Running Outlook in Safe Mode may solve the problem.
- Exit Outlook.
- Press Windows+R buttons simultaneously to open Run command.
- Type Outlook.exe /safe (There is a space after Outlook and the /) and then click OK.
If Windows can’t find Outlook.exe /safe, try using the full path to Outlook.exe.
Now check if Outlook is operating fine. If it is working fine then disable Outlook Add-ins one by one by using the following steps
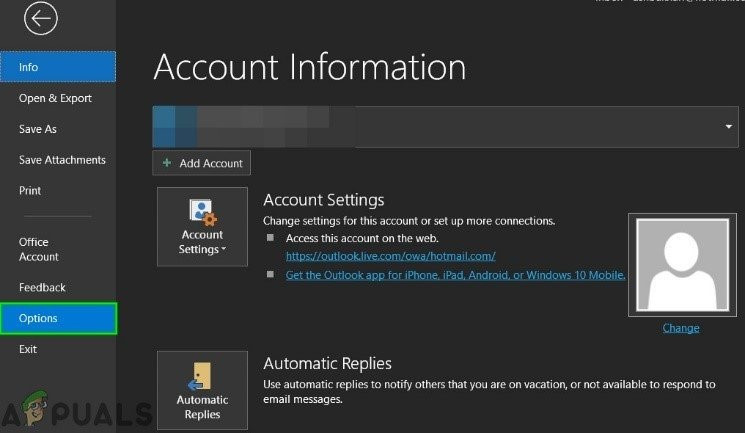
- Open Outlook in normal mode and then click on the File tab and in the left pane of the window click on Options.
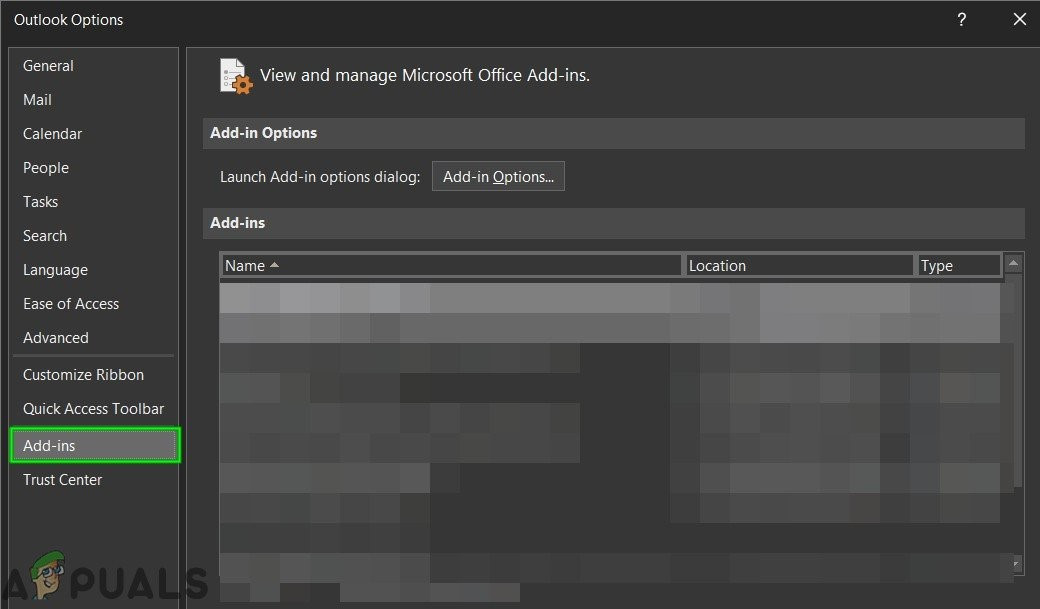
Open Outlook Options - Now click on Add-Ins.
Open Add-ins in Outlook Options - Locate the “Manage” dropdown list and select which type of add-ins you would like to enable/disable e.g. COM Add-ins and then click on “Go”.
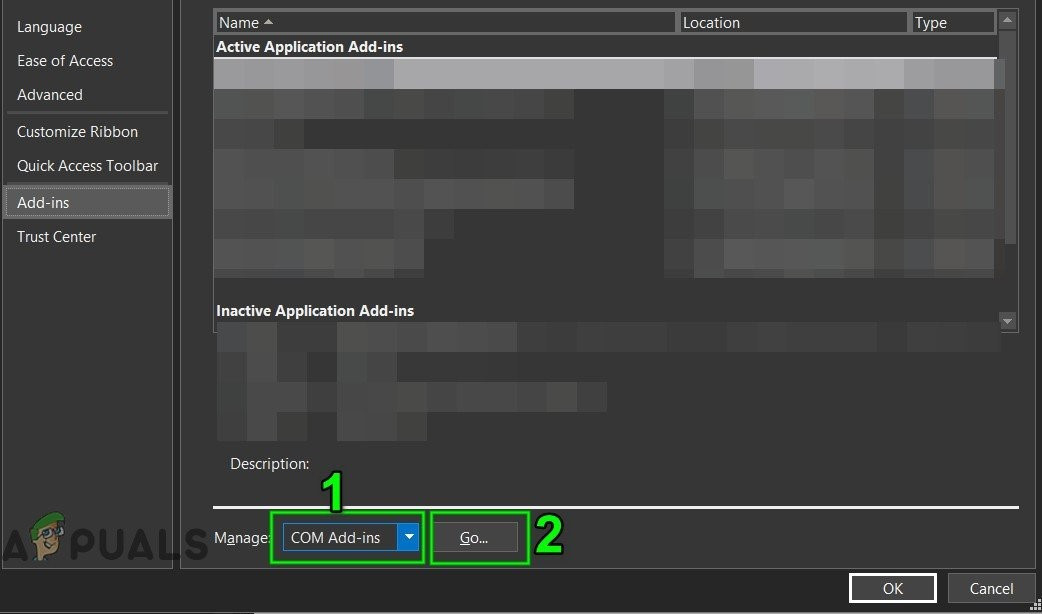
Manage Com Add-ins - Now uncheck all the Add-in and restart the Outlook and check if outlook has started to work normally. If so, then enable add-ins one by one to find out the problematic one and then keep it disabled. Now search for an updated version of that problematic add-in and install that updated version to see if it solves the problem.
14. Repair the PST File
When you perform Send/Receive operation in Outlook, then Outlook uses the user’s folders to fetch out the required data. A PST file is used for this purpose but if the PST file is corrupt, then this corruption can cause the timeout error message. SCANPST.EXE is a built-in utility by Microsoft to fix the corruption of PST and using this utility to repair the PST file may solve the problem.
- Exit Outlook.
- Click on the Windows button and then in the search box type Outlook and in the resulting list, Right-click on Outlook and then click on “Open File Location”.
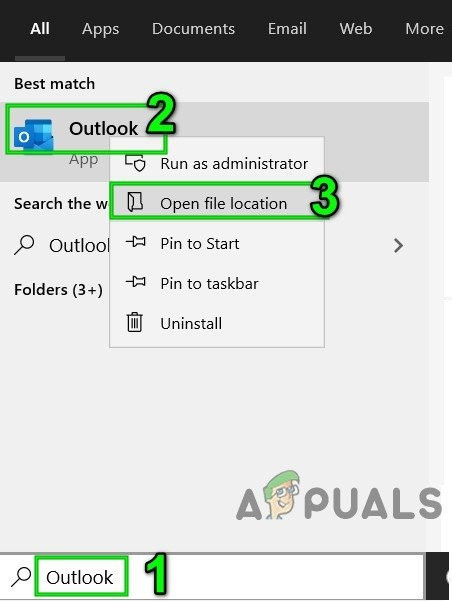
Open File Location of Outlook from Windows Start Menu - You will be directed to the following folder of shortcuts of startup programs.
C:\ProgramData\Microsoft\Windows\Start Menu\Programs
In the folder, Right-click on the shortcut icon of Outlook and then again click on the “Open File Location”.
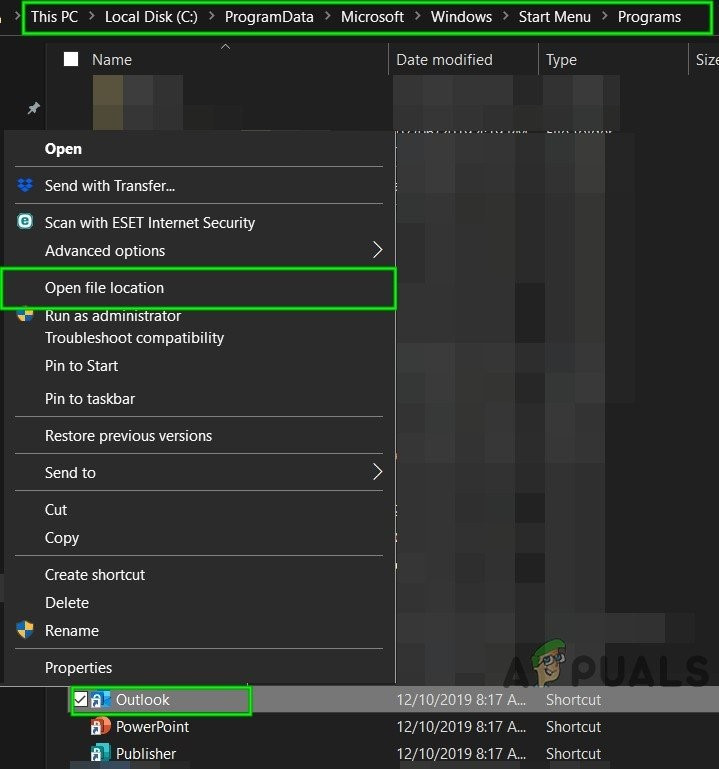
Open File Location From Programs Shortcut Folder - You will be directed to the following Office folder.
C:\Program Files (x86)\Microsoft Office\root\Office16
Now in this Office folder, find and right-click the SCANPST.EXE and then click on “Run as Administrator”.
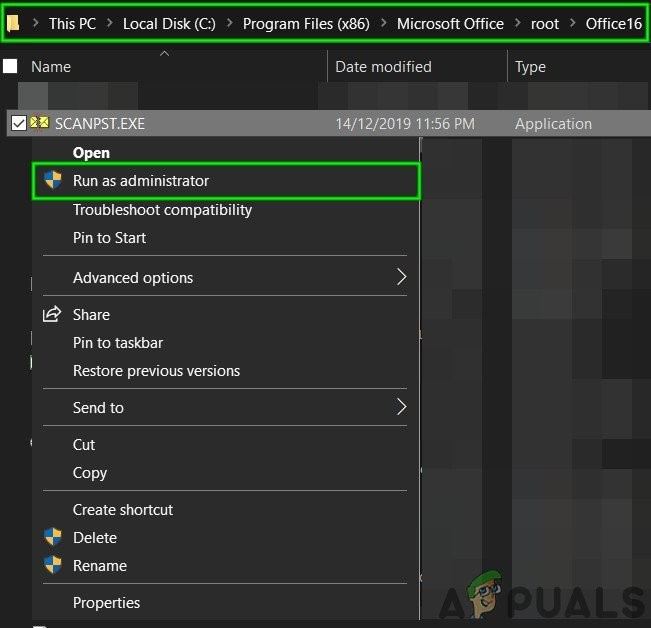
Run ScanPST as Administrator - Now in the Microsoft Outlook Inbox Repair windows click on the Browse button.T hen select the PST file to be repaired. (Location of the PST file is explained at the end of solution’s steps).
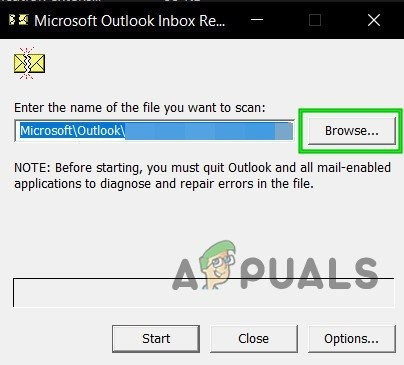
Browse to Corrupted PST File - Then click on the Start button to start scanning the PST file.
- After completion of the scan, check the option Make a backup of scanned file before repairing.
- Then click Repair. A Repair complete message will be displayed if the repairing was successful. If the Inbox Repair Tool was unable to repair the file, you will need to use the backup of your file.
- After the repair is complete, Launch Outlook and check if Outlook has started to operate without any issue.
The location of the PST file varies for different users depending upon different factors like Outlook version, Windows version, and how the user’s account is configured. Following locations are the default locations of the PST file for the Windows version:
- Windows 10
drive:\Users\<username>\AppData\Local\Microsoft\Outlook
drive:\Users\<username>\Roaming\Local\Microsoft\Outlook
- Older Windows Version
drive:\Documents and Settings\<username>\Local Settings\Application Data\Microsoft\Outlook
15. Delete the Old Outlook Profile and Create a New Outlook Profile
‘The time limit for logging on was reached Outlook’ error could occur due to the wrong configuration of a user profile or a corrupted user profile. In that case, deleting the current user profile and creating a new one may solve the problem. Keep in mind that this step completely deletes your Outlook profile, and you have to create a new one and reconfigure your connection.
- Exit Outlook.
- Press the Windows key and type Control Panel, in the resulting list click on Control Panel.

Open Control Panel - Near the top right corner, change View by from Category to Large.
Change View of Control Panel From Category to Large Icons - Now click on Mail.
Open Mail From Control Panel - Then in the Mail Setup, click on Show Profiles.
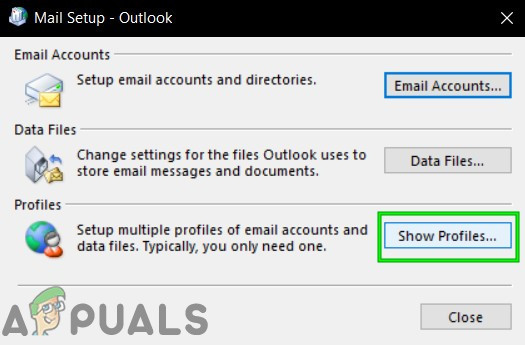
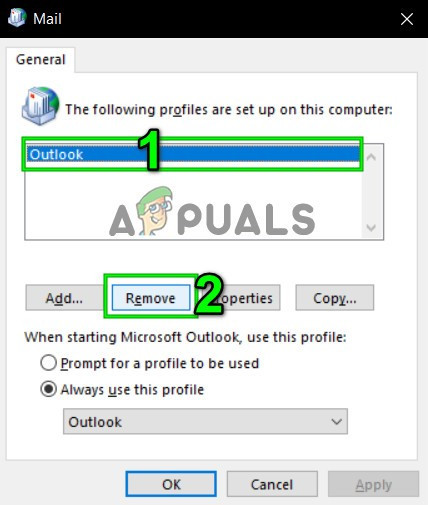
Show Profiles in Mail Setup - Now select the current Outlook profile and then click on Remove to delete the current profile.
Remove Outlook Profile - Now click on the Windows button and type “Registry Editor” and in the results, right-click on Registry Editor and then click on “Run as Administrator”.

Open Registry Editor as Administrator - In the registry editor, navigate to the following registry key which depends upon your version of Outlook
- Outlook 2019, 2016 & 365:
HKEY_CURRENT_USER\Software\Microsoft\Office\16.0\Outlook\Profiles
- Outlook 2013:
HKEY_CURRENT_USER\Software\Microsoft\Office\15.0\Outlook\Profiles
- Outlook 2010 and older:
HKEY_CURRENT_USER\Software\Microsoft\Windows NT\CurrentVersion\Windows Messaging Subsystem
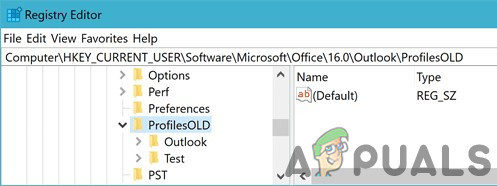
- In the Registry Editor, right-click on Profiles and then click Rename.
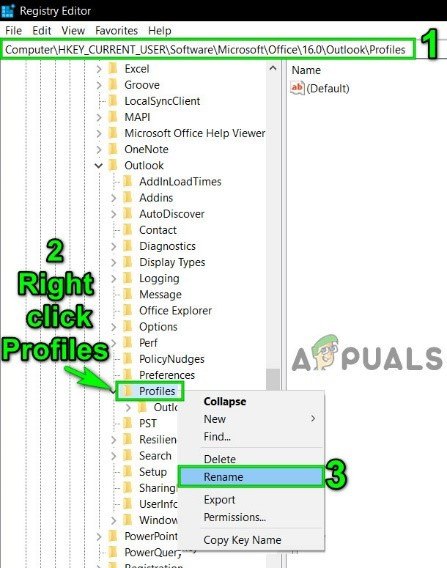
Rename Outlook Profiles in Registry Editor - Add Old at the end of Profiles to keep things in order i.e. PofilesOld.
Profiles Renamed to ProfilesOLD - Now close registry editor.
- Then add a new profile.
- Now repeat steps 1-5 to open Mail in Control Panel.
- Now in the Mail, select the newly created profile and select Always use this profile.
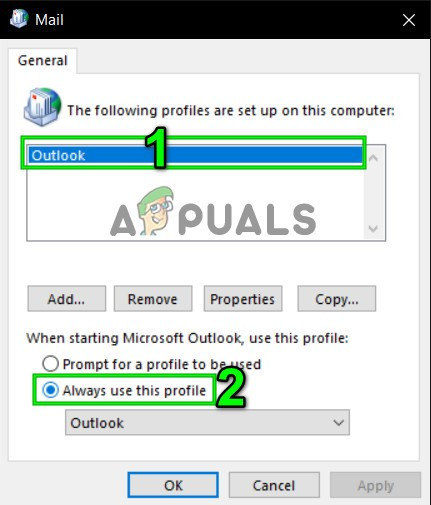
Select Always Use this Profile in Mail - Now click on Apply and then on OK.
- Relaunch Outlook and check if it has started to work normally. If so, then delete the renamed registry key.
16. Repair Office/ Outlook
If Microsoft Office/Outlook’s installation itself is corrupt, then it will cause numerous problems with the Outlook module. Using the Microsoft Office built-in repair tool will clear out any problems with the Office installation and thus may solve the problem.
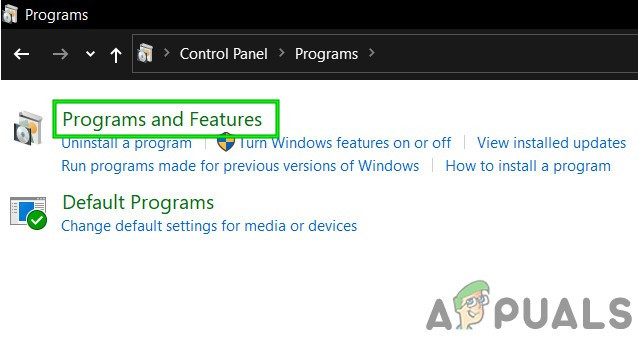
- Press the Windows key and then type Control Panel and in search results click on Control Panel.
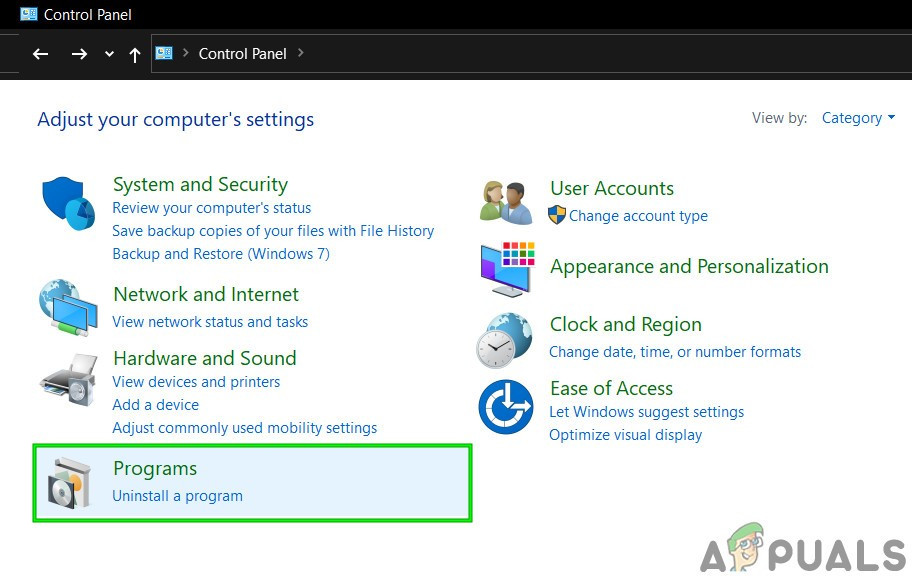
Open Control Panel - Click Programs.
Click on Programs in Control Panel - Now click on Programs and Features.
Open Programs and Features - Click to select the Office suite installation that you want to repair, then click on Change.
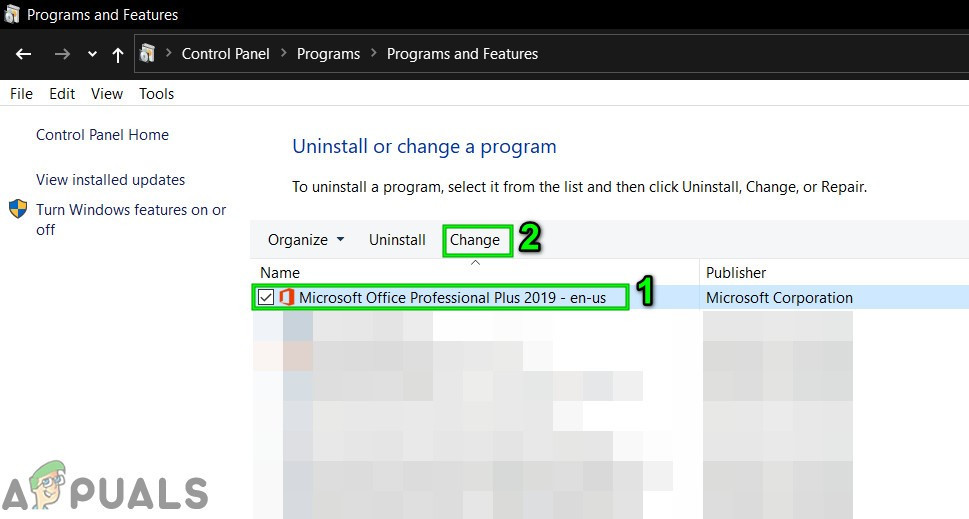
Change Office Installation - If UAC prompts, click yes.
- Then select Quick Repair.
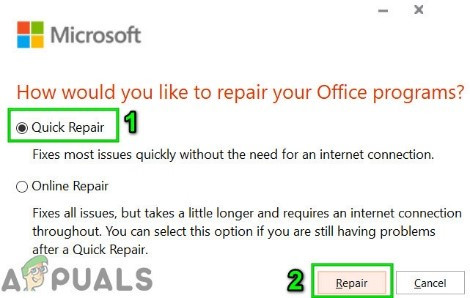
Quick Repair of Office Installation - Click Repair, and then click Continue.
- After completion of the repair process, restart your computer.
- Launch Outlook and check if Outlook is functioning normally.
- If not, then repeat step-1 to step-5.
- This time select the option Online Repair.

Online Repair Office Installation - Now click Repair and afterwards click Continue.
- After completion of the repair process, restart your system and launch Outlook and check if Outlook is operating properly.
Note: This will repair the whole Office suite even if you want to repair just Outlook. If you are using a standalone version of Outlook, then in the control panel search for Outlook by name and repair it by following the steps mentioned above.
17. Perform a System Restore
System Restore is a Windows utility used to restore Windows. This technique is quite useful in case the system gets infected, any system Windows files get corrupted or changes made to the system that affects system legitimate operation. If the time limit for logging error has started to occur recently, then using the System Restore to revert the system to point of time when Outlook was working fine may solve the problem.
To restore the system, please follow the guidelines provided in our article How to Configure System Restore.
After performing a system restore, check if the Outlook has started to work fine.
18. Create the New Windows Local User Profile
If the local user profile is corrupt, then it may cause numerous problems with alot of applications including Outlook (Outlook communicates directly with the Windows user profile). In that case, creating a new local user profile may solve the problem.
- Exit Outlook.
- Create a New Local User Profile.
- Now restart the system and log-in using the new local user profile.
- Launch Outlook and use the credentials that you were using before and check if Outlook has started to function properly.
19. Run Microsoft Support and Recovery Assistant
The Microsoft Support and Recovery Assistant run tests to figure out what is problematic and offers the best possible solution for the identified problem. This tool can currently fix Outlook as well as Office/Office 365 issues. If the Microsoft Support and Recovery Assistant shortly SaRA cannot fix a problem then it will suggest the next steps in troubleshooting the problem. So, running the Microsoft Support and Recovery Assistant may solve the problem.
- Visit the official Microsoft Website and Download Microsoft Support and Recovery Assistant.

Download Microsoft Support and Recovery Assitant - Launch the downloaded SaRA file after completion of the download.
- After reading & understanding the Microsoft Services Agreement, click I Agree to agree.
- Choose the Outlook and then click Next.
- Now select Outlook failed to start option and click Next.
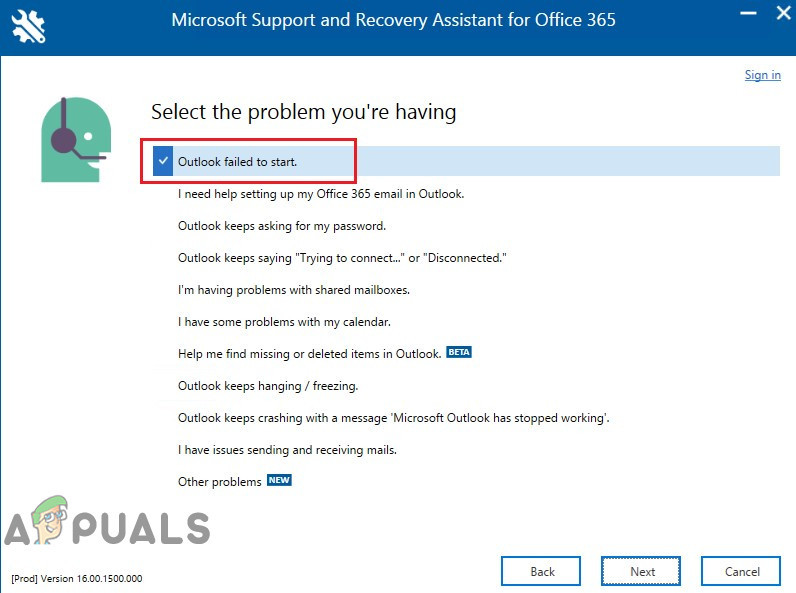
Select Outlook Failed to Start in SaRA - Follow the directions displayed by the Microsoft Support and Recovery Assistant provides to solve the Outlook issue.
Last Words:
Hopefully, now you are enjoying Outlook without any problem. If you are still having a problem using Outlook then Use Outlook Web App (OWA). You can also try uninstalling and reinstalling Office/Outlook.
Keep visiting us for new tips and tricks!
Best list of solutions ever! Thank you!