Fix: DHCP is not enabled for Ethernet
The Internet makes use of Dynamic Host Configuration Protocol (DHCP) to provide quick, automatic, and centrally managed distribution of IP addresses to different devices wanting to connect within a network. A DHCP server is also used to help in configuring the default gateway, subnet mask, and DNS server information on your device/computer.
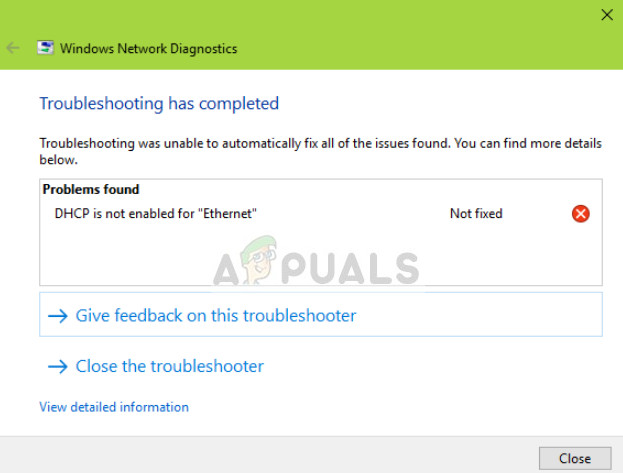
Users experience the error message ‘DHCP is not enabled for Ethernet’ when they troubleshoot their not working internet connection through the Windows troubleshooter. This error usually occurs when you have manually assigned your computer an IP address and subnet mask. The task of DHCP is to take control of this element from you and resolve all the IP addresses and allocate them automatically. You might get your internet access some of the times but if that address is already taken, you will not be able to access the internet.
You might also experience this error with the variations in Wi-Fi, Ethernet, and Local Area connection.
What is Dynamic Host Configuration Protocol (DHCP)?
A DHCP server is used to automatically assign unique IP addresses to computers attempting to connect to a network. In small businesses and homes, the router acts as a DHCP server.
The process is comprised of several different steps:
- The computer (client) requests an IP address from the router (host).
- The router checks for available free IP addresses and assigns it to the computer.
- They both handshake on it before the computer starts using the IP address.
Whenever your device is turned on and connected to a network, it issues a DHCPDISCOVER to the router. Then the process begins and the IP address is assigned.
What causes the error message ‘DHCP is not enabled for Ethernet’?
This error message is caused by simple misconfigurations on your computer. Some of the reasons are:
- You are using a manual entry of IP address for your computer to use in the Network configuration menu.
- The DHCP client service might not be running on your computer. This client service helps your computer to register the IP address and keep track of DNS records.
- Your network driver might be outdated or corrupt. This can occur after potential Windows updates.
- The router might not be working properly. A simple restart usually solves the problem since it clears all the wrongly saved configurations.
Before we start with the solutions, make sure that you are logged in as an administrator on your computer and you are connected to your network properly. Check Ethernet cables, try replacing them or make sure that you have enough strength of Wi-Fi signals.
Solution 1: Automatically fetching IP addresses from DHCP
The most common reason why users face this problem is because they have predefined the IP address they want to use; hence disabling the DHCP mechanism. This might conflict with your network settings if the manual request is not entertained. We will navigate to your internet settings, set both options to automatic and see if this fixes the issue.
- Press Windows + R, type ‘control’ in the dialogue box and press Enter.
- Once in the control panel, click on Network and Internet > Network and Sharing Center. Now select the option Change adapter settings from the left side of the screen.
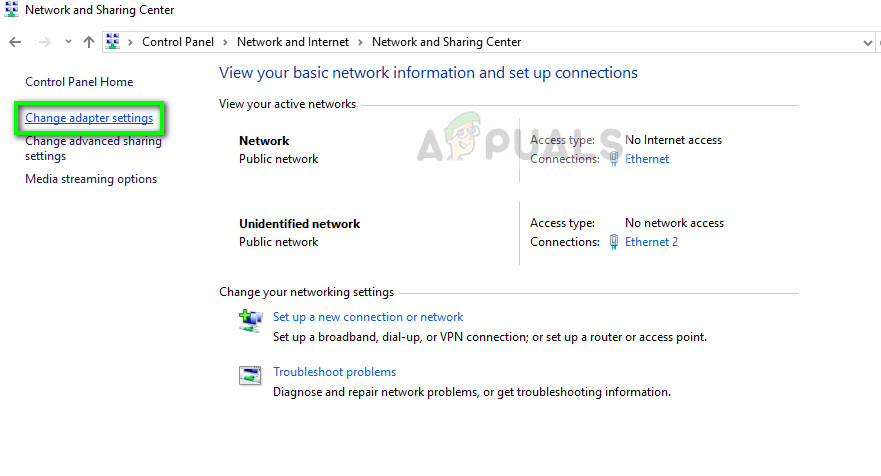
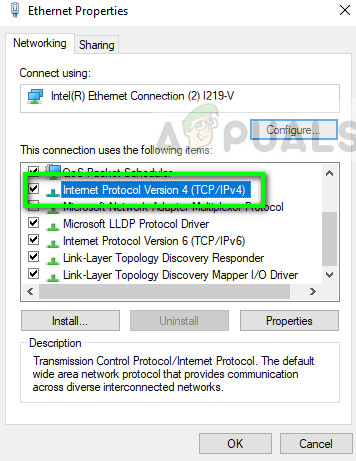
- Now right-click on the adapter which is the medium of your connection and select Properties.

- Double Click on the option of Internet Protocol Version 4 (TCP/IPv4) to open its properties.
- Select the options Obtain an IP address automatically and Obtain DNS server address automatically.
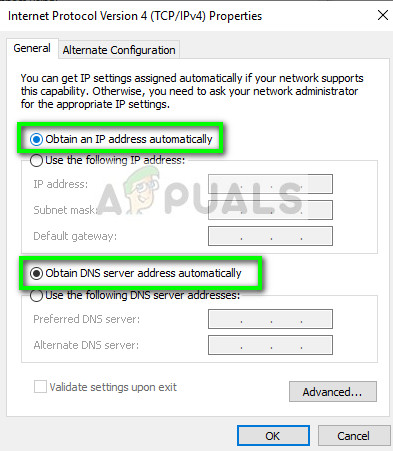
- Press OK to save changes and exit. Restart your computer and after reconnecting to your network, check if the issue is resolved.
Solution 2: Enabling DHCP Client Service
Like mentioned in the introduction, the DHCP client helps the computer register IP addresses and also update the DNS records on your computer. If the very DHCP client is not working on your computer, you cannot expect smooth operation of DHCP on your computer over the network. We will make sure that the client service is up and running properly.
- Press Windows + R, type “services.msc” in the dialogue box and press Enter.
- Once in the services, locate the entry of DHCP client. Make sure that it is running and the startup type is set as Automatic.
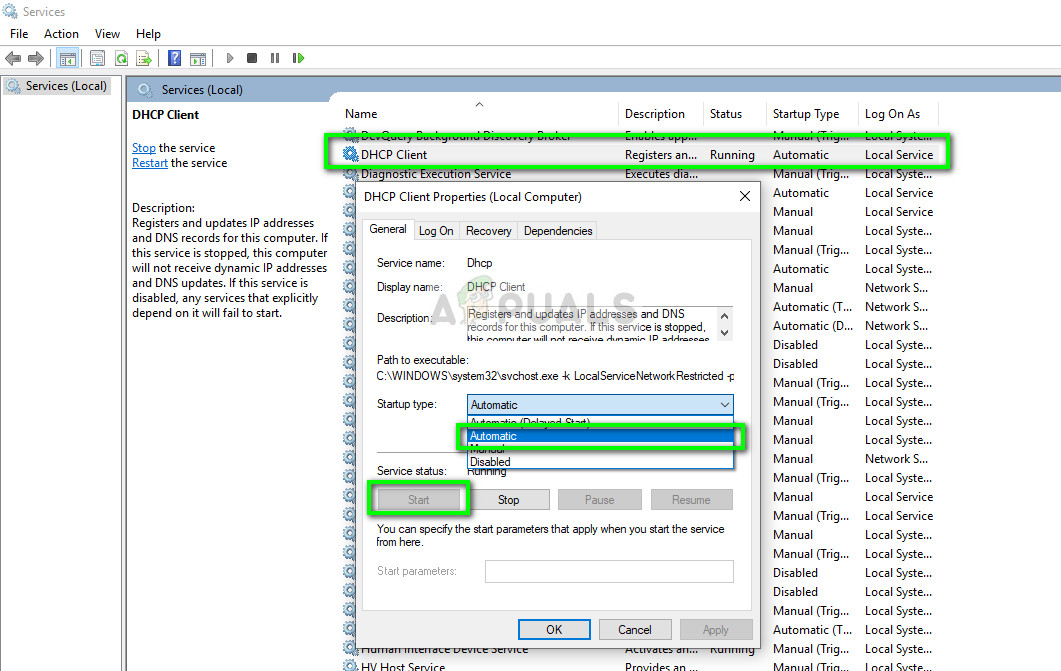
- Press Apply to save changes and exit. Now reconnect to your network and see if you still get connection problems.
Solution 3: Resetting Network configurations
If both the above methods don’t work, you can manually try to reset your network configurations on your computer. We will flush your IP address and after reinitializing all the parameters, request an IP again from the DHCP server properly. Make sure that you are logged in as an administrator before following this solution.
- Press Windows + R, type “command prompt” in the dialogue box, right-click on the application and select “Run as administrator”.
- Once in elevated command prompt, execute the following commands one by one:
ipconfig /flushdns

ipconfig /renew

- Restart your computer completely after resetting your network and check if the issue is resolved.
Solution 4: Resetting Router
If you are using a home network with your router acting as your DHCP server, there are chances that your router might be acting out or maybe in an error state. This happens every once in a while and when it does, a simple power cycle usually fixes things. We will try to power cycle both your computer and router just to be sure.
- Turn off the router and your computer. Take out their main power supply and wait for around 10 minutes.
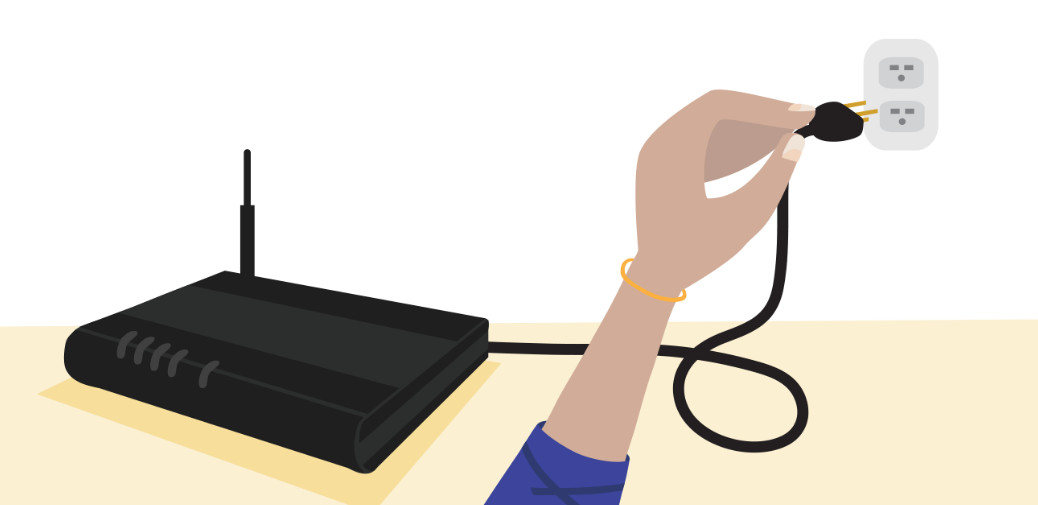
- After the time has passed, plug the power supply back in and turn on both devices. Wait for an additional ~4 minutes before attempting to connect to the network. Check if the issue is solved.
If you still don’t get the issue resolved, you can refer to the following tips:
- Make sure that Windows is updated to the latest version.
- If you are in an organization, it is best to consult your IT administrator since the DHCP server is not a router and there may be other implications as well.
- Update your network drivers after uninstalling them from the device manager.
- Roll back windows to a restore point after backing up your data if this issue occurred after an update.


thanks a lot.