Fix: File Explorer Not Opening on Windows 10
Windows 10, like all other versions of the Windows Operating System, has its fair share of different bugs and issues, some of which affect users more than others. One specific Windows 10 bug that has managed to agitate the living hell out of Windows 10 users who have had the displeasure of being met with it is a bug that causes the File Explorer in Windows 10 to simply refuse to open regardless of what method you use to try and open it. In such cases, whether the user double-clicked on a folder on their Desktop or tried to launch the File Explorer by opening it directly, File Explorer would not launch.
In some – but not all – cases, when the user opened File Explorer, their screen would go black for about a second but would then return to its original state with no other change being observed and File Explorer still not opening. Users who suffered from this issue reported that they were unsuccessful at fixing it by simply restarting their computers. A bit of research into this problem at the hands of mundane Windows 10 users uncovered the fact that this issue is actually caused by the size of text, apps and other items being set to a value that Windows 10’s File Explorer could not possibly handle, leading to it refusing to even open successfully. There may be other reasons for this issue so you should follow everything in the sequence below.
Tips
If you have an HDMI cable plugged in then unplug the cable and check if the issue is resolved.
Thankfully, the solution to this issue is just as simple as its cause – all a person needs to do is revert the value for the size of text, apps and other items in their computer’s Display settings to a smaller value, a value that File Explorer can easily process and deal with. To do so, you need to:
- Right-click on an empty space on your Desktop.
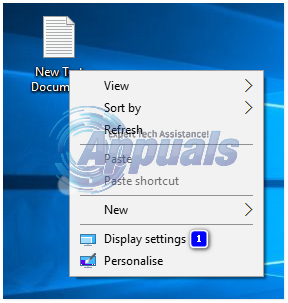
- Click on Display settings in the contextual menu.
- Make sure that you are in the Display tab in the left pane of the resulting window.
- Using the slider, change the size of text, apps, and other items to 125% and test, and if that doesn’t work, then 150% and test.
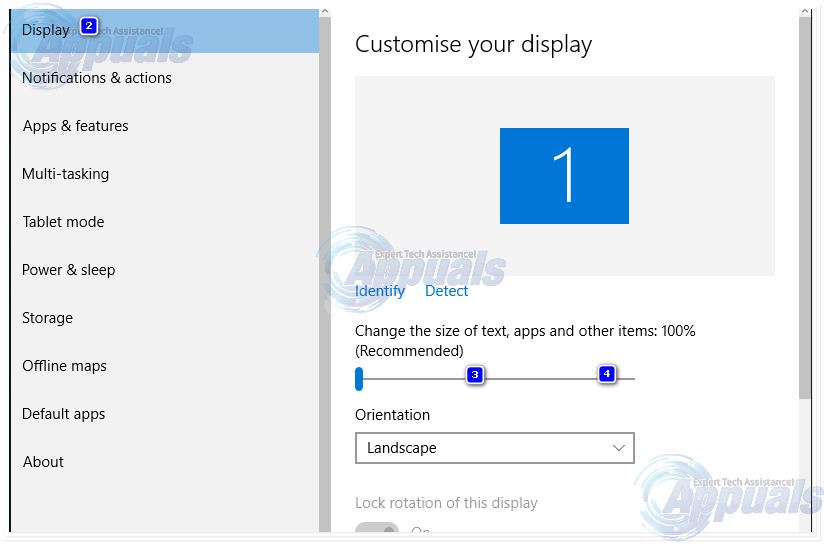
- Click on Apply.
Either restart your computer or sign out of and then back in to your computer. Once you do so, File Explorer should start opening successfully and the way it is meant to.
Method 1: Change the display settings
Sometimes, the issue may be caused due to incompatible display settings. Changing the settings or restoring them to the default settings might solve the issue for you.
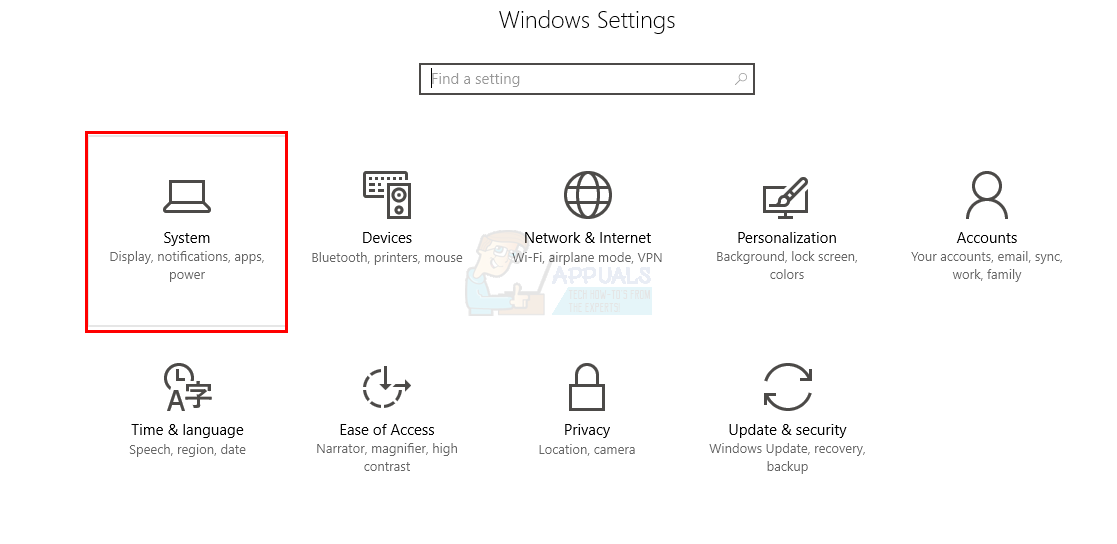
- Press Windows key once
- Select Settings from the start menu
- Click System
- In the System window, select the Display tab in the left hand pane (if it isn’t already).
- In the display tab, change the size of your text using the bar on the right pane. This should be the bar under the Change the size of text, apps, and other items: 100% (Recommended) You can choose any percentage except for the 175%. Setting the bar to 175% is known to cause the issue.
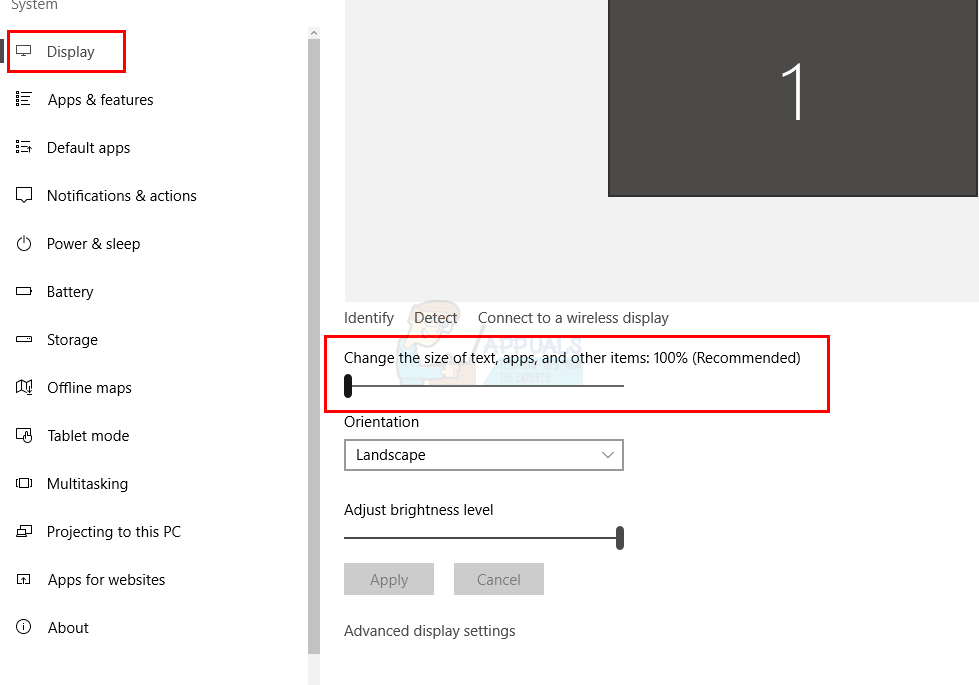
After selecting the font size, click Ok and check if the error persists.
Method 2: Close Programs like Anti-viruses
If you are using the AVG anti-virus then it may be the cause of this error. In which case, you just have to use your task manager to close the program. Once closed, the file explorer will start working properly. To close your AVG anti-virus, do the following:
- Press CTRL, SHIFT and ESC key simultaneously (CTRL + SHIFT + ESC).
- This should open the Task Manager.
- In the Task manager, click the Processes
- The Processes tab has a number of columns, look at the Description column and find the process that is related to the AVG anti-virus. It should have a name AVG or something related to AVG.
- Select the anti-virus process from the list and click End Process (bottom right corner).
- Click Yes when prompted for confirmation.
Once done check if the problem is solved or not. If you are still experiencing the problem then make sure there aren’t any other security related programs running in the background. There might be programs other than the security programs that might be causing this issue. Try to turn off as many applications as you can to see if the problem is solved.
Method 3: Restart the File Explorer
Some of the technical problems can be solved by a simple restart, so why not do the same for the file explorer? It does tend to solve the problem from time to time; to do so, follow these steps:
- Press CTRL, SHIFT and ESC key simultaneously (CTRL + SHIFT + ESC).
- This should open the Task Manager.
- In the Task manager, click the Processes
- Locate and select the Windows Explorer.
- Click the Restart bottom at the bottom right corner.
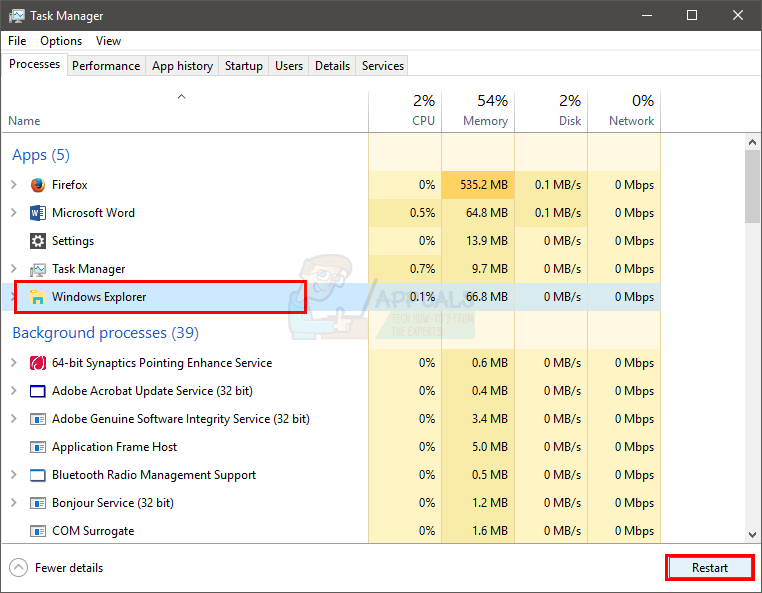
This will restart the file explorer and that will be the end of the problem.
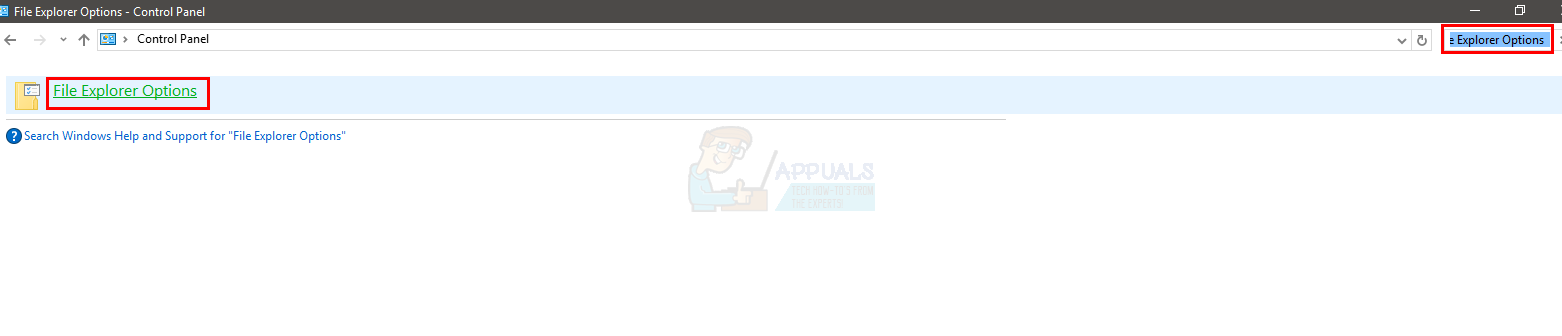
Method 4: Change File Explorer Options
Changing the File Explorer’s “Open File Explorer To:” option has helped solve the issue for a lot of users. The problems seems to appear if this option isn’t set to “This PC” option. Follow the steps given below to change this setting.
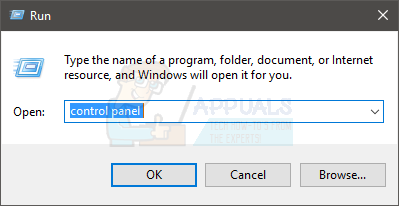
- Press and Hold Windows key and press R
- Type control panel and press Enter or click Ok

- Type File Explorer Options in the search bar
- Select File Explorer Options
- This will open the Folder Options
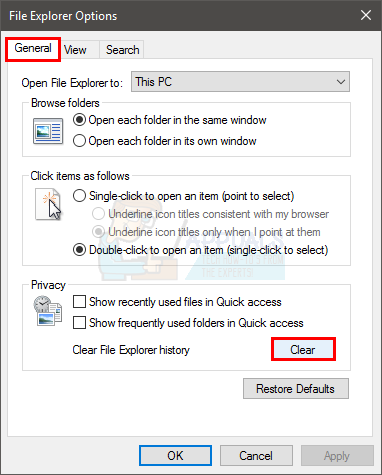
- Select the General tab if it isn’t already
- Select This PC from the drop down menu in Open File Explorer To:
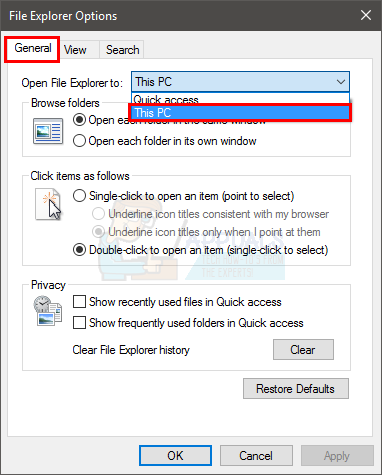
Once done, click Ok and the problem should be resolved.
Method 5: Clear the Cache & Create New Path
Clearing the cache or history of the Windows Explorer and creating a new path has solved the issue for a lot of users. So, here are the steps for clearing cache and creating a new path.
- In the toolbar, right click the File Explorer icon and select Unpin from toolbar.
- Press and Hold Windows key and press R
- Type control panel and press Enter or click Ok
- Type File Explorer Options in the search bar
- Select File Explorer Options

- This will open the Folder Options
- Select the General tab if it isn’t already
- In the General tab, click the Clear button in the Privacy section.
- Now, close the Windows Explorer by clicking the X at the top right corner of the window
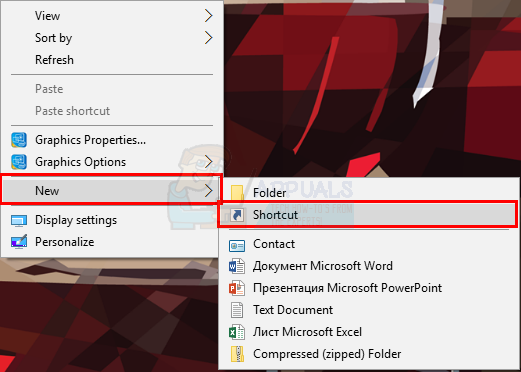
- Right click on the Desktop at any empty space.
- Click New and then click Shortcut.
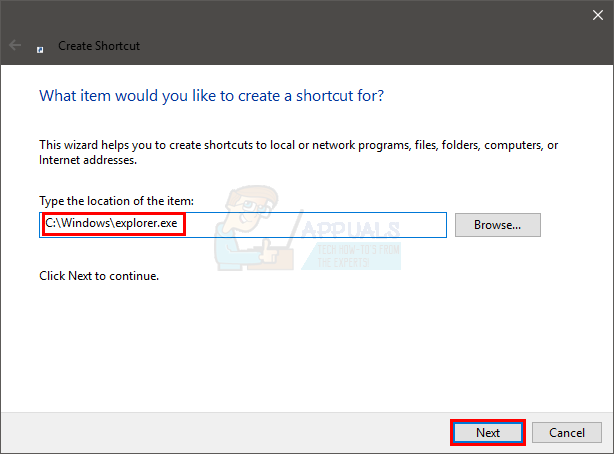
- This will open the Create new shortcut
- In the dialog box, type C:\Windows\explorer.exe and click Next.
- Rename this file to File Explorer and click Finish.
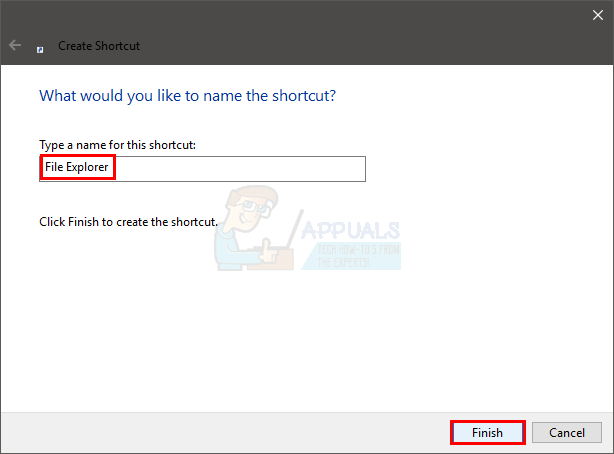
- The shortcut will be created on the desktop.
- Right click this shortcut and select Pin to taskbar.
Concluding this, your cache history will have been cleared and a new path will have been setup. This should fix the issue for you.
Method 6: Disable Windows Search
Windows Search is also known to be the cause of this issue. Disabling the Windows Search has worked for plenty of users, so this is what we will try here.
- Press Windows key once
- Type command prompt in the Start Search box
- Right click the Command Prompt from the search results and select Run as administrator.
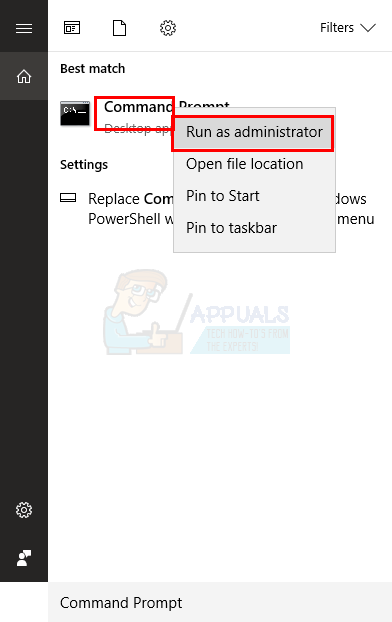
- When prompted for confirmation, click Yes.
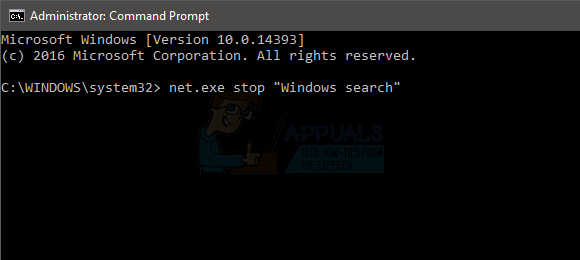
- Type exe stop “Windows search” in the Command Prompt and press Enter. Make sure it is written exactly as mentioned, with the spaces, capital letters and the quotations.
You can also permanently stop Windows Search. To stop it, do the following:
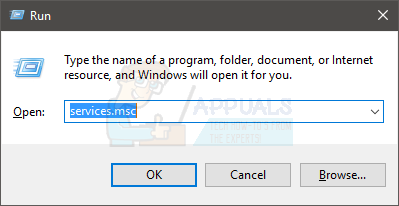
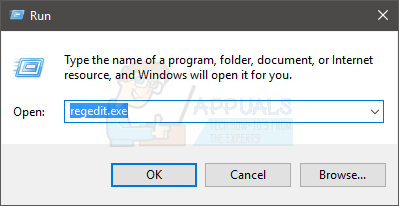
- Open the Run dialog box by pressing Windows + R
- Type services.msc and press Enter or click Ok.
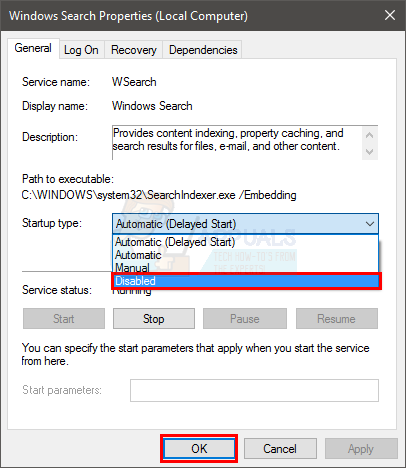
- In the services window, locate the Windows Search service in the right hand pane.
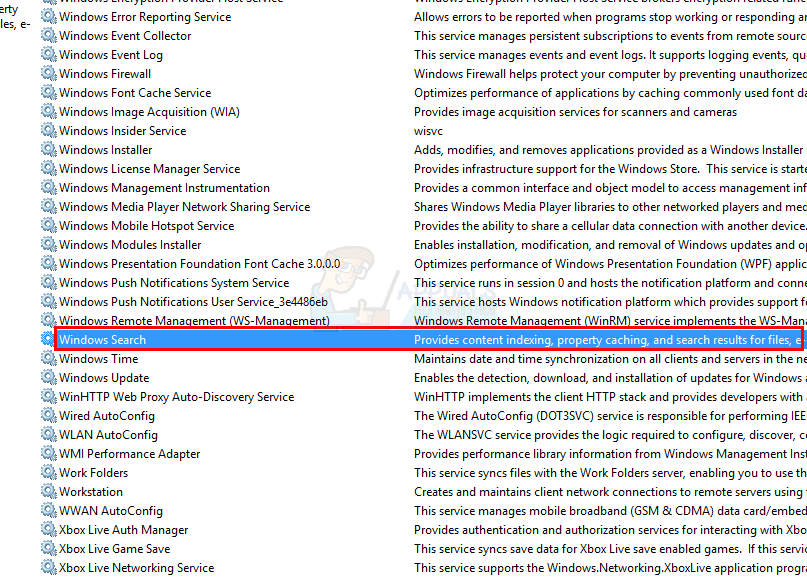
- Double click the Windows Search service to open its Properties windows.
- In the Windows Search Properties window, change the Startup Type to Disabled using the drop down menu.
- Then click Ok at the bottom.
Check if the Windows Explorer has started working again or not.
Method 7: Delete BagMRU and Bags folders
Deleting the BagMRU and Bags folders from the Registry Editor has helped solved the issue for a ton of users. Here is how to do it.
Note: Changing or deleting the wrong Registry keys can cause serious problems for your computer. So, it is advised to back up the keys before doing any changes.
Here are the steps for backing up the Registry keys.
- Open the Run dialog box by pressing Windows + R
- Type regedit in the box and press Enter or click ok.
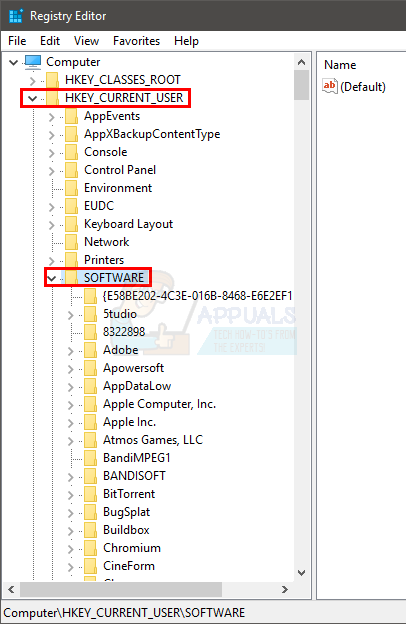
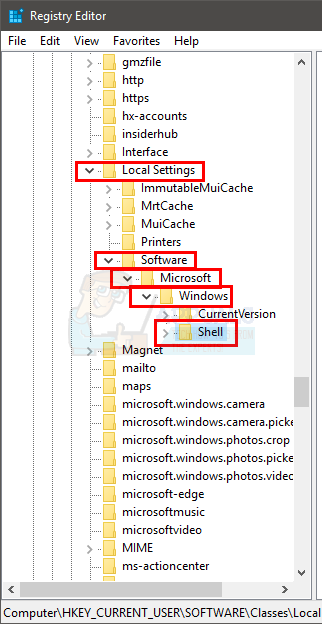
- Now, navigate to this address HKEY_CURRENT_USER\SOFTWARE\Classes\Local Settings\Software\Microsoft\Windows\Shell. If you don’t know how to navigate to this path then follow the steps given below
- Locate and double click HKEY_CURRENT_USER from the left pane
- Locate and double click SOFTWARE from the left pane
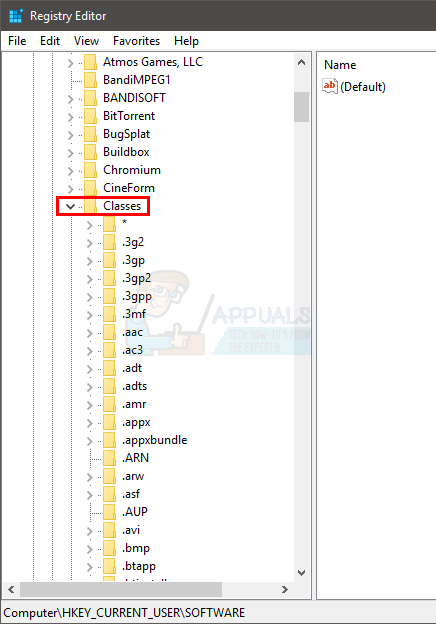
- Locate and double click Classes from the left pane
- Locate and double click Local Settings from the left pane
- Locate and double click Software from the left pane
- Locate and double click Microsoft from the left pane
- Locate and double click Windows from the left pane
- Locate and single click Shell from the left pane
- Click File at the top.
- Then click Export and select the location on your system where you wish to backup this registry file.
- Assign an identifiable name to the backup and click Save to create the backup.
If you have made a mistake and you wish to recover an existing registry backup, you can do that easily by doing this:
- Open the Run dialog box by pressing Windows + R
- Type regedit.exe in the box and press Enter or click ok.
- In the registry editor, click File from the toolbar and then click
- Go to the location where you have stored the backup file, left click the file and then click Open or simply double click the file.
Now, here are the steps for deleting the BagMRU and Bags folders
- Open the Run dialog box by pressing Windows + R
- Type regedit.exe in the box and press Enter or click ok.
- Now, navigate to this address HKEY_CURRENT_USER\SOFTWARE\Classes\Local Settings\Software\Microsoft\Windows\Shell. If you don’t know how to navigate to this path then follow the steps given below
- Locate and double click HKEY_CURRENT_USER from the left pane
- Locate and double click SOFTWARE from the left pane
- Locate and double click Classes from the left pane
- Locate and double click Local Settings from the left pane
- Locate and double click Software from the left pane
- Locate and double click Microsoft from the left pane
- Locate and double click Windows from the left pane
- Locate and double click Shell from the left pane
- Right click the BagMRU folder (from the left pane under Shell) and select Delete. Confirm any additional prompts
- Right click the Bags folder (from the left pane under Shell) and select Delete. Confirm any additional prompts
Close the Registry editor and try to open the Windows Explorer. It should work fine now.
Method 8: Change Display Settings to Single Screen
If the problem started happening after the Windows update/upgrade then this method might work for you. For a lot of users, Windows automatically changed the display settings to multiple displays. For those users, the File Explorer was opening but on the second “imaginary” screen that was nowhere to be found. So, simply changing the settings back to a single display will solve the issue.
Follow the steps given below to change these settings
- Press Windows key once
- Select Settings
- Select System
- Make sure the Display tab is select on the left pane
- Select Show only on 1 from the drop down menu in Multiple Display section
That’s it. Now your Windows Explorer should work just fine.
That didn’t work. Changed my display and restarted PC. File explorer still doesn’t work. It used to and now it doesn’t. Something stuffed it up but it wasn’t the display settings.