How to Fix ‘System Error 67 Has Occurred’?
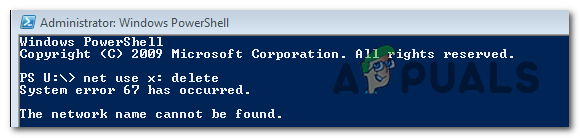
The ‘System Error 67 has Occurred‘ issue is encountered when Windows users attempt to run a Network Discover scan or when trying to map a network drive from CMD or Powershell.
As it turns out, one of the most common causes that will end up triggering this error is an incorrect Syntax. Some users end up using backslashes instead of forwarding slashes, which forces the terminal to look at it as an option supply.
However, a glitched driver can also cause this error. Especially in case you’re using an old driver version that is dated immediately after Windows 10 initially launched. Other potential causes include an enabled ‘Hardened UNC Paths’ policy or an improperly configured IP NAT.
Solution 1: Using the correct syntax (if applicable)
Before trying out any other fix, you should start by ensuring that the syntax that you’re inputting is correct.
In case you want to map a network drive using ‘net use * //*IP Address*’, you see this error message due to the fact that you use forward slashes instead of backslashes. This is is a fairly common mistake that a lot of affected users end up making.
In case you end up using forward slashes, the terminal will think you are supplying an option instead.
The correct syntax in this case is:
net use * \\*IP Address*\sharenameNote: Keep in mind that *IP Address* is simply a placeholder. Replace it with your own address that you’re trying to map.
In case this method wasn’t applicable to your particular scenario or you are already using the correct syntax, move down to the next potential fix below.
Solution 2: Updating the Network driver
As it turns out, one of the most common causes that will end up triggering the’System Error 67 has Occurred‘ error is a glitched Network driver that is stuck between states. In most cases, this issue is facilitated with some kind of bug.
Situations like this one used to be frequent in the initial years after the launch of Windows 10, but now most manufacturers have released revised network versions that will no longer cause this problem. To take advantage of the hotfix, you will need to update your network driver to the latest version available.
Here’s a quick guide on how to update your Network driver via Device Manager:
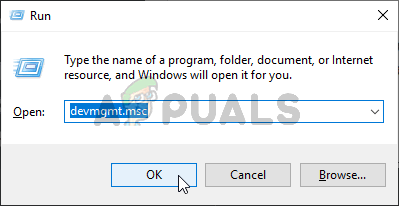
- Press Windows key + R to open up a Run dialog box. Next, type ‘devmgmt.msc’ inside the text box, then press Enter to open up Device Manager. When prompted by the User Account Control (UAC), click Yes to grant administrative privileges.
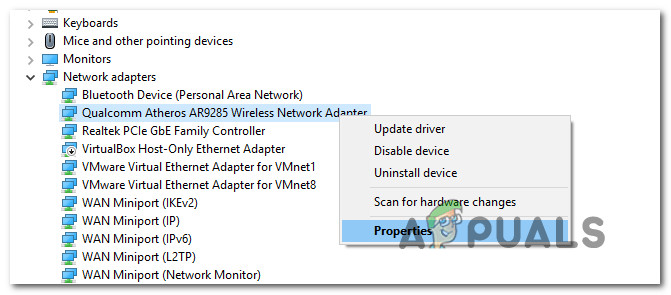
Running the Device Manager - Once you manage to get inside Device Manager, scroll down through the list of installed devices and locate the Network adapters section. When you see the correct section, expand the drop-down menu associated with Network adapters, then right-click on your network driver and choose Properties from the context menu.
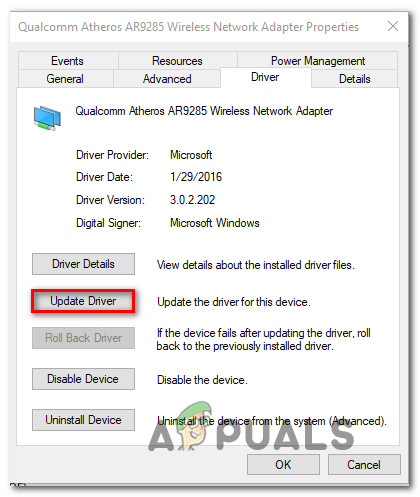
Accessing the Properties screen of the Network Adapter - Once you’re inside the properties screen of your Network adapter, select the Driver tab from the list at the top, then click on Update driver from the list of available options.
Updating the Wireless Network Adapter driver - Once you get to the next screen, click on the button associated with Search automatically for updated driver software.
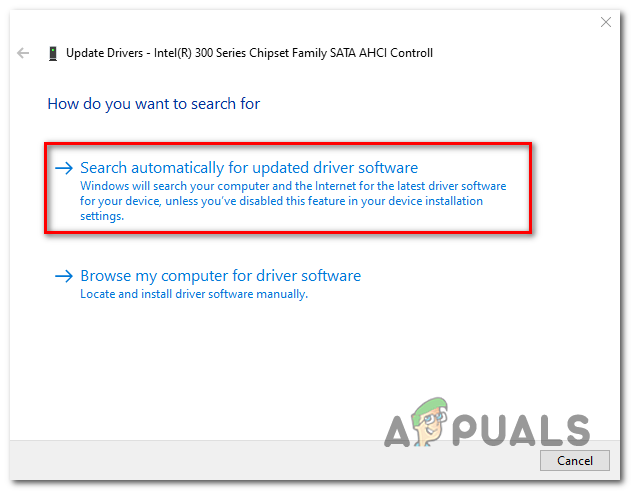
Searching automatically for newer driver software - Wait to see if a new version of the same driver is discovered. If it is, follow the on-screen prompts to install the newest driver version.
- Once the operation is complete, restart your computer and see if the problem is resolved at the next startup sequence.
Solution 3: Enable ‘Hardened UNC Paths’ via Gpedit.msc
Another common cause that will cause the ‘System Error 67 has Occurred‘ issue and a whole host of other problems on a shared network is an enabled policy called Hardened UNC Paths. As long as it’s enabled, you might encounter this problem when trying to map your drive via Group Policy on Windows 10.
Several affected users that were also struggling with the same problem have confirmed that they managed to fix the issue by opening the Local Group Policy Editor (Gpedit.msc) and disabling the Hardened UNC Paths policy in order to prevent it from creating additional conflicts.
Here’s what you need to do:
- Press Windows key + R to open up a Run dialog box. Next, type ‘gpedit.msc‘ inside the text box and press Enter to open up the Local Group Policy Editor.

Open gpedit.msc Note: If you are prompted by the User Account Control, click Yes to grant administrative privileges in order to give the program the necessary access.
- Once you’re inside the Local Group Policy Editor, navigate to the following location:
Computer Configuration > Administrative Templates > Network > Network Provider
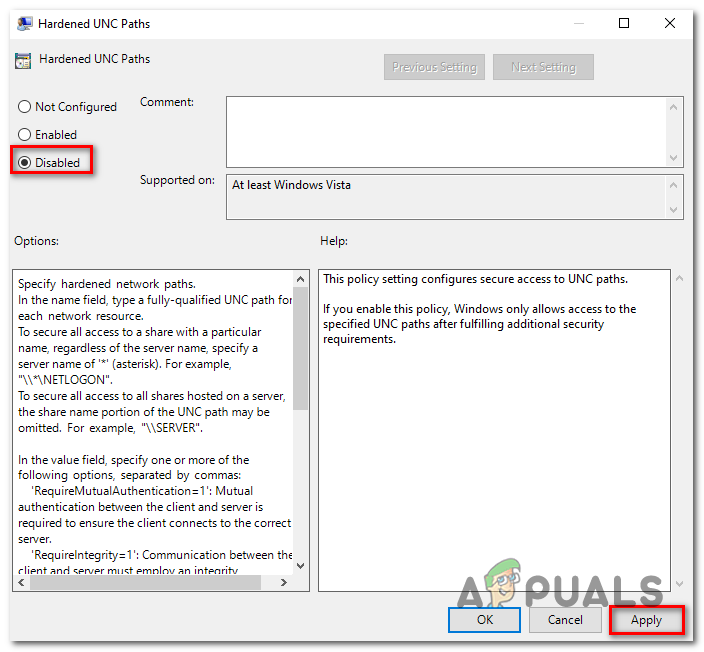
- Once you expand the Network provider folder, move over to the right-hand side of the Gpedit.msc utility and double-click on Hardened UNC Paths.

Accessing the Hardened UNC paths policy - Inside the Hardened UNC Paths windows, change it’s status to Disabled and click Apply to save the changes.
Applying change to the policy - Once the modification has been enforced, restart your computer and see if the problem is resolved at the next system startup.
In case the ‘System Error 67 has Occurred‘ issue is still occurring, move down to the next method below.
Solution 4: Disabling improperly configured IP NAT
Another fairly common problem that will trigger the System Error 67 has Occurred‘ issue is an improperly configured networking device drivers. In most cases, it will occur due to the fact that NAT is installed but it’s not properly configured.
Several affected users have confirmed that they managed to fix this particular issue by using Device Manager to disable the IP NAT driver. This is typically reported to be effective in instances where the user tries to log on to a computer using a domain account and gets the System Error 67 has Occurred‘ error.
Here’s a quick guide on fixing the issue by disabling the improper IP NAT:
- Press Windows key + R to open up a Run dialog box. Next, type ‘devmgmt.msc’ and press Enter to open up Device Manager.
Running the Device Manager - Inside Device Manager, start by clicking on View from the ribbon-menu at the top, then click on Show on hidden devices.
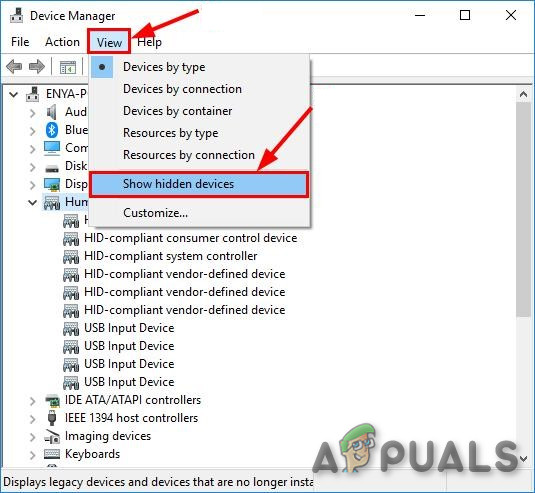
Show Hidden Devices - Once the hidden devices are visible, scroll down the list of installed devices and expand the drop-down menu associated with Non-Plug and Play Drivers.

Expanding the Non-Plug and Play Drivers - Next, from the list of available sub-items, right-click on IP Network Address Translator and choose Disable from the context-menu to ensure that the improperly configured NAT is disabled.
- Once this modification has been enforced, restart your computer and see if the problem is resolved at the next system startup.


