How to Fix a Steam Deck Stuck on the Logo Screen?
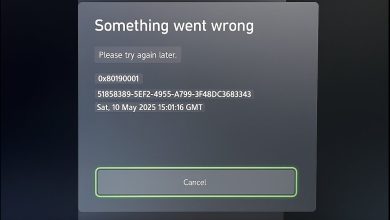
The Steam Deck is an impressive gaming device until it gets stuck on the logo screen and fails to load any games. When this issue arises, the device remains on the logo screen for hours.
The level of panic is indescribable when this happens to your Steam Deck. The device will either continuously display the logo or enter a startup loop. This usually occurs after an update to the system. In some cases, toggling between the modes (game mode and desktop mode) has triggered the issue.
At times, the Steam Deck crashes when installing or playing a certain game or app, and upon restarting, it gets stuck on the logo screen. Additionally, the problem has been known to occur when attempting to dual-boot the device (installing Windows or another OS) on the Steam Deck. Even brand-new, out-of-the-box Steam Decks have exhibited this issue.
1. Connect the Deck to the Internet by Other Means
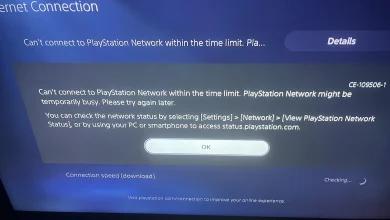
If the Steam Deck is updating but cannot load the Wi-Fi driver after restarting, it will not be able to connect to the Internet, preventing it from progressing past the logo screen, as the OS is in an update phase. In such cases, connecting the Deck to the Internet through alternative means (like USB tethering from a mobile phone) will solve the problem.
Should you have an Ethernet connection available, you can use an Ethernet to USB cable to connect the Steam Deck to the Internet. Below, we will outline the steps to employ USB tethering from an Android phone to connect the Steam Deck to the Internet.
- Using a USB cable, connect your Android phone and Steam Deck. Ensure that mobile data or Wi-Fi is active on the phone.
- On the phone, navigate to Settings > Connections > Mobile Hotspot and Tethering.
- Activate USB Tethering, then wait for 20 minutes to see whether the update completes and the Steam Deck boots properly.
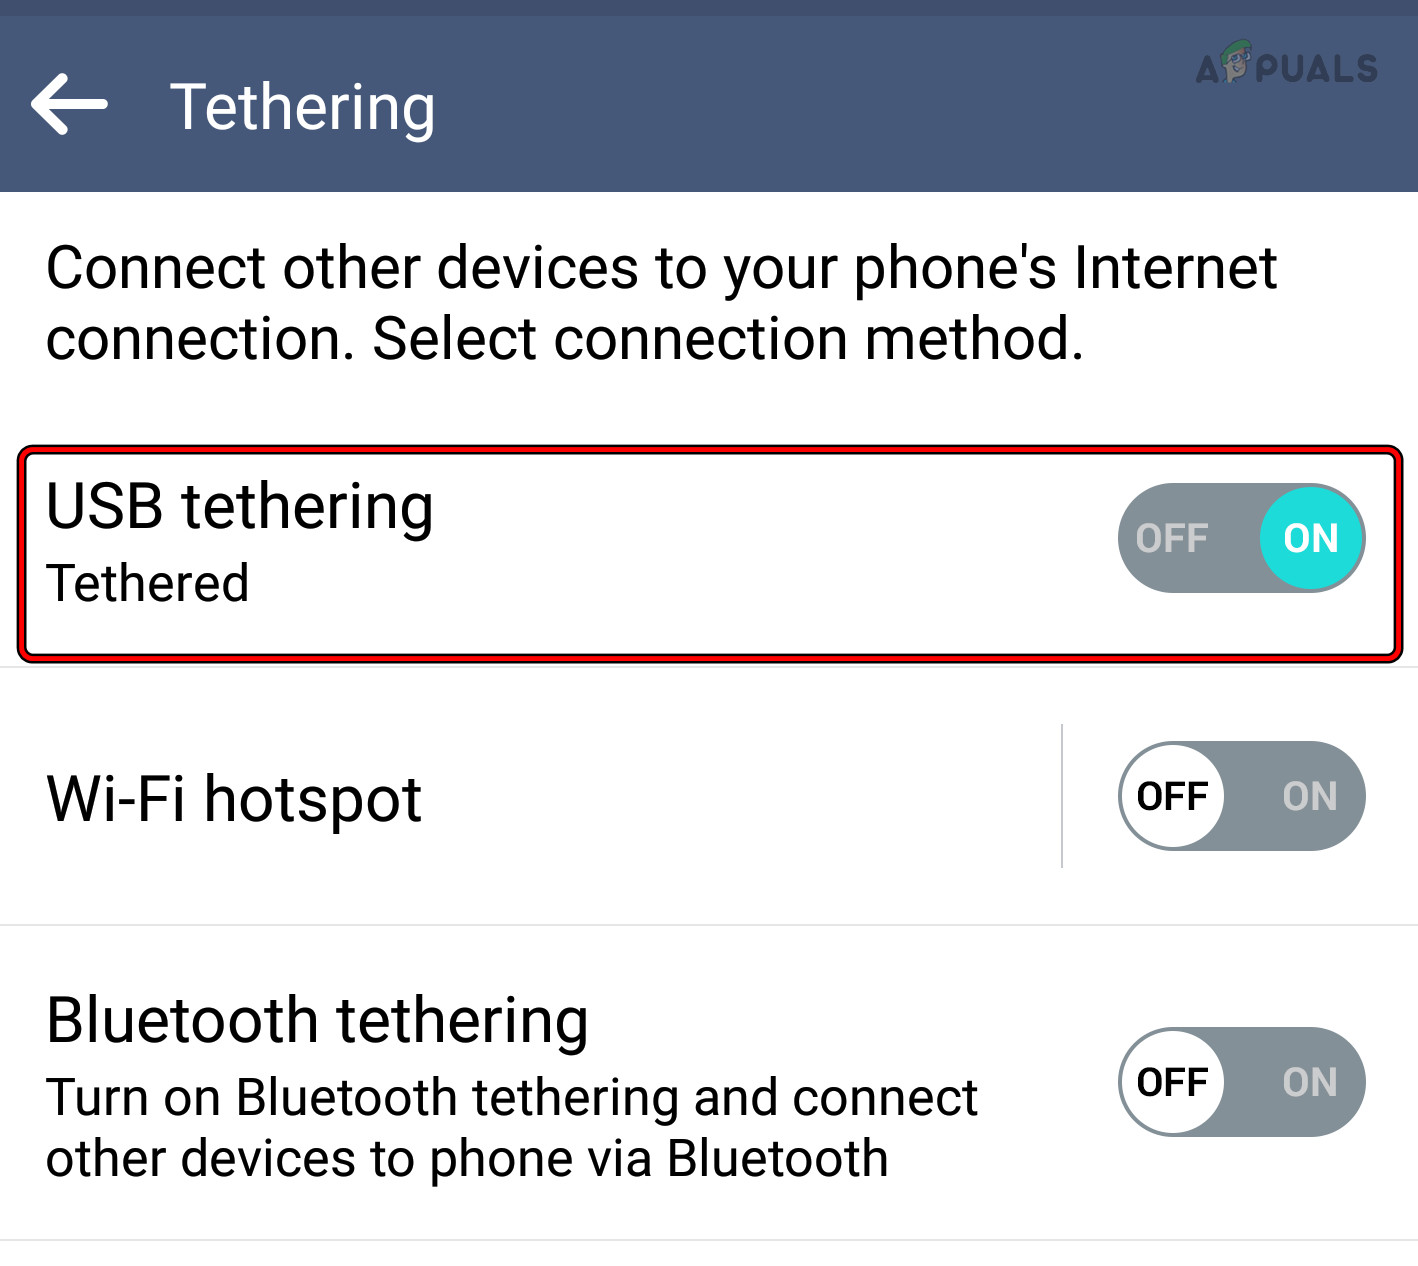
Enable USB Tethering on the Android Phone
2. Try Different Restart Methods
Since the Steam Deck is stuck on the logo screen, we can try various restart methods to get past the logo screen.
Perform a Hard Restart
- Press and hold the Steam Deck’s power button until you either see the deck’s screen turn off or hear a chime sound (this may take around 12 seconds), then release the key. Alternatively, monitor the power LED and release the button when it turns white.
Press the Power Button Till the Power Light Turns on/off - Press the power key once more and check if the Steam Deck boots into the OS.
Hold the Power Button for 3 Chime Sounds
- Press and hold the Steam Deck’s power button.
- Maintain your hold on the button through 3 chimes, and release the button before the chime sounds for the 4th time. If you don’t hear any chimes, watch for three blinks of the power-on light and release the button before the 4th blink occurs.
- If the Steam Deck does not power on by itself, press the power button to see if it boots up correctly.
Power on the Deck While Charging
- Hold the Steam Deck’s power button until it is powered off.
Put the Steam Deck on Charging - Begin charging the Steam Deck, and if it does not boot up automatically, press the power button. Check to see if the issue is resolved.
- If not, disconnect the Steam Deck from the charger and repeat step 1 to turn off the device.
- Continue to hold the power button.
- While holding down the power button, plug and unplug the Steam Deck from the charger multiple times to see if it boots up correctly.
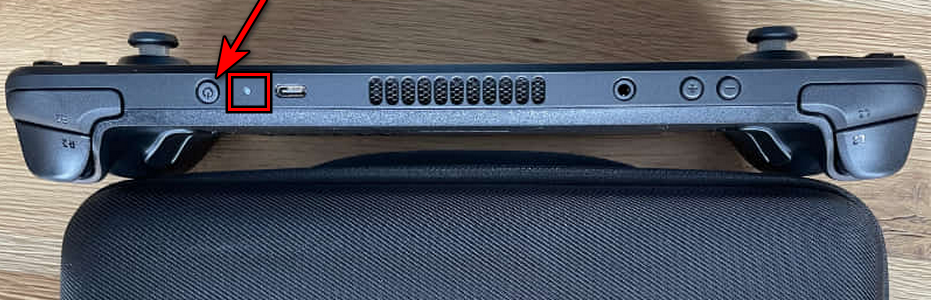
Use the Volume Up and Power Buttons to Power on the Deck
- Simultaneously press and hold the volume up and power buttons.
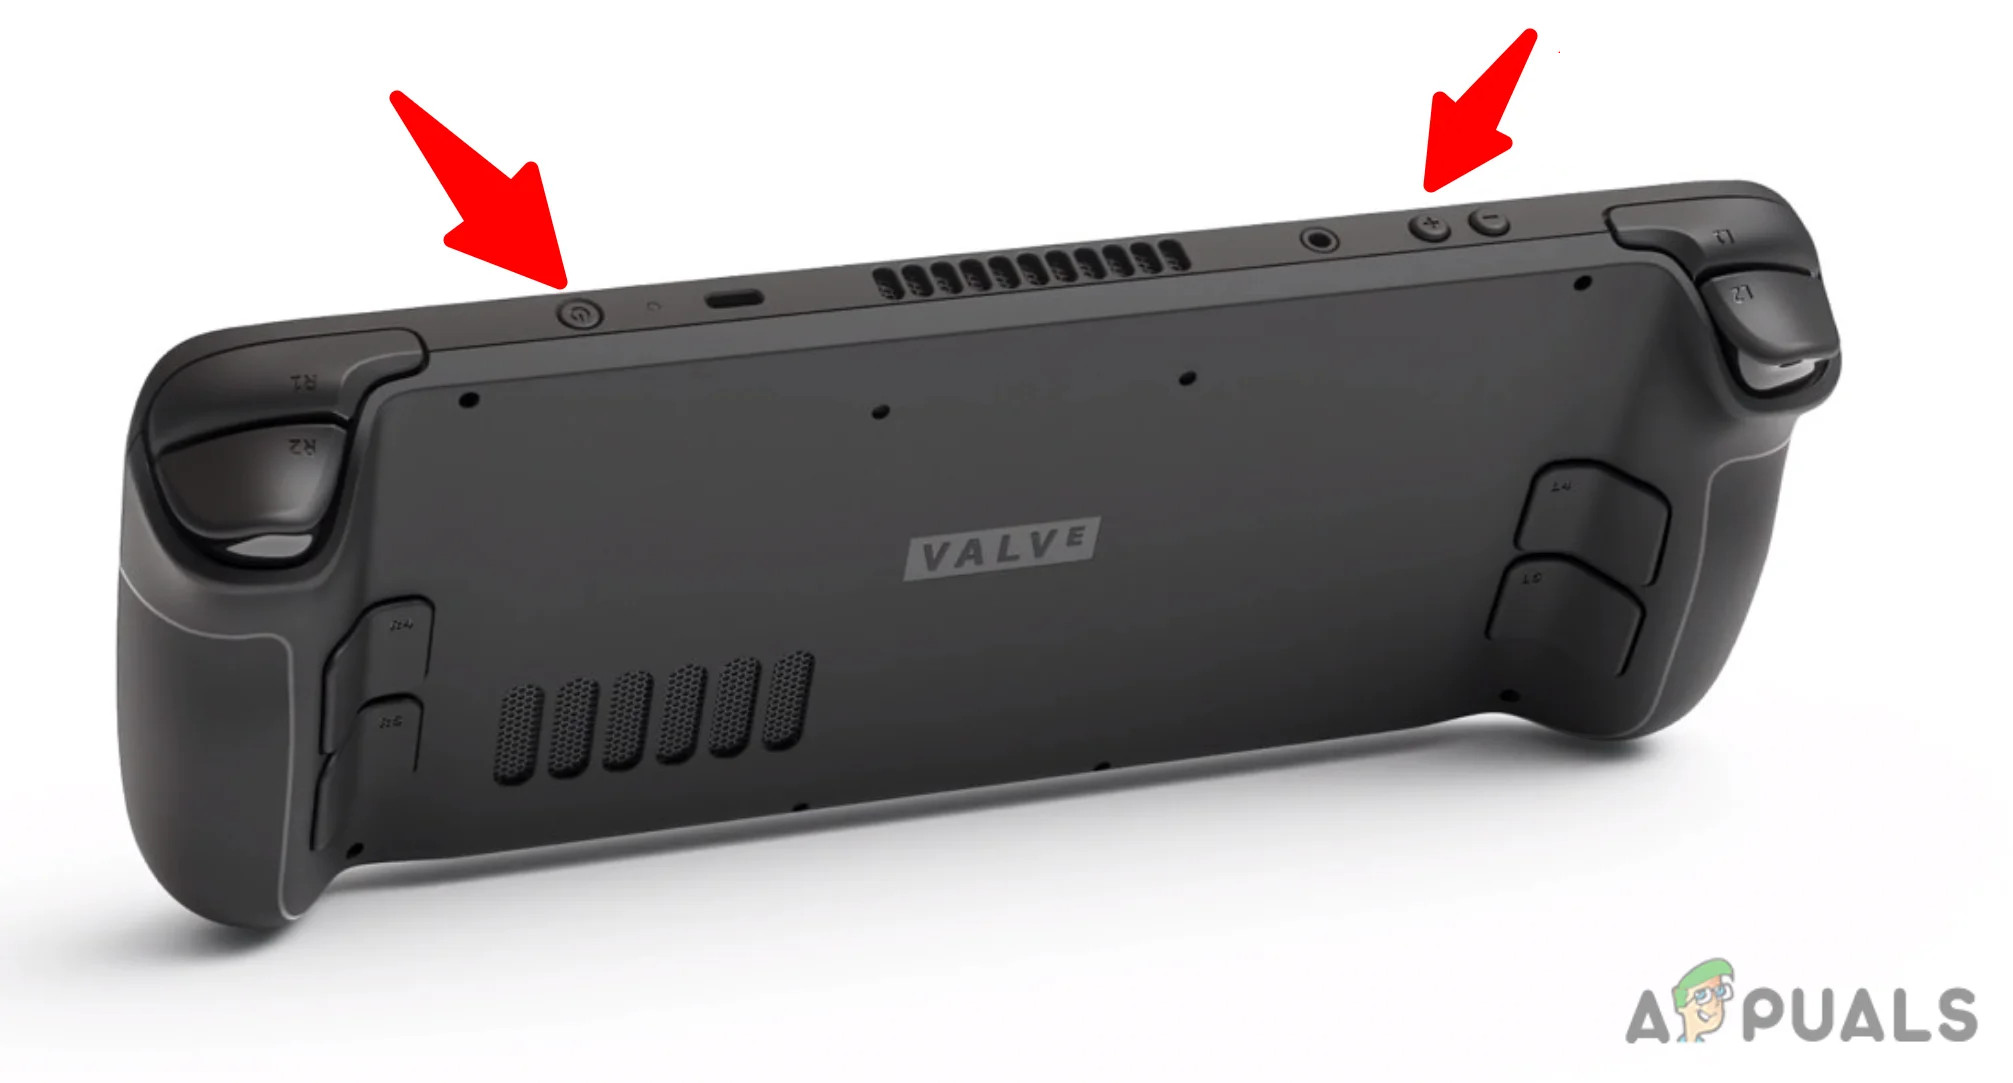
Press the Volume Up and Power Button on the Steam Deck - Wait until the power light blinks three times before releasing the buttons. Check if the Steam Deck has powered on and booted into the OS.
- If not, press and hold the power button until the Steam Deck turns off.
- Connect the Steam Deck to the charger, then immediately press and hold the following buttons:
Vol+

Power
- Continue holding these buttons for 30 seconds. During this process, the Steam Deck will power on and off, and the logo will appear on the screen.
- When the logo shows up for the third time on the screen, release the power button but keep holding the volume up button.
- Once the Steam Deck boots into the OS, release the volume up button to check if the issue is resolved.
Use the Volume Down, Quick Access, and Power Buttons to Boot the Deck
This procedure will reset the APU or graphics driver of the Steam Deck.
- Hold down the power button of the Steam Deck until it turns off.
- Press and hold the following buttons:
Vol-

Quick Access

Power
Press the Quick Access, Volume Down, and Power Buttons on the Steam Deck - Release the power button as soon as you hear the startup chime while continuing to hold the other buttons.
- Once the Steam logo appears, release the other two buttons and wait for a minute. Verify whether the system has reached the OS interface.
Power on the Deck After Completely Discharging Its Battery
- Leave the Steam Deck powered on until its battery completely discharges. If the battery is fully charged, this may take a day or more to occur.
Discharge the Steam Deck’s Battery - Afterward, connect it to a charger and press the power button if it doesn’t turn on automatically. Confirm that the Steam Deck is no longer stuck on the logo screen.
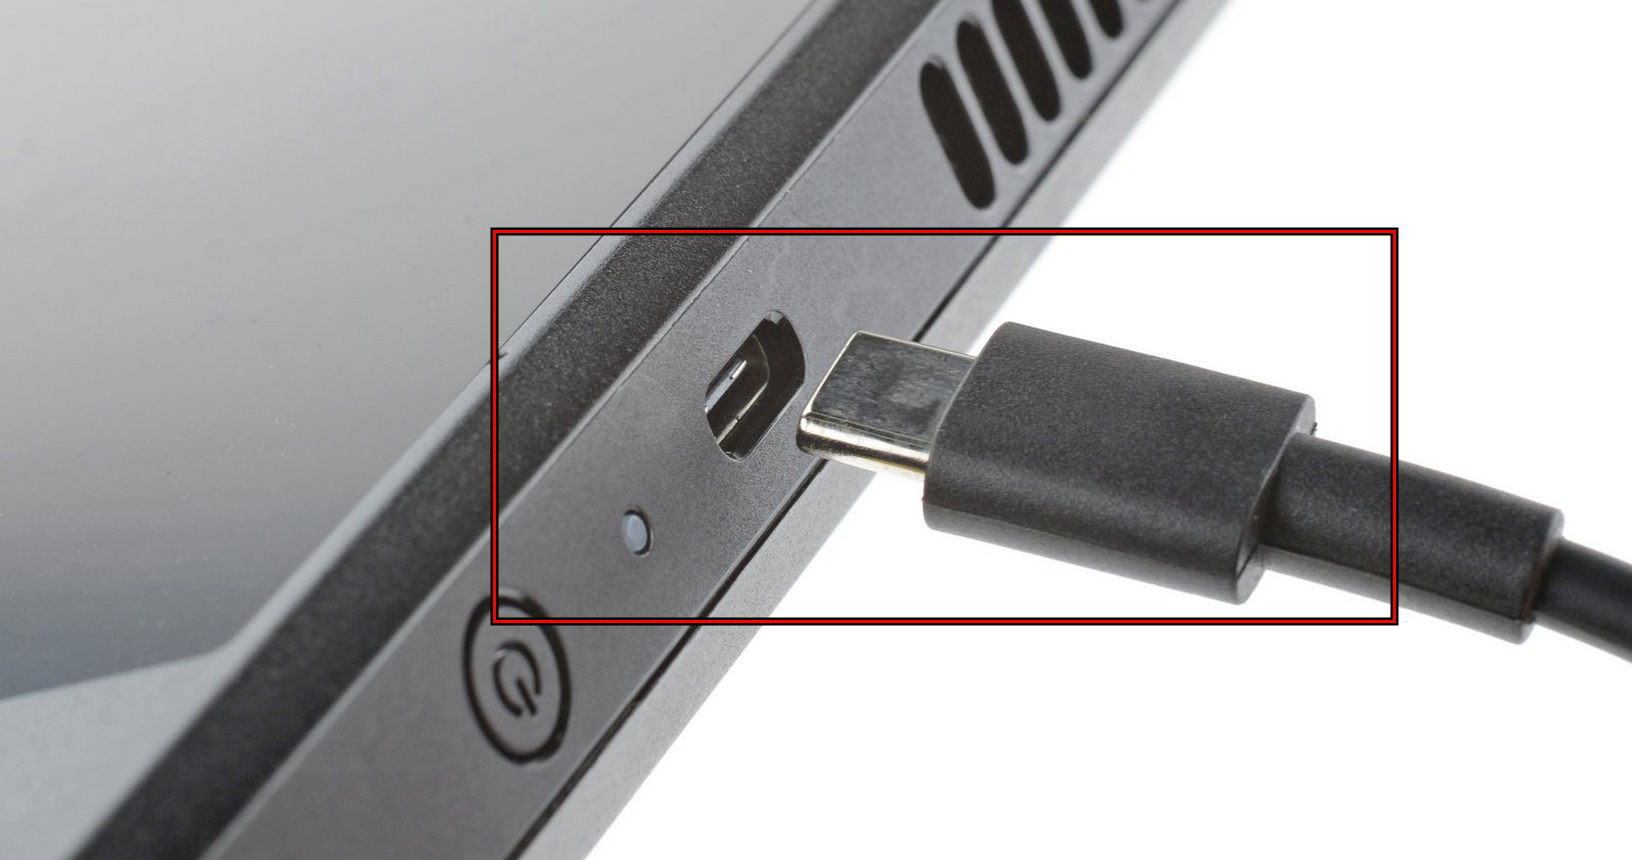
3. Start the Deck After Removing the SD Card
If the SD card content is corrupted or it is causing a short circuit within the Steam Deck, the device may get stuck on the logo screen. Starting the Steam Deck after removing the SD card may solve this issue.
- Press and hold the power button until the Steam Deck turns off.
- Eject the SD card and press the power button for 30 seconds. Check if the Steam Deck boots into the OS.
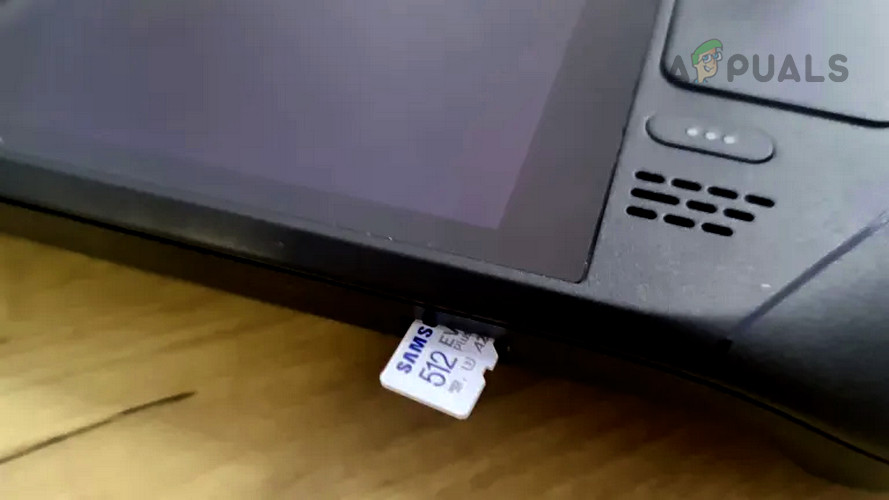
Remove the SD Card from the Steam Deck
4. Boot the Steam Deck After Putting It in Battery Storage Mode
If a hardware component within the Steam Deck is malfunctioning and not interacting properly with the OS, the device may not boot properly and get stuck on the logo screen. Placing the Steam Deck into battery storage mode may resolve this issue as it effectively resets the hardware of the device.
Note: Do not attempt this if your battery level is above 80%.
- Turn off the Steam Deck.
- Simultaneously hold down the power button and the Volume up (+) button.
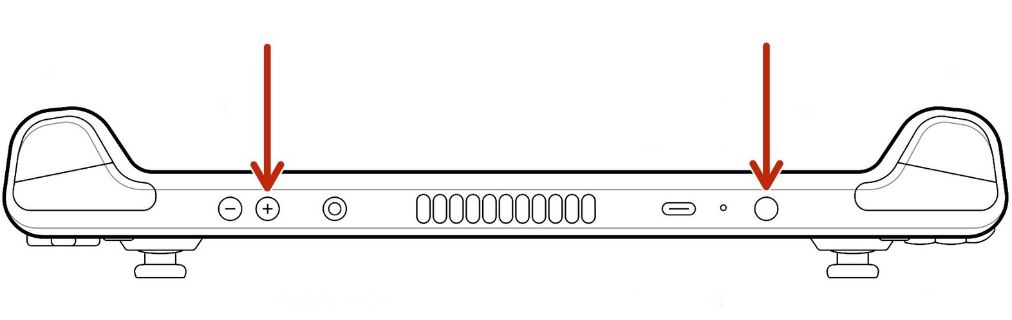
- Release both buttons, and you should now see the Deck’s BIOS menu.
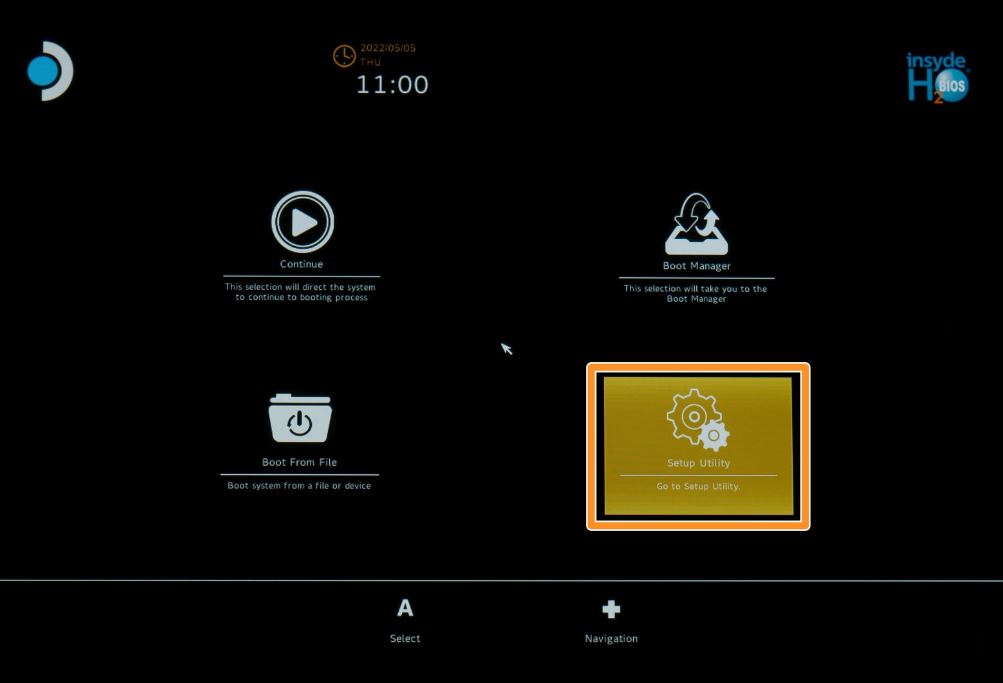
- Navigate to Setup Utility using the D-pad and select it with the A button.
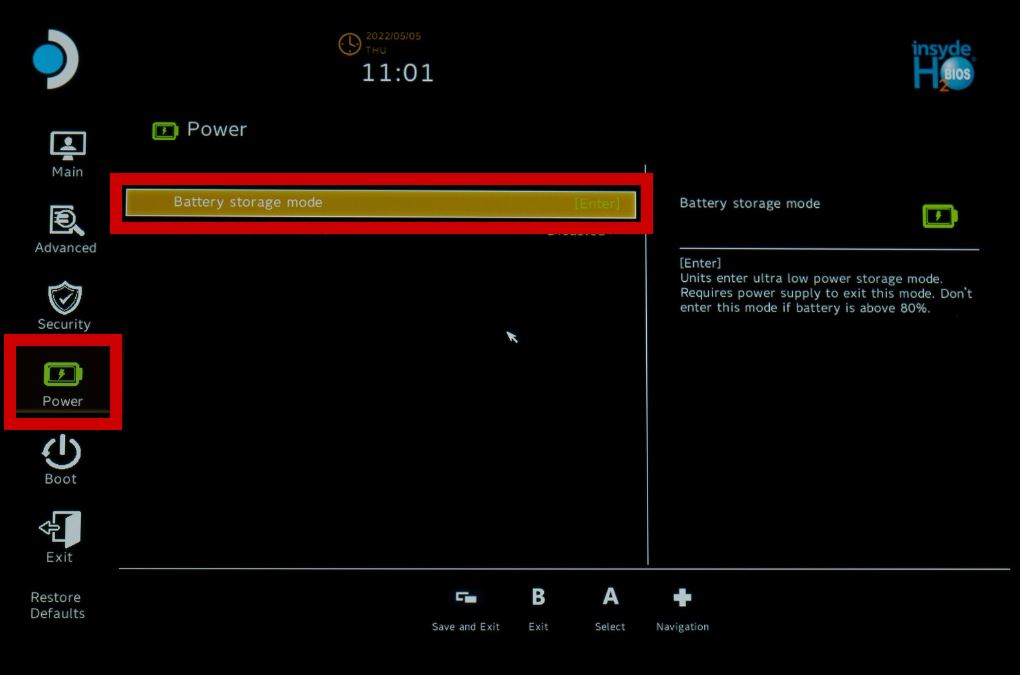
- In the Power menu on the left, select Battery Storage Mode.
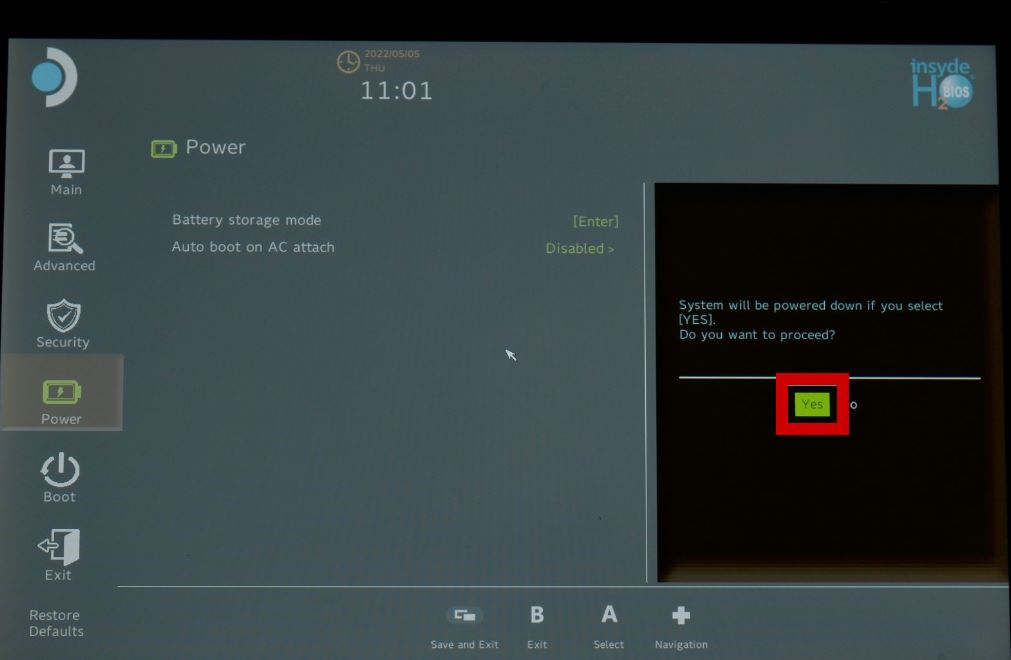
- Confirm by choosing Yes, and the Steam Deck will enter storage mode.
5. Use the BIOS to Select the Boot Drive
When the Steam Deck is not booting as expected, using the BIOS to select the boot drive may enable you to access the OS.
Select the SteamOS Drive
- Press and hold the Steam Deck’s power button until the device powers off.
- Hold down the following buttons:
Volume+

Power
- Access the Boot Device menu and choose the EFI option containing SteamOS in the name. Confirm that the Steam Deck starts correctly.
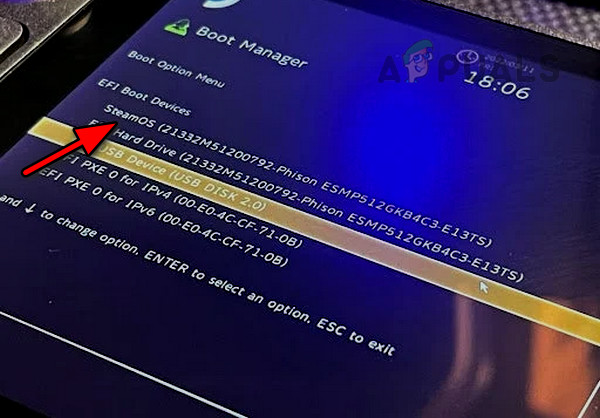
Select the EFI Boot Device with SteamOS on the Steam Deck - If this doesn’t work, boot into the BIOS again and navigate to the Boot Device menu.
- Choose the internal drive that doesn’t list SteamOS in the name to see if the Steam Deck boots up properly.
Use the Last Known Good Configuration from Boot Manager
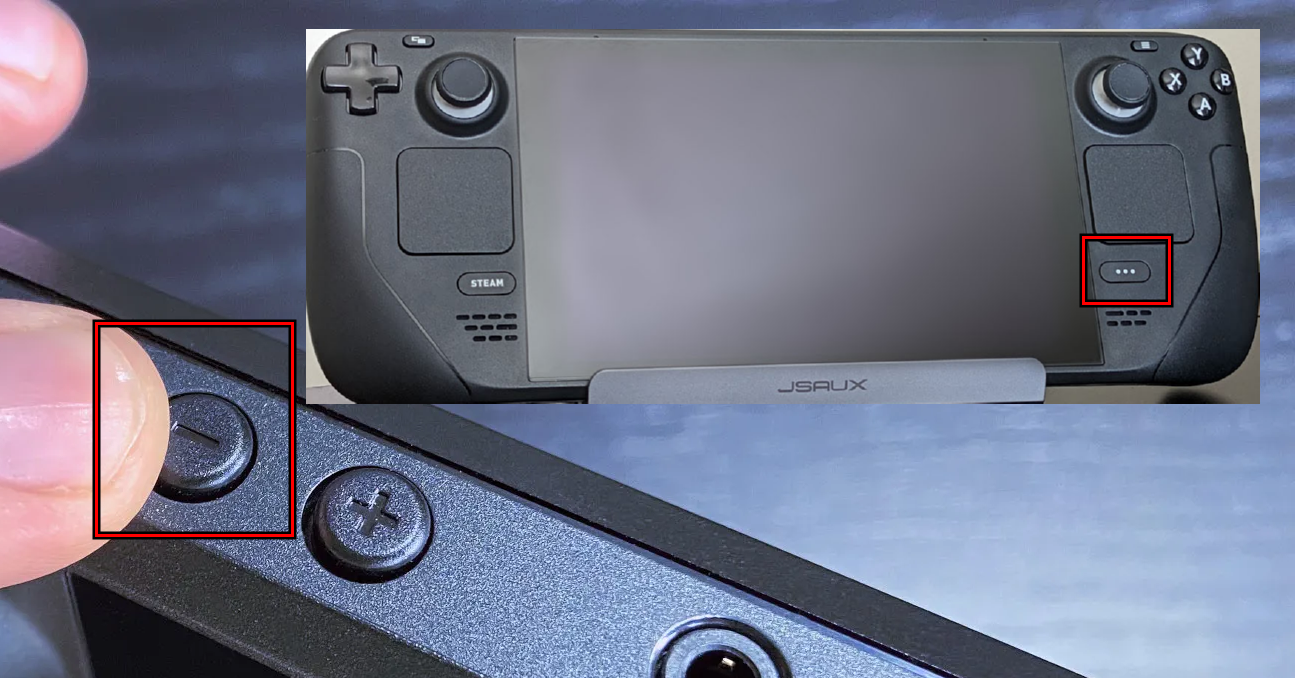
- Turn off the Steam Deck by pressing and holding the power button.
- Hold the Quick Access menu (…) and press the power button once.
- Within the Boot Manager, navigate to SteamOS and press the right arrow on the D-pad.
- You will be presented with Current and Previous options.
- Select Previous and press Enter. Check to see if the issue is resolved.
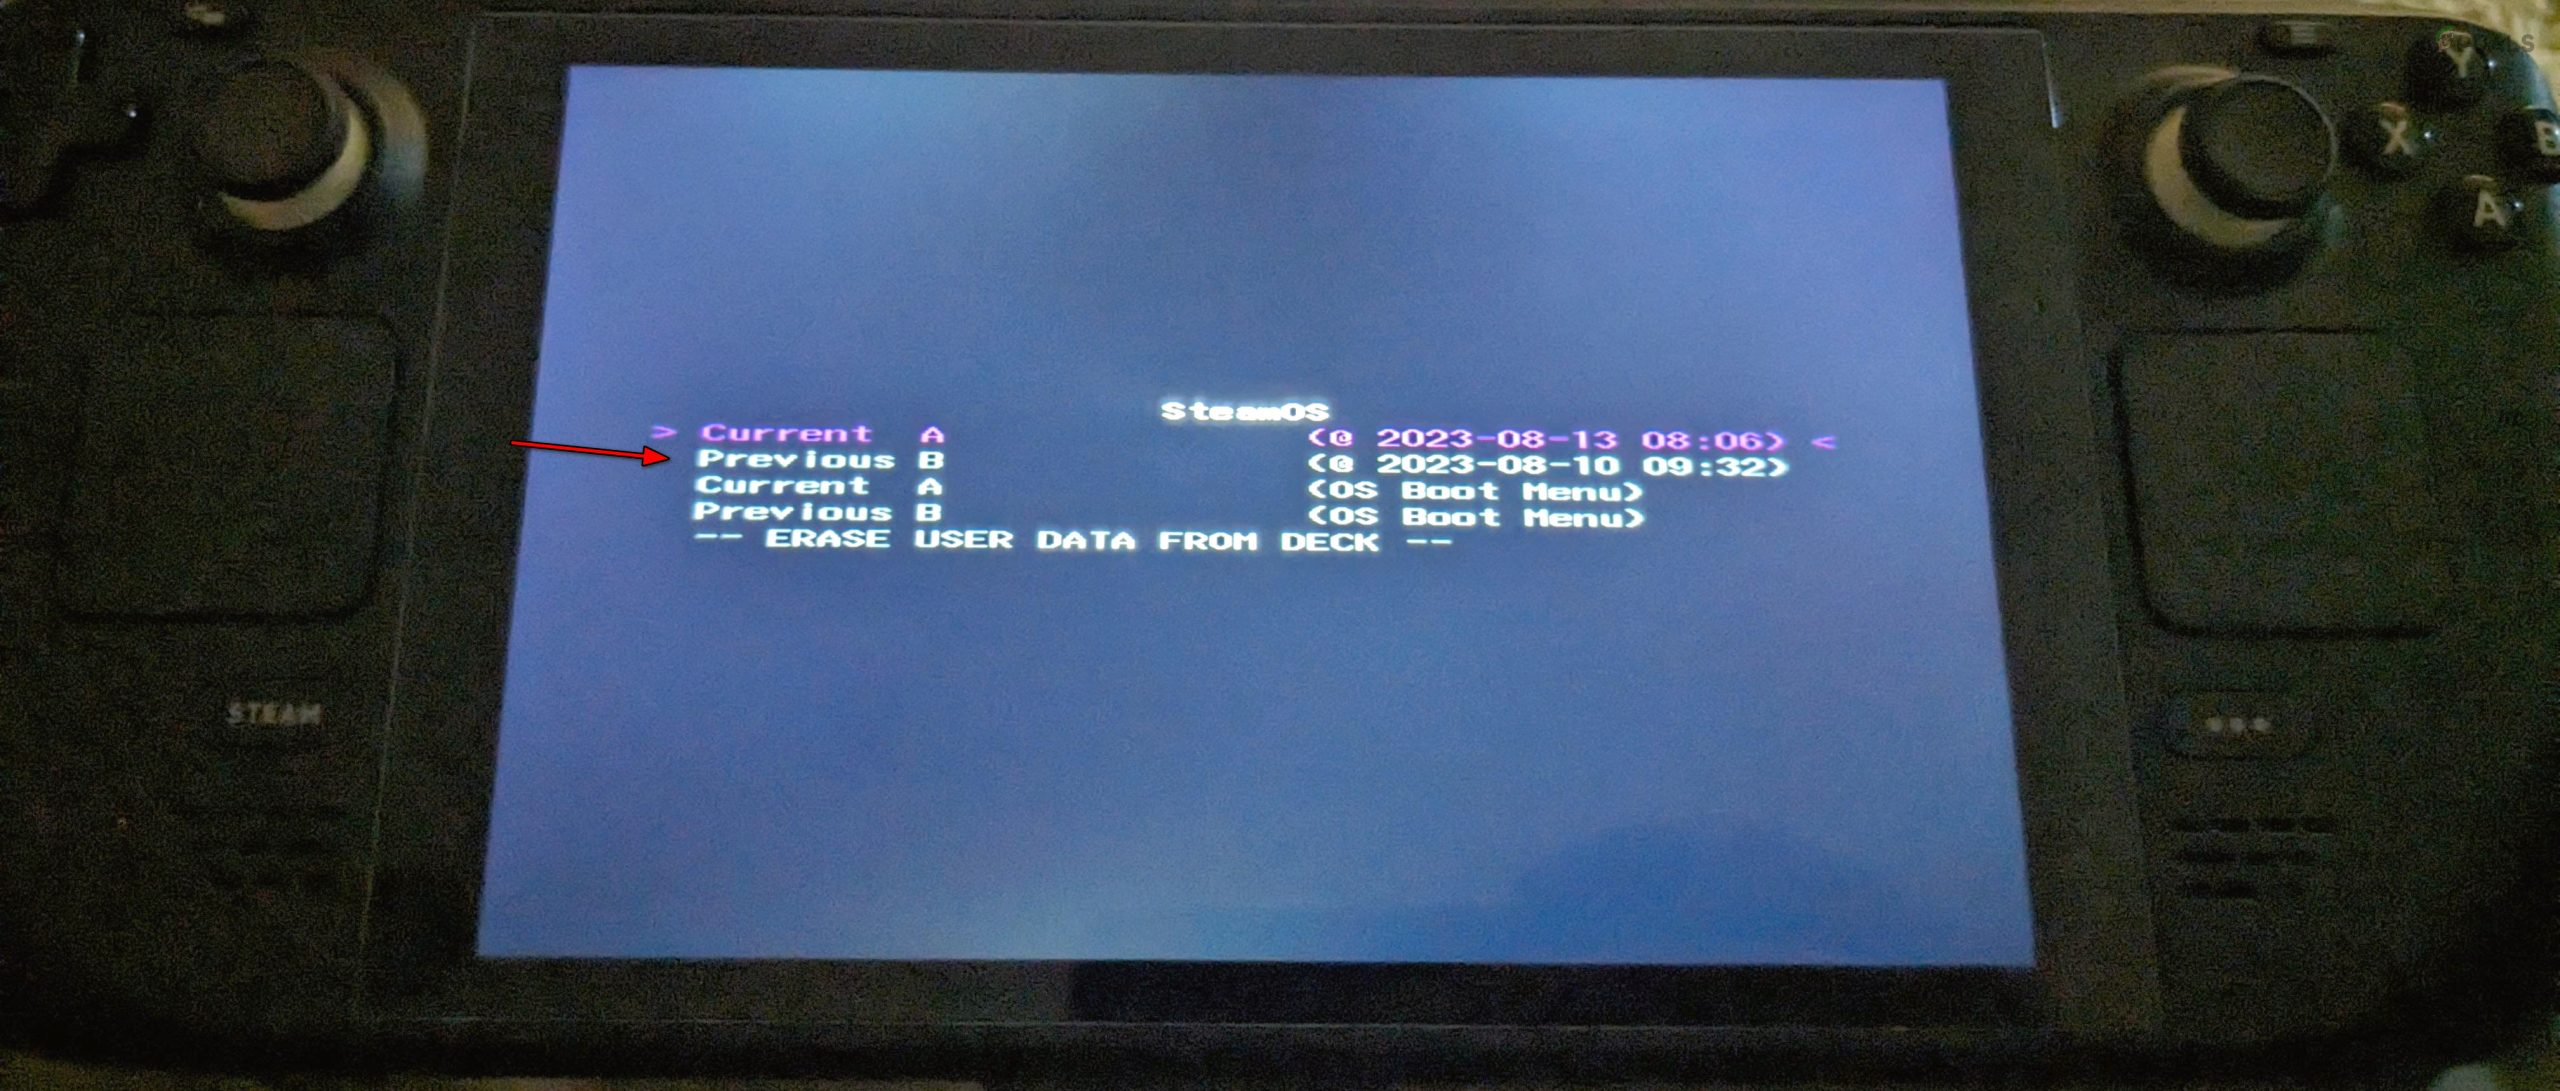
Select Previous in the SteamOS Boot Manager
6. Check and Fix Partitions on the Deck
The Steam Deck will fail to boot into the OS if any of its partitions are corrupted. Here, inspecting and repairing the partitions on the Deck will address the issue.
- Download the Steam Deck Recovery Image from the official Steam website.
- Create a bootable USB with the SteamOS recovery image. You can use tools like Rufus (on Windows) or Balena Etcher (on Mac or Linux).
- Insert the USB into the Steam Deck using a hub or adapter.
- Hold the Steam Deck’s power button until it shuts off.
- While holding the volume down button, press the power button once; release the volume button upon hearing the startup chime.
- In the Boot Manager window, choose to Boot from the EFI USB Device <USB drive>.
- Once in desktop recovery mode, launch KDE Partition Manager and use it to check and repair each partition on the internal drive.
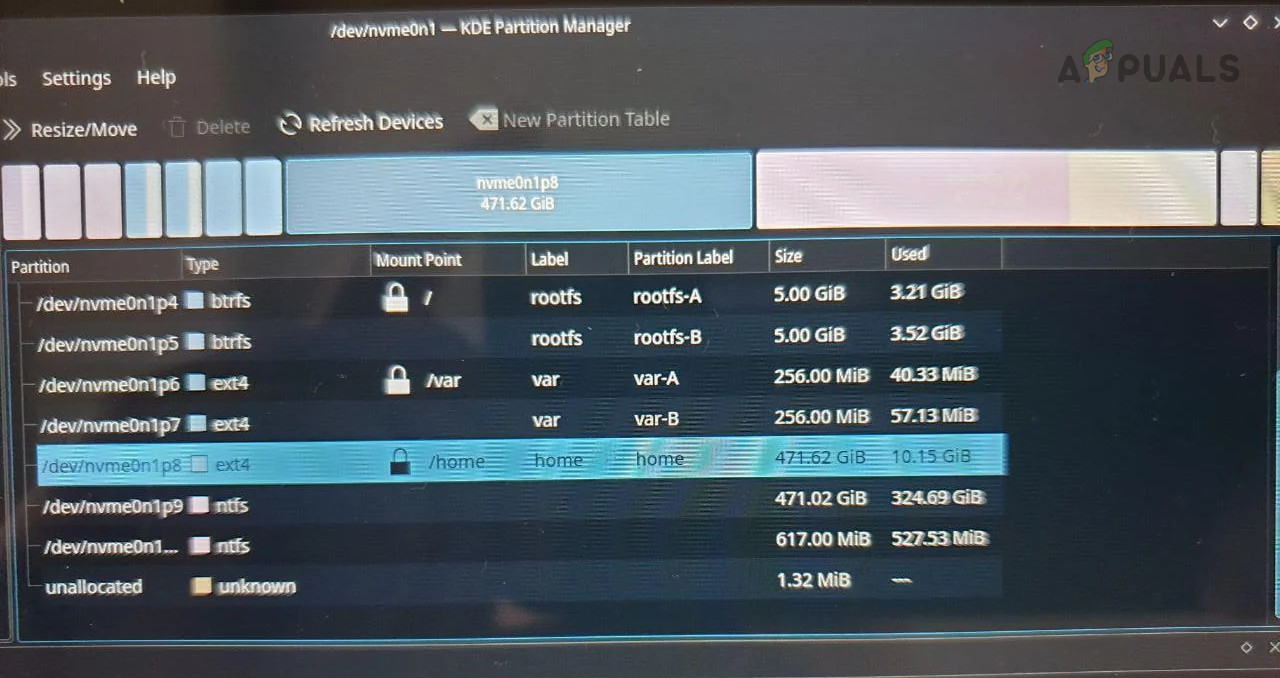
Use KDE Partition Manager to Scan and Fix Errors on the Partitions on the Steam Deck - Restart the Steam Deck and boot from the internal drive to see if the problem is rectified.
If the USB approach is unsuccessful, you might opt to make a bootable SD card (preferably from a reputable manufacturer such as SanDisk) and repeat the above steps.
8. Reinstall or Reimage SteamOS
If essential components of the SteamOS on the Deck are compromised, the device will not be able to boot into the OS, resulting in the discussed issue. To correct this, either reinstall or reimage SteamOS on your Steam Deck.
Please note that this will erase your data on the Steam Deck. You can back up your data by connecting the internal drive to a PC.
Reinstall SteamOS
- Boot the Steam Deck into the Desktop Recovery Environment from the Recovery USB (as mentioned above).
- Choose Reinstall SteamOS and follow the on-screen prompts to complete the installation.
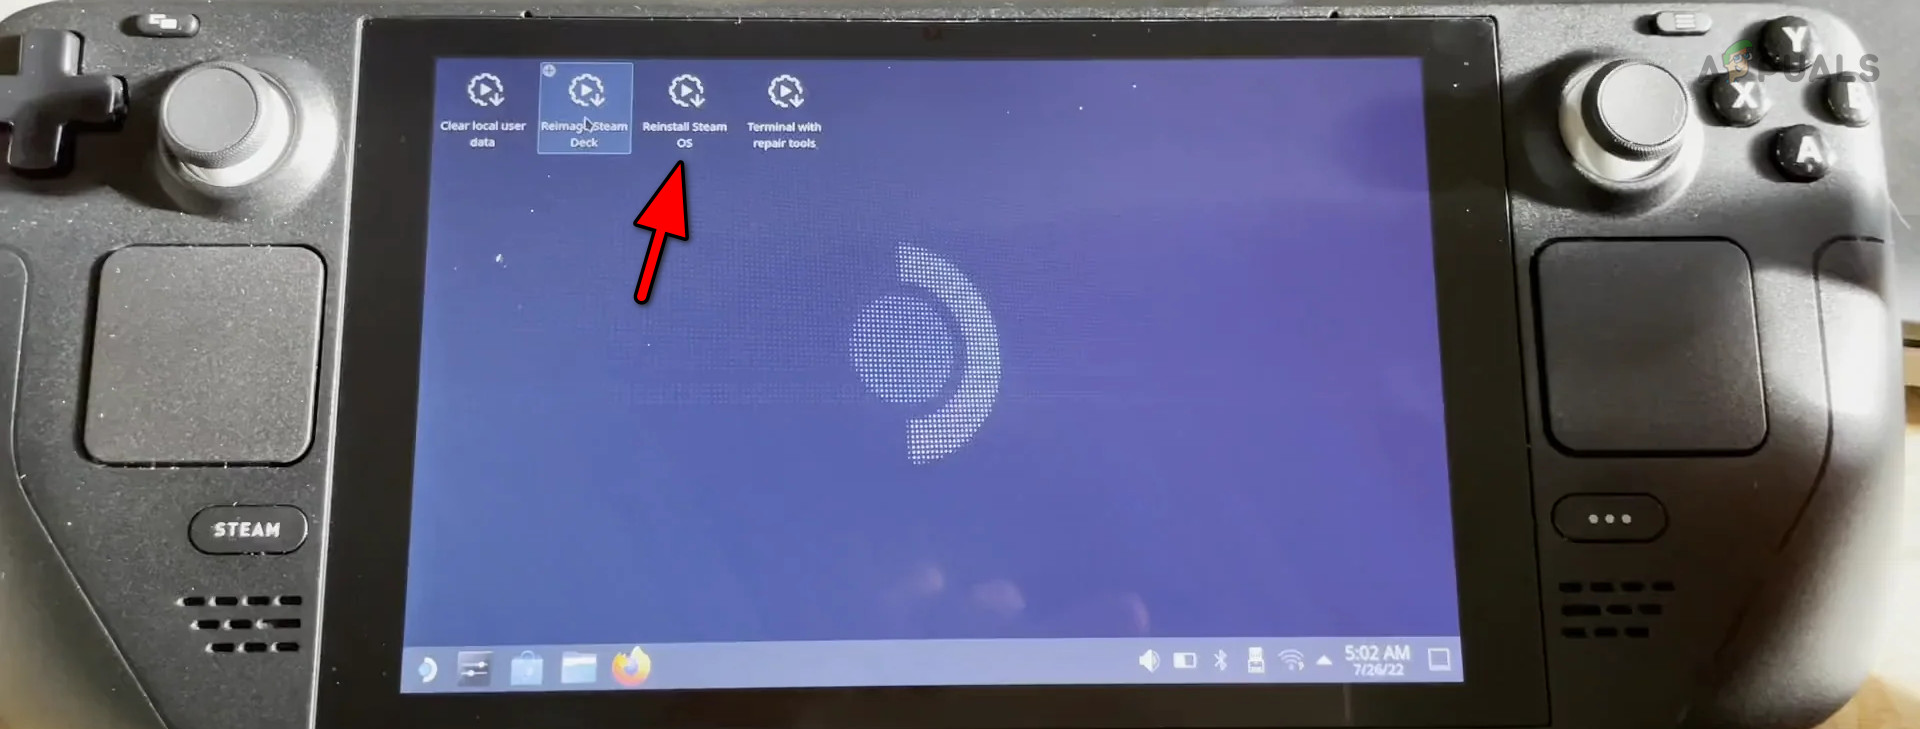
Reinstall SteamOS on the Steam Deck - Once the reinstallation is complete, check if the Steam Deck is able to get past the logo screen successfully.
Reimage SteamOS
- Start the Steam Deck in the Desktop Recovery Environment using the Recovery USB (as outlined above).
- Select Reimage SteamOS and adhere to the on-screen instructions to finish the process.

Reimage Steam Deck - After completion, restart the Steam Deck. With luck, it will no longer be stuck on the logo screen.
9. Update Firmware
Staying on top of firmware updates can prevent a host of problems. To update your Steam Deck’s firmware:
- Navigate to the settings menu on your Steam Deck.
- Select ‘System’ and then ‘Software Updates’.
- Follow the instructions to install any available firmware updates.
Should reimaging not resolve the issue, consider using an older version of SteamOS, which can be requested from Steam Support, to try reimaging the Steam Deck again.
If the problem continues, there might be damage to the internal drive that could require replacement. When facing issues after replacing the drive, ensure to clone it from the older drive. If the difficulty persists, reach out to Steam Support for further help.