How to Disable / Enable Windows Recovery Environment on Windows 10?
Windows Recovery Environment (WinRE) is an extremely effective tool when it comes to troubleshooting problems that might end up affecting the stability of every recent Windows iteration. However, there’s a growing trend of users that are looking for ways to disabling it, especially in the light of recent security concerns that it lets unauthorized users to factory restore PCs and wipe out user data using this utility.

By disabling the Windows Recovery Environment, you the Advanced options menu will no longer contain the option to ‘Reset this PC‘. This will prevent unauthorized users from facilitating total data loss without the necessary permissions.
If you want to do this, we’ve included two different methods that will allow you to force this utility into remaining disabled (via Command prompt or via Registry Editor).
We’ve also included steps that will allow you to enable the Windows Recovery Environment utility in case you previously disabled it or you brought a machine where WinRE was already disabled.
Solution 1: Verifying the status of WinRE
Before using one of the methods below to disable the Windows Recovery Environment, it’s important to check the current status of WinRE. If you’re encountering the ‘Could not find the Recovery Environment’ error’, it’s likely that the Windows RE status is already set to Disabled.
Here’s a quick guide on verifying the status of WinRE via an elevated CMD prompt:
- Press Windows key + R to open up a Run dialog box. Once you’re inside the run box, type ‘cmd’ and press Ctrl + Shift + Enter to open up an Elevated Command Prompt. When you’re prompted by the UAC (User Account Control), click Yes to grant administrative privileges.

Running the Command Prompt - Once you’re inside the Elevated CMD prompt, type the following command and press Enter to get inside on the status of your Windows RE status:
reagentc /info
- Check on the results and see the value of Windows Re Status. If the value is set to Enabled, you should be able to use one of the methods below to disable the Windows Recovery Environment.
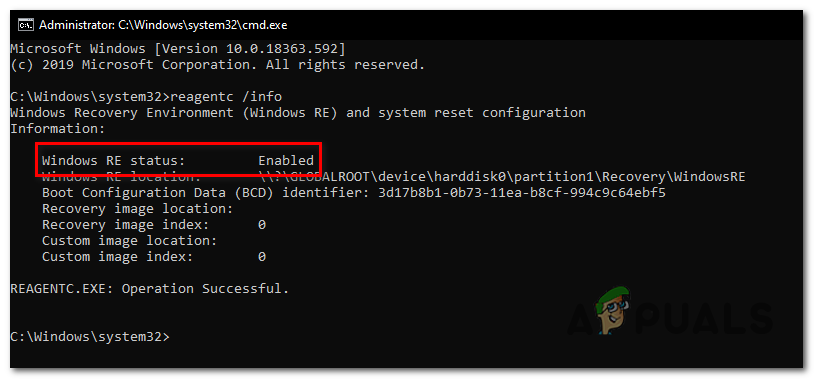
Verifying the Windows RE status
In case the investigation has revealed that the status of WinRE is set to Disabled and you’re encountering an issue associated with this component, follow Method 4 for instructions on Enable it again and correct the error.
Solution 2: Disabling WinRE via Elevated Command Prompt
If you want to disable the Recovery Environment after a power cycle has been performed 3 times, the best way to do it is via an elevated Command Prompt. However, depending on your Windows version, the exact command might be different.
In any case, if you want to go through with this, the ideal way to do it is by opening an elevated CMD prompt before your computer boots up. Several affected users have confirmed that this operation has allowed them to disable the Windows Recovery Environment (WinRE).
Here’s a quick guide on disabling the Windows Recovery Environment (WinRE) from an elevated CMD prompt:
- Start by inserting a compatible installation media into your computer, then restart it in order to boot from it.
- Once you get to the booting screen, press any key when prompted to in order to boot from the installation media.

Press any key to boot from installation media - Once you’ve successfully booted from the installation media, click on Repair your computer (bottom-left corner) and wait for the repair tool to load.

Click Repair your computer on Windows Screen Note: On Windows 10, you can force entry the repair menu without the installation media by facilitating 3 consecutive machine interruptions (by turning off your computer in the middle of the booting sequence).
- Once you’re inside the initial repair menu, click on Troubleshoot from the list of available options. Next, click on Command Prompt from the list of sub-options to open a Command Prompt window with admin access.
- Inside the elevated Command Prompt, type the following commands and press Enter after each one to disable the Windows Recovery Environment:
bcdedit /set bootstatuspolicy ignoreallfailures
bcdedit /set recoveryenabled No
bcdedit /set {default} bootstatuspolicy ignoreallfailures
bcdedit /set {default} recoveryenabled No
Note: This way of disabling the Windows Recovery Environment is universal and should work regardless of the OS that you’re using. However, Windows 10 includes a superficial way of disabling the Recovery Environment. To make use of it, use this command instead:
reagentc.exe /disable
- When prompted to confirm that you want to disable it, hit Yes. After you do this, you can close the Elevated Command Prompt and restart your computer.
- At the next system startup, the Windows Recovery Environment should be already disabled.
If this operation wasn’t successful in your case or you’re using for a different approach, move down to the next method below.
Solution 3: Disabling WinRE via Registry Editor Utility
If you don’t want to disable the Recovery Environment via an elevated Command Prompt, a working alternative is to perform the same operation via Registry Editor.
The ultimate outcome is ultimately the same, but this operation allows you to change the Registry directly, which might prove to be effective in situations where the terminal is not working correctly.
Note: Keep in mind that this operation might not work on Windows versions older than Windows 8.1.
Here’s a quick guide on how to disable the Windows Recovery Environment via the Registry Editor:
- Press Windows key + R to open up a Run dialog box. Next, type ‘regedit’ inside the text box, then press Enter to open up Registry Editor. When prompted by the UAC (User Account Control), click Yes to grant admin access.

Open Regedit - Once you manage to get inside the Registry Editor, use the left-hand section to navigate to the following location:
Computer\HKEY_LOCAL_MACHINE\SYSTEM\CurrentControlSet\Control\Session Manager
Note: You can either navigate there manually or you can paste the location directly into the navigation bar at the top and press Enter to get there instantly.
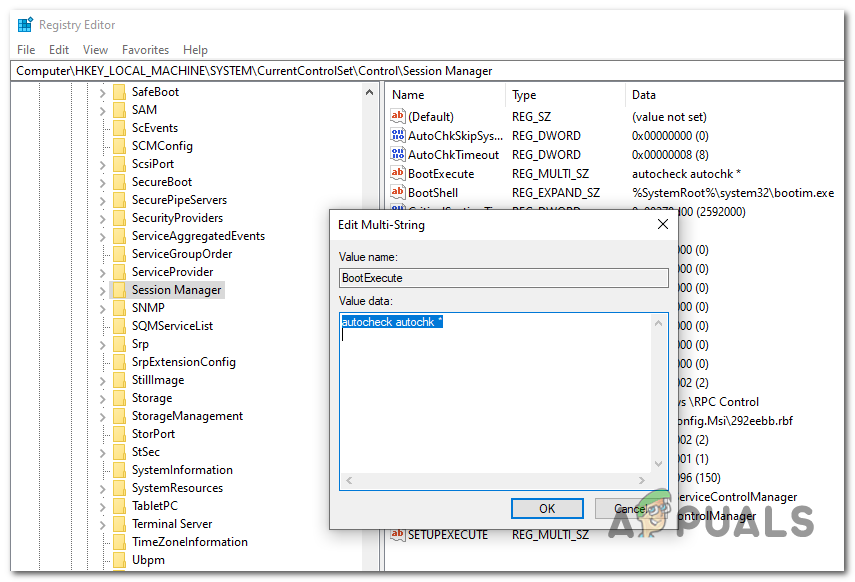
- After you manage to arrive to the correct location, move over to the right-hand page and double-click on the BootExecute Multi-String value.
- Once you’re inside the Edit-String value of BootExecute, simply delete the text inside value data and click Ok once the box is completely empty.

Deleting the value of BootExecute string - Once this modification is enforced, you can safely close the Registry Editor and restart your computer.
- After the next startup is complete, the Windows Recovery Environment should be effectively disabled.
In case your WinRE environment is already disabled and you’re looking for a way to make it available again, follow the instructions below.
4. How to Enable the Windows Recovery Environment
In case you’re looking for a technique that will allow you to enable a previously disabled Windows Recovery Environment (WinRE). Just as the process of disabling WinRE, there are two different ways that will allow you to make this option available again on your PC.
Choose whichever guide you feel more comfortable with. Both will ultimately achieve the same results, but they will use different utilities.
Enable WinRE via Command Prompt
- Press Windows key + R to open up a Run dialog box. Next, type ‘cmd’ inside the text box and press Ctrl + Shift + Enter to open up an elevated Command Prompt. When you’re prompted by the UAC (User Account Control), click Yes to grant admin access.
Running the Command Prompt - Once you’re inside the elevated Command Prompt, type the following command and press Enter to enable the recovery environment:
reagentc.exe /enable
- You might be prompted to confirm the modification. If this happens, click Yes to enable Windows Recovery Environment, then restart your computer to make the change permanent.
- After the next startup sequence is complete, the WinRe component should already be re-enabled.
Enable WinRE via RegistryEditor
- Press Windows key + R to open up a Run dialog box. Next, type ‘regedit’ and press Enter to open up Registry Editor. When prompted by UAC (User Account Control), click Yes to grant administrative privileges.
Open Regedit - Once you’re inside the Registry Editor, use the left-hand section of the utility to navigate to the following location:
Computer\HKEY_LOCAL_MACHINE\SYSTEM\CurrentControlSet\Control\Session Manager
Note: You can either navigate to this location manually or you can paste the location directly into the nav bar at the top and press Ente to get there instantly.
- With the Session Manager key selected, move over to the right-hand section and double-click on BootExecute. Once you’re inside the Edit Multi-String window, paste the following text into the Value Data box and press Ok to save the changes.
autocheck autochk *
Populating the Value Data of BootExecute - Close Registry Editor and restart your computer to enforce the modification.
- At the next startup, the Windows Recovery Environment should be enabled again.


