How to Fix “Secure Boot is Not Enabled” Error in FIFA 23?
When launching FIFA 23, the “Secure Boot is not enabled” error can prevent the game from starting. This error occurs because FIFA 23’s Anti-cheat software needs Secure Boot, a security feature in your system’s BIOS, to be active.

Even if Secure Boot is enabled, incorrect system configurations or issues with the anti-cheat software can trigger this error. For more info, check our article on Secure Boot.
Follow these methods to fix this issue.
Note: This issue mainly affects players using Windows 11 due to its strict security requirements that need Secure Boot to be enabled.
1. Run FIFA 23 As Admin
Running FIFA 23 with admin privileges can help resolve issues related to permissions and system access. This ensures that the game has all the necessary permissions to interact with essential security features, potentially resolving some restrictions preventing the game from detecting Secure Boot status correctly.
Warning: Do not do this if you have a pirated copy of FIFA 23, as some malicious modders may include viruses/malware in the pirated copy.
- Right-click on the FIFA 23 game shortcut or executable file.

- Select ‘Properties‘ from the context menu.
- In the Properties window, go to the ‘Compatibility’ tab.
- Check the box that says ‘Run this program as an admin’.

- Click ‘Apply’, then click ‘OK’ to save the changes.
- Restart the game.
Note: Now, whenever you open your game, UAC (User Account Control) will ask if you want to open this application. You just have to press “Yes” to allow admin rights to your game. If this doesn’t resolve your issue, uncheck the “Run this program as an administrator” option.
2. Reinstall EA Anti-Cheat Software
Reinstalling EA’s Anti-Cheat software can ensure that necessary files are not missing or corrupted and are correctly configured. This can resolve issues caused by file corruption, missing components, or software conflicts, improving the overall functionality of the anti-cheat system.
RELATED READ: Failure During Update Process Anti-Cheat Error in Fifa 23
- Right-click the FIFA icon and select ‘Open File Location’.

- Go to the ‘_Installer’ directory.
Note: If this directory doesn’t exist for you, you will have to download the EA anticheat installer.

- Open the ‘EAAntiCheat’ folder.

- Start the ‘EAAntiCheatInstaller.exe’ file.
- In the drop-down menu, select ‘(Installed) FIFA 23’.

- Click on the ‘Uninstall’ button.
- Restart FIFA after the uninstallation is complete.
- A pop-up will appear prompting for the reinstallation of EA Anti-Cheat.

- Click ‘Reinstall EA Anti-Cheat’ in the pop-up.
Note: This approach ensures that EA’s anti-cheat system is properly installed and configured.
3. Enable Secure Boot
Many users, when they install Windows 11, try to bypass the TPM & Secure Boot requirements imposed by Microsoft. This can cause problems since any app that tries to use Secure Boot or TPM will not function properly.
A popular example of this issue also occurs in VALORANT called “Error Code: VAN 9001“, which doesn’t even let you launch the game. To fix this, we need to enable Secure Boot and make sure Windows is configured to support and recognize its activation.
Note: If you’re using an older system with a legacy BIOS, you may not have the option to enable Secure Boot. To transition from legacy BIOS to UEFI, you may need to change your firmware settings or reinstall your OS. For more info on UEFI and Secure Boot, you can refer to Intel’s guide on UEFI and Secure Boot.
- Open the ‘Settings’ menu.
- Go to ‘System’ > ‘Recovery’.
- Click on ‘Advanced Startup’, then click ‘Restart Now’.

- The system will restart into the Advanced Startup Menu.

- From the menu, click ‘Troubleshoot’.
- Choose ‘Advanced Options’.

- Click on ‘UEFI Firmware Settings’.

- Click ‘Restart’.
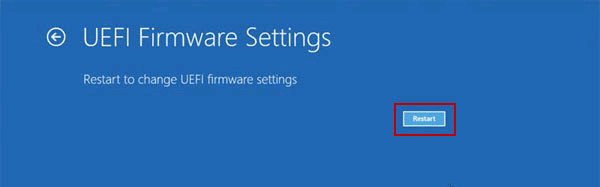
- The device will restart in the Startup Menu.
- Access the BIOS/UEFI Setup upon reboot by pressing the designated key (usually shown during startup or specified by your PC manufacturer). Refer to our detailed guide on how to check the BIOS key.
- Find the ‘Boot’ or ‘Boot Configuration’ section. The exact name may vary.

- Enable the ‘Secure Boot’ option. If options like ‘Custom’ or ‘Standard’ come up, select ‘Standard’.

Restart your computer and boot into Windows. Follow these steps to check if Secure Boot is enabled:
- Press Windows Key + R to open the Run dialog box.
- Type msinfo32 and press Enter.

- The System Information window will open. Look for the System Summary section.
- In the summary, scroll down to find the Secure Boot State entry.
- Verify the status:
- On: Secure Boot is enabled.
- Off: Secure Boot is disabled.
- Unsupported: Your system does not support Secure Boot.

Note: If Secure Boot still says “OFF” even after configuring the BIOS, this might indicate that your system does not support Secure Boot. Your boot config might need to be converted from Legacy to UEFI, or a firmware update might be required. Ensure your OS is compatible with Secure Boot. It may be necessary to reinstall Windows.
Note: Navigating BIOS can be different for each manufacturer. If you get stuck, refer to your manufacturer’s official guide on enabling Secure Boot. Below are some common manufacturer’s BIOS guides:


