Relocated Items Folder on macOS Catalina: What is it? and How to delete it?
There are a lot of users who have not updated their macOS Software. If you are one among them and still running the macOS Catalina version, you might have come across the Relocated Folder that may seem suspicious.
We have ruled out every possible reason and myth surrounding it, and if you are looking to get rid of it sooner than ever, this guide might be of some help to you. After intense searching, we realized that it is present in almost every system, and at first, it may look like a folder that might bring in errors.
However, we have busted all the myths, and you can check out all the reasons behind its existence and if you can get rid of it.
What is the Relocated Items Folder on macOS Catalina?
The Apple team itself has brought up the most straightforward explanation. Suppose you had upgraded your macOS to version macOS 10.15 (Catalina). In that case, all the information, data, and files existing on the previous version need space to be stored in their original location unharmed. However, during this upgrade, some files and data are unable to follow the said process, and thus they are relocated to another location.
This particular location or folder is what sums up the Relocation Folder. In fact, to be sure, you can simply read the PDF document in the folder that tells you all you need to know.
The major reason behind this folder in a more technical manner happens when the system attempts to create two separate volumes (Macintosh HD and Macintosh HD- Data) where all your data and files are stored. All the data like we mentioned could not be verified or stored on the Macintosh HD- Data volume is sent to the Relocated Folder.
Should I delete the Relocated Items Folder?
Now, the biggest question arises if we should get rid of the folder from the system. We have learned all we need to know as to why it exists. But it is taking up space, and if you need to get rid of it, you may need to rethink.
Well, it entirely depends on the content of the folder and whether it is essential for you. As we said earlier, it has the data while you upgraded your system, and you might need it for running an app or simply anything you may not be fully aware of.
If you are keen to get rid of the folder, here is what you need to keep in mind.
- Check the content of the folder whether or not it contains important data.
- Look at the space it is taking up in your system to analyze if it is necessary to delete it.
- Back up the data in an external drive if you are unsure if the data might be necessary for the future.
You can delete it if everything we have mentioned suits you well and there is nothing you need from the Relocated folder that might be of use to you. Or else you can simply let it be undisturbed and move on.
Ways to find the Relocated Folder on your macOS
If you are new to this and still have no idea where you find the relocated folder. We have listed and tried out all the ways you can use to get to the folder. Simply use any that might fit you well and decide whether you wish to delete or keep it.
1. Use Spotlight Search to Find Relocated Items Folder
Spotlight Search is a search feature that you can take advantage of to search and find the “Relocated Items” Folder. It will basically scan your whole macOS to find “Relocated Items”, and it will let you know where this folder can be found. Follow these steps to access Spotlight search and search for “Relocated Folder”.
- Tap on Command + Space Bar to open Spotlight Search.
- Now, enter “Relocated Items” in the space.

Spotlight Search Relocated Items Folder - Click on the first option that comes by.
2. Use Finder to Manually Search for “Relocated Items” Folder
If you can’t find the “Relocated Items” folder using Spotlight Search, Alternatively, you can find that folder by using the “Finder”. Follow these steps to find the “Relocated Items” Folder. Follow these steps to use Finder and find the “Relocated Items” folder.
- Click on Finder.
- Now, tap on “Your MacBook Air or Macintosh HD”.
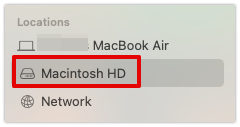
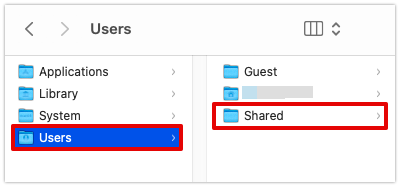
Using Finder to Find Relocated Items - Select the Users folder.
- Now, click on Shared from the options.
Accessing The User Folder From Finder - You can now access the Relocated Folder.
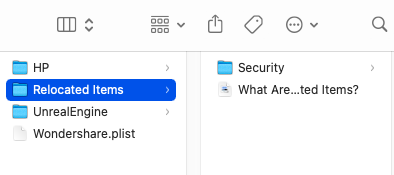
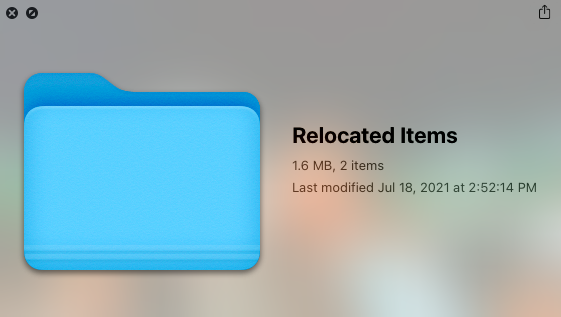
Finding the Relocated Items Folder
How to Remove the Relocated Folder from Mac?
If you have made up your mind to delete the Relocated Items Folder from Mac, you can follow the steps we have mentioned here. However, before you proceed, we will highly recommend going through the folder’s content and proceeding further likewise.
Also, if the folder is on your Desktop, you can simply make a Right-Click or tap with two fingers and Move to Trash. This will delete only the shortcut from the system. Let us see how to remove the Relocated Folder from macOS.
- Press the Command + Space Bar buttons to open Spotlight Search.
- Enter the “Relocated Items” in the blank space to search.
- Click on the folder on the screen.
- Check and see if the files are important and make their backup.
- Tap on the folder with your two fingers and click on Move to Trash.
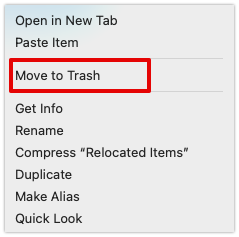
Moving Relocated Items Folder to Trash - Now, enter your Admin Password to confirm.
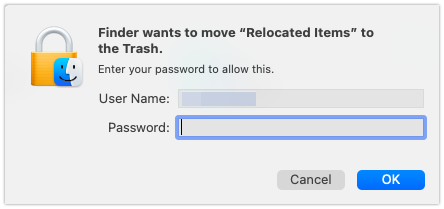
Removing the Relocated Items Folder - Your folder is sent to the Trash.
You can now head to the Trash and delete the folder permanently, or if you wish to recover, you can do the same.
Here we are with everything you need to know about the Relocated Folder. We were unsure, too, when we first updated our system and did the research thoroughly. So, you simply need to go through every aspect we have mentioned to remain aware of it.
You can delete the folder if you or else leave it as it is. Many users, including us, have deleted the folder and haven’t faced errors or bugs as of this day. But it all depends on the folder’s content, so make sure you perform any action at your own risk.