How To Use Remote Desktop Over LAN on Windows 10 & 11
 Reviewed by Huzaifa Haroon
Windows is one of the most popular operating systems in the world partly due to its vast collection of features. One of these is the ability to remotely connect to any computer from anywhere in the world or even the next room. The feature is enabled through the “Remote Desktop” application included in Windows 10/11, as well as the Legacy “Remote Desktop Connection” program, which is still available.
In this guide, we will walk you through the process of connecting remotely to another PC on your LAN connection, using both the Windows Remote Desktop client and the Remote Desktop Connection program.
Table of Contents
Key for this guide:
Host PC: The PC that you are going to connect to.
Client PC: The PC that will connect to the Host PC.
Requirements for Remote Desktop
In order to connect and use RDP over LAN, or even Wi-Fi for that matter, you need to keep a few prerequisites in mind. First and foremost, remote connections should actually be enabled on your/host computer. Then you need to decide between a static or dynamic IP to connect to. We will talk more about how to do it both ways later in the article. There’ll be nuggets of info mentioned in between that are important to the overall procedure as well.
1. Enabling Your PC To Use Remote Desktop
Remote Desktop is disabled by default in Windows, so you need to turn it on first in order to proceed with the other steps.
- Press Windows+R to open Run and type “sysdm.cpl” then press OK or Enter on your keyboard.
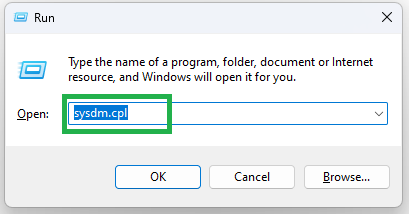
Type and search for sysdm.cpl - After this, a new window will pop up for System Properties. Navigate to the “Remote” tab and under Remote Desktop, select the “Allow remote connections to this computer” option.
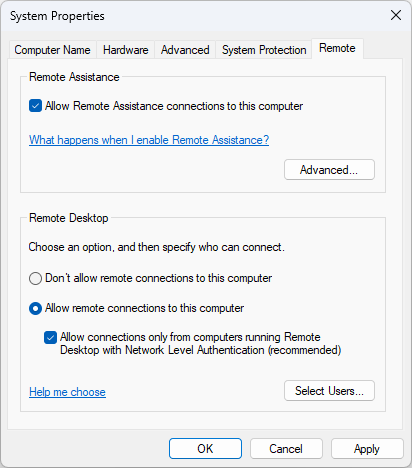
Make sure “Allow connection only from computer…” is also checked off - Click the Apply button, then click the OK button and close the window.
2. Allowing Remote Desktop Through Windows Firewall (Optional)
After these steps are finished, the device will be ready to accept remote desktop connections. Rules will also be added to Windows 10’s built-in Microsoft Defender Firewall. However, if you’re using a third-party security solution, you might have to set up the rules by hand.
To allow remote connection through Firewall in Windows 11, Follow these steps:
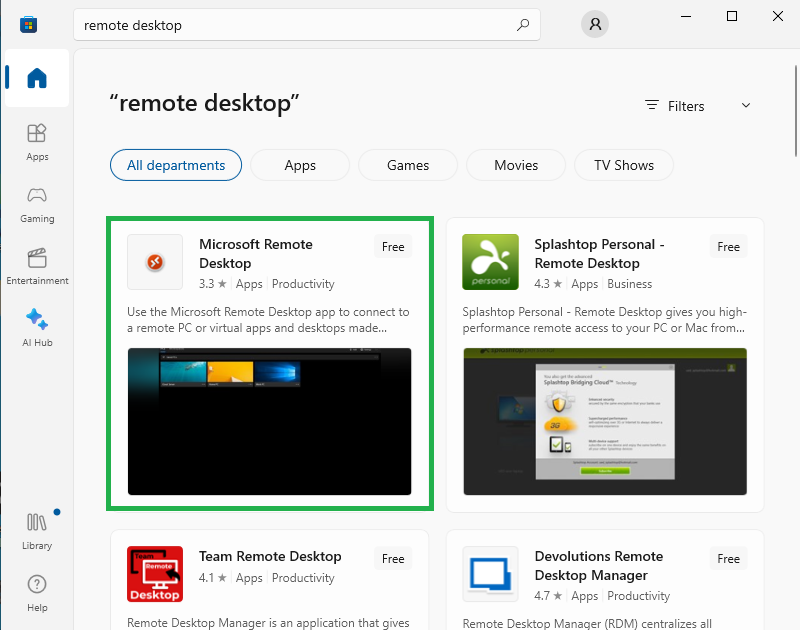
- Navigate to the Microsoft App Store and search for the Remote Desktop application. Download the app as shown below:
Remote Desktop Application - After installation is completed, open the app and click on the Add button on the top right. This will save the Remote Desktop you are connecting to for future use.

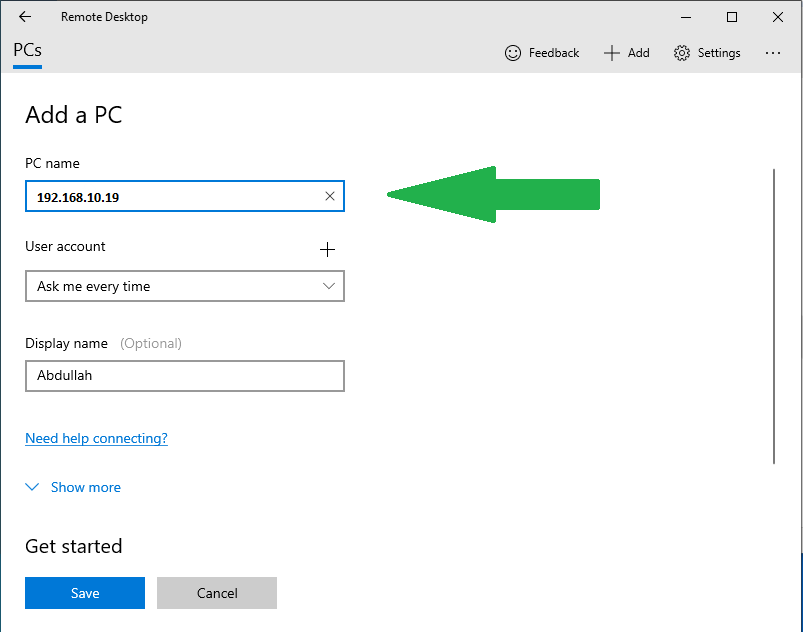
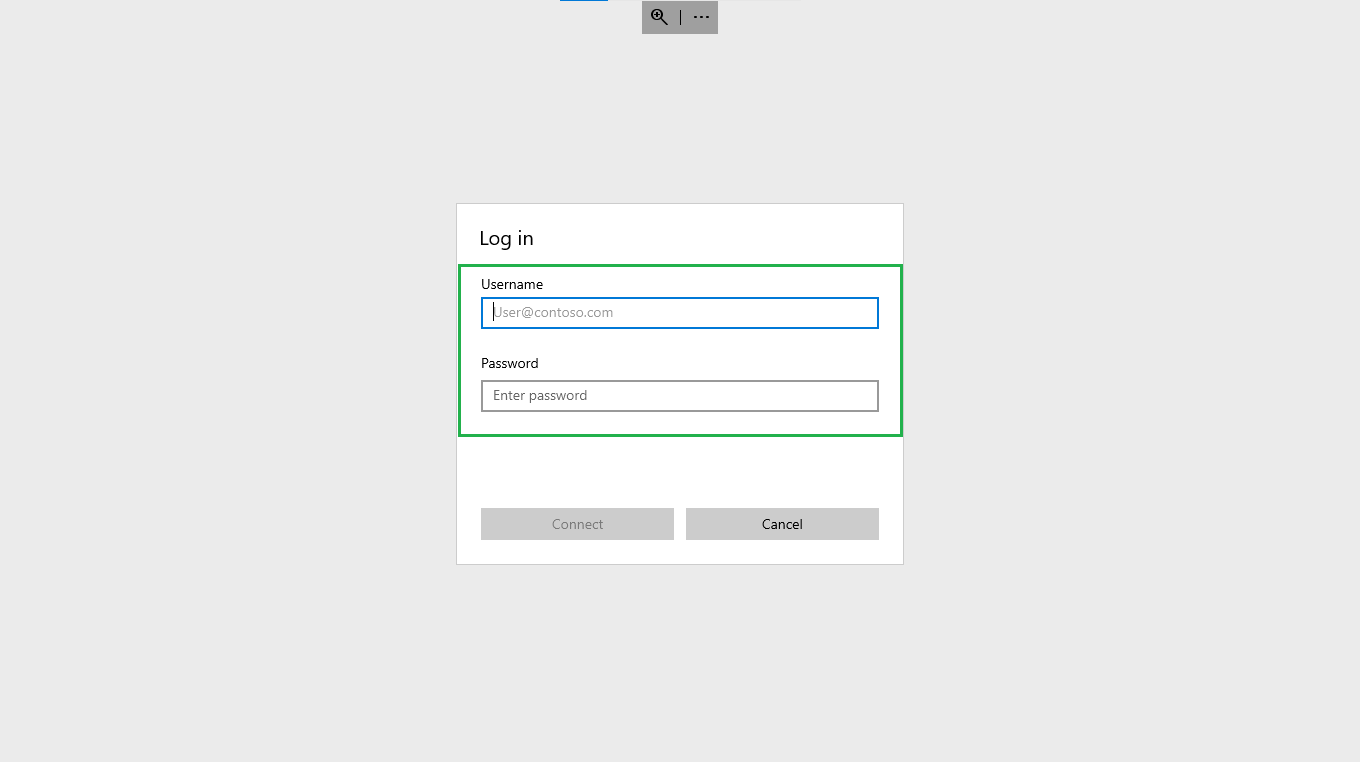
Add Host PC on Remote Desktop - After clicking on the Add button, you will now enter the details of the Host PC. In the PC name, enter the IP address of the Host PC. Beneath that, select the User account that you want to initiate the connection with (client). You can also optionally enter a Display name if you want.
Remote Desktop App Connection - After entering all of your information, click the Save button. Upon pressing the save button, the Remote Desktop software will launch a fullscreen version of the connection. When you turn on the connection, the app will prompt you for your Username and Password, which you can enter in order to gain access to it.
Note: Username refers to the local account name.
Client Side App Login Details
2. Remote Desktop Connection
If you don’t want to download a new, dedicated app for remote connection, Windows includes a built-in remote desktop app as well. The built-in app is basic, but it provides all of the necessary features for a smooth connection. The steps outlined below will assist you in connecting to a remote desktop using the built-in app provided:
-
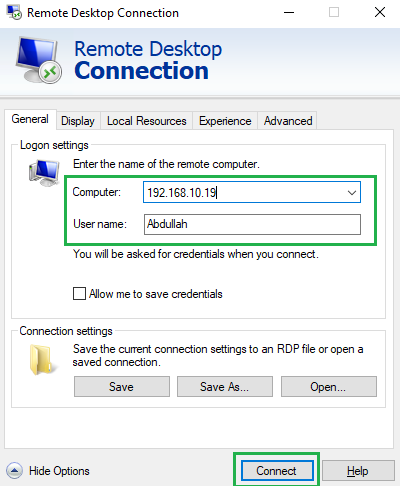
- Press the Windows key for the “Remote Desktop Connection” app in the Start Menu.
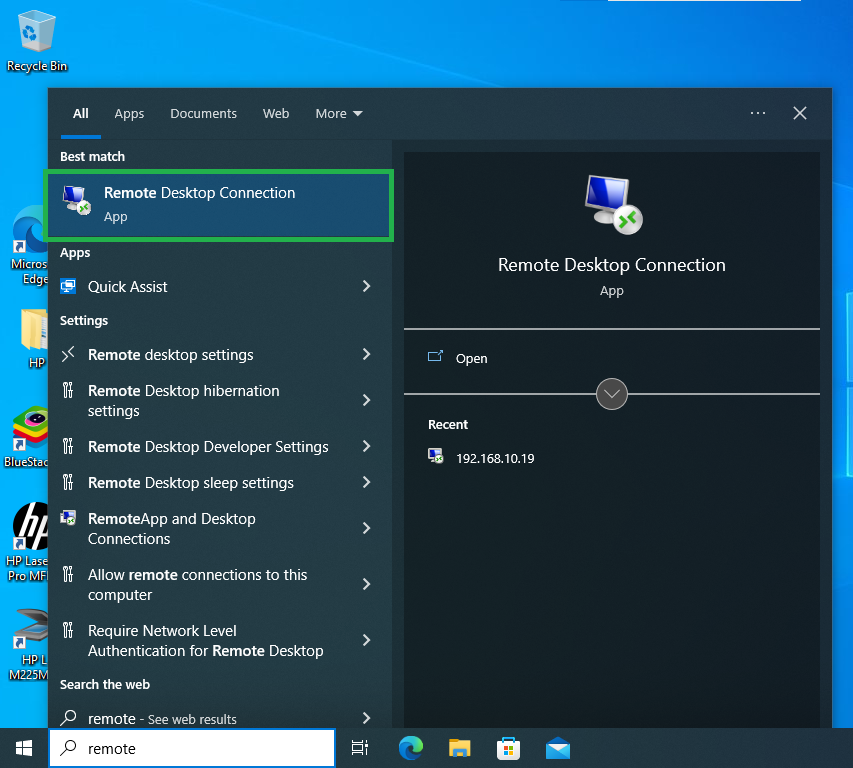
Open Remote Desktop Connection - Enter the IP Address of the Host PC and the Username of the account you want to access on the Host PC.
Enter Host IP address and username - Enter the password of the User Account of the Host PC. This option will only show up if the host PC (and its account) is password-protected.
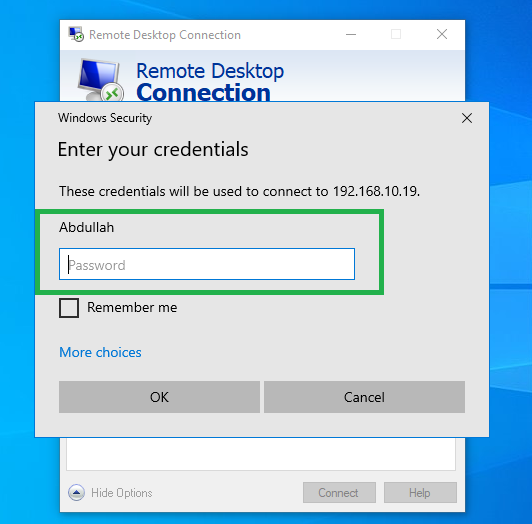
Enter host PC/user password
- Press the Windows key for the “Remote Desktop Connection” app in the Start Menu.
After all these steps, your connection will be successful, and you can now easily use your PC remotely over LAN. If you’re facing any issues with internal errors or a denied connection, our guides should be able to help you out.
Conclusion
The Windows Remote Desktop tool is a game-changer. Whether you’re connecting to a PC in the next room or across continents, the process is straightforward. Have you explored other remote features on Windows? Share your experiences or drop any questions in the comments below.
FAQs
Microsoft Remote Desktop is a modern app available for free from the Microsoft App Store. It offers more advanced features and capabilities compared to the built-in Remote Desktop Connection. On the other hand, the built-in app comes pre-installed with Windows and provides essential features for remote connections without the need for any additional downloads.
The essential protocol required for the Remote Desktop feature does not exist in the Home version of Windows. Thus, you can only utilize this feature in the Pro and Enterprise versions. However, there are workarounds available to enable RDP on Home versions, and you can check our guide for that.
A Dynamic IP changes every time a device connects to the internet. It’s suitable for occasional remote connections but can pose challenges for regular remote access. A Static IP remains consistent, making it easier for frequent remote connections. However, it might be considered less secure for business-oriented tasks.
If you’re using a third-party security solution, you may need to set up the rules manually to allow Remote Desktop connections. Navigate to the firewall settings of your third-party software and ensure you allow Remote Desktop to establish a connection.
You’ll need the IP address of the host PC (either dynamic or static based on your setup) and the username of the account on the host PC. If the host PC is password-protected, you will also require the password of that account to establish a connection.
-
- Press Win+I or use the Start menu to open Settings.
- Navigate to “Network and Internet.”
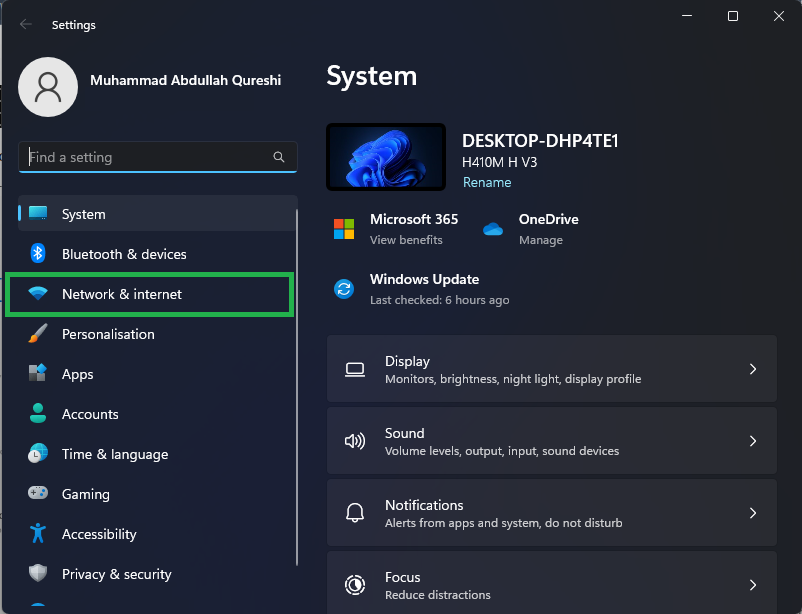
Network and Internet in Settings - In the Network and Internet settings, click on “Ethernet.”
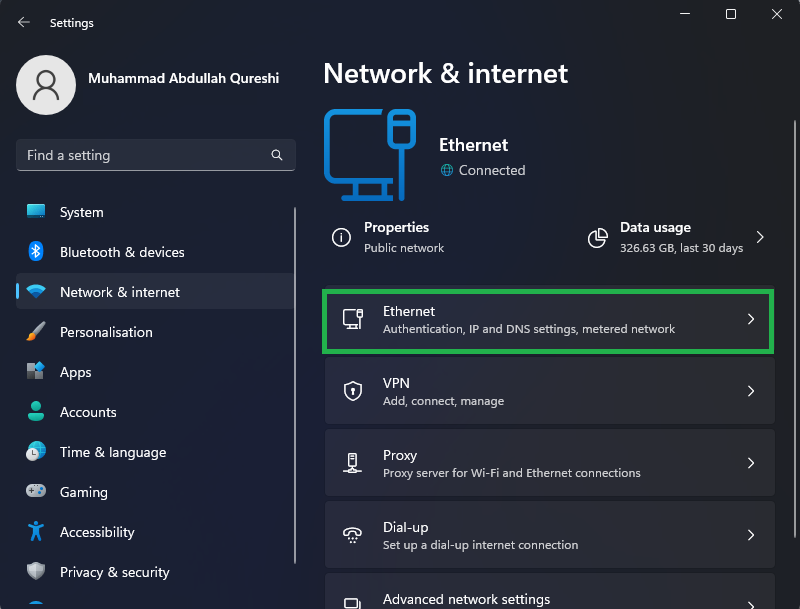
Click on Ethernet - Scroll down in the Ethernet Settings and click Edit on the “IP Assignment” option.
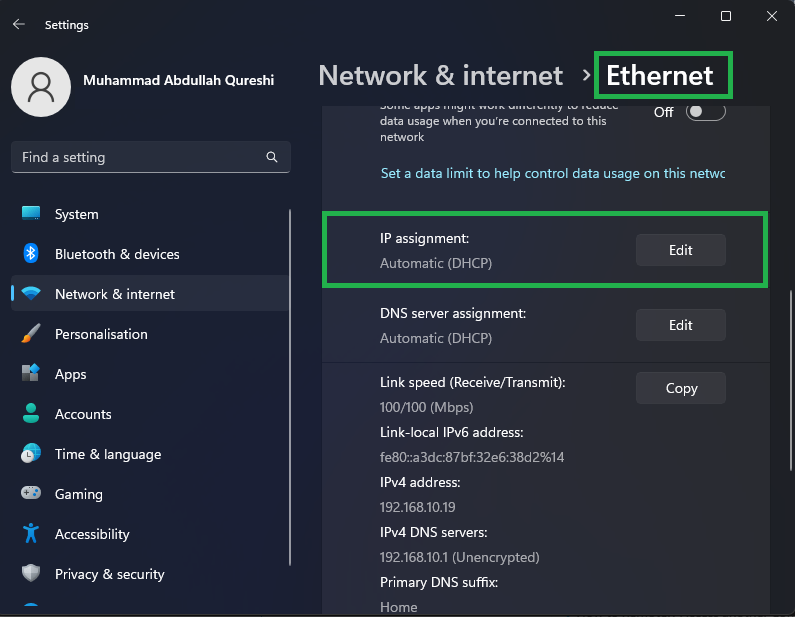
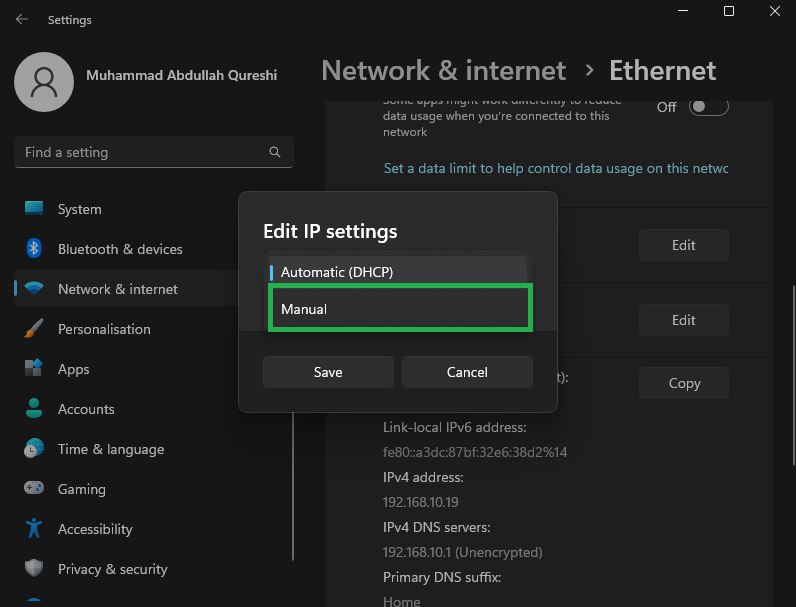
Click on IP Assignment - From the dropdown menu, select “Manual” to assign a custom IP to your PC.
Select Manual from the menu -
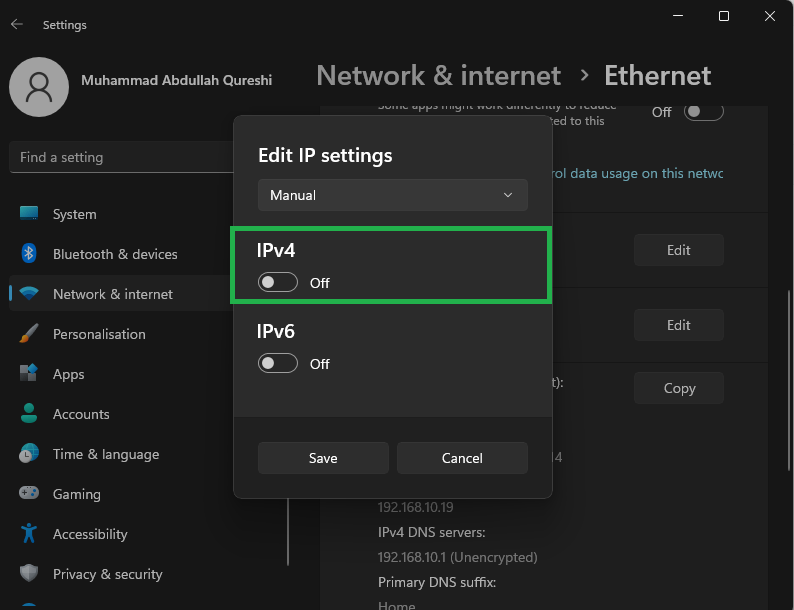
Click on IPv4 and turn it on.
Toggle on IPv4 - Now, it’s time to fill in the IP settings and here’s how:
-
-
- IP address: Pick any IP address that’s in the same group as your router’s address (default gateway), but make sure it’s not one that your router might give out automatically (DHCP range). You can check your DHCP range from your router’s admin page/portal. For instance, if your range is from
192.168.1.2to192.168.1.100, you will choose an IP that’s outside of that, such as192.168.1.150.
- IP address: Pick any IP address that’s in the same group as your router’s address (default gateway), but make sure it’s not one that your router might give out automatically (DHCP range). You can check your DHCP range from your router’s admin page/portal. For instance, if your range is from
-
-
-
- Subnet mask: Use 255.255.255.0 as your subnet mask.
- Default Gateway: Enter the default gateway you just fetched earlier.
- DNS: For this, we recommend using Google’s DNS which is given below along with the other settings:
-
Preferred DNS: 8.8.8.8
DNS Over HTTPS: Off
Alternative DNS: 1.1.1.1
DNS Over HTTPS: Off
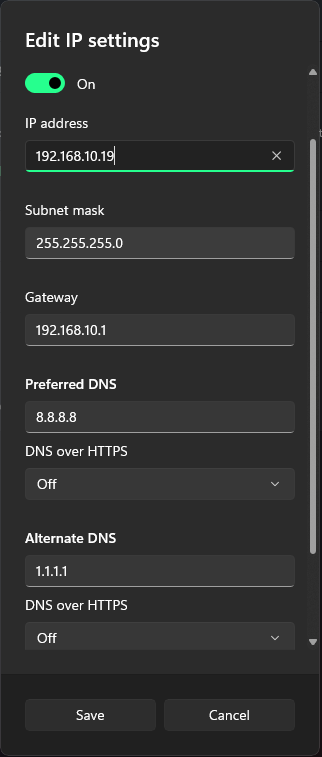
Verify that you’ve put all the correct numbers and click Save. This ends the server-side, aka host setup, for our remote desktop connection.
Client-Side Connection
Once you’ve set up the host computer, you’re ready to connect from the client side. To do this, you need the username of the account on the host PC, which can be seen from its Start menu. If the PC is password-protected, you will also need the password from the owner.
After the user has been identified, move on to the client-side computer where we will show you how to connect using the Microsoft Remote Desktop application as well as the Remote Desktop Connection app.
1. Microsoft Remote Desktop
The modern Microsoft RDP app does not come pre-installed in Windows, but it’s easily available for free. It’s more advanced and offers extra features missing from the native app that we’ll discuss next. For now:
- Navigate to the Microsoft App Store and search for the Remote Desktop application. Download the app as shown below:
Remote Desktop Application - After installation is completed, open the app and click on the Add button on the top right. This will save the Remote Desktop you are connecting to for future use.
Add Host PC on Remote Desktop - After clicking on the Add button, you will now enter the details of the Host PC. In the PC name, enter the IP address of the Host PC. Beneath that, select the User account that you want to initiate the connection with (client). You can also optionally enter a Display name if you want.
Remote Desktop App Connection - After entering all of your information, click the Save button. Upon pressing the save button, the Remote Desktop software will launch a fullscreen version of the connection. When you turn on the connection, the app will prompt you for your Username and Password, which you can enter in order to gain access to it.
Note: Username refers to the local account name.
Client Side App Login Details
2. Remote Desktop Connection
If you don’t want to download a new, dedicated app for remote connection, Windows includes a built-in remote desktop app as well. The built-in app is basic, but it provides all of the necessary features for a smooth connection. The steps outlined below will assist you in connecting to a remote desktop using the built-in app provided:
-
- Press the Windows key for the “Remote Desktop Connection” app in the Start Menu.
Open Remote Desktop Connection - Enter the IP Address of the Host PC and the Username of the account you want to access on the Host PC.
Enter Host IP address and username - Enter the password of the User Account of the Host PC. This option will only show up if the host PC (and its account) is password-protected.
Enter host PC/user password
- Press the Windows key for the “Remote Desktop Connection” app in the Start Menu.
After all these steps, your connection will be successful, and you can now easily use your PC remotely over LAN. If you’re facing any issues with internal errors or a denied connection, our guides should be able to help you out.
Conclusion
The Windows Remote Desktop tool is a game-changer. Whether you’re connecting to a PC in the next room or across continents, the process is straightforward. Have you explored other remote features on Windows? Share your experiences or drop any questions in the comments below.
FAQs
Microsoft Remote Desktop is a modern app available for free from the Microsoft App Store. It offers more advanced features and capabilities compared to the built-in Remote Desktop Connection. On the other hand, the built-in app comes pre-installed with Windows and provides essential features for remote connections without the need for any additional downloads.
The essential protocol required for the Remote Desktop feature does not exist in the Home version of Windows. Thus, you can only utilize this feature in the Pro and Enterprise versions. However, there are workarounds available to enable RDP on Home versions, and you can check our guide for that.
A Dynamic IP changes every time a device connects to the internet. It’s suitable for occasional remote connections but can pose challenges for regular remote access. A Static IP remains consistent, making it easier for frequent remote connections. However, it might be considered less secure for business-oriented tasks.
If you’re using a third-party security solution, you may need to set up the rules manually to allow Remote Desktop connections. Navigate to the firewall settings of your third-party software and ensure you allow Remote Desktop to establish a connection.
You’ll need the IP address of the host PC (either dynamic or static based on your setup) and the username of the account on the host PC. If the host PC is password-protected, you will also require the password of that account to establish a connection.
-
- Open Control Panel and navigate to System and Security.
- Select “Allow an app through Firewall” in the Windows Defender Firewall subheading.
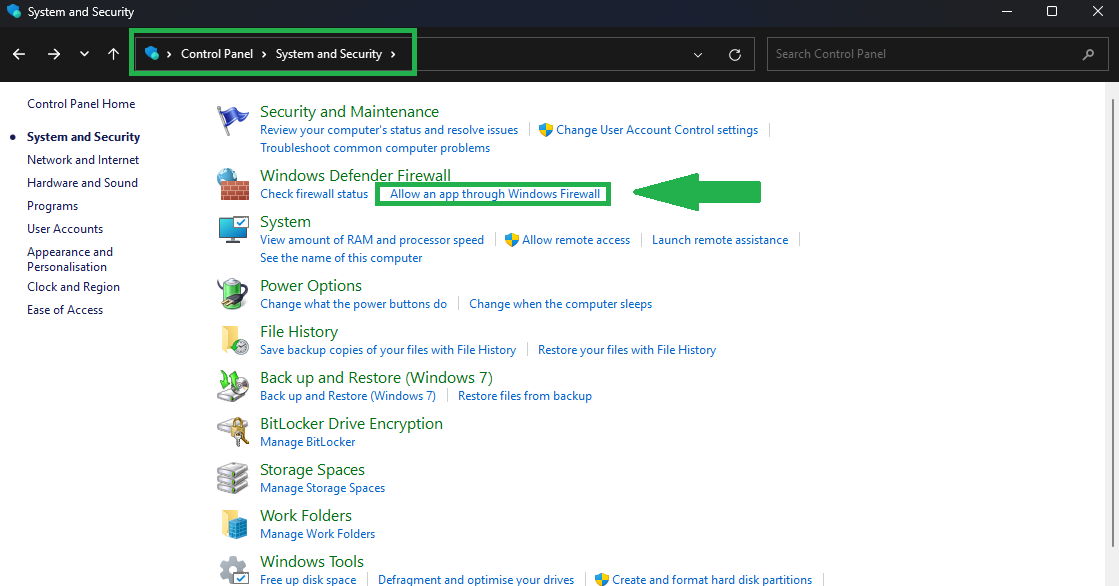
Select Windows Defender Firewall in Control Panel - Check Remote Desktop from the given list to allow the app through Firewall. This ensures connectivity through the Internet. For normal Windows users, this option will already be checked, and this step is not compulsory.
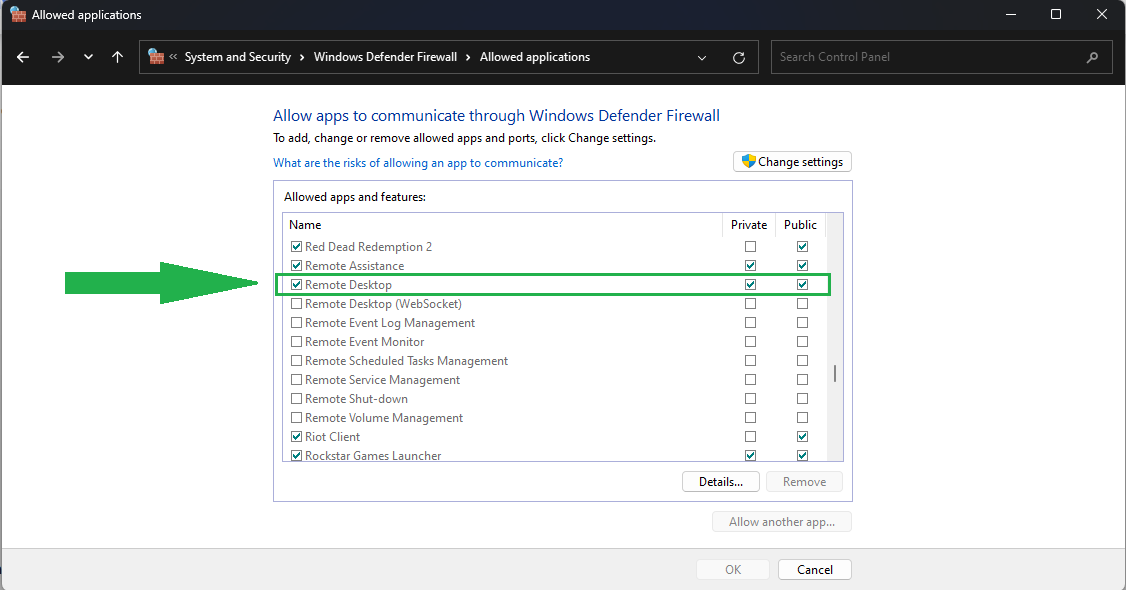
Check off Remote Desktop
Remote Desktop will now be enabled on your computer.
Server-Side Connection
After enabling Remote Desktop on Windows, the only thing left to do is connect to the host. However, there are two ways to connect to the host machine: one is temporary and the other is permanent. We’ve outlined both methods below for your convenience and to avoid confusion. After you’ve chosen between the two, that will complete your server-side (host) connection.
Understanding IP Addresses
-
Dynamic IP: Every device online is usually assigned a changing IP address each time it connects by default. While this can offer some security benefits, it might be challenging for those who need to regularly connect to the device remotely.
-
Static IP: Some users opt for a static IP, ensuring their device has a consistent IP address that stays the same. This is handy for more frequent remote connections but might be considered less secure, especially for business-oriented tasks.
Temporary Connection (Dynamic IP)
For a one-time remote connection, you can use the PC’s current dynamic IP address. Here’s how:
Finding Your Current IP
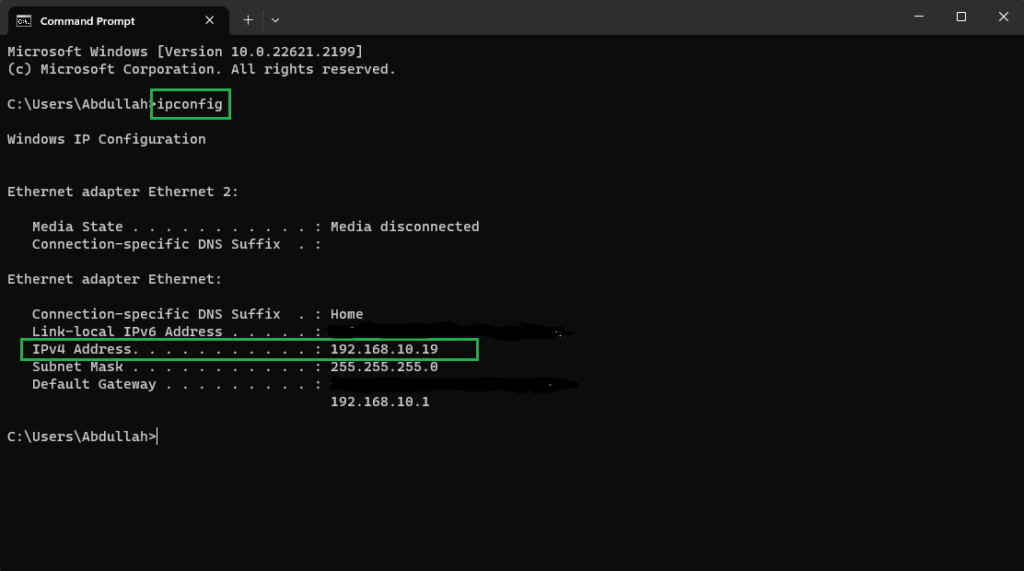
To determine your current IP, you simply need to type out a command in CMD (Command Prompt) and Windows will return your IPv4 Address that is required to connect to the PC Remotely.
-
- Using your Start Menu, Search for “CMD” and open it.
- Type “ipconfig” in the CMD
- Locate the IPv4 Address, note it down and move to the next section.
Permanent Connection (Static IP)
For establishing RDP connections regularly, you might want to use a static IP, but it requires some extra effort. Listed below are the pre-requisites and actual steps in order to get a static IP on your PC for RDP.
Default Gateway
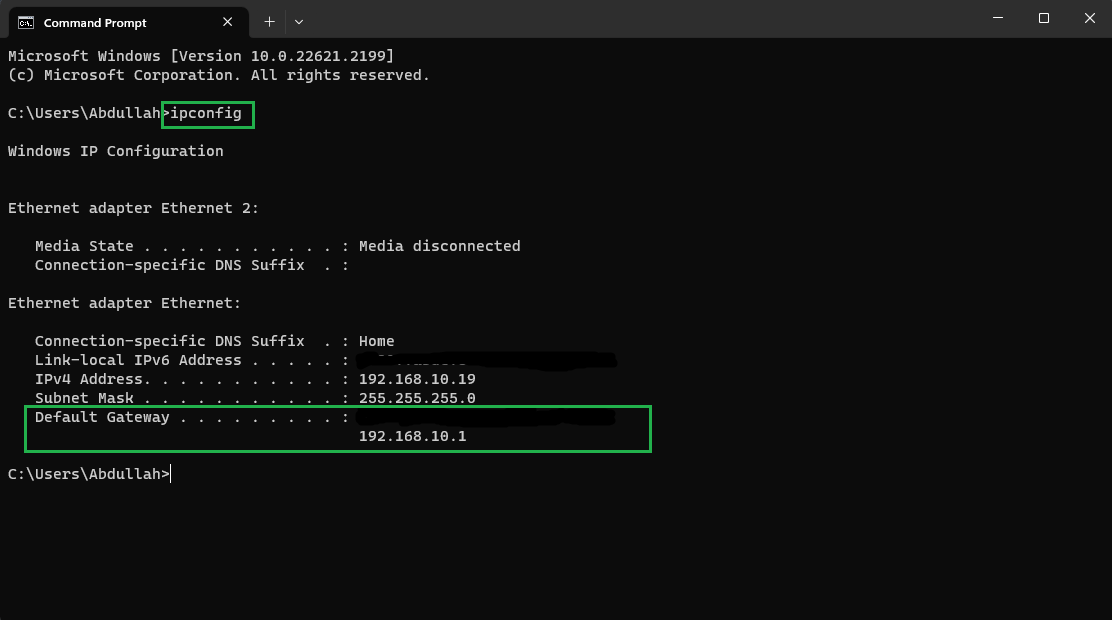
Each device in a local network communicates through a router. To send or receive data outside of this local network, the device talks with the router using its IP address, known as the default gateway. This gateway routes the data to its intended destination outside of the local network, and it’s essential to setting up a static IP.
You can find your network’s default gateway using the same steps as your IP address in the section above. Simply open Command Prompt, type ipconfig and press Enter. The gateway should be underneath your IP.
Setting Up Static IP
Follow the steps given below to set a Static IP on your computer:
-
- Press Win+I or use the Start menu to open Settings.
- Navigate to “Network and Internet.”
Network and Internet in Settings - In the Network and Internet settings, click on “Ethernet.”
Click on Ethernet - Scroll down in the Ethernet Settings and click Edit on the “IP Assignment” option.
Click on IP Assignment - From the dropdown menu, select “Manual” to assign a custom IP to your PC.
Select Manual from the menu -
Click on IPv4 and turn it on.
Toggle on IPv4 - Now, it’s time to fill in the IP settings and here’s how:
-
-
- IP address: Pick any IP address that’s in the same group as your router’s address (default gateway), but make sure it’s not one that your router might give out automatically (DHCP range). You can check your DHCP range from your router’s admin page/portal. For instance, if your range is from
192.168.1.2to192.168.1.100, you will choose an IP that’s outside of that, such as192.168.1.150.
- IP address: Pick any IP address that’s in the same group as your router’s address (default gateway), but make sure it’s not one that your router might give out automatically (DHCP range). You can check your DHCP range from your router’s admin page/portal. For instance, if your range is from
-
-
-
- Subnet mask: Use 255.255.255.0 as your subnet mask.
- Default Gateway: Enter the default gateway you just fetched earlier.
- DNS: For this, we recommend using Google’s DNS which is given below along with the other settings:
-
Preferred DNS: 8.8.8.8
DNS Over HTTPS: Off
Alternative DNS: 1.1.1.1
DNS Over HTTPS: Off
Verify that you’ve put all the correct numbers and click Save. This ends the server-side, aka host setup, for our remote desktop connection.
Client-Side Connection
Once you’ve set up the host computer, you’re ready to connect from the client side. To do this, you need the username of the account on the host PC, which can be seen from its Start menu. If the PC is password-protected, you will also need the password from the owner.
After the user has been identified, move on to the client-side computer where we will show you how to connect using the Microsoft Remote Desktop application as well as the Remote Desktop Connection app.
1. Microsoft Remote Desktop
The modern Microsoft RDP app does not come pre-installed in Windows, but it’s easily available for free. It’s more advanced and offers extra features missing from the native app that we’ll discuss next. For now:
- Navigate to the Microsoft App Store and search for the Remote Desktop application. Download the app as shown below:
Remote Desktop Application - After installation is completed, open the app and click on the Add button on the top right. This will save the Remote Desktop you are connecting to for future use.
Add Host PC on Remote Desktop - After clicking on the Add button, you will now enter the details of the Host PC. In the PC name, enter the IP address of the Host PC. Beneath that, select the User account that you want to initiate the connection with (client). You can also optionally enter a Display name if you want.
Remote Desktop App Connection - After entering all of your information, click the Save button. Upon pressing the save button, the Remote Desktop software will launch a fullscreen version of the connection. When you turn on the connection, the app will prompt you for your Username and Password, which you can enter in order to gain access to it.
Note: Username refers to the local account name.
Client Side App Login Details
2. Remote Desktop Connection
If you don’t want to download a new, dedicated app for remote connection, Windows includes a built-in remote desktop app as well. The built-in app is basic, but it provides all of the necessary features for a smooth connection. The steps outlined below will assist you in connecting to a remote desktop using the built-in app provided:
-
- Press the Windows key for the “Remote Desktop Connection” app in the Start Menu.
Open Remote Desktop Connection - Enter the IP Address of the Host PC and the Username of the account you want to access on the Host PC.
Enter Host IP address and username - Enter the password of the User Account of the Host PC. This option will only show up if the host PC (and its account) is password-protected.
Enter host PC/user password
- Press the Windows key for the “Remote Desktop Connection” app in the Start Menu.
After all these steps, your connection will be successful, and you can now easily use your PC remotely over LAN. If you’re facing any issues with internal errors or a denied connection, our guides should be able to help you out.
Conclusion
The Windows Remote Desktop tool is a game-changer. Whether you’re connecting to a PC in the next room or across continents, the process is straightforward. Have you explored other remote features on Windows? Share your experiences or drop any questions in the comments below.
FAQs
Microsoft Remote Desktop is a modern app available for free from the Microsoft App Store. It offers more advanced features and capabilities compared to the built-in Remote Desktop Connection. On the other hand, the built-in app comes pre-installed with Windows and provides essential features for remote connections without the need for any additional downloads.
The essential protocol required for the Remote Desktop feature does not exist in the Home version of Windows. Thus, you can only utilize this feature in the Pro and Enterprise versions. However, there are workarounds available to enable RDP on Home versions, and you can check our guide for that.
A Dynamic IP changes every time a device connects to the internet. It’s suitable for occasional remote connections but can pose challenges for regular remote access. A Static IP remains consistent, making it easier for frequent remote connections. However, it might be considered less secure for business-oriented tasks.
If you’re using a third-party security solution, you may need to set up the rules manually to allow Remote Desktop connections. Navigate to the firewall settings of your third-party software and ensure you allow Remote Desktop to establish a connection.
You’ll need the IP address of the host PC (either dynamic or static based on your setup) and the username of the account on the host PC. If the host PC is password-protected, you will also require the password of that account to establish a connection.
Reviewed by Huzaifa Haroon


