Troubleshoot Photoshop Freezing and Lagging in Windows
Photoshop freezes can often be caused by the application’s memory allocation, the graphics card used, and more. The interference of third-party files with the application can cause it to lag or freeze at random instances as well.
In addition, user preferences for the application can, in some cases, negatively impact the performance of the application which leads to lag and stutters. In this article, we will be listing down several methods that you can use on your system to resolve the issue in question.
1. Use the Primary Graphics Card (if applicable)
The first thing you should do when starting to troubleshoot the Photoshop freezing issue is to ensure you are using the primary graphics card. In most cases, higher-end motherboards come with an integrated graphics card that can be used to utilize less power and also save battery on laptops.
If your motherboard comes with an integrated GPU while you have a dedicated graphics card installed, you will need to make sure that Photoshop is using the primary GPU on your computer. Integrated graphics cards are not meant to be used for creative purposes, such as Photoshop.
Thus, if your Photoshop app uses the integrated GPU, it will face freezes and lag. Follow the instructions below to change the graphics card used by Photoshop:
- First, open the Windows Settings app by pressing the Windows key + I on your keyboard.
- In the Settings window, navigate to System > Display > Graphics.
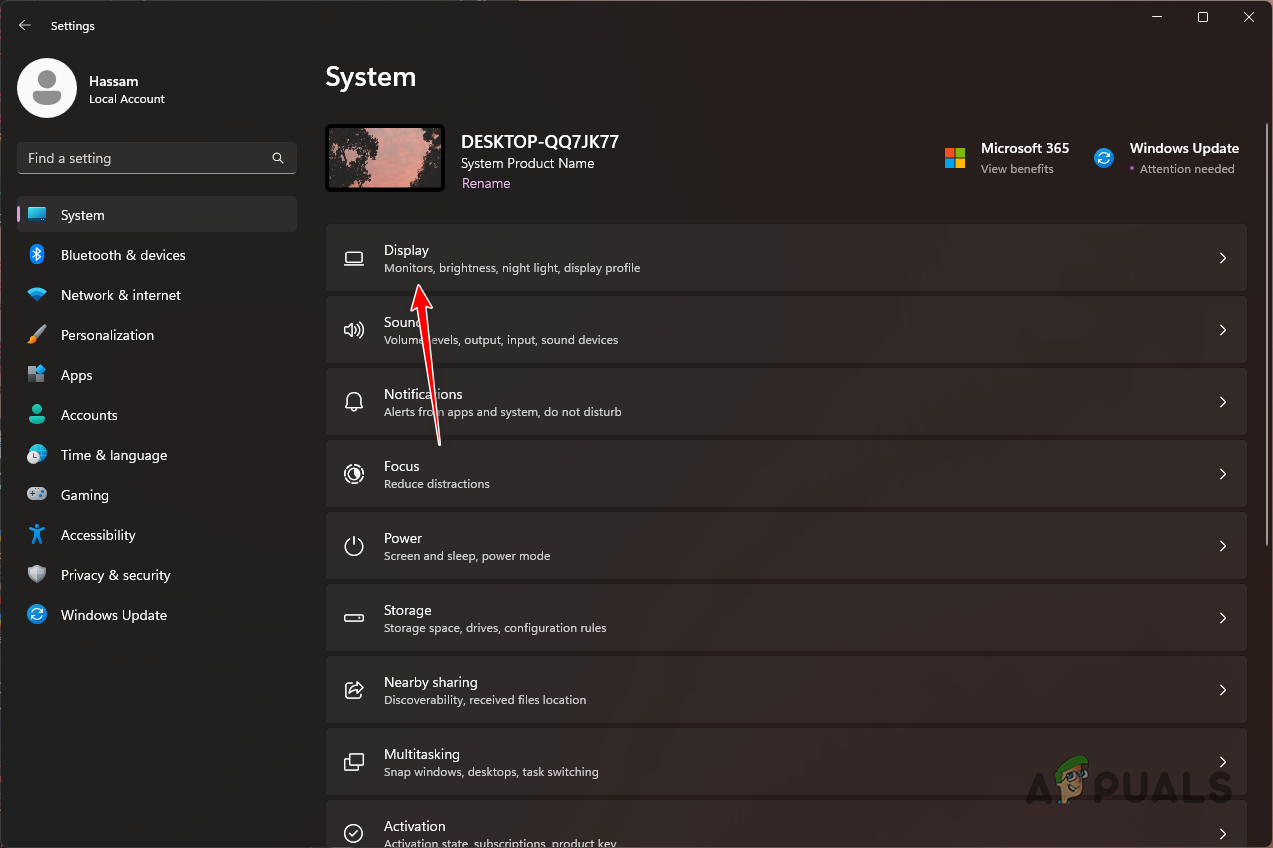
Navigating to Display Settings - There, locate and select Photoshop.
- After that, click on the Options button.
- On the Graphics preference screen, choose the High performance option and click Save.
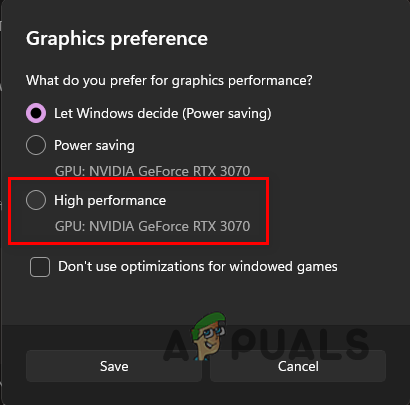
Changing Graphics Preference - Once you do that, restart Photoshop and see if the problem is still there.
2. Disable Third-Party Antivirus
One of the reasons the issue occurs can be the third-party antivirus program installed on your computer. This happens when the antivirus program keeps interfering with the application in the background which causes it to freeze for a while.
Antivirus programs intervene with the other processes running on your computer which can often originate various issues. If you are using a third-party antivirus program, turn it off and see if Photoshop still freezes. In case the problem has gone away, you can mitigate the issue by whitelisting the application in your antivirus settings.

Alternatively, you could also completely uninstall the antivirus program from your computer. This is because Windows Defender has gotten quite good over the years to keep your PC safe and protected without the need for a third-party security program.
3. Increase Memory Allocation
Another reason that can cause Photoshop to lag on your computer can be the memory allocation setting. Photoshop allows you to allocate a specific amount of memory on your computer that can be used by the app. This allows you to optimize the application on your computer by improving the performance, and more.
In some scenarios, when the allocated memory is insufficient for Photoshop, you will encounter lag and freezes while using the app. If this scenario is applicable, you can resolve the issue by increasing Photoshop’s memory allocation.
Follow the instructions below to do this:
- First, open the Photoshop app on your computer.
- In the menu bar, navigate to Edit > Preferences > Performance.
- On the Performance tab, use the Let Photoshop Use option to increase the allocated memory. We recommend increasing it to 80-85%.
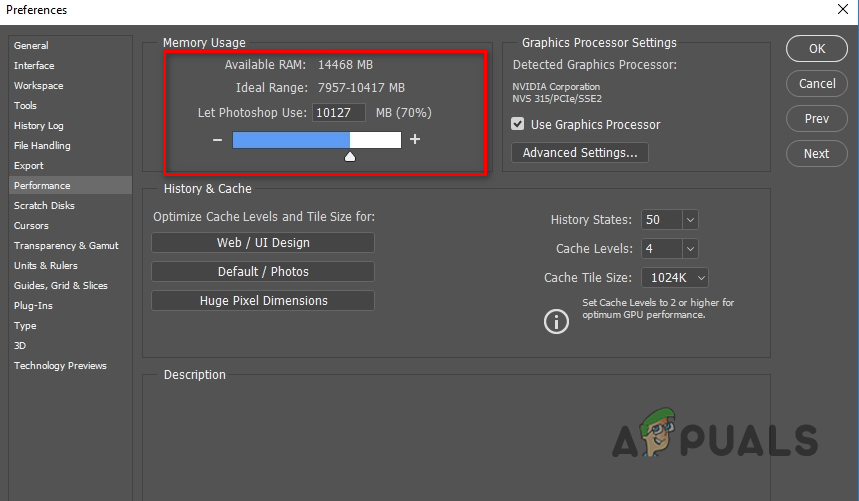
Adjusting Photoshop Memory Allocation - After that, restart Photoshop.
- See if that fixes the issue.
4. Reset Photoshop Font Cache
Photoshop uses a local cache on your computer to store information about the various fonts available and their features. In some scenarios, the font cache on your computer can cause Photoshop to lag and freeze, especially when a font is loaded or used.
In this case, you can mitigate the issue by resetting the font cache. This is entirely safe to do and it will not remove any fonts from your computer. Resetting the font cache will force Photoshop to create a new one, thus, resolving any issue caused by it.
Follow the instructions below to reset the font cache:
- First, close Photoshop and the Creative Cloud app on your PC.
- Then, open the Run dialog box by pressing the Windows key + R on your keyboard.
- In the Run dialog box, type in %AppData% and hit the Enter key.
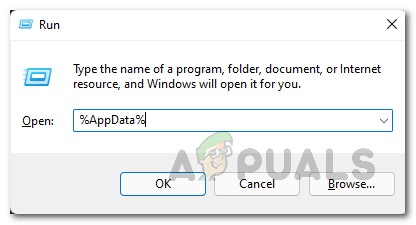
Navigating to AppData Directory - This will open a File Explorer window. Navigate to Adobe > Adobe Photoshop.
- There, locate the CT Font Cache folder and permanently delete it.
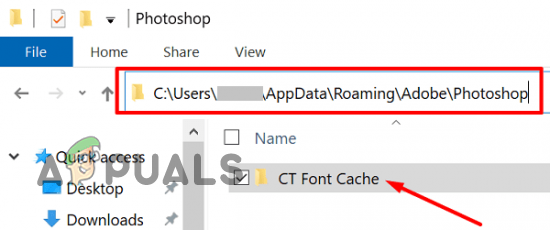
Deleting Photoshop CT Font Cache - After that, open Photoshop to see if the issue is still there.
5. Reset Photoshop Preferences
You can customize Photoshop to your liking to fit your workflow by setting up your preferences. This includes various things such as display options, performance options, presets, scratch disks, and more. If the lag and freezes have recently started and the app ran fine before, the issue can be due to your preferences.
In such a scenario, you can resolve the issue by resetting your Photoshop preferences. To reset your Photoshop preferences, follow the instructions below:
- First, open the Photoshop app on your computer.
- Then, navigate to Edit > Preferences > General in the top-left corner.
- On the Preferences window, click on the Reset Preferences on Quit option.
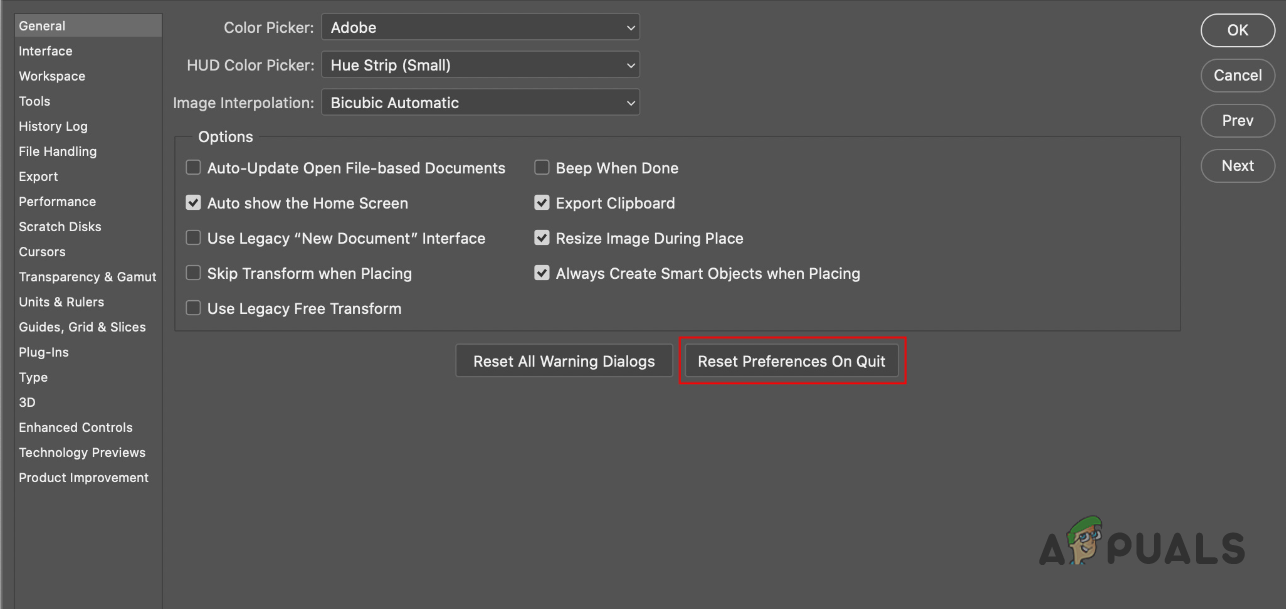
Resetting Photoshop Preferences - Click OK on the follow-up dialog box.
- After that, restart Photoshop and see if the problem persists.
6. Update Graphics Drivers
In some instances, Photoshop lag and freezes can be triggered by the graphics drivers on your computer. This is because Photoshop is a GPU-intensive application. If the app is using the graphics processor on your computer while the graphics drivers are obsolete or encountering an issue due to previous updates, the issue in question is likely to occur.
In this case, you will have to uninstall the graphics drivers on your computer and perform a fresh installation of the latest drivers available for your graphics card. To do this, you can use a third-party utility called Display Driver Uninstaller (DDU) which removes every trace of your graphics driver from your computer.
Follow the instructions below to do this:
- First, download the latest version of Display Driver Uninstaller (DDU) from the official website here.
- Extract the downloaded file to a desired location.
- Navigate to the extracted folder and open the Display Driver Uninstaller.exe file.
- Once DDU starts, you will be shown the General Options window. Click Continue to proceed.
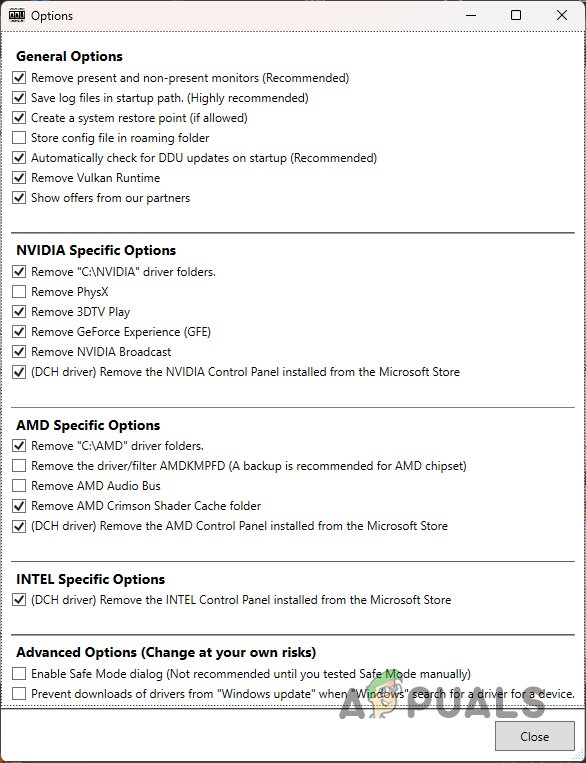
DDU General Options - After that, select GPU from the Select device drop-down menu.
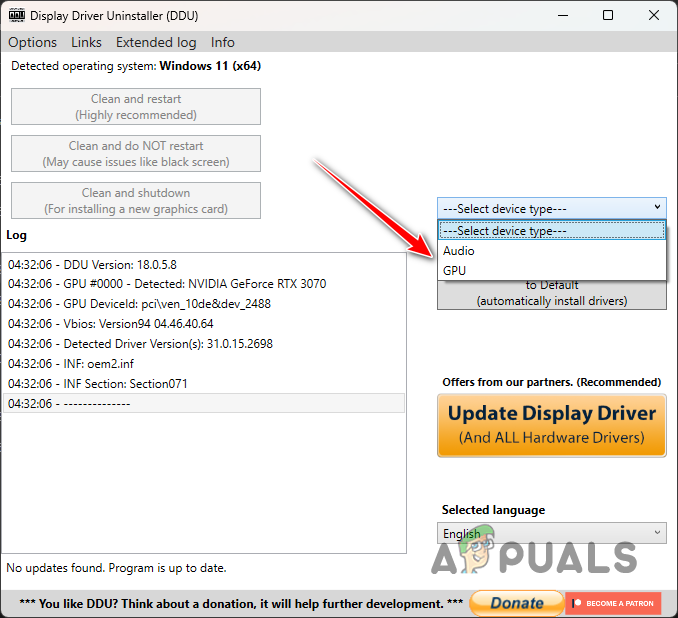
Choosing GPU as the Device Type - Then, choose your graphics card manufacturer from the Select device type drop-down menu.
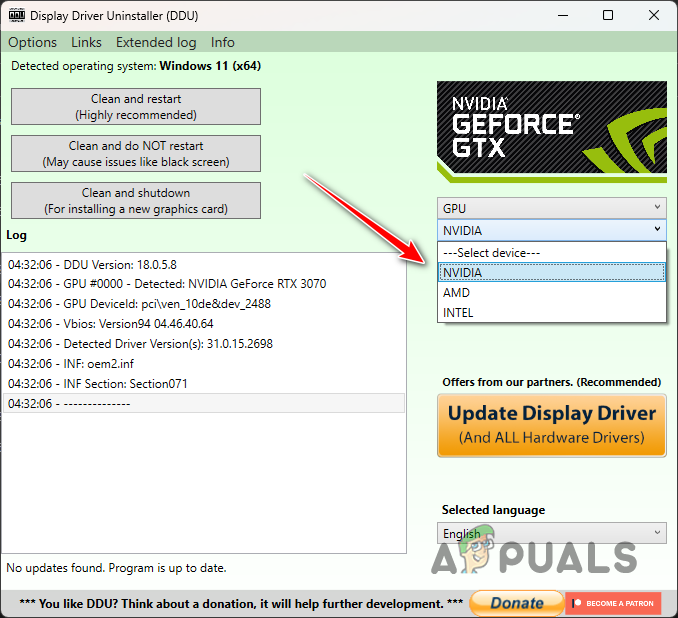
Choosing GPU Manufacturer - Finally, click the Clean and restart option to uninstall your graphics drivers.
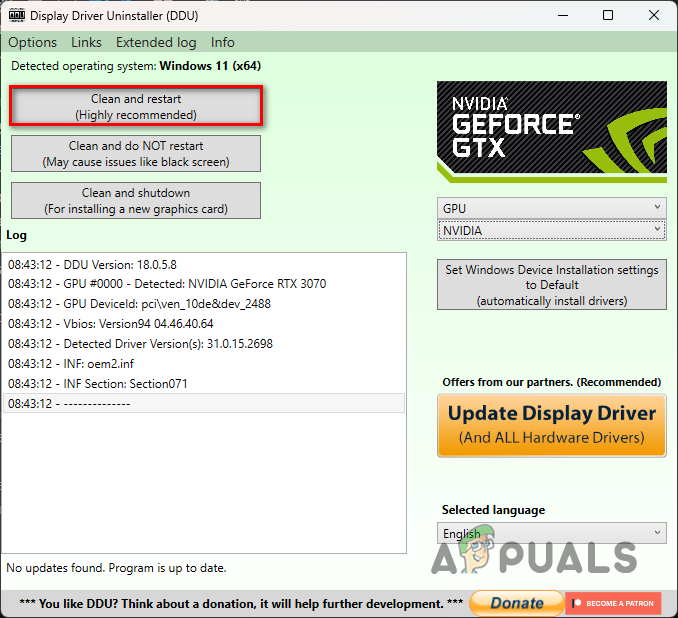
Uninstalling Graphics Drivers - After your PC boots up, head to your graphics card manufacturer’s website and download the latest drivers available for your computer.
- Install the new drivers and open Photoshop to see if the issue is still there.


