Fix: Error (0x8004010F) Outlook Data File Cannot be Accessed
 Reviewed by Muhammad Zubyan
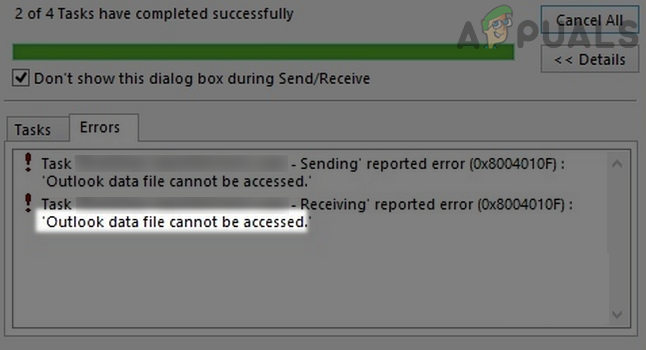
Outlook error 0x8004010F occurs when you try to send or receive an email in Outlook. It occurs if Outlook is unable to access the data file. Many users have reported that this issue occurs mostly during the migration of an old Outlook file. There are two variations of this error, and it depends on whether you are sending an email or receiving it.
- Error when sending email: Sending’ reported error (0x8004010F) ‘Outlook data file cannot be accessed).’
- Error when receiving email: Receiving’ reported error (0x8004010F) ‘Outlook data file cannot be accessed).’
In this article, we will discuss the causes of Outlook error 0x8004010F and how to fix it. We will also explore how to prevent this error from occurring again.
Before we begin, you have to understand how Outlook operates and why Outlook’s data files, commonly known as OST (Offline Storage Files) and PST (Personal Storage Table), are essential for sending or receiving an email.
What are these Outlook data files, and why are they so important?
An Outlook data file (PST) or Offline Outlook Data File (OST) contains all your emails and other important information required for Outlook to properly display your messages. When you add an email account to Outlook, all your email messages are downloaded and stored in these data files. These files act like an offline copy of all your mailbox information, which is stored on the email server.
Now, why are they so important? Well, these files contain all your mailbox information, and if these files are corrupted or not working as intended, then Outlook will be stuck in a loop and won’t know where to store more email information. This is because these files contain all the email messages you send or receive. That’s why the ‘Outlook data file cannot be accessed’ error appears.
There are many other errors related to PST and OST files as well. Two more errors are often faced alongside this error if the Outlook data file is corrupted:
For more information and references regarding the information above, Please visit Microsoft’s Official Blog Page on ‘OST & PST Files.’
What are the causes of Outlook error 0x8004010F?
Although the main cause of this error is a corrupted Outlook data file, this error can also be caused by several other factors. These factors include a corrupted Outlook data file, conflicting applications, or a corrupt Office installation.
- Conflicting Applications: If there is an application on your system, such as OneDrive, that interferes with Outlook’s access to the data file (especially if the file is located inside the OneDrive backup folder), it can cause a data file access issue.
- Corrupt Outlook Data File: If the Outlook data file itself is corrupted, it may be the reason for the error you are experiencing.
- Corrupt Cached Exchange Data:If Outlook is configured to use cached Exchange mode, corrupted cached data in Outlook may be the cause of the data file access issue.
- Corrupt Office Installation: If the Office suite installation is corrupted, you may encounter issues with Outlook file access.
How can I fix Outlook error 0x8004010F?
Now that we know the main causes of this error, let’s explore some solutions to fix it. Our primary goal is to ensure that Outlook can access its OST or PST data files properly without any issues.
If the data file is inaccessible, then it must be corrupted or malfunctioning. Let’s take a look at each solution and see why it might help resolve the issue, then move on to detailed instructions for each solution.
- Launch Outlook as administrator:If Outlook does not have administrator privileges to access the directory where the Outlook data file is located, it can result in the issue of being unable to access the data file. In this case, launching Outlook as an administrator may resolve the problem.
- Perform a Clean Boot: Outlook might display the ‘data file cannot be accessed’ issue if another application or service on the system is limiting Outlook’s access to its data file. In this case, performing a clean boot of the system may prevent the problematic application or service from starting, which could resolve the problem.
- Disable Exchange Cached Mode of Outlook: If the associated Outlook account is used in Exchange Cached Mode, then the corrupted cached data could be the reason for the ‘Outlook data file cannot be accessed’ issue. In this case, you can fix the ‘Outlook data file cannot be accessed’ error by disabling the Exchange Cached Mode in Outlook.
- Repair the Office Installation: This can potentially fix the paths and correct corrupted installation issues with Outlook, which can help resolve errors with PST and OST files.
- Repair Inbox using the Scan PST utility: The data file access issue in Outlook could be a result of corruption in Outlook’s data file. Performing an inbox repair using the ScanPST utility (if the data file is in the PST format) may solve the problem.
- Fix Path of Data Files:If the path is defined incorrectly in Outlook’s registry settings, Outlook will fail to locate the data file. In this case, using the system’s registry to force the PST path might solve the problem.
- Edit the Mail-Related Settings of the System:There may be numerous email-related settings causing the data file access issue at hand, and modifying the relevant settings could potentially resolve the problem.
- Reinstall the MS Office: If none of the above methods work, then a corrupt installation of Office (which cannot be repaired) may be the cause of the data file problem. In this scenario, reinstalling Office might solve the problem.
1. Launching Outlook as Administrator
- Close Outlook completely.
- Run Outlook as an administrator.

Open Outlook as Administrator - Check if the issue is resolved.
- If not, open Command Prompt as an administrator.

Open Command Prompt as Administrator - Execute the following command:
icacls *.pst /setintegritylevel m
- Check if the issue is resolved.
2. Performing a Clean Boot
- Firstly, perform a clean boot of your PC. Make sure to disable OneDrive and its associated services during the clean boot process, as OneDrive is a known application that interferes with Outlook data files.

Disable Microsoft OneDrive at the System’s Startup - Once done, launch Outlook and check if the Outlook data file accessed problem is solved.
3. Disable Exchange Cached Mode of Outlook
- Close Outlook.
- Open Control Panel.

Open Control Panel - Go to Mail > Email Accounts.

Open Mail in Control Panel - Now, in the Email tab, select the problematic email account and click on Change.

Open Email Accounts in the Mail Setup - Then, near the right bottom of the window shown, open More Settings and head to the Advanced tab.

Select the Problematic Email Account and Click on Change - Now uncheck the option of Download Shared Folders and apply the changes made.\

Open More Settings of the Problematic Account in Outlook - Then launch Outlook and check if it is working fine.

Uncheck Download Shared Folders and Use Cached Exchange Mode - If not, head to the Advanced tab of the Email account’s More Settings (repeat steps 1 to 5) and uncheck Use Cached Exchange Mode.
- Afterward, apply the changes and launch Outlook to check if the data file cannot be accessed problem is cleared.
4. Repairing the Office Installation
- Restart your PC.
- Then, right-click on Windows and select Apps & Features.

Open Apps & Features - Now, in the right pane, expand the Microsoft Office installation and select Modify.

Modify the Office Installation - Select Quick Repair and click on Repair.

Quick Repair Office - Wait until the repair process completes.
- Check if the Outlook issue is resolved.
- If not, open the Office Repair menu again and select Online Repair.

Online Repair Office - Wait until the online repair process finishes.
- Check if the Outlook data file cannot be accessed problem is cleared.
5. Performing an Inbox Repair by Using the ScanPST Utility
- Firstly, make sure to enable the viewing of hidden and protected operating system files on the system.
- Now, exit Outlook and ensure that you close all of its related processes in the Task Manager.
- Then, right-click on Windows and select “Run.

Open the Run Command Box from the Quick Access Menu - Now navigate to the following path (as per the Office installation):
For Office 64-bit
\Program Files\Microsoft Office\root\Office16

For Office 32-bit
\Program Files (x86)\Microsoft Office\root\Office16

Open the Office16 Folder Through the Run Command Box - Then find and right-click on the ScanPST.exe.

Open ScanPST.exe as Administrator - Now select Run as Administrator and in the Inbox Repair Tool, Browse to the location of the PST file.

Browse for the Outlook Data File in the ScanPST Utility - Then, click on ‘Start‘ and wait until the process is complete. This may take some time, depending on the size of the PST file. If you encounter the ‘PST file is in use’ error, perform a clean boot of the PC (as discussed earlier), and then try the above steps once again. If Outlook is synced through a mobile phone (such as an iPhone), turn off the phone or disable Outlook Sync, and then attempt to use the ScanPST utility again.
- Once finished, launch Outlook and check whether the data file issue has been resolved.
6. Edit the System’s Registry to Force the PST Path
Warning: Proceed at your own risk and with the utmost care, as editing the system’s registry requires skill. If not done properly, you may cause irreparable damage to the system/data. It’s best to create a backup of your Windows registry and refer to the related forum before proceeding. Here’s a detailed guide on ‘Path of OST and PST Files in Microsoft Windows‘
- Click Windows, search for Registry Editor, right-click on it, and select Run as Administrator.

Open Registry Editor as Administrator - Now navigate to the following path:
Computer\HKEY_CURRENT_USER\Software\Microsoft\Office\16.0\Outlook

Create a New Expandable String Value Under The Outlook Registry Key - Then, in the left pane, right-click on Outlook and select New>> Expandable String Value.
- Now double-click on the value and enter the Value Name as ForcePSTPath.

Set the Value of the ForcePSTPath to the Data File’s Location - Then enter the value of the PST file path (like C:\Documents) in the field of Value Data and click on OK.
- Then close the Registry Editor and reboot your PC.
- Upon reboot, launch Outlook and check if its data file problem is cleared.
7. Edit the Mail-Related Settings of the System
There can be many email-related settings that might cause the data file access issue at hand, and editing the related settings may solve the problem.
7.1 Repair the Outlook Profile
If the Outlook profile is corrupt, it may result in data file access issues within Outlook. In this case, repairing the Outlook profile could potentially solve the problem.
- Exit Outlook and terminate its related processes in the system’s Task Manager.
- Then, click on Windows, search, and open the Control Panel.
- Now, near the top-right corner, switch to the Large Icons View and open Mail (or Mail 32-bit if the Office installation is 32-bit). If no Mail icon is shown in the Control Panel, make sure you are not using the Microsoft Store version of Outlook or Office.
- Then, in the Email tab, select the problematic account, and afterward, click on the Repair button..

Repair the Outlook Profile - Now follow the prompts on the screen to complete the process. You may have to enter your relevant E-mail credentials during the process.
- Once done, launch Outlook and check if it is clear of the data file access issue.
7.2 Use Additional Mailboxes Feature
If the issue occurs with the shared mailboxes, then using the additional mailboxes feature may solve the problem.
- Firstly, delete all the shared mailboxes (do not forget to back up the data files) and launch Outlook.
- Now, expand the File menu and select Account Settings > Account Settings.

Open Account Settings of Outlook - Then select the main account in use and click on Change.
- Now open More Settings and head to the Advanced tab.
- Then click on Add and add the shared mailboxes (one by one) to check if that resolves the file access issue.

Add Additional Mailboxes to the Main Account in Outlook - If not and the issue is occurring when sending/receiving emails, then make sure to enable one, Send on or Send as (not both), and then check if the Outlook issue is resolved.
7.3 Use the Change Folder Button
- Launch Outlook and open its File tab.
- Now, open Account Settings >> Account Settings, and select the problematic account.
- Then, click on “Change Folder” (near the bottom left) and select “Personal Folder/Inbox“. If the “Change Folder” button is not shown, you may be using IMAP.

Change Folder of the Outlook Profile - Now click on OK and check if the Outlook data file issue is resolved.
7.4 Create a New Data File in Outlook
- Open Mail in the system’s Control Panel and head to the Data Files tab..

Open Data Files in the Mail Setup - Now click on Add and save the new data file (make sure to choose a destination on the system drive).

Add a New Data File for the Outlook Profile - Then select the newly created Data File and click on Set as Default.

Set the New Data File as Default for the Outlook Profile - Now head to the Email tab and select the problematic account.
- Then click on Change Folder and select the newly created data file.
- Afterward, launch Outlook and check if it is clear of the data file issue.
- If not, open the File menu of Outlook and select Open & Export.
- Then click on Open Outlook Data File and navigate to the old PST file.

Open Outlook Data File in the Open & Export Menu - Now double-click on the PST file and check if that resolves the data file access issue.
7.5 Add the New Outlook Profile and Point it to the Data File
The Outlook data file issue might arise due to a corrupt Outlook profile. In this context, adding a new Outlook profile and pointing it to the problematic data file may solve the problem.
- Exit Outlook and end its related processes in the system’s Task Manager.
- Now, click on “Windows,” search for, and open the Control Panel.
- Then, change the View to Large Icons and open Mail or Mail (32-bit).
- Now, click on the Show Profiles button, and in the resulting window, select the problematic profile.

Open Show Profiles in the Mail Setup - Then click on Properties and select Data Files. Now select the problematic data file.

Open Properties of the Outlook Profile in Mail - Afterward, click on the Change File Location button and copy the address from the address bar.

Open Data Files in the Mail Setup - Then close all the opened Windows till the Mail window is shown and at that window, click on Add.

Open the File Location of the Outlook Data File - Then enter a name for the new profile and follow the on-screen instructions to complete the process.

Add a New Outlook Profile - Once done, open Mail from the Control Panel and select the new profile.
- Now, checkmark Prompt a Profile to be Used and click on Apply.

Enable Prompt for a Profile to be Used in the Mail Setup - Then launch Outlook and select the newly created profile. If no prompt is shown when Outlook is launched, then you may add the “PromptRepair” value with the value of 0 in the following registry path:
Computer\HKEY_CURRENT_USER\Software\Microsoft\Office\16.0\Outlook\PST
- Afterward, open the File menu of Outlook and select Open & Export. Now, in the right pane, click on Import/Export.

Click on Import/Export in the Open & Export Menu of Outlook - Then select Import from Another Program and File.

Import from Another Program or File in Outlook - Now click on Next and select Outlook Data File.

Select Outlook Data File in the Outlook Import - Then click on Next and browse to the data file (path noted at step 6).

Browse to the Outlook Data File and Select the Appropriate Duplicate Option - Now click on Next and select the appropriate option about duplicates.
- Once imported, check if the file’s access issue is cleared.
- If the issue persists, delete the old user profile in the Control Panel’s Mail applet (make sure to back up the data file) and then repeat the above steps to check if the issue is resolved.
- If that did not work, delete all the user profiles in the Control Panel’s Mail and add a new profile (as discussed earlier) but during the setup, use the old PST file to check if that lets you successfully solve the data file issue at hand.
8. Reinstalling the MS Office
- Corrected sentence: “Right-click on Windows and select Apps & Features.
- Now, expand the Office installation and click on ‘Uninstall.’
- Then confirm to uninstall Office, and afterward, follow the prompts on the screen to complete the uninstallation process.

Uninstall Office - Once done, restart your PC and upon restart, reinstall MS Office to check if the Outlook issue is resolved.
- If not, download the Official MS Office Uninstaller, and once downloaded, launch it as administrator.

Download Office Uninstallation Tool from Microsoft Website - Then follow the prompts on the screen to complete the process.

Uninstall Microsoft Office Through the Uninstall Tool - Once uninstalled, restart your system, and upon restart, reinstall the Office suite.
- Once done, launch Outlook and hopefully, it will be clear of the data file access issue.
That’s it! It’s very important to always keep a backup of your Outlook data file to prevent this issue from happening again. Microsoft have an official guide on backing-up Outlook data file. Refer to, “Back up your email Outlook for Microsoft 365 Outlook 2021 Outlook 2019 Outlook 2016 Outlook 2013”
If none of these solutions fixed the problem you are facing, then you must contact Microsoft Office tech support and explain the problem to them, because in some cases the root cause and solution can be difficult to precisely track down. Microsoft also has an official blog page that contains a repairing tool along with a guide. If you need more information, Please refer to “Repair Outlook Data Files (.pst and .ost)“. Furthermore, you can leave a comment down below, and our expert technicians will respond to you in no time!
Reviewed by Muhammad Zubyan