MSI Z370 Gaming Pro Carbon Motherboard Review
MSI stands for Micro-Star Int’l. When it comes to the high-end enthusiast PC components MSI is a name needing no introduction. They have established themselves among the top leading manufacturers of the PC stuff. MSI was established in 1986 and was manufacturing the motherboards. It was not until 1997 when MSI announced their first graphics card and barebone product. They become a public company in 1998. In 2000 they announced their first server product. In 2003, they announced their first Notebook product. MSI CE products won IF Design Award in 2005 and 2006. There has been no stopping when it comes to continuous innovation, breakthrough designs and gamers focus in mind. Keeping up with the industry trend they have ventured into the Peripherals, CPU Cooler and PC Chassis lines as well. They are focused on building and supporting the eSports community. MSI Gaming is a brand that has excelled in providing some cool solutions to the gamers and PC users alike. Dedicated to gamer-driven innovation, MSI leverages its remarkable R&D strengths to craft top-notch, well-acclaimed notebook PCs, graphics cards, motherboards, and desktop PCs.
PRODUCT INFO MSI Z370 Gaming Pro Carbon Manufacture MSI Available at View at Amazon
All these distinctive products have made MSI a forerunner in the high-end market. Also adding to the lineup are cloud servers, tailor-made IPCs, intelligent robotic appliances and human-centric vehicle electronics that further demonstrate MSI’s strengths and endeavors in artificial intelligence, commercial and IOT (Internet of Things) markets.
Today, I will be taking a look at the Gaming Pro Carbon motherboard from MSI in the Z370 chipset from Professional Gaming category. It’s another variant is also available which is MSI Z370 Gaming Pro Carbon AC that comes with the WiFi module. Here are the highlights of the salient features of this motherboard:
- Supports 9th / 8th Gen Intel® Core™ / Pentium® Gold / Celeron® processors for LGA 1151 socket
- Supports DDR4 Memory, up to 4000+(OC) MHz
- MYSTIC LIGHT: 16.8 million colors / 17 effects controlled in one click. MYSTIC LIGHT EXTENSION supports both RGB and RAINBOW LED strip.
- Lightning Fast Game experience: 2x TURBO M.2, Intel Optane Memory Ready. M.2 Shield, LIGHTNING USB 3.1 GEN2
- AUDIO BOOST 4 with NAHIMIC 2+: Studio grade sound quality for the most immersive gaming experience
- DDR4 Boost: Fully isolated, shielded and optimized DDR4 PCB design to give your DDR4 memory a performance boost.
- GAMING LAN, powered by Intel®: The best online gaming experience with lowest latency and bandwidth management.
- MULTI-GPU: With STEEL ARMOR PCI-E slots. Supports 2-Way NVIDIA SLI™ & 3-Way AMD Crossfire™
- VR Ready: Best virtual reality game experience without latency, reduces motion sickness.
- Military Class 5, Guard-Pro: Latest evolution with high quality Japanese components for best protection and efficiency.
- In-Game Weapons: Game Boost, GAMING Hotkey, X-Boost, WTFast.
- EZ Debug LED: Easiest way to troubleshoot.
- Click BIOS 5: Award-winning BIOS with high resolution scalable font, favorites and search function.
- GAMING CERTIFIED: 24-hour on- and offline game and motherboard testing by eSports players.
Product: Z370 Gaming Pro Carbon
Manufacturer: MSI
Price: $199.99/- [At the time of the review]
Packaging and Unboxing
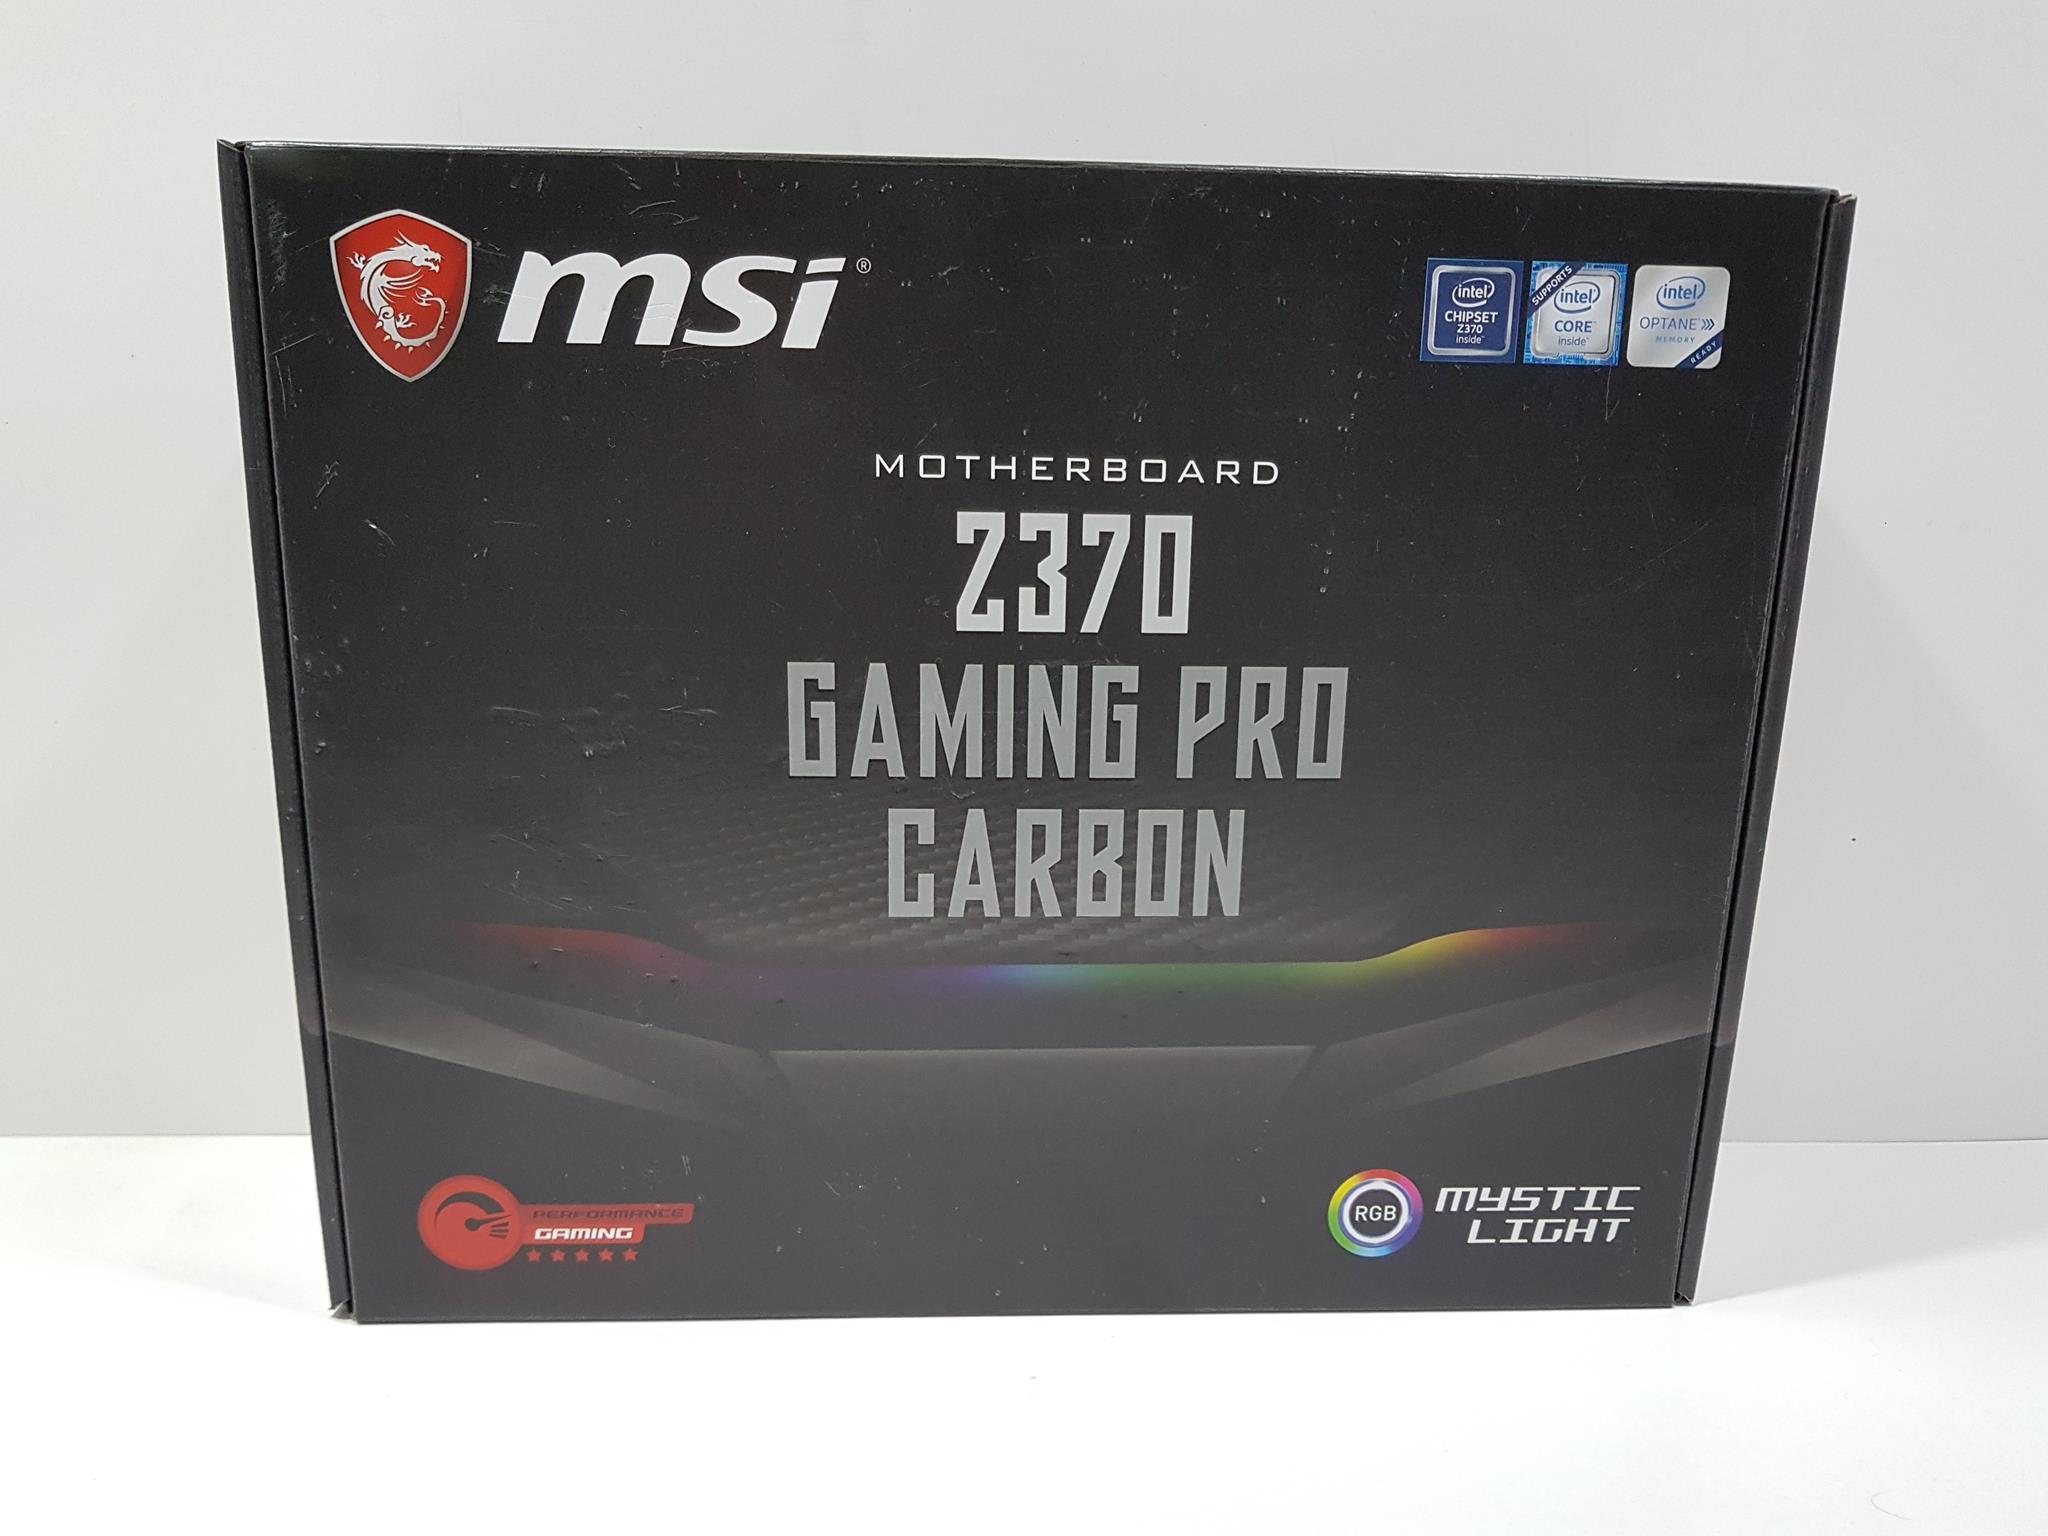
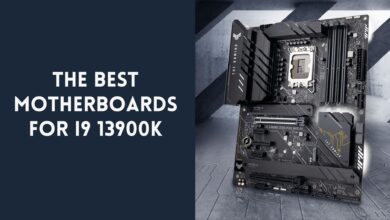
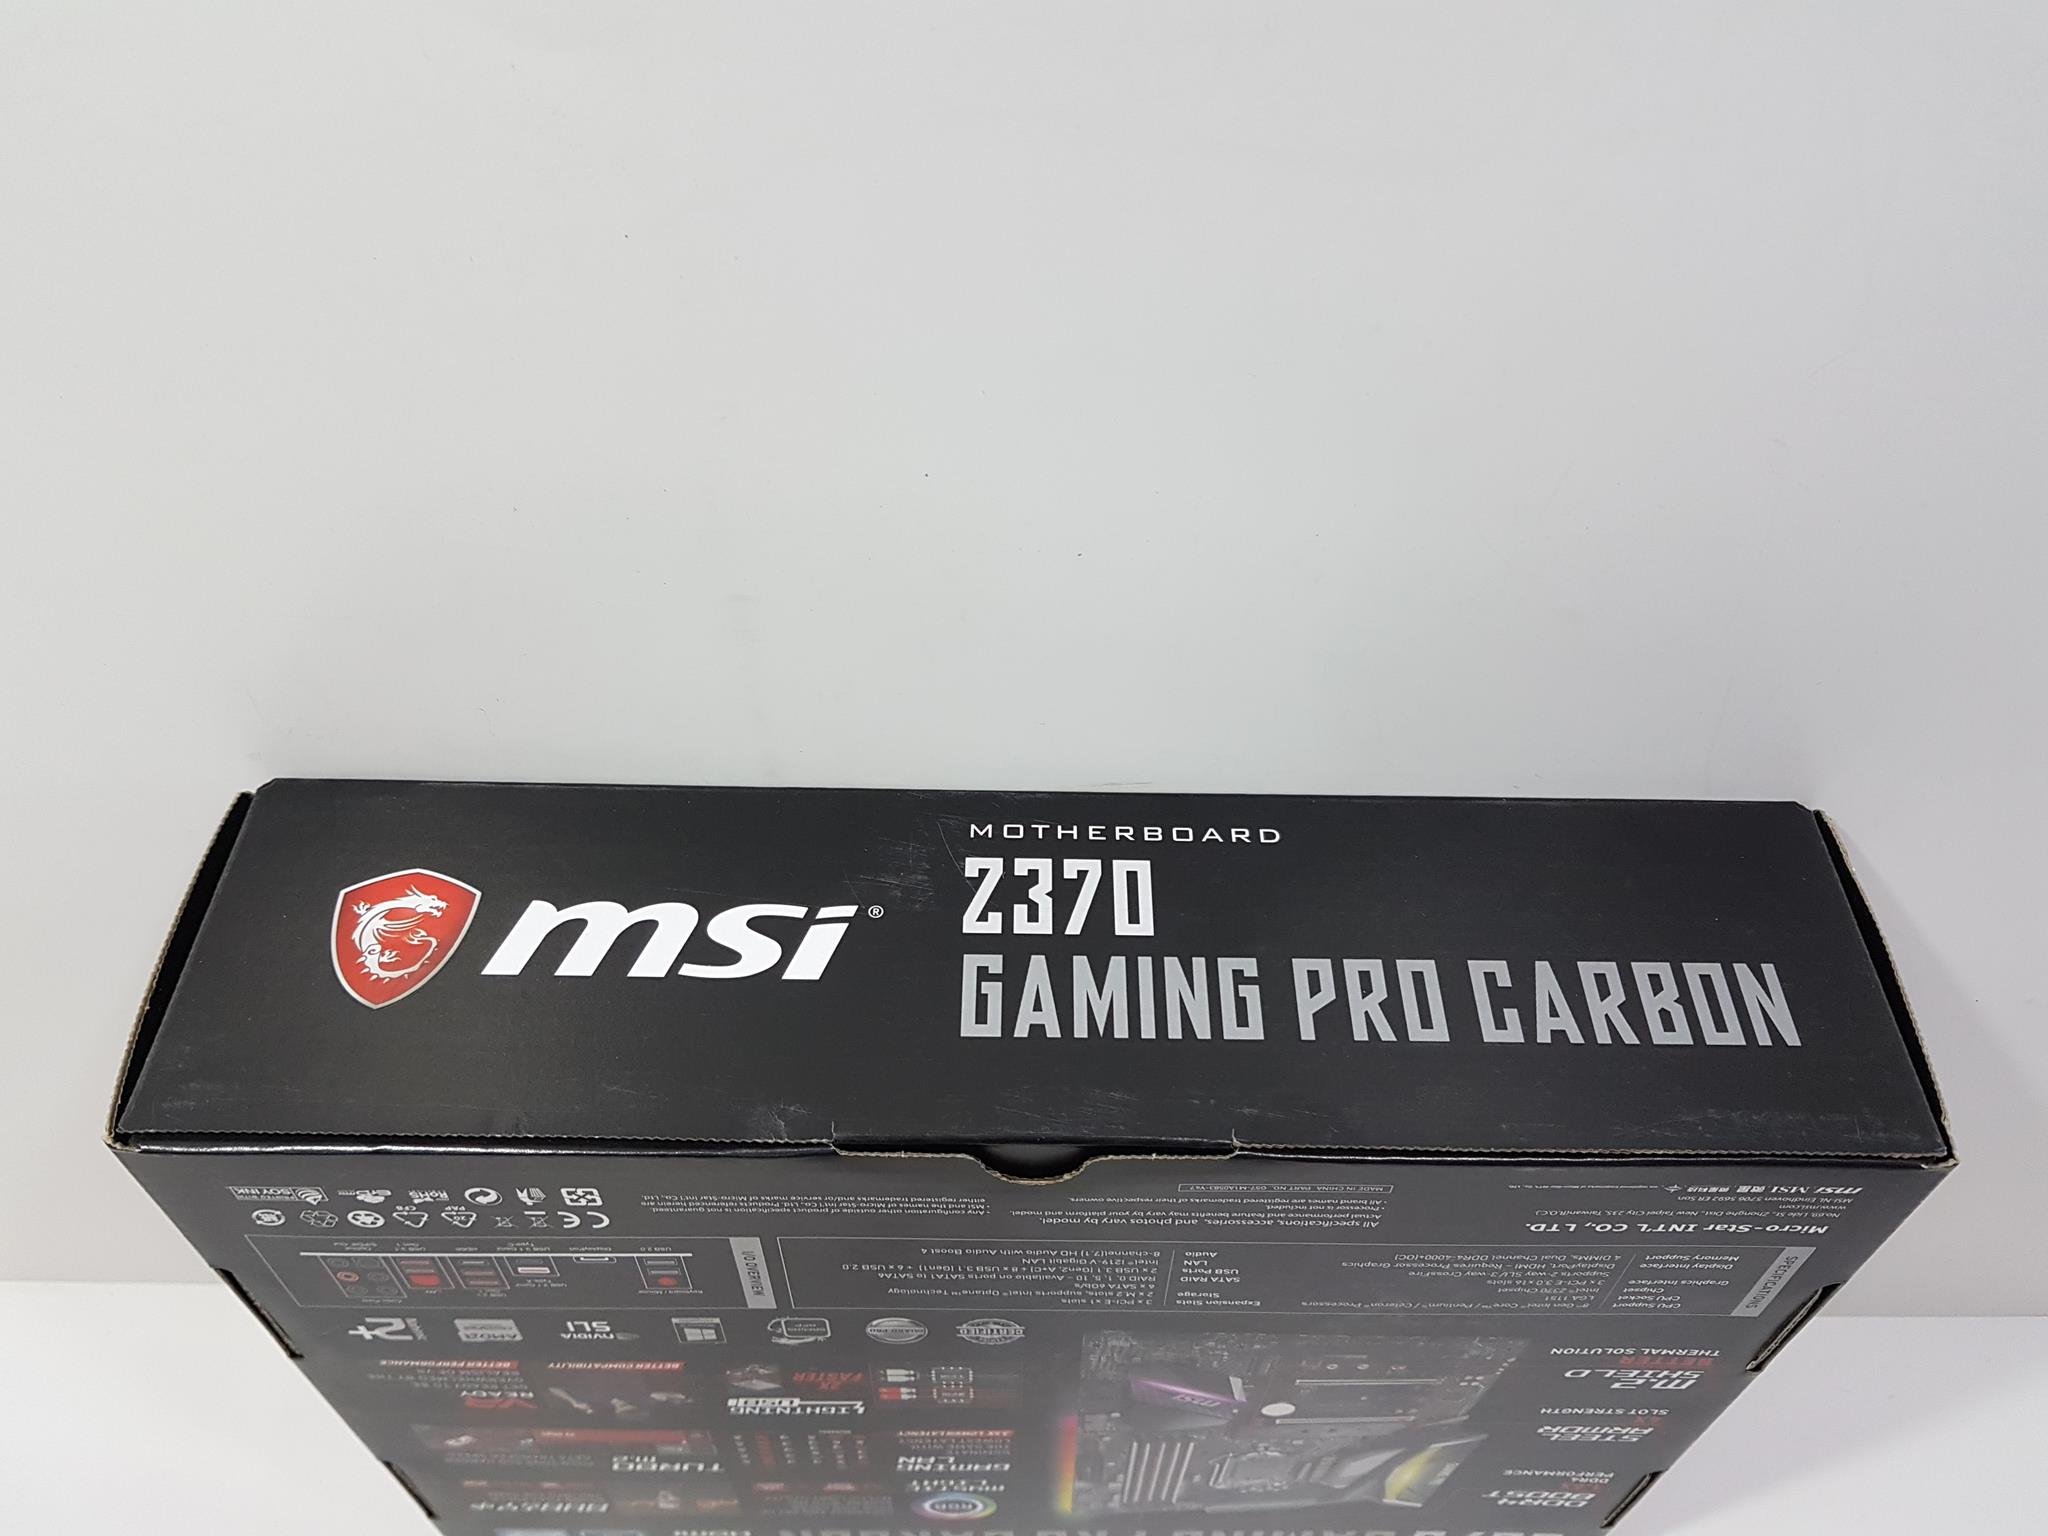
The motherboard comes inside a cardboard box. The top side of the box has an MSI brand logo and name printed on the top left. The motherboard has Intel Z370 chipset and is Optane Memory Ready. The text Motherboard MSI Z370 Gaming Pro Carbon is printed in the middle section. It is MSI Mystic Lighting (RGB) enabled.
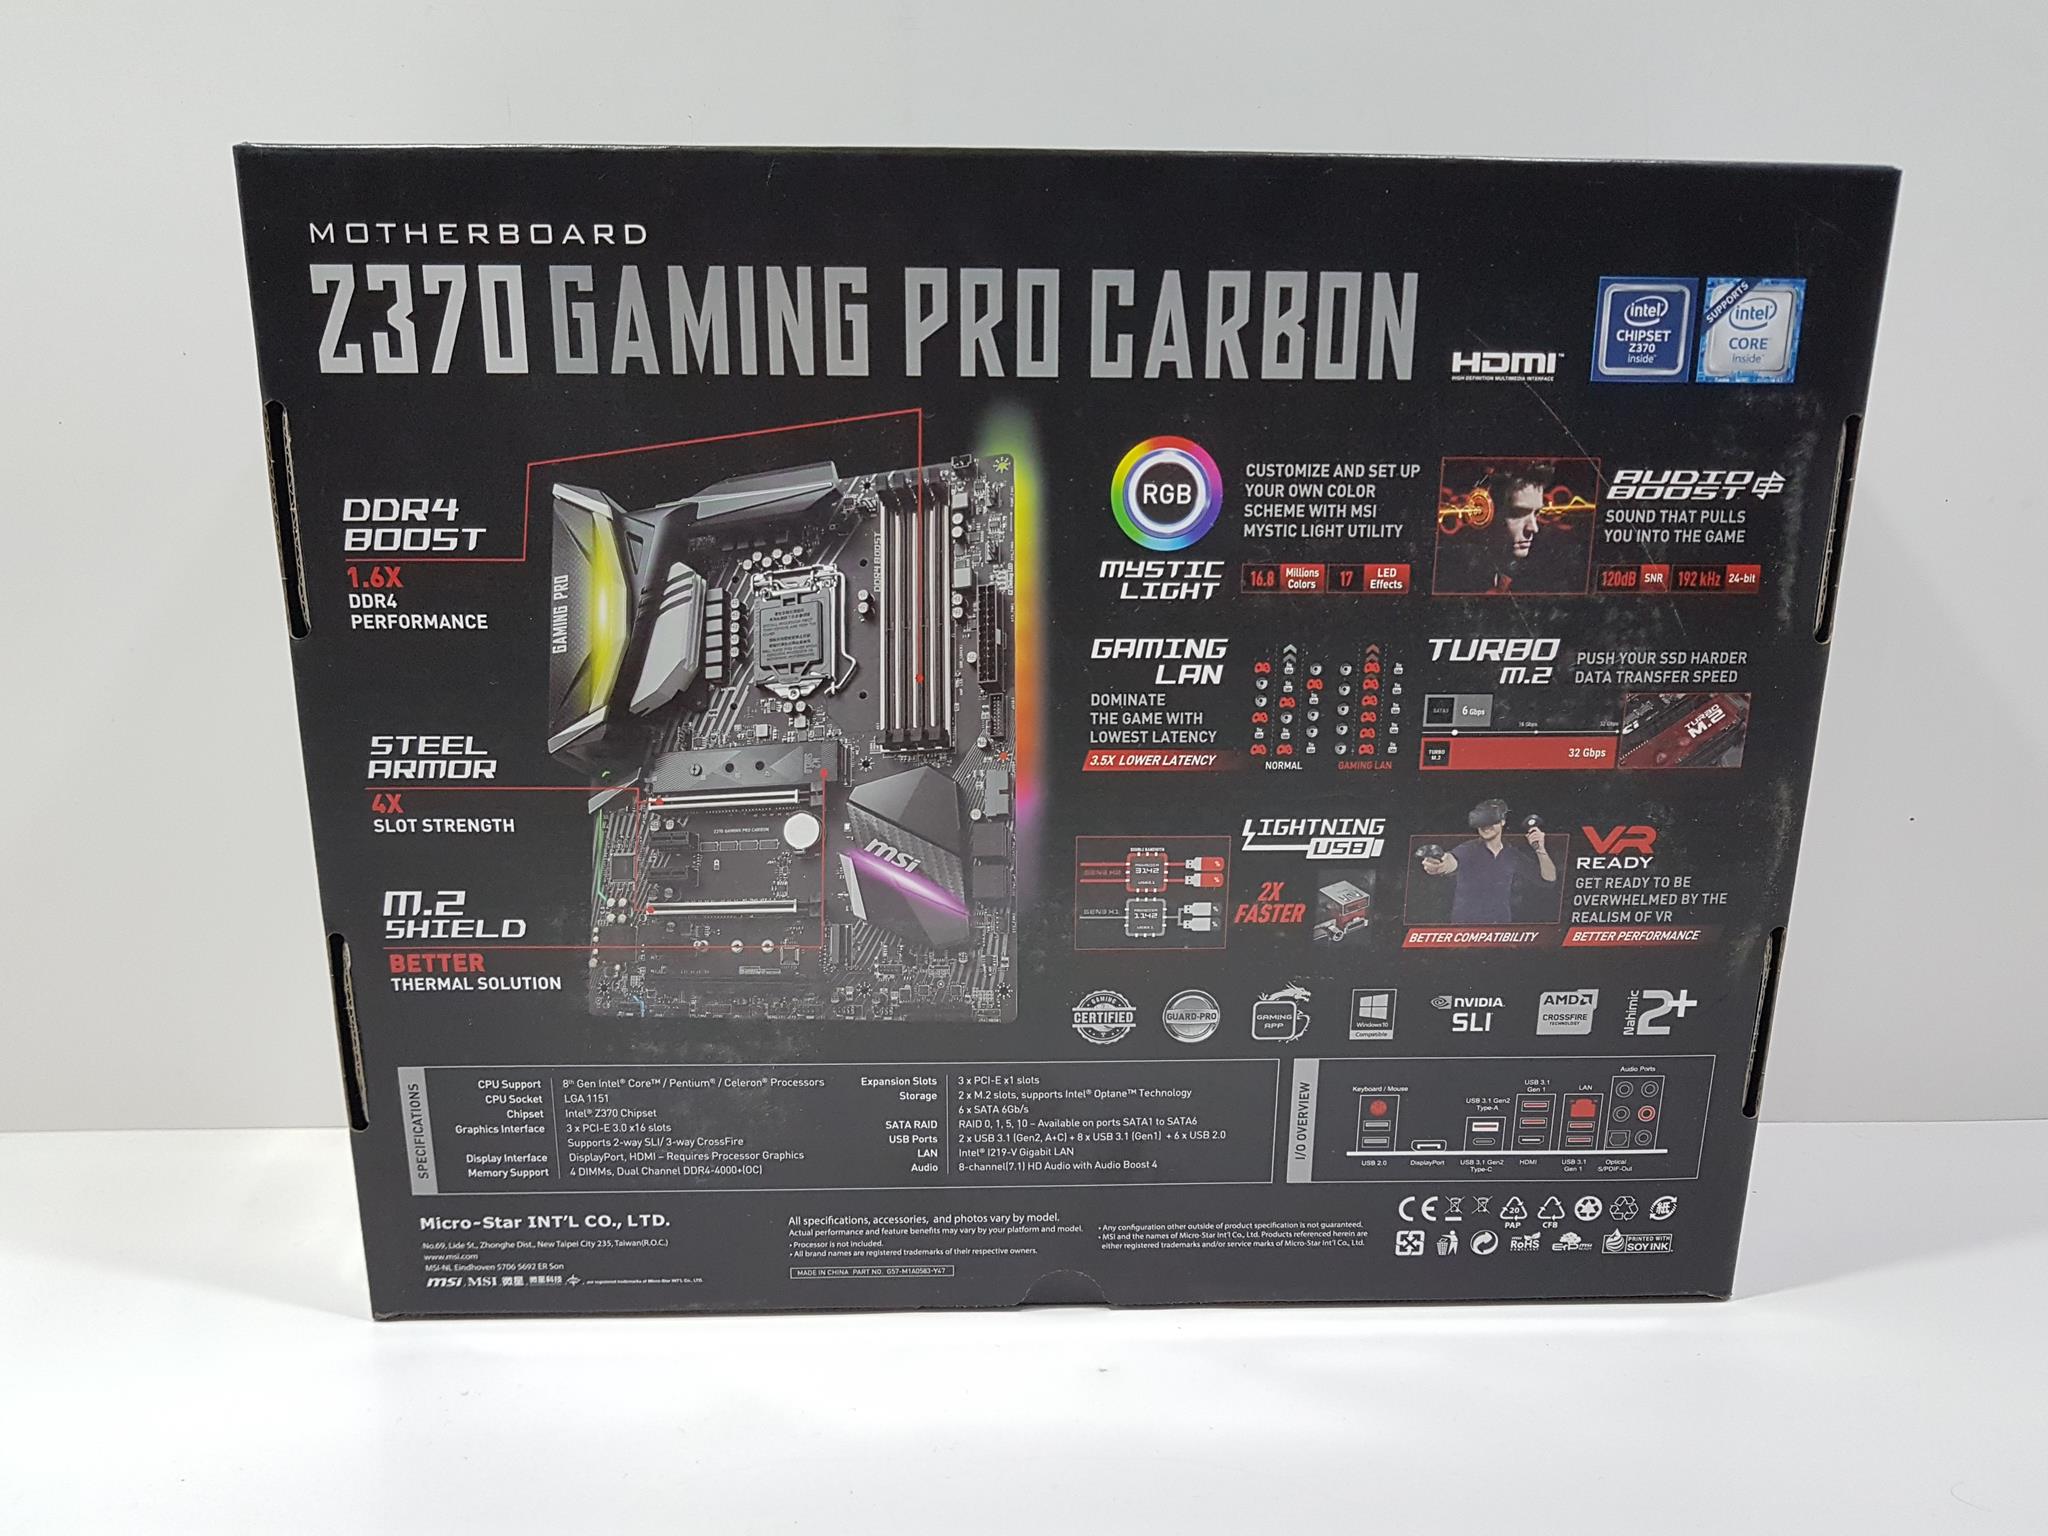
The backside of the box has motherboard’s model printed in enlarged font size on the top. There is a labeled picture of the motherboard on the left side highlighting the salient aspects like Steel Armor for reinforced PCIe slots strength, M.2 shield for better thermals and aesthetics, DDR4 boost. More features of the motherboard have been printed on the right side. Major specifications are printed below the motherboard’s picture. Rear I/O connectivity is shown in the picture printed towards the right side of the specifications.
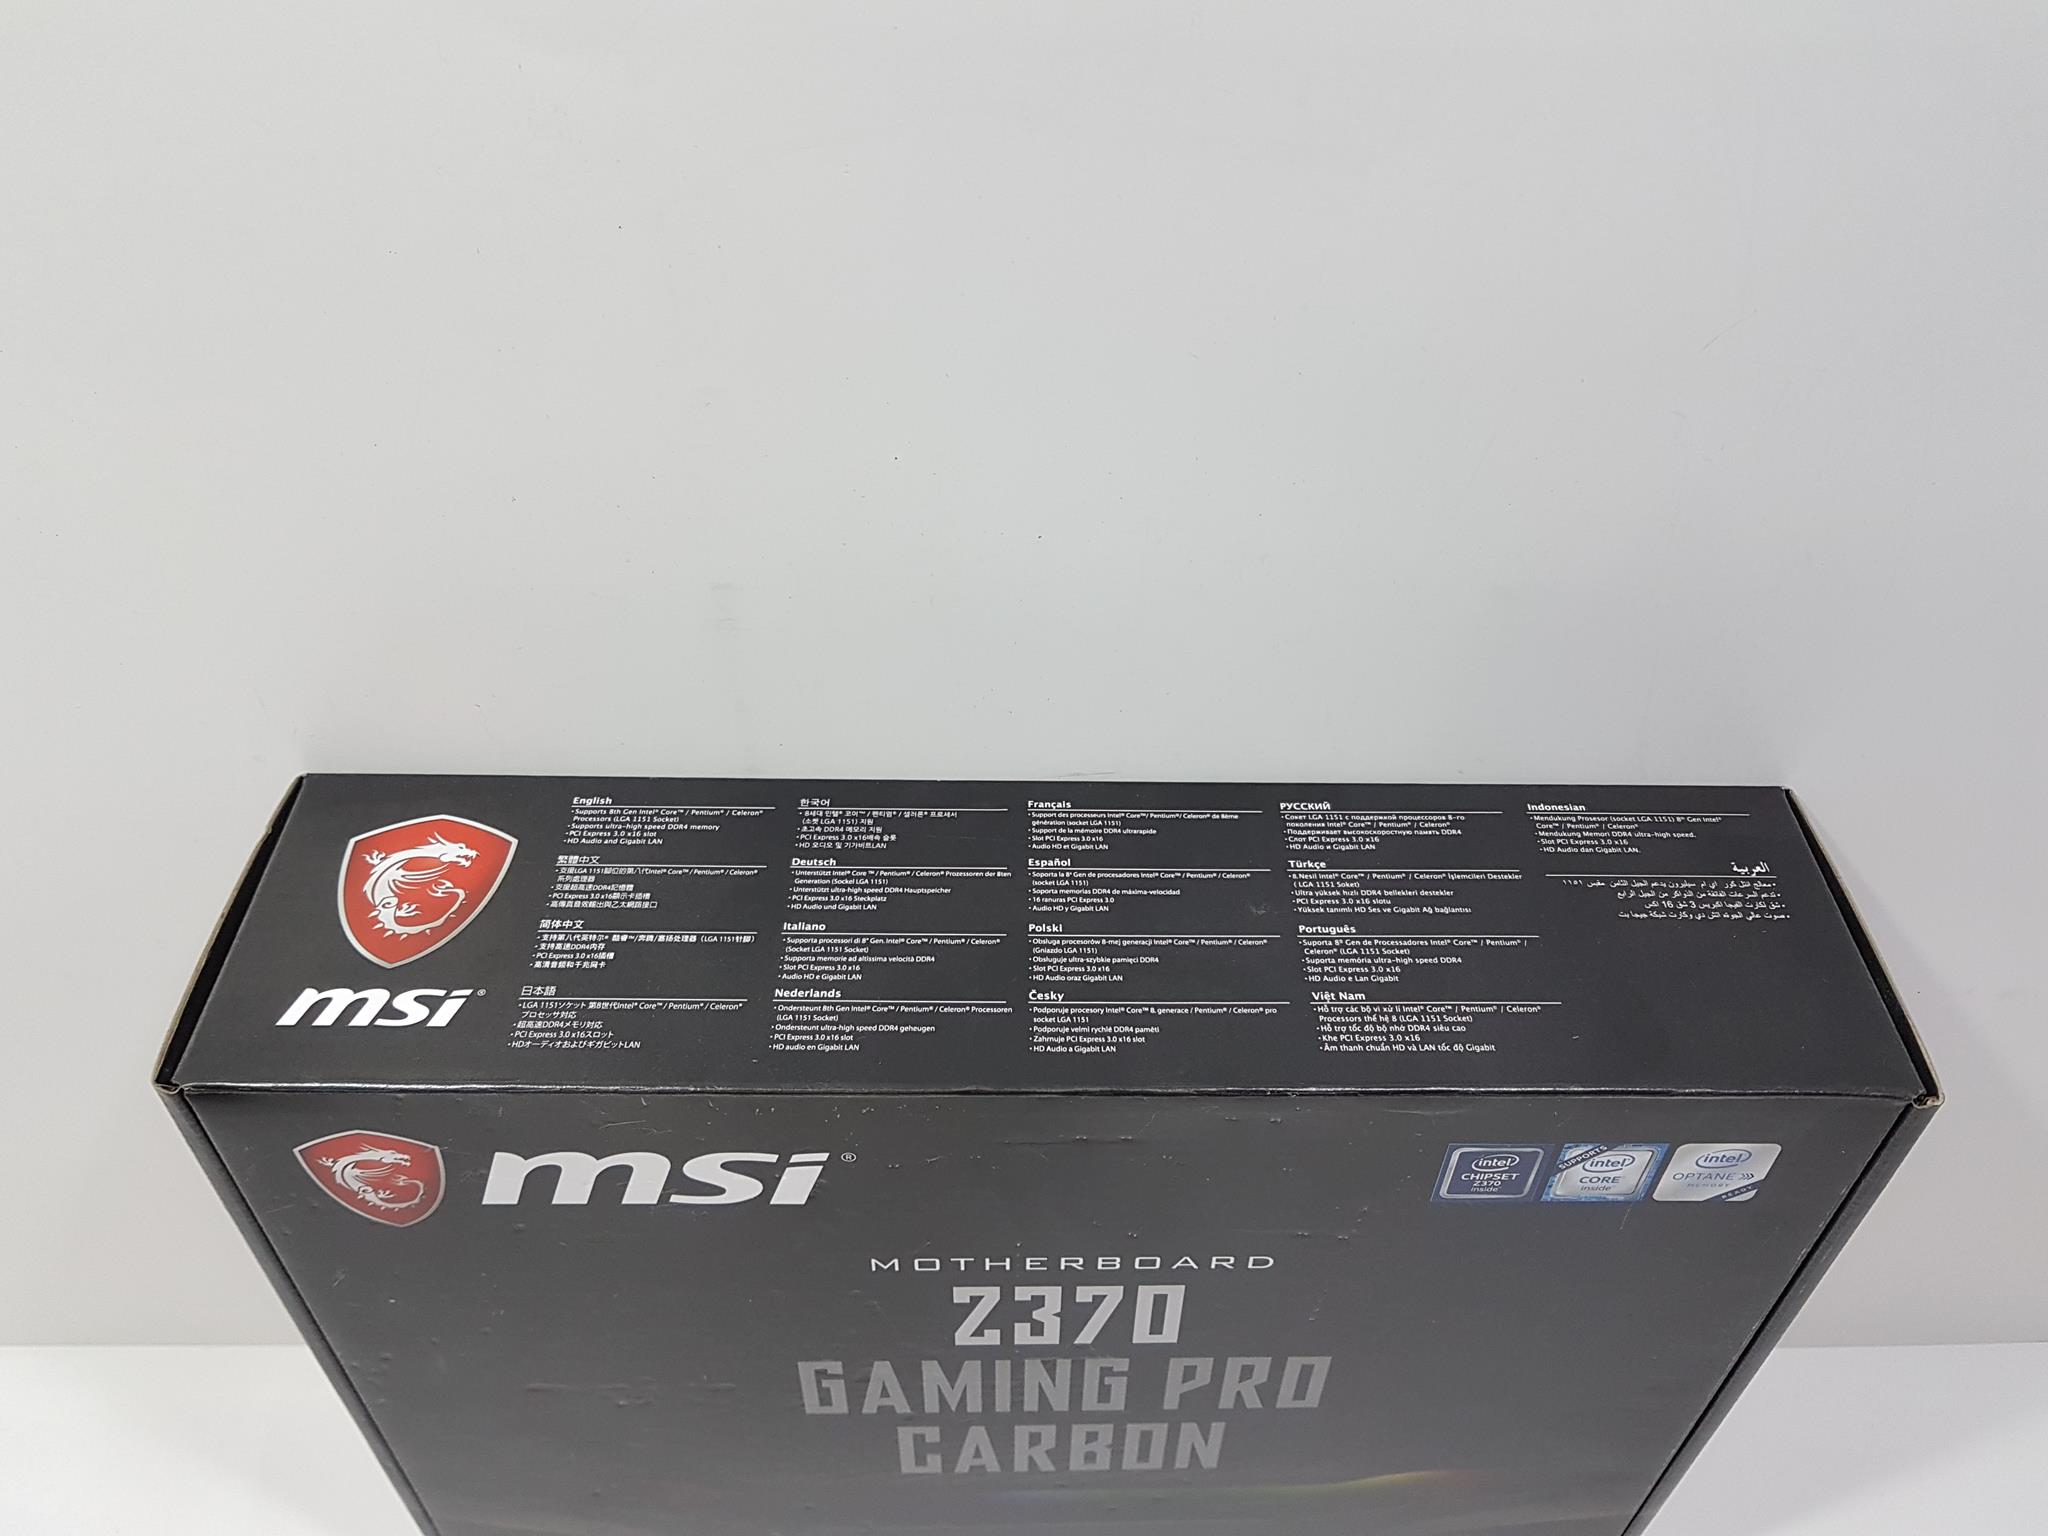
This side has salient features of the motherboard printed in 18 different languages.
This side of the box has an MSI brand logo and name printed on the left side followed by the model information of the motherboard. This is the opening side of the box.
The left side of the box has the MSI brand logo and name printed on the left side followed by the motherboard’s model.
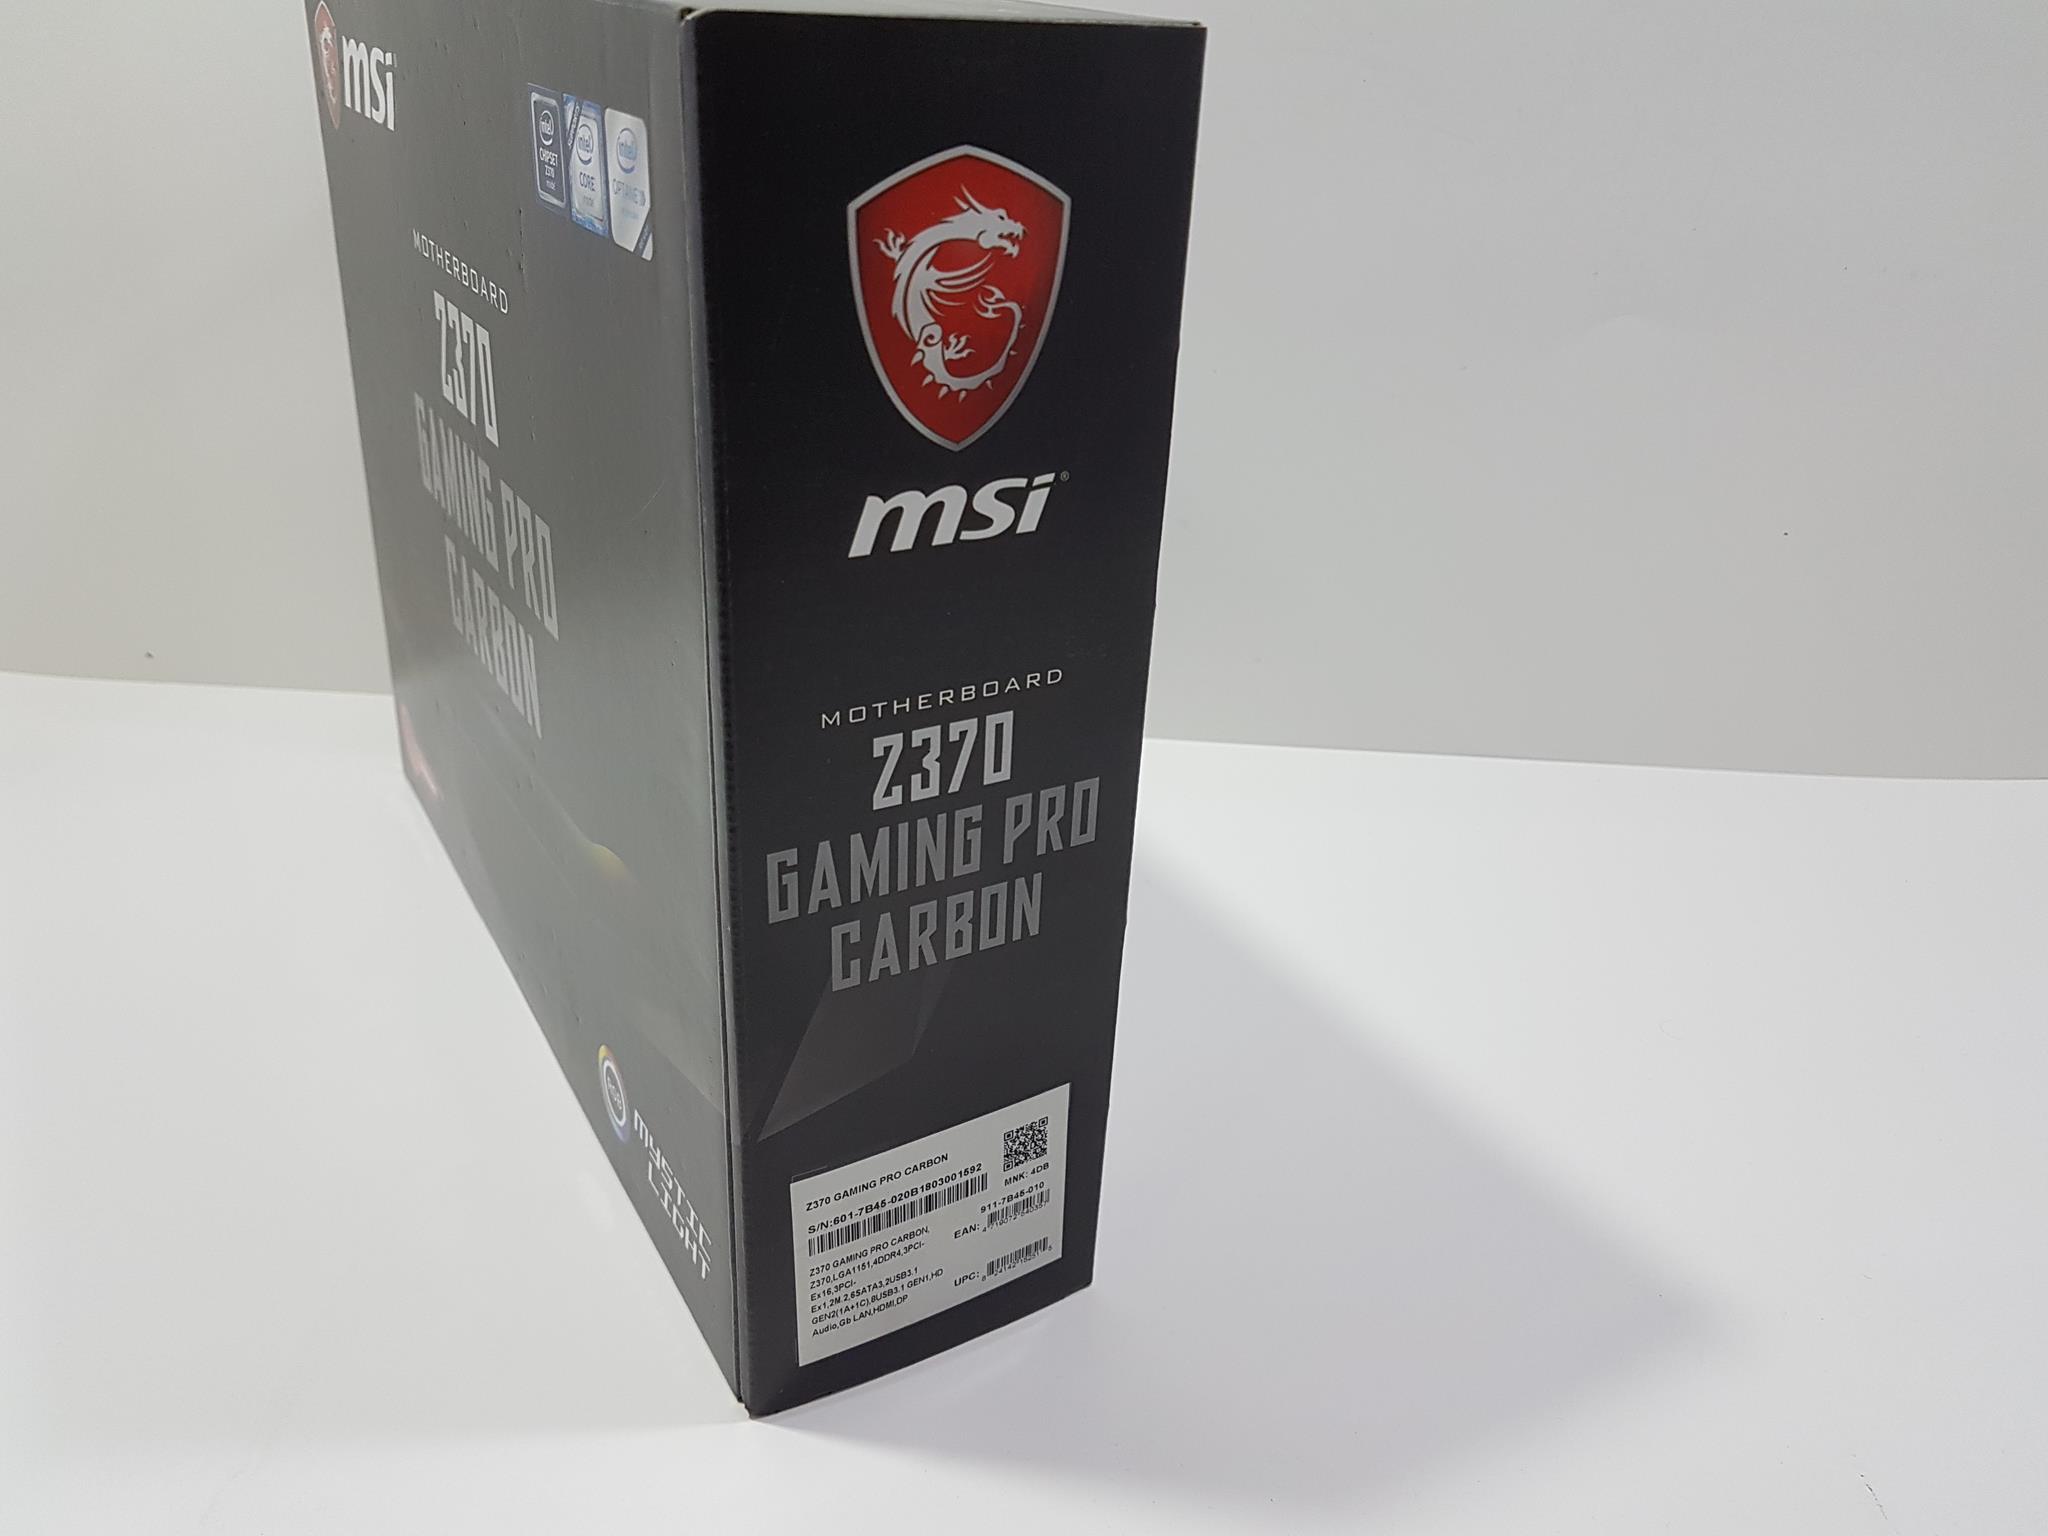
The right side is almost identical to the left side in layout except that there is an info label printed at the bottom showing the serial no, UPC, EAN labels.
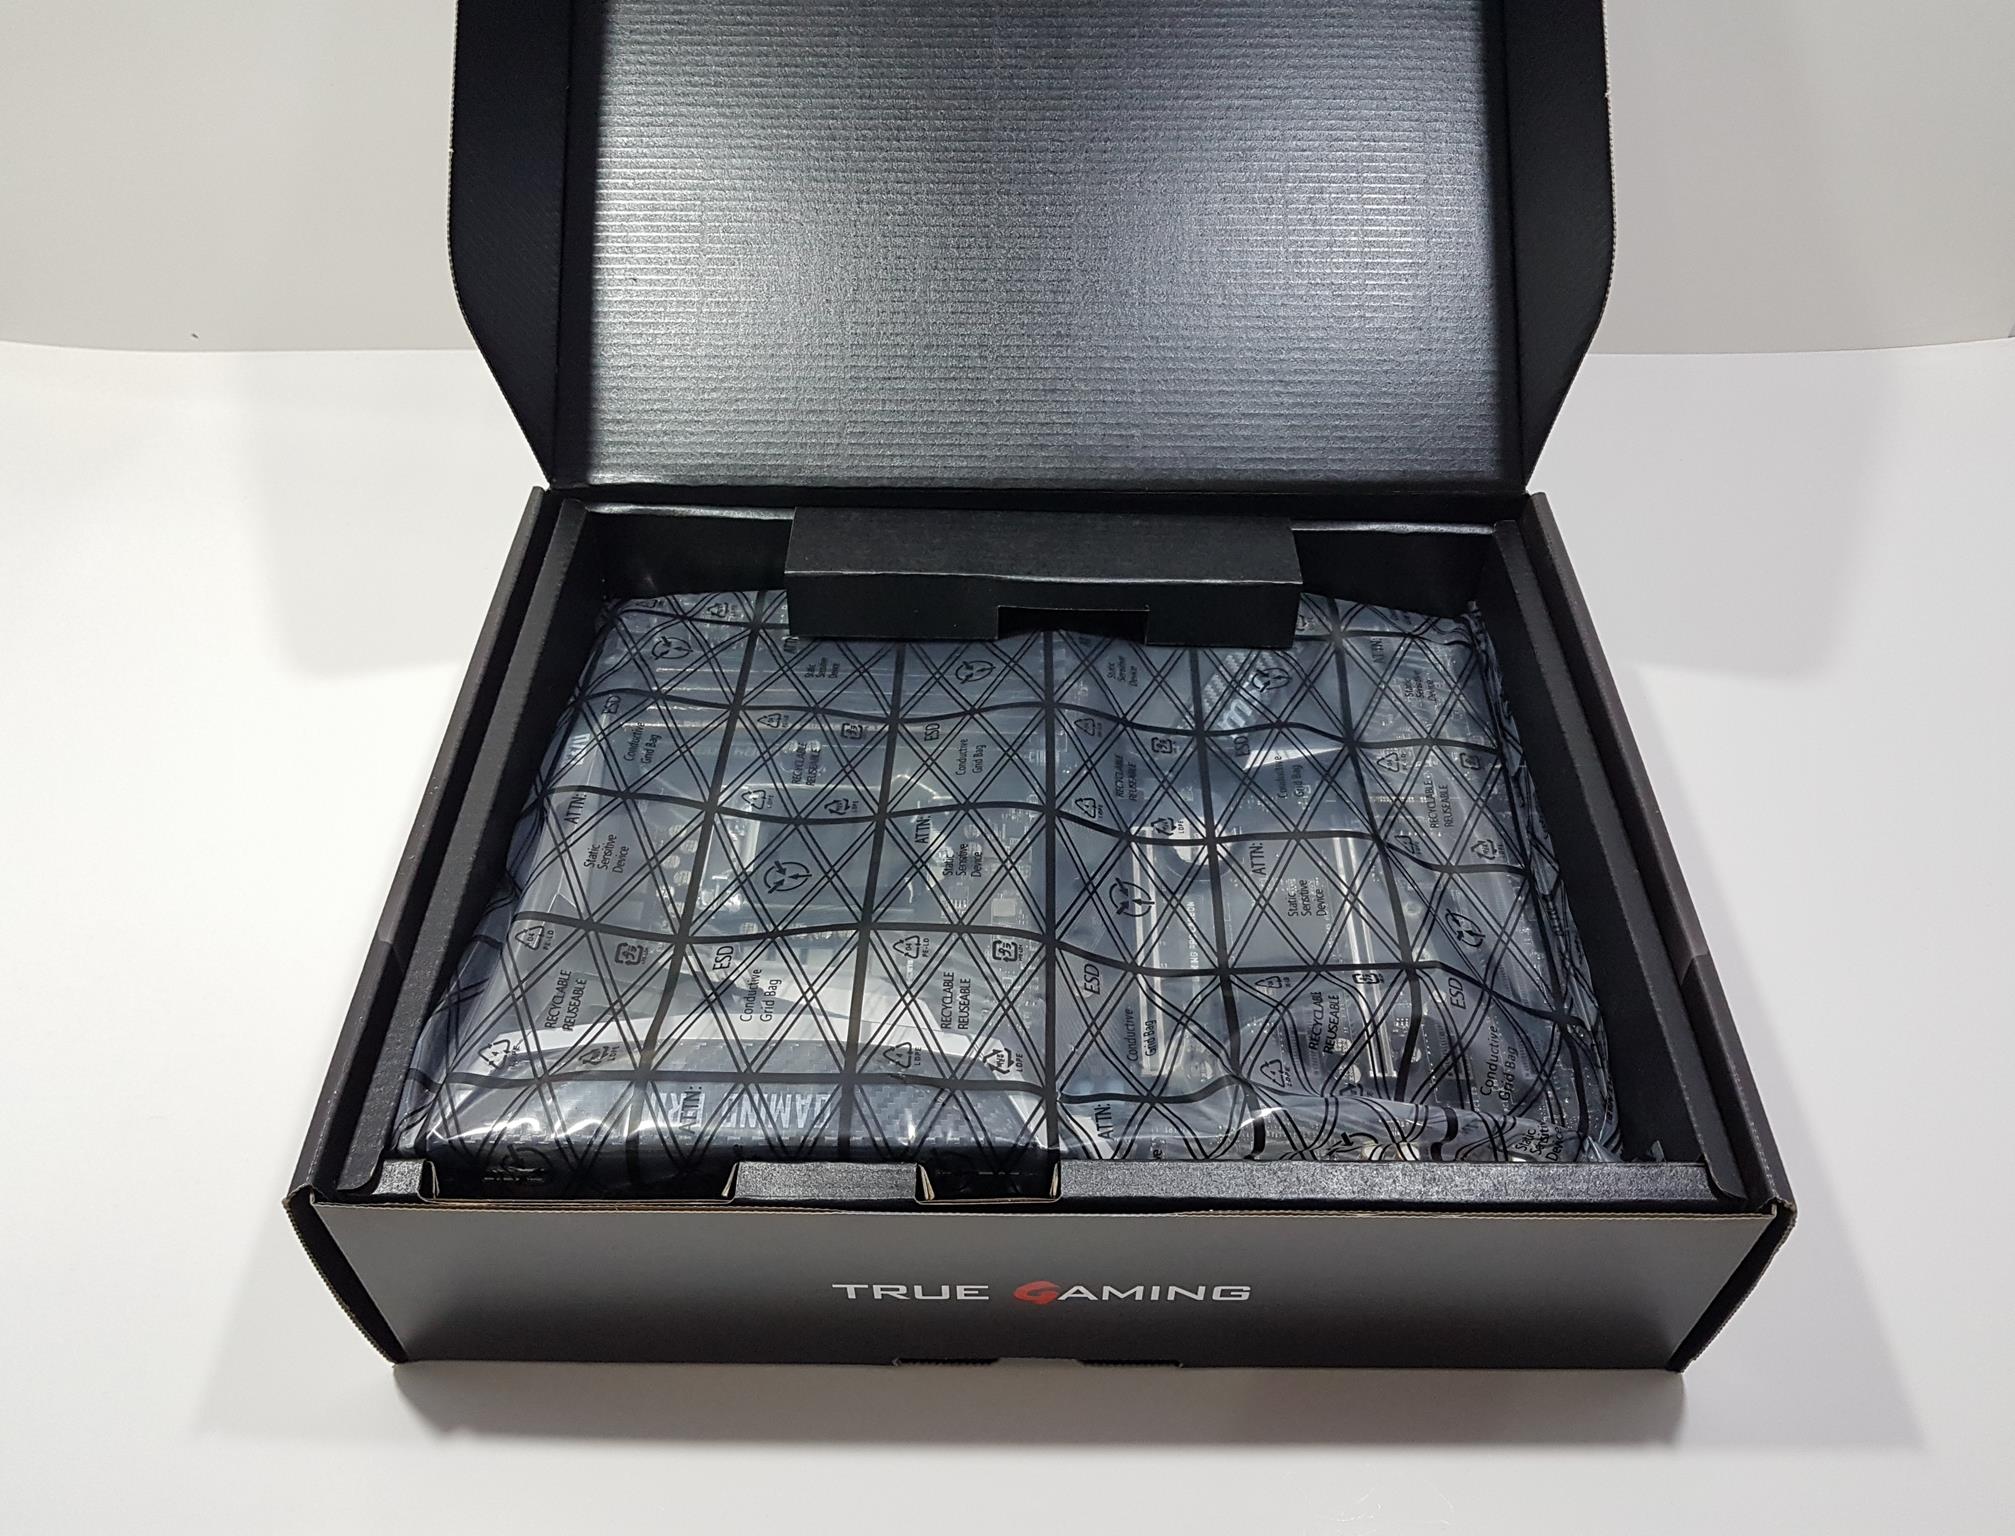
Opening the box will show the motherboard placed inside the anti-static container.
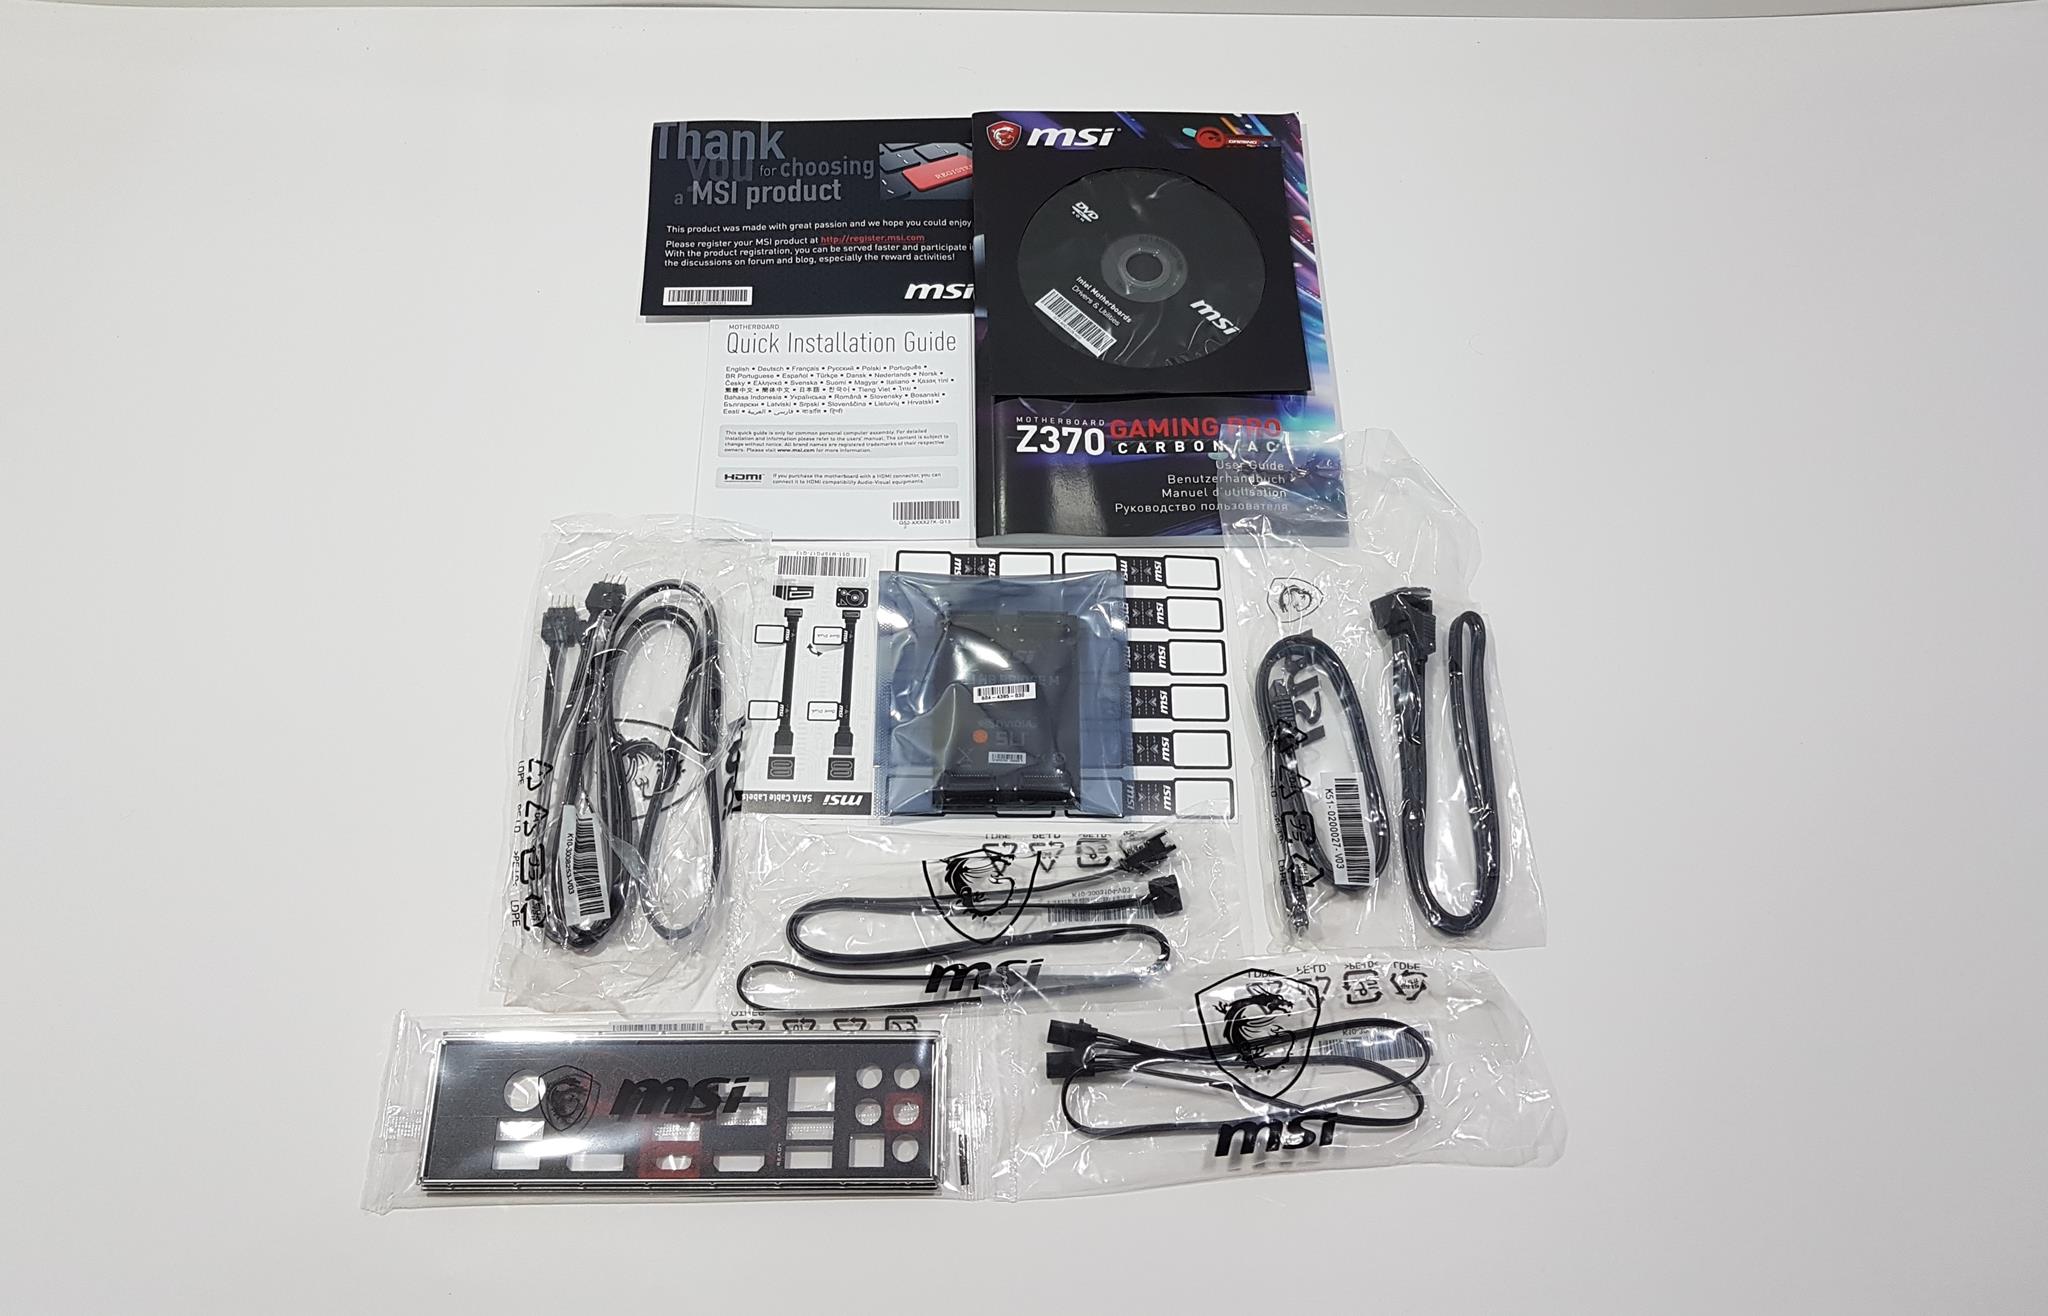
Contents
Following is included:
- User Manual
- Quick Installation Guide
- Installation Disk
- Rear I/O Shield
- SLI Bridge
- Labeled Sticker Sheet
- SATA Cables
- RGB 4/3 pins cables
Closer Look
The Z370 Gaming Pro Carbon from MSI is one cool looking design with a plethora of features tuned towards ultimate gaming experience. This is a feature-rich motherboard and given the extent of these features in this price, this is too good a deal. Let’ start taking a closer look at the motherboard.
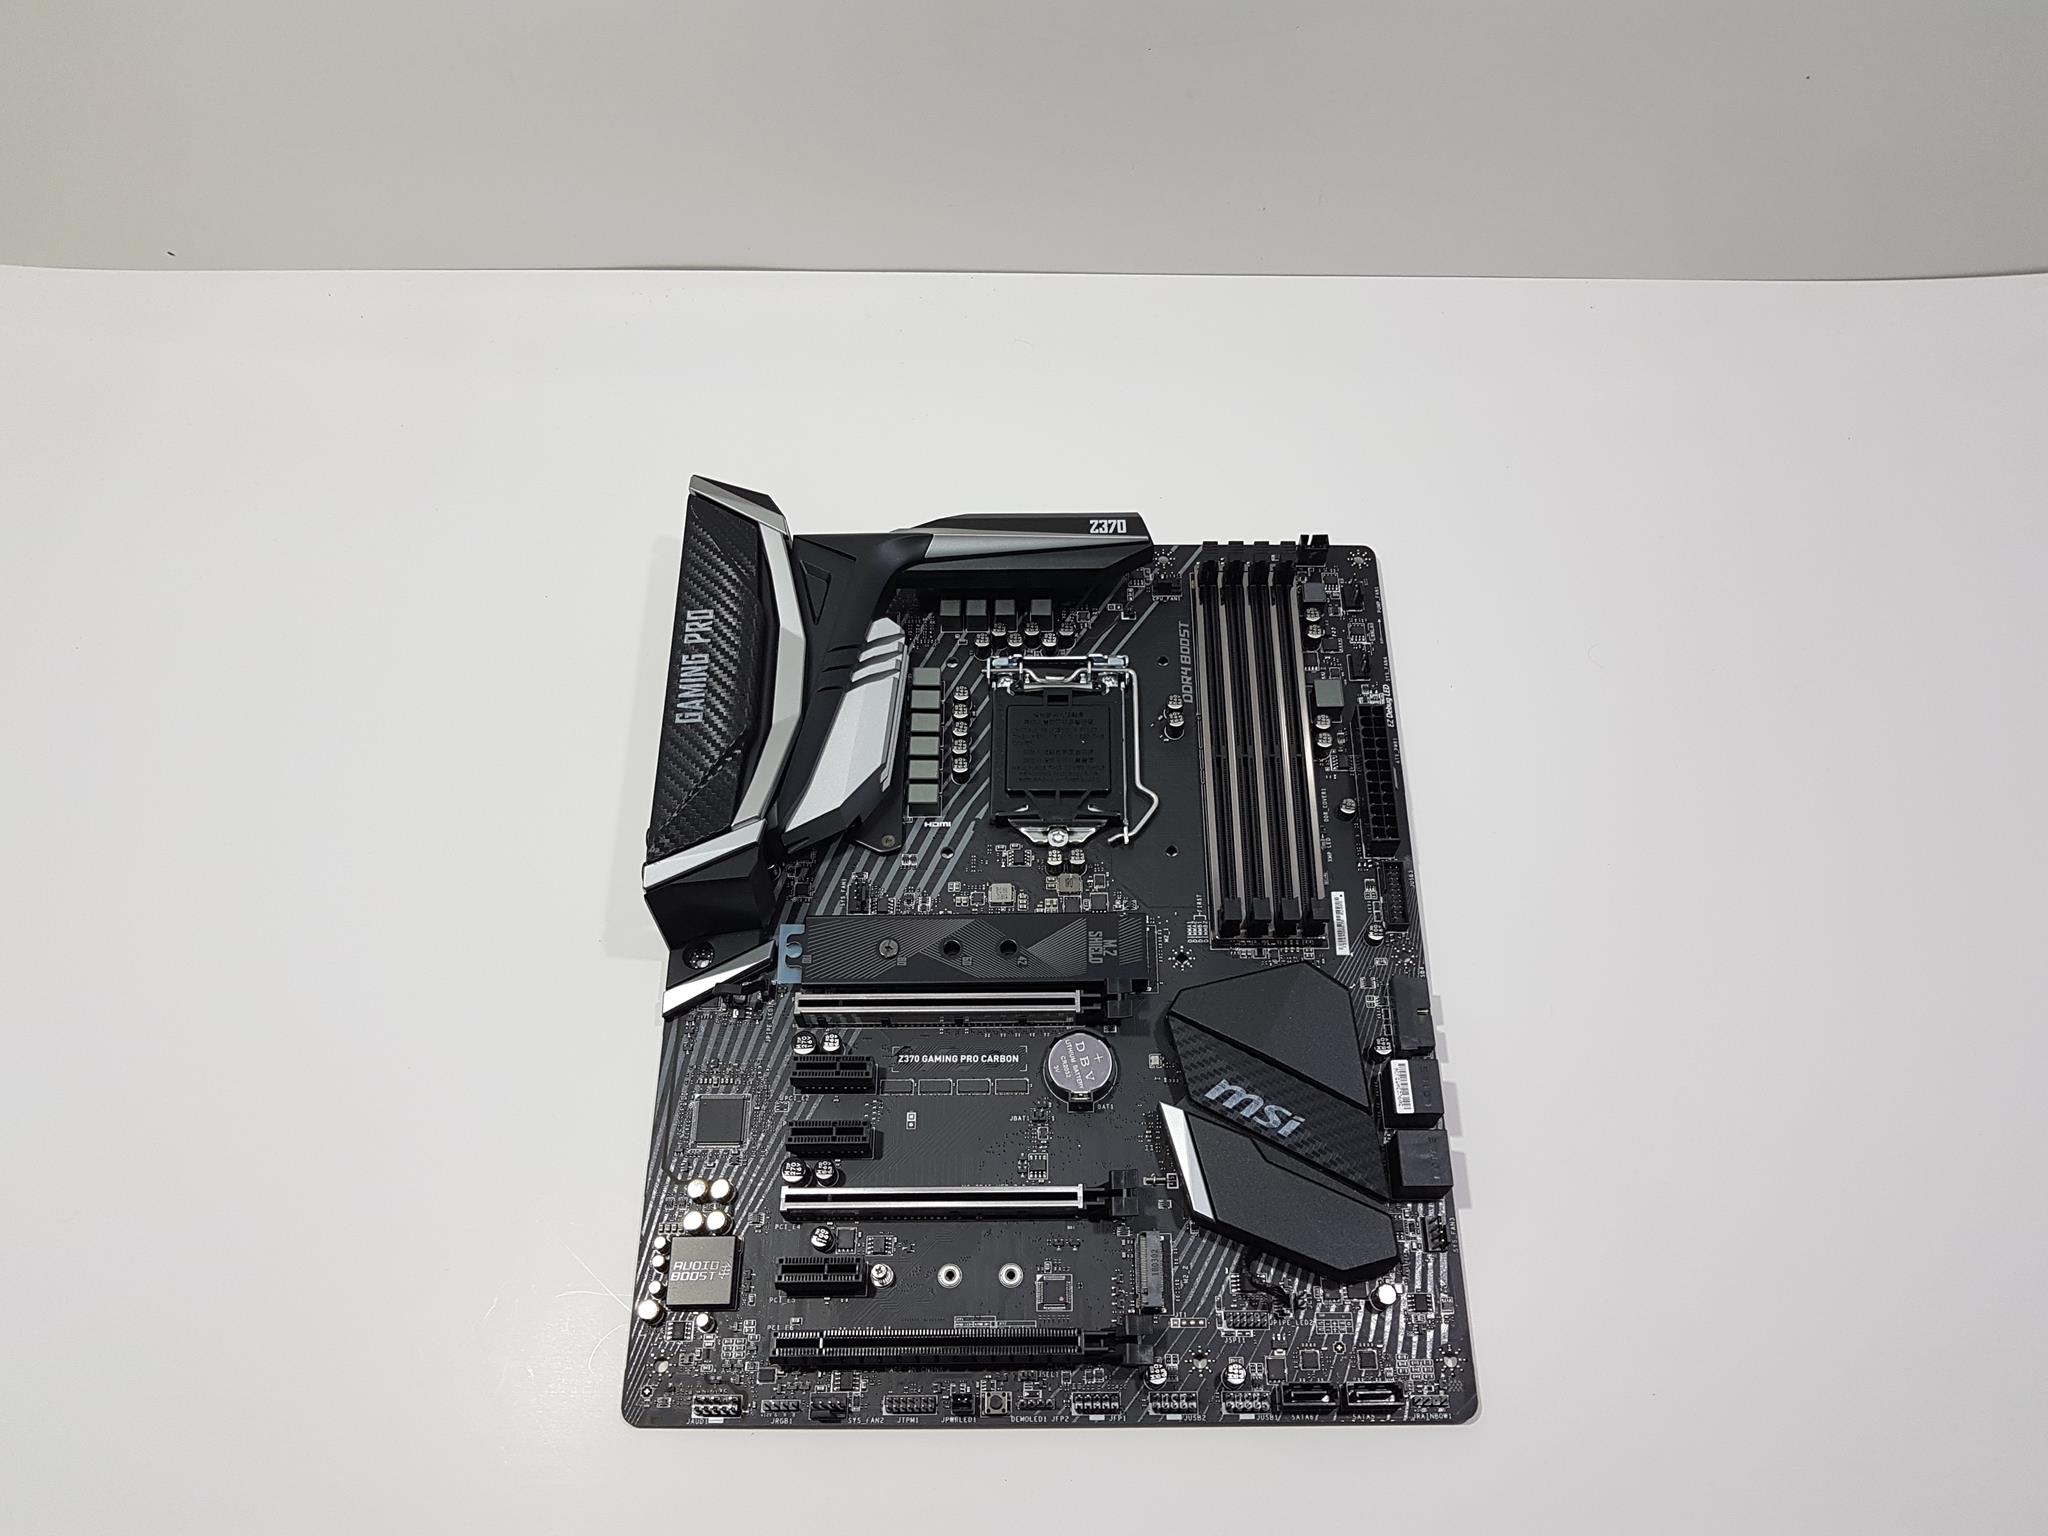
As the name indicates, there are carbon wraps on two areas on this motherboard. The I/O shroud has typical dark colored carbon wrap on its top. The chipset cover’s middle portion has a carbon wrap over it. The PCB’s stenciling is in black/gray colors and this overall combination of the colors and carbon wrap speaks for itself. Taking a quick look at the overall motherboard, we can see 4 SATA ports in a standard design whereas two ports have been implemented at the bottom as well. Seems like this approach was taken to save some space on the right side’s connectivity options of the PCB but I am not sure about this particular design. We have two USB 2.0 ports, two USB 3.1 ports with one in 90° angle. Total 6 PCIe slots can be seen. Two M.2 ports and 4 DIMM slots are visible. Steel reinforcement on DIMM and PCIe X16/x8 slots can be seen. The PCB has ATX form factor measuring 30.5cmX22.5cm and it is compatible with Microsoft Windows 10. The audio solution is on a dedicated PCB layer and so is the design of the DIMM slots. There are lighting zones on this motherboard as well which can be controlled using the MSI Mystic Lighting. The wire tracing is done in a particular design which looks that good in person but there is one caveat to this approach. Any negligence while handling the motherboard could easily damage these traces that would render the motherboard damaged beyond repairs. So, take care while handling the board.
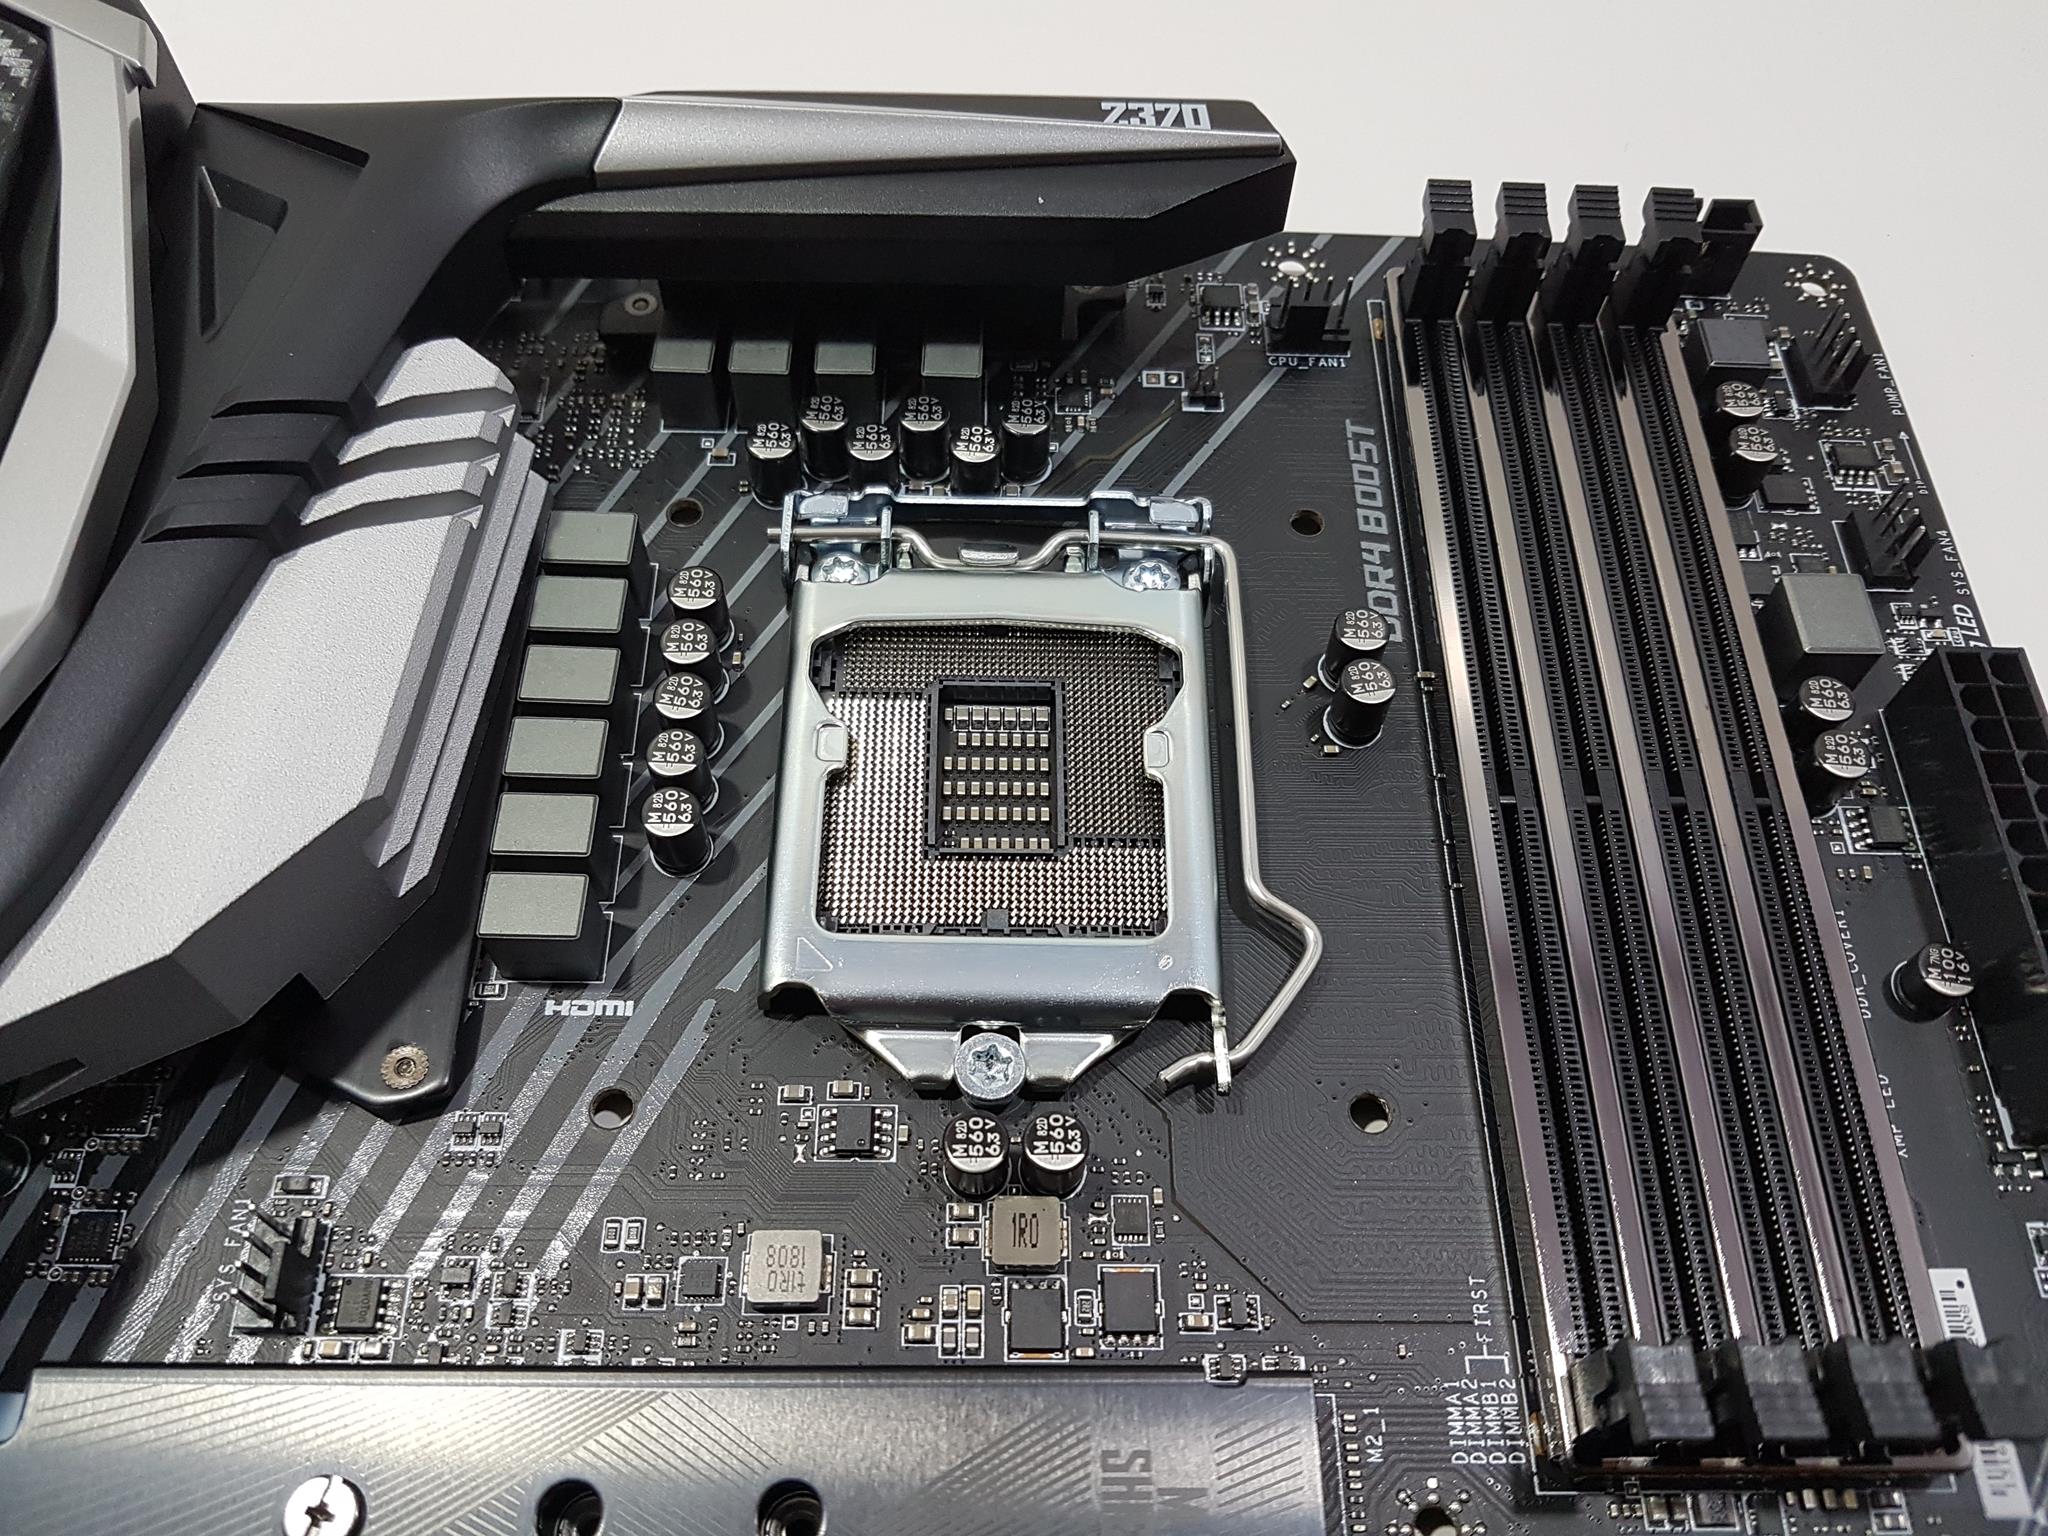
The MSI Z370 Gaming Pro Carbon features Intel LGA1151 socket. Yup, the same socket with the third revision. The Z370 socket can host the Intel’s 9th generation of Core processors for which BIOS update is mandatory. Though the socket is same, the user can’t use Intel’s Skylake and Kabylake series of the CPUs on this socket. Only the Coffeelake and 9th generation of the Intel Core processors can be used on this socket. As the name indicates, this socket is using the Intel’s 300 series of the Chipset which is another different comparing to the 100 series chipset for the Skylake and 200 series chipset for the Kabylake. The socket has four pre-drilled mounting holes on the nearby area. No surprise there as these are for the installation facilitation of the CPU cooler.
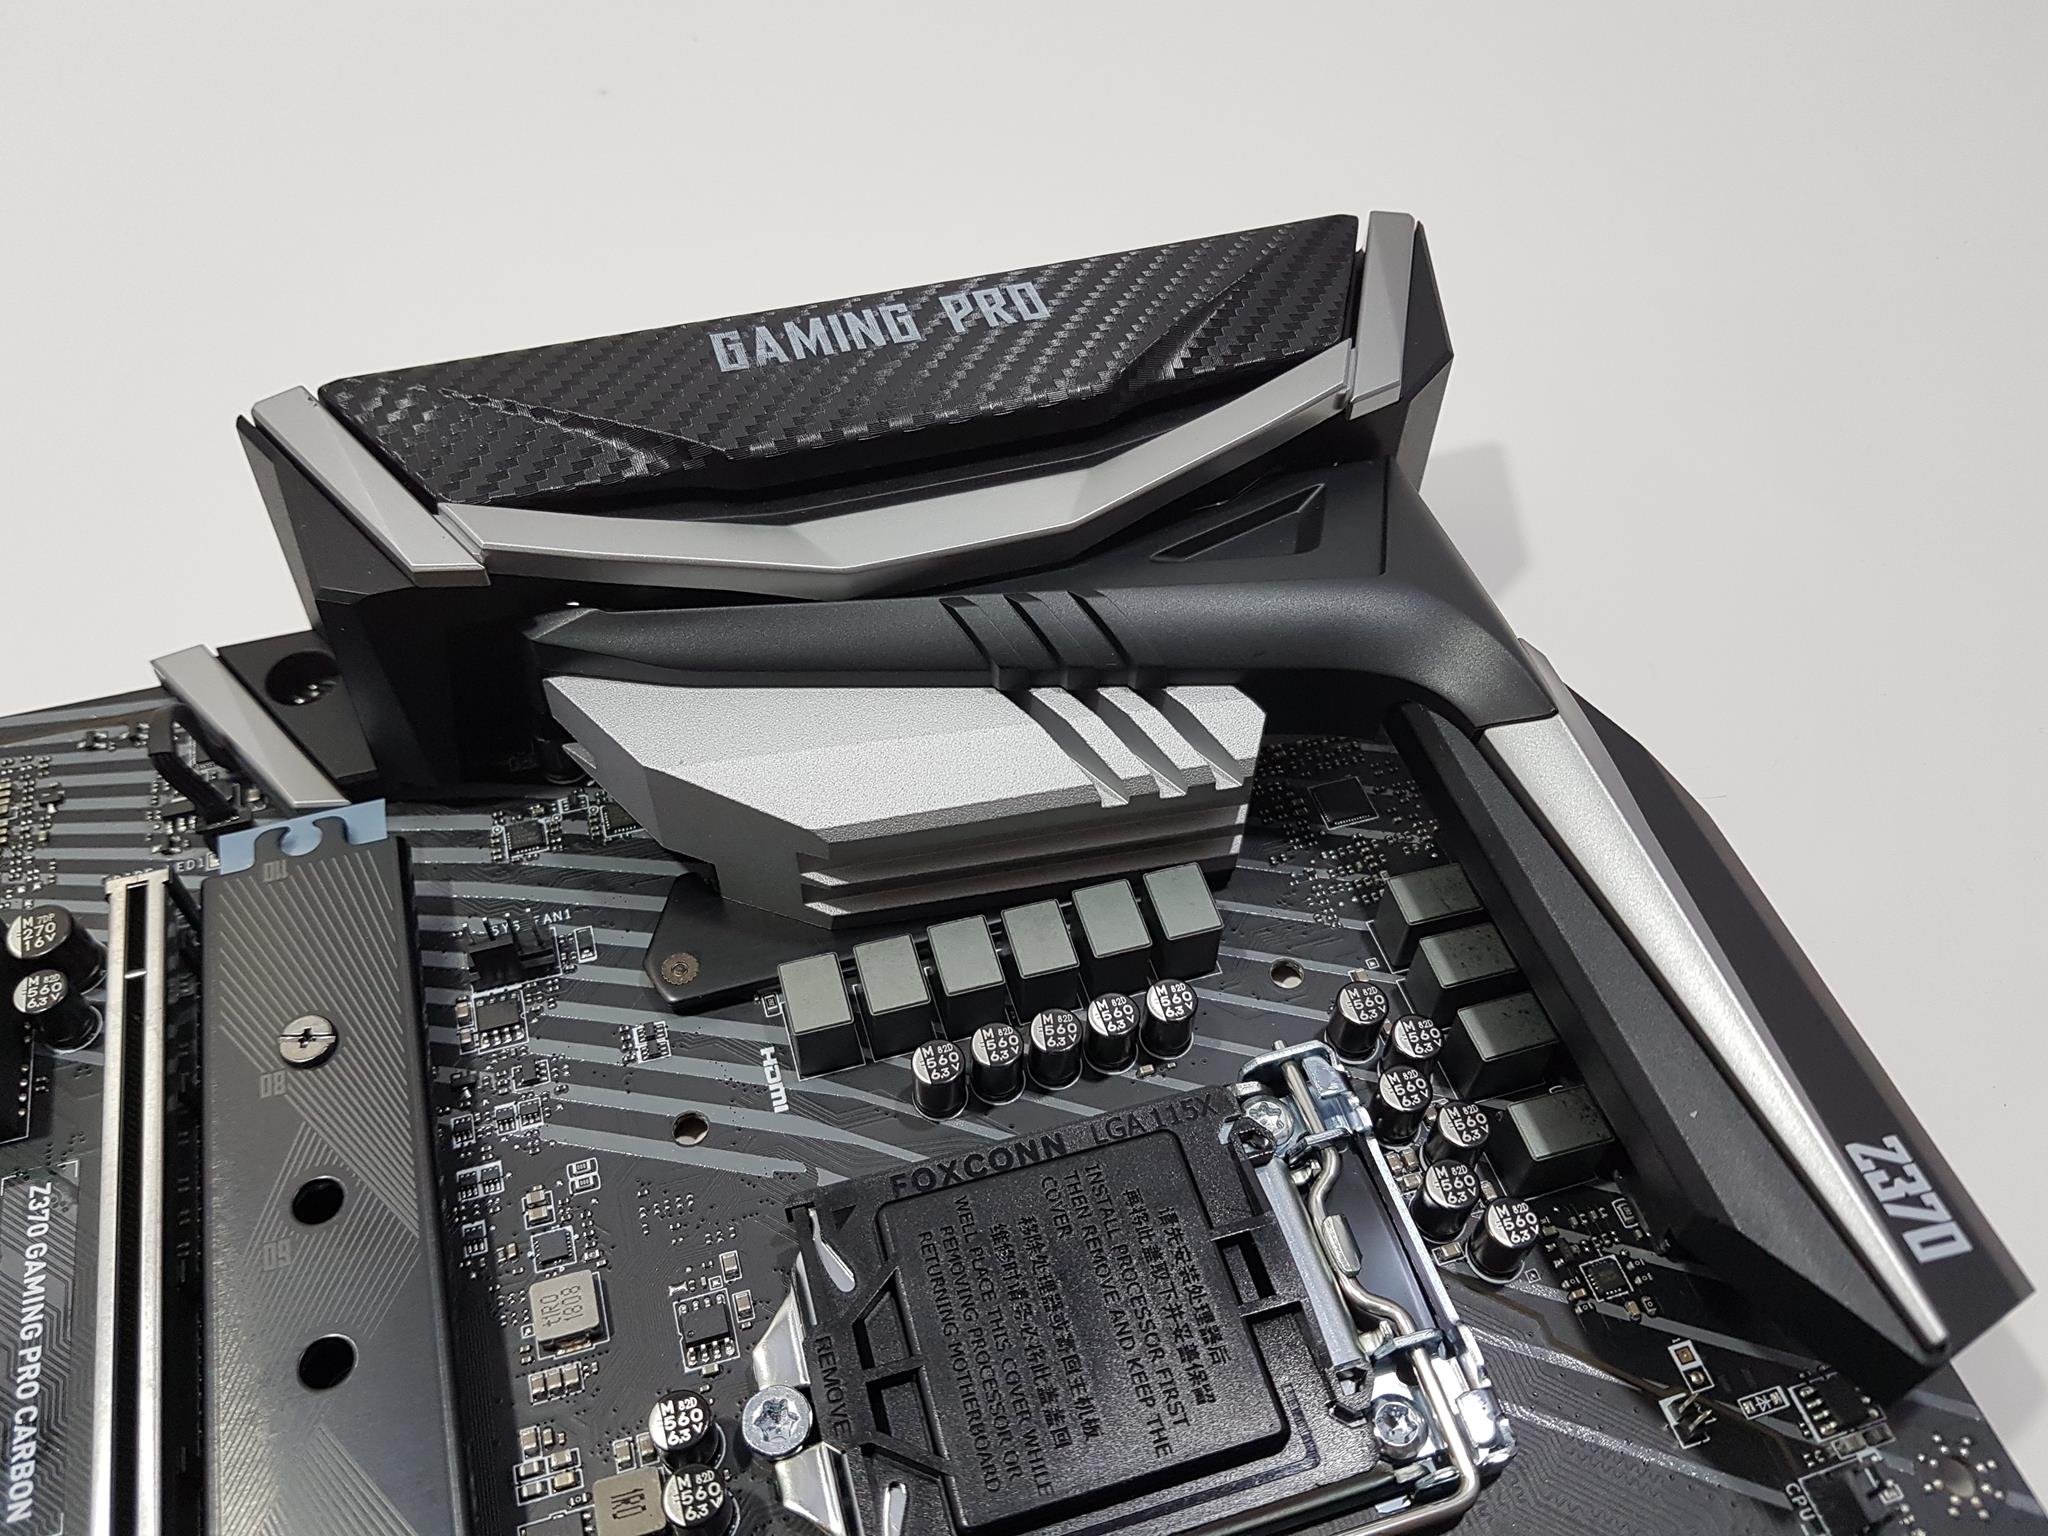
This motherboard has a stylish shroud on the rear I/O side which extends toward the MOSFET side on the top. Though it is a uni-body design, please take a note that two aluminum heatsinks under the shrouds are not inter-connected using any heat pipe. The heatsinks are in silver color which is typical for the aluminum ones. These heatsinks have cutouts and bear stepped design making sure that airflow would come handy in keeping the overall temperatures in check. The top side aluminum heatsink has a slim design and this is where I believe MSI should not have skipped a full body heatsink. I will discuss it in the testing section when discussing the power and thermals. The motherboard is using 11 power phases though I could not check for further details like which PWM VRM chip is being employed and if the solution is using doublers or actual phases though from the looks of it. This is due to the restriction from the source that is why I did not remove the heatsink cover.

The CPU power connector is located on the top left side which is the standard ATX implementation. There is an RGB connector located before the EPS connector. It is labeled as JRGB2. It has 4 pins and is in +12V GRB pin format (5050 RGB). Keep in mind that this is not an addressable RGB header so take care while plugging in the RGB device. The maximum current rating is 3A with a 2m length of the strip.
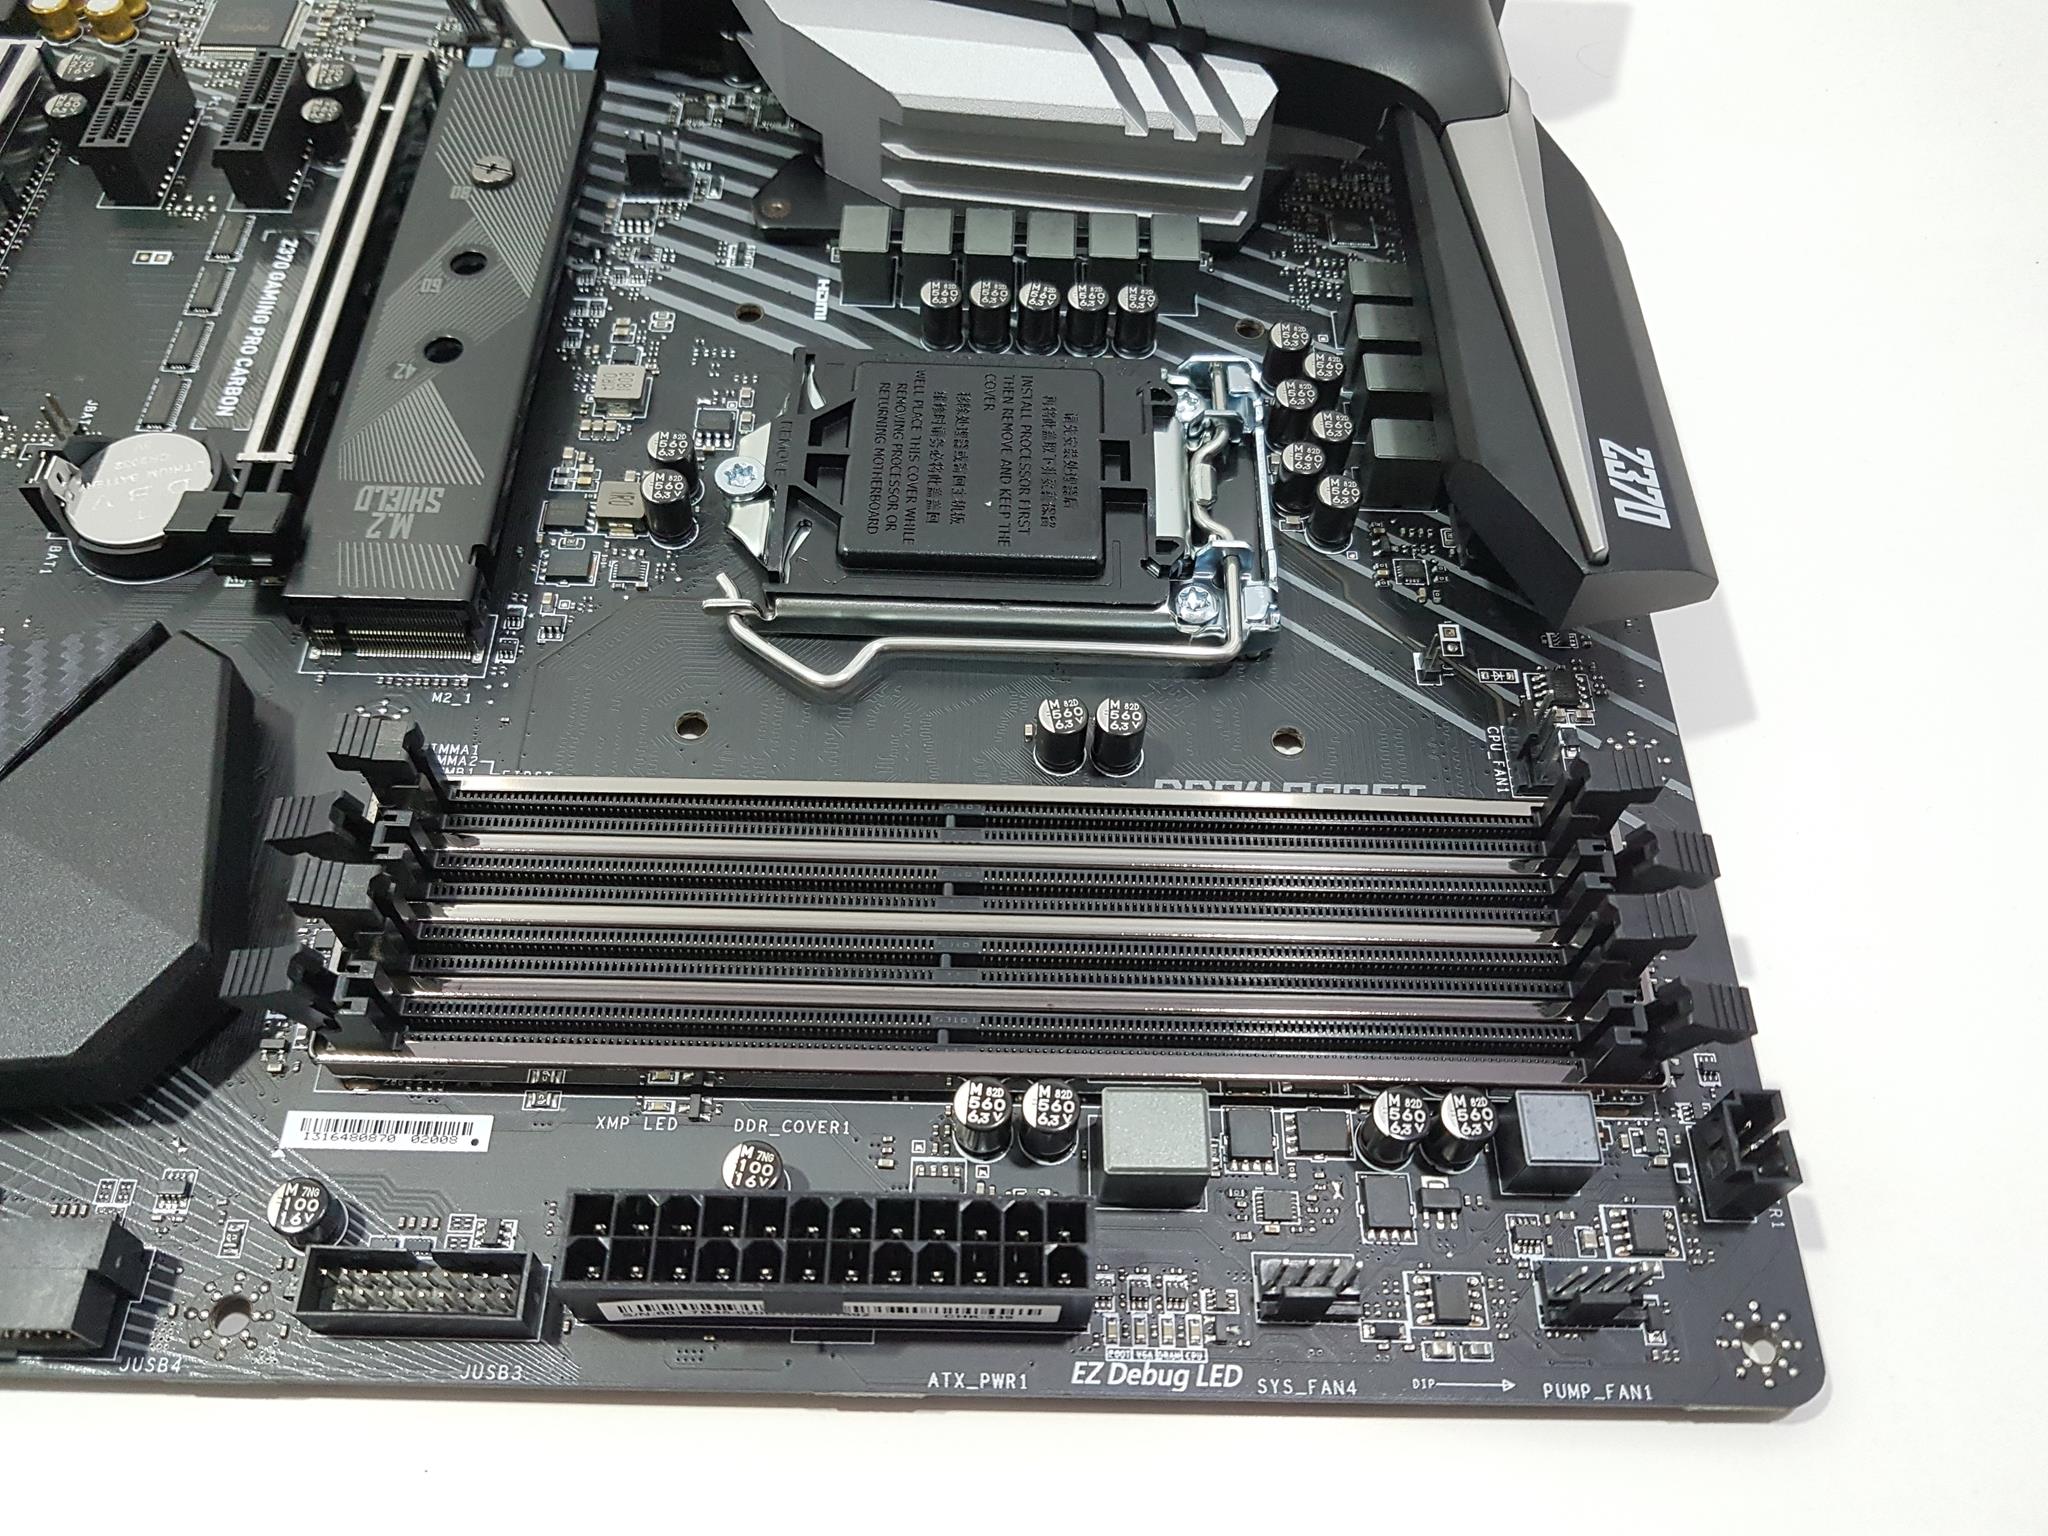
The MSI Z370 Gaming Pro Carbon has a total of 4 DIMM slots in the black color. For two modules configuration, use the DIMM slots no 2 and 4 (A2 and B2) starting from the socket. These slots are steel reinforced. The latches on both ends of the DIMM slots are to be opened to install the RAM which is unlike the typical design these days in which one end is fixed and the other is used to secure the installation of the RAM. The motherboard supports up to 64GB of DDR4 memory with dual channel architecture using non-ECC, un-buffered memory. The maximum supported speed or frequency on this motherboard is 4000 (OC) which is indeed a better offering and it supports Intel XMP. DDR4 Boost is printed on the left side of the DIMM slots. Optimized traces and a fully isolated memory circuitry ensures perfect stability and performance on MSI Z370 Gaming Pro Carbon. These slots have LEDs on top notches. These LEDs indicate the installed memory module on each slot. LED will not light up if the memory is not installed in that slot. On the lower right side of the DIMM slots, there is an LED labeled as XMP LED. This LED lights up if the XMP profile is loaded and activated.
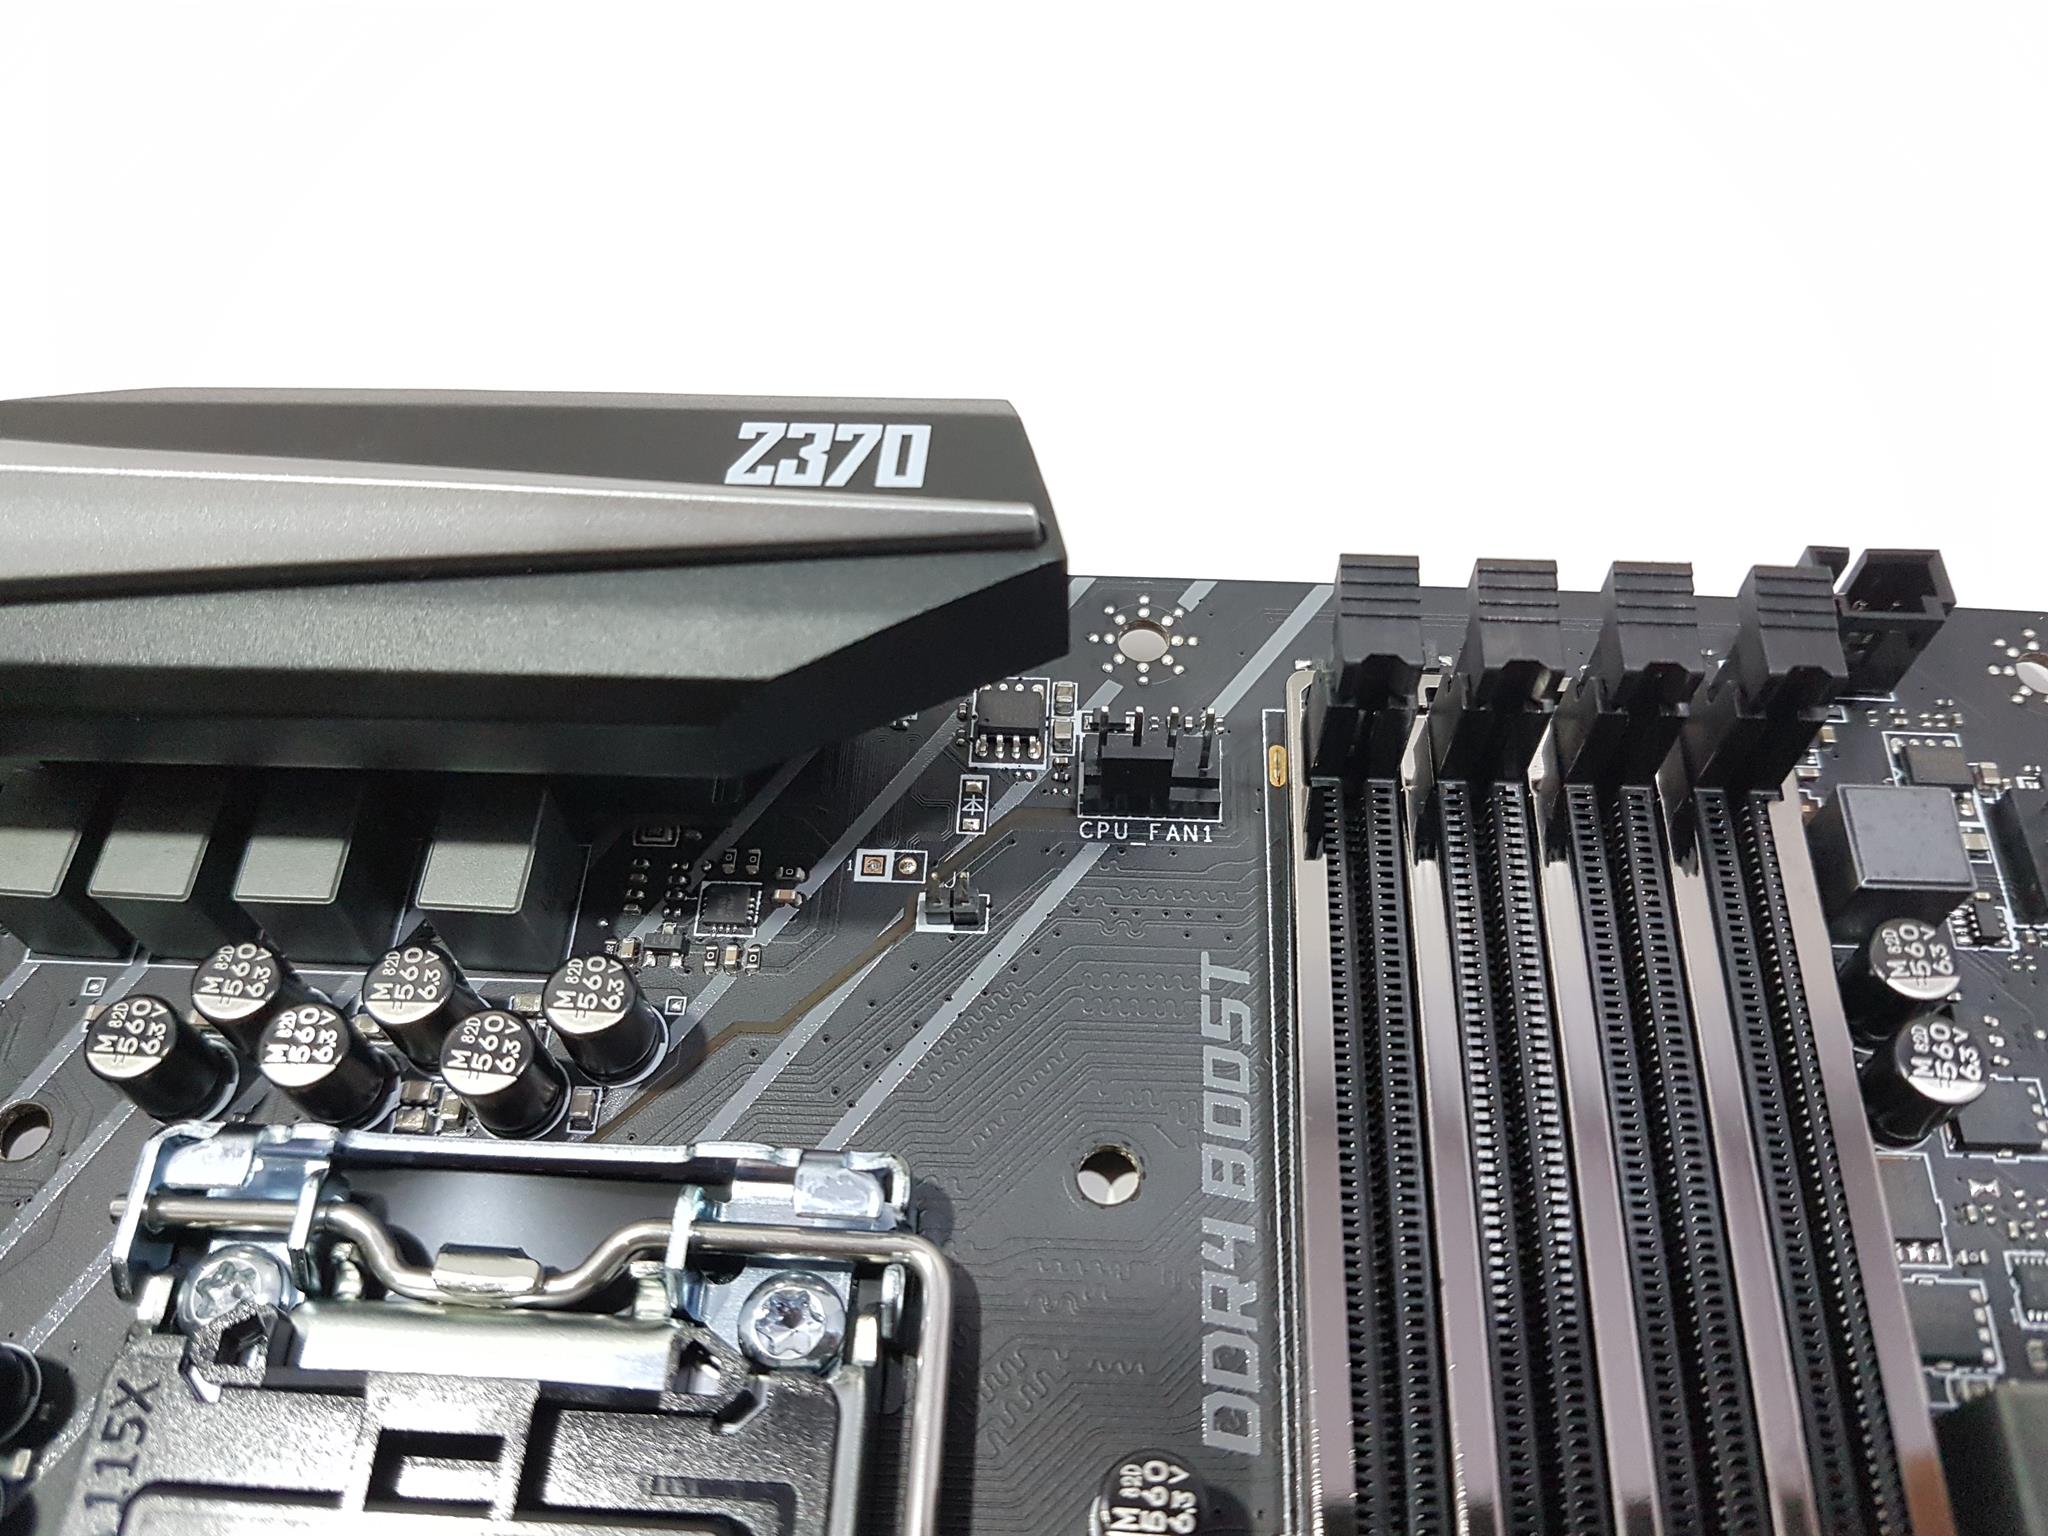
The CPU Fan header is located between the DIMM slots and the CPU socket on the upper side. It is a 4-pin PWM fan header. It is labeled as CPU_Fan1. There is no other CPU fan header or CPU_Opt header on this motherboard. The location of this header makes it convenient to connect the fan of the cooler to the power source.
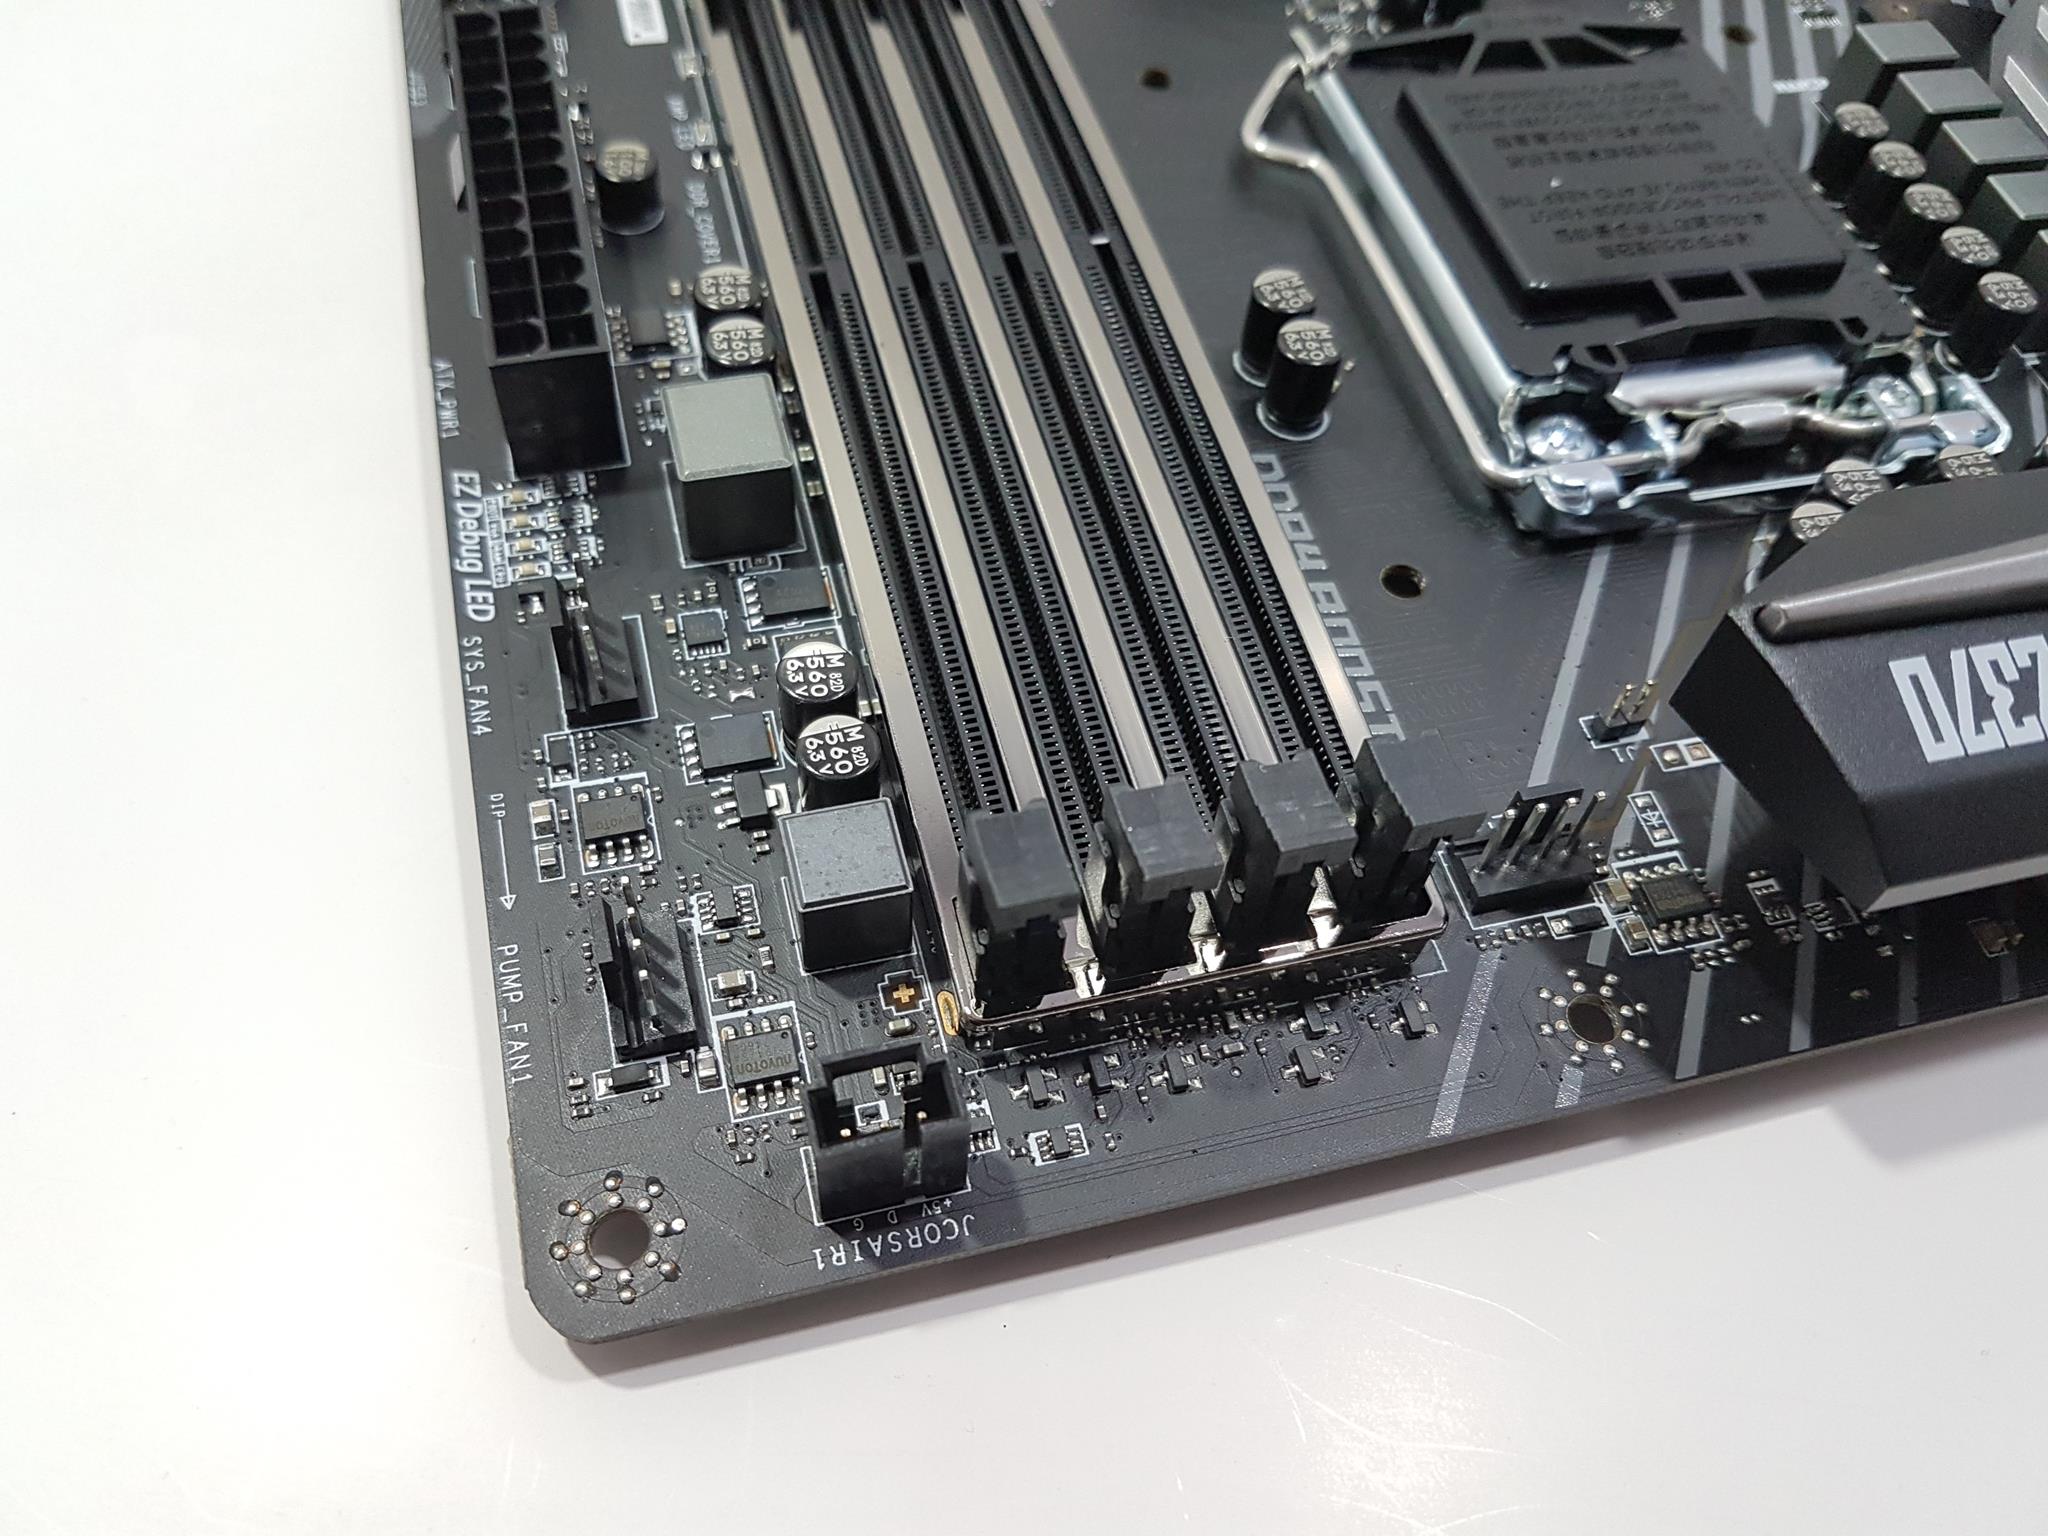
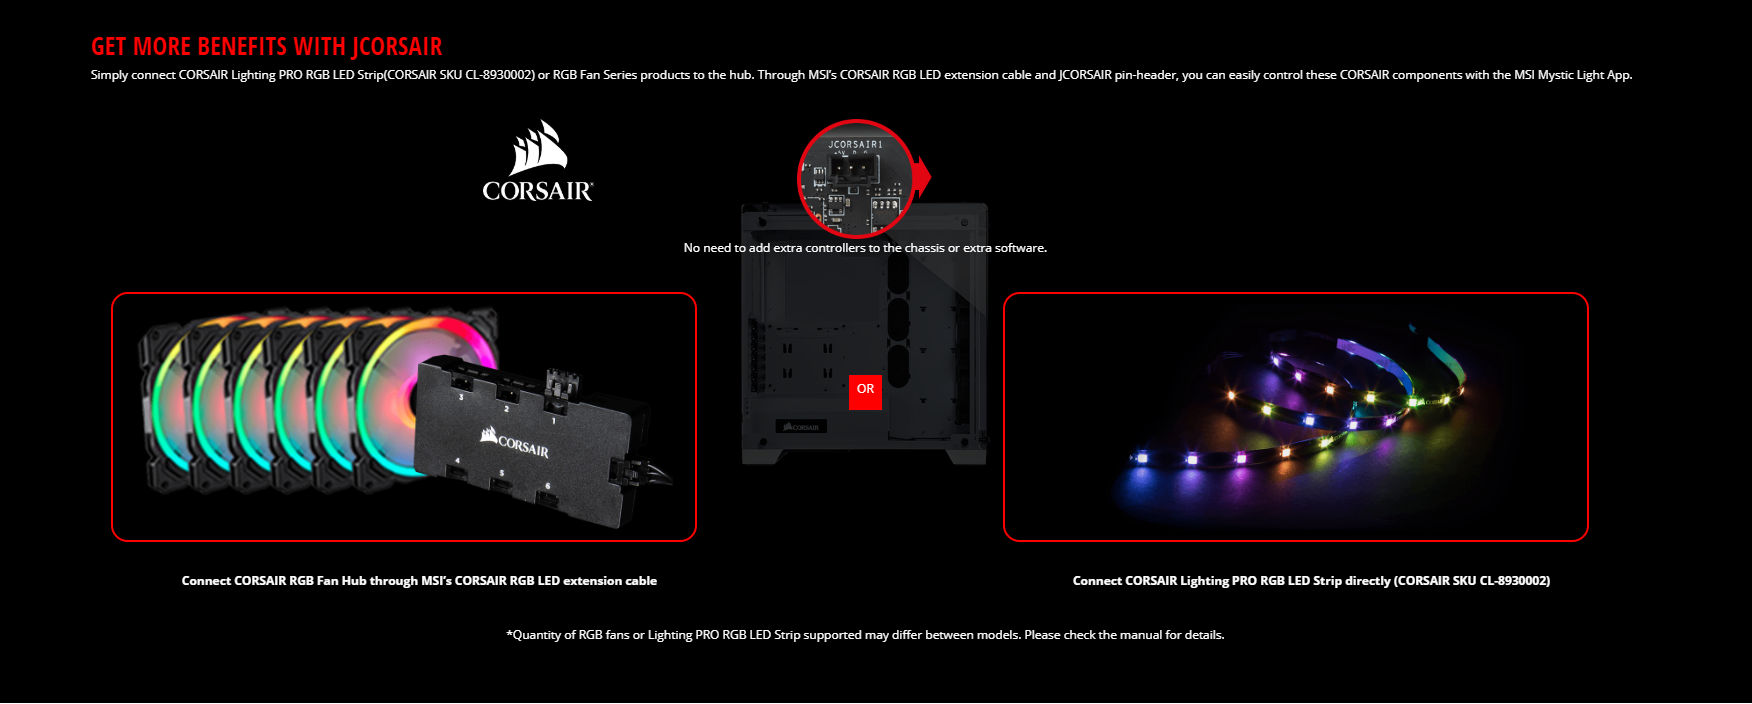
There is a header on the top right side of the motherboard labeled as JCORSAIR1. It has a pin format of +5V DG (3-pin header, addressable RGB) and is used to host a multitude of the Corsair RGB lighting devices like Node Pro, Commander Pro that would allow the user to control and sync those devices using the MSI Mystic Lighting. To make up for this, MSI has bundled their proprietary RGB cable that connects the Corsair devices to the JCORSAIR port. This is something new for me and I appreciate this approach as many peeps have been asking on how to sync the Corsair devices with the motherboard’s lighting solution and I think other manufacturers should take note of this implementation.
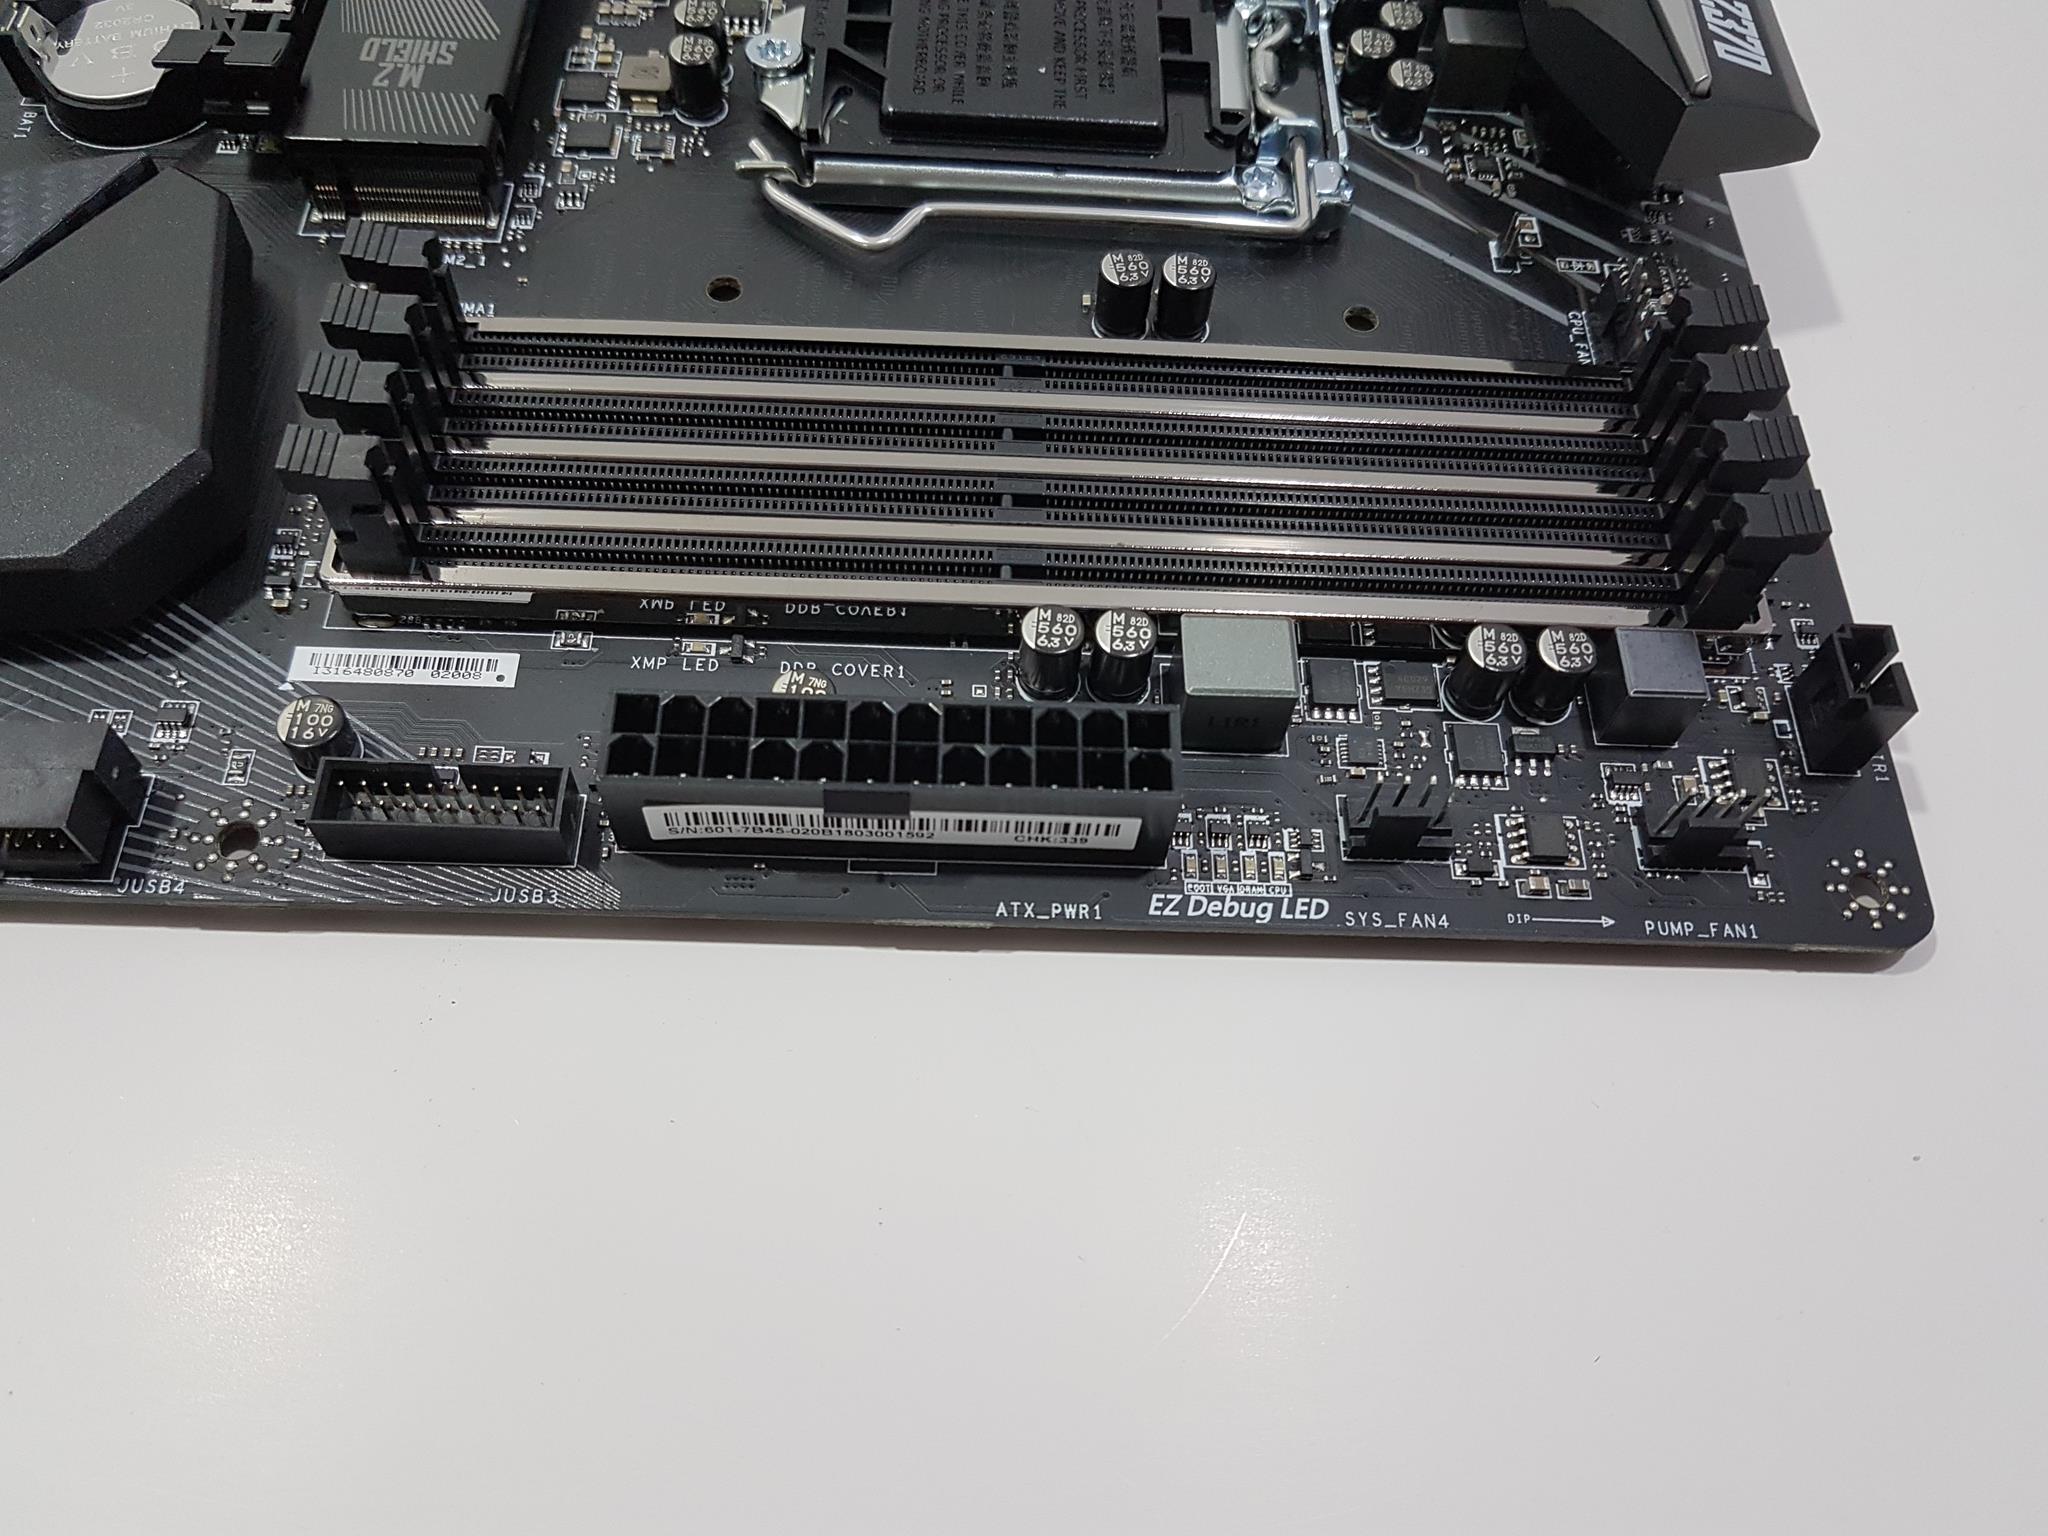
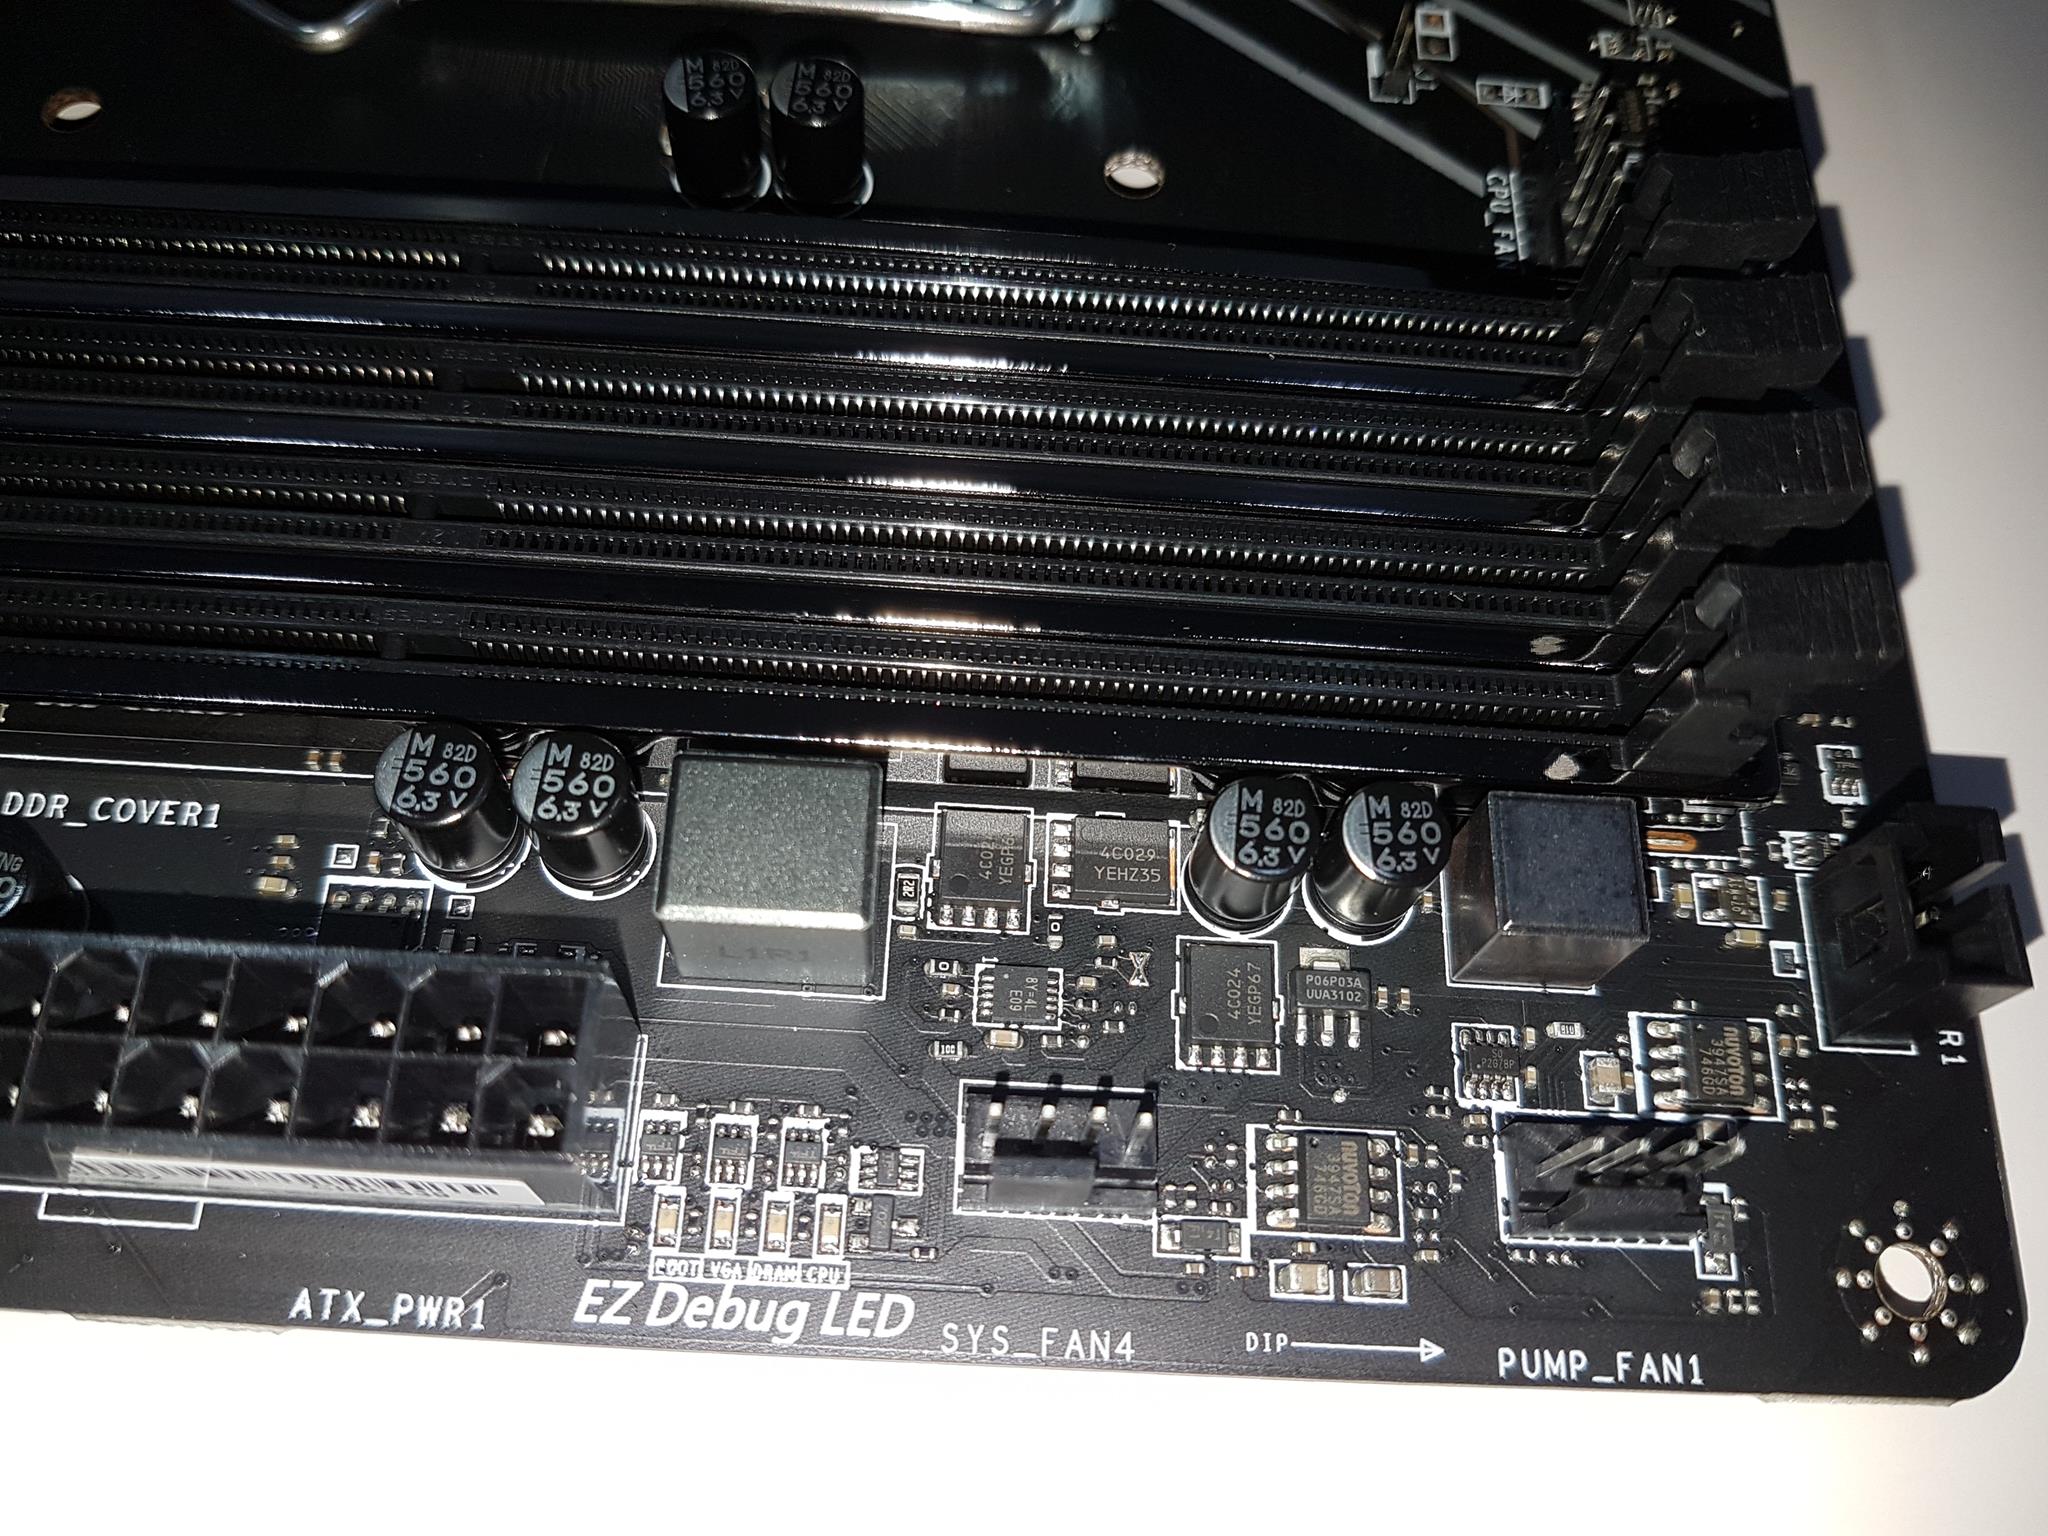
We have a 24 ATX connector located on the right side of the DIMM slots. It is labeled as ATX_PWR1. There are two more headers towards the right side of the ATX connector. The topmost is the 4-pin pump header labeled as Pump_Fan1. The user can connect their loop’s Pump or AIO’s pump power cable to this header. The PWM header below this pump header is labeled as Sys_Fan4 indicating that this motherboard has 4 system fan headers in addition to the CPU and Pump fan headers.
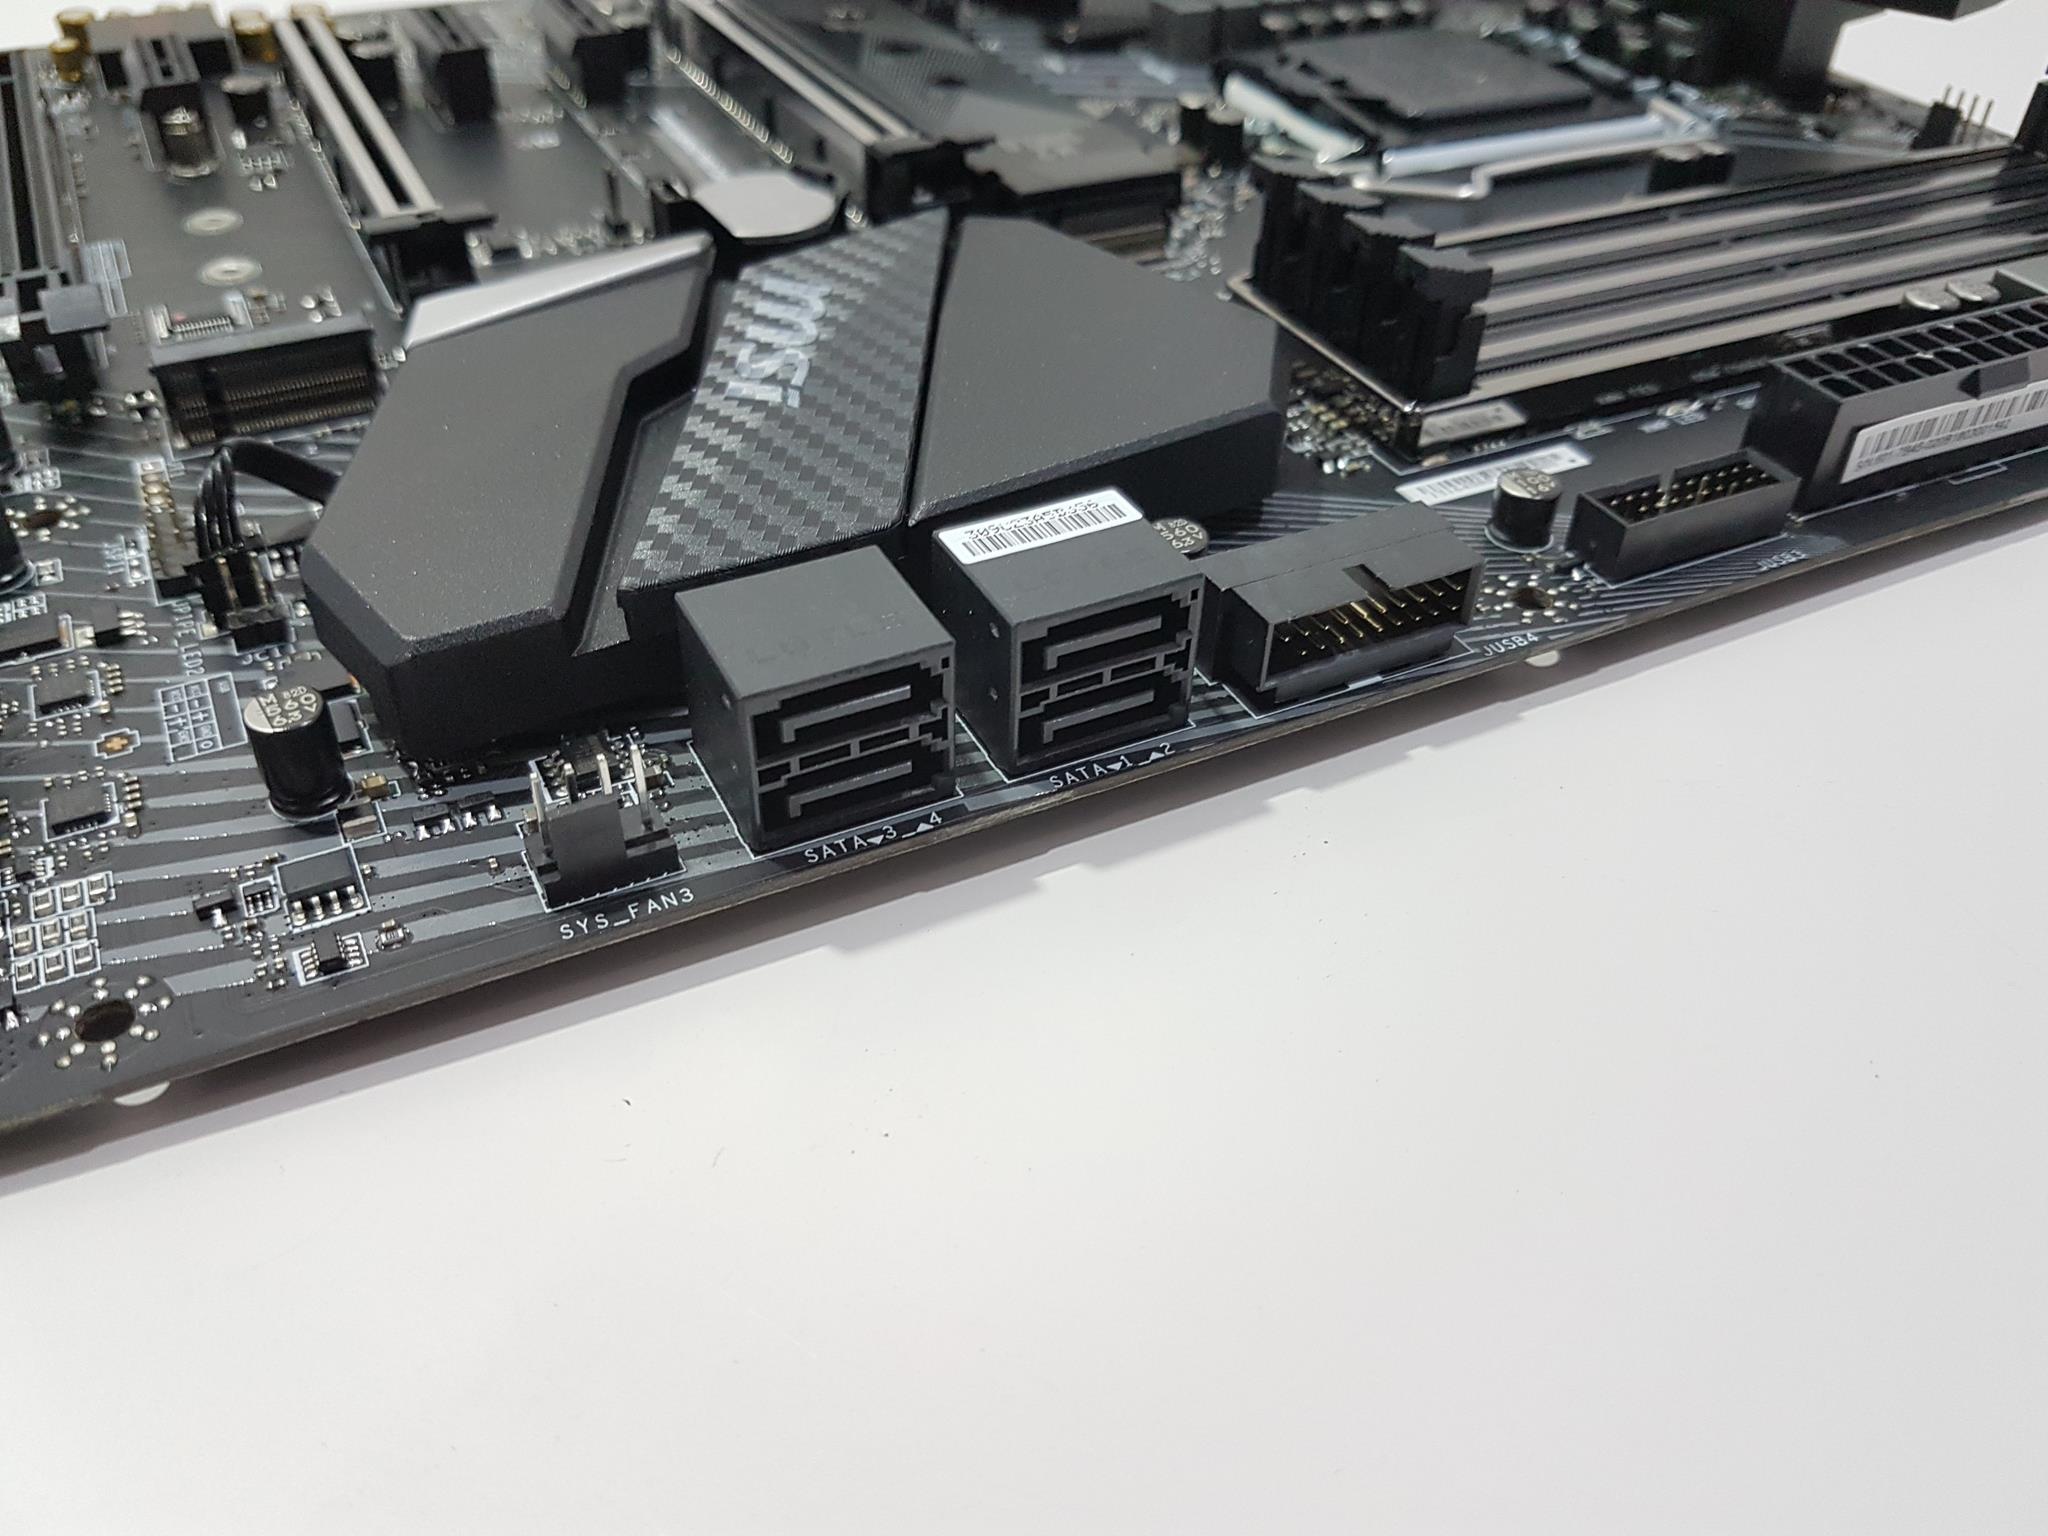
There are two USB 3.1 headers on the left side of the ATX power connector. One of these is implemented in 90° angle. They are labeled as JUSB3 and JUSB4. Next, to them, we have 4 SATA ports labeled as SATA 1_2 and SATA 3_4. These are rated 6 Gbps. The motherboard supports RAID 0,1,5, and 10. On their left side, we have a Sys_Fan3 PWM header.
From what we can see on the right side of the DIMM slots we have a single phase memory VRM using MOSFET with one high and two low configurations.
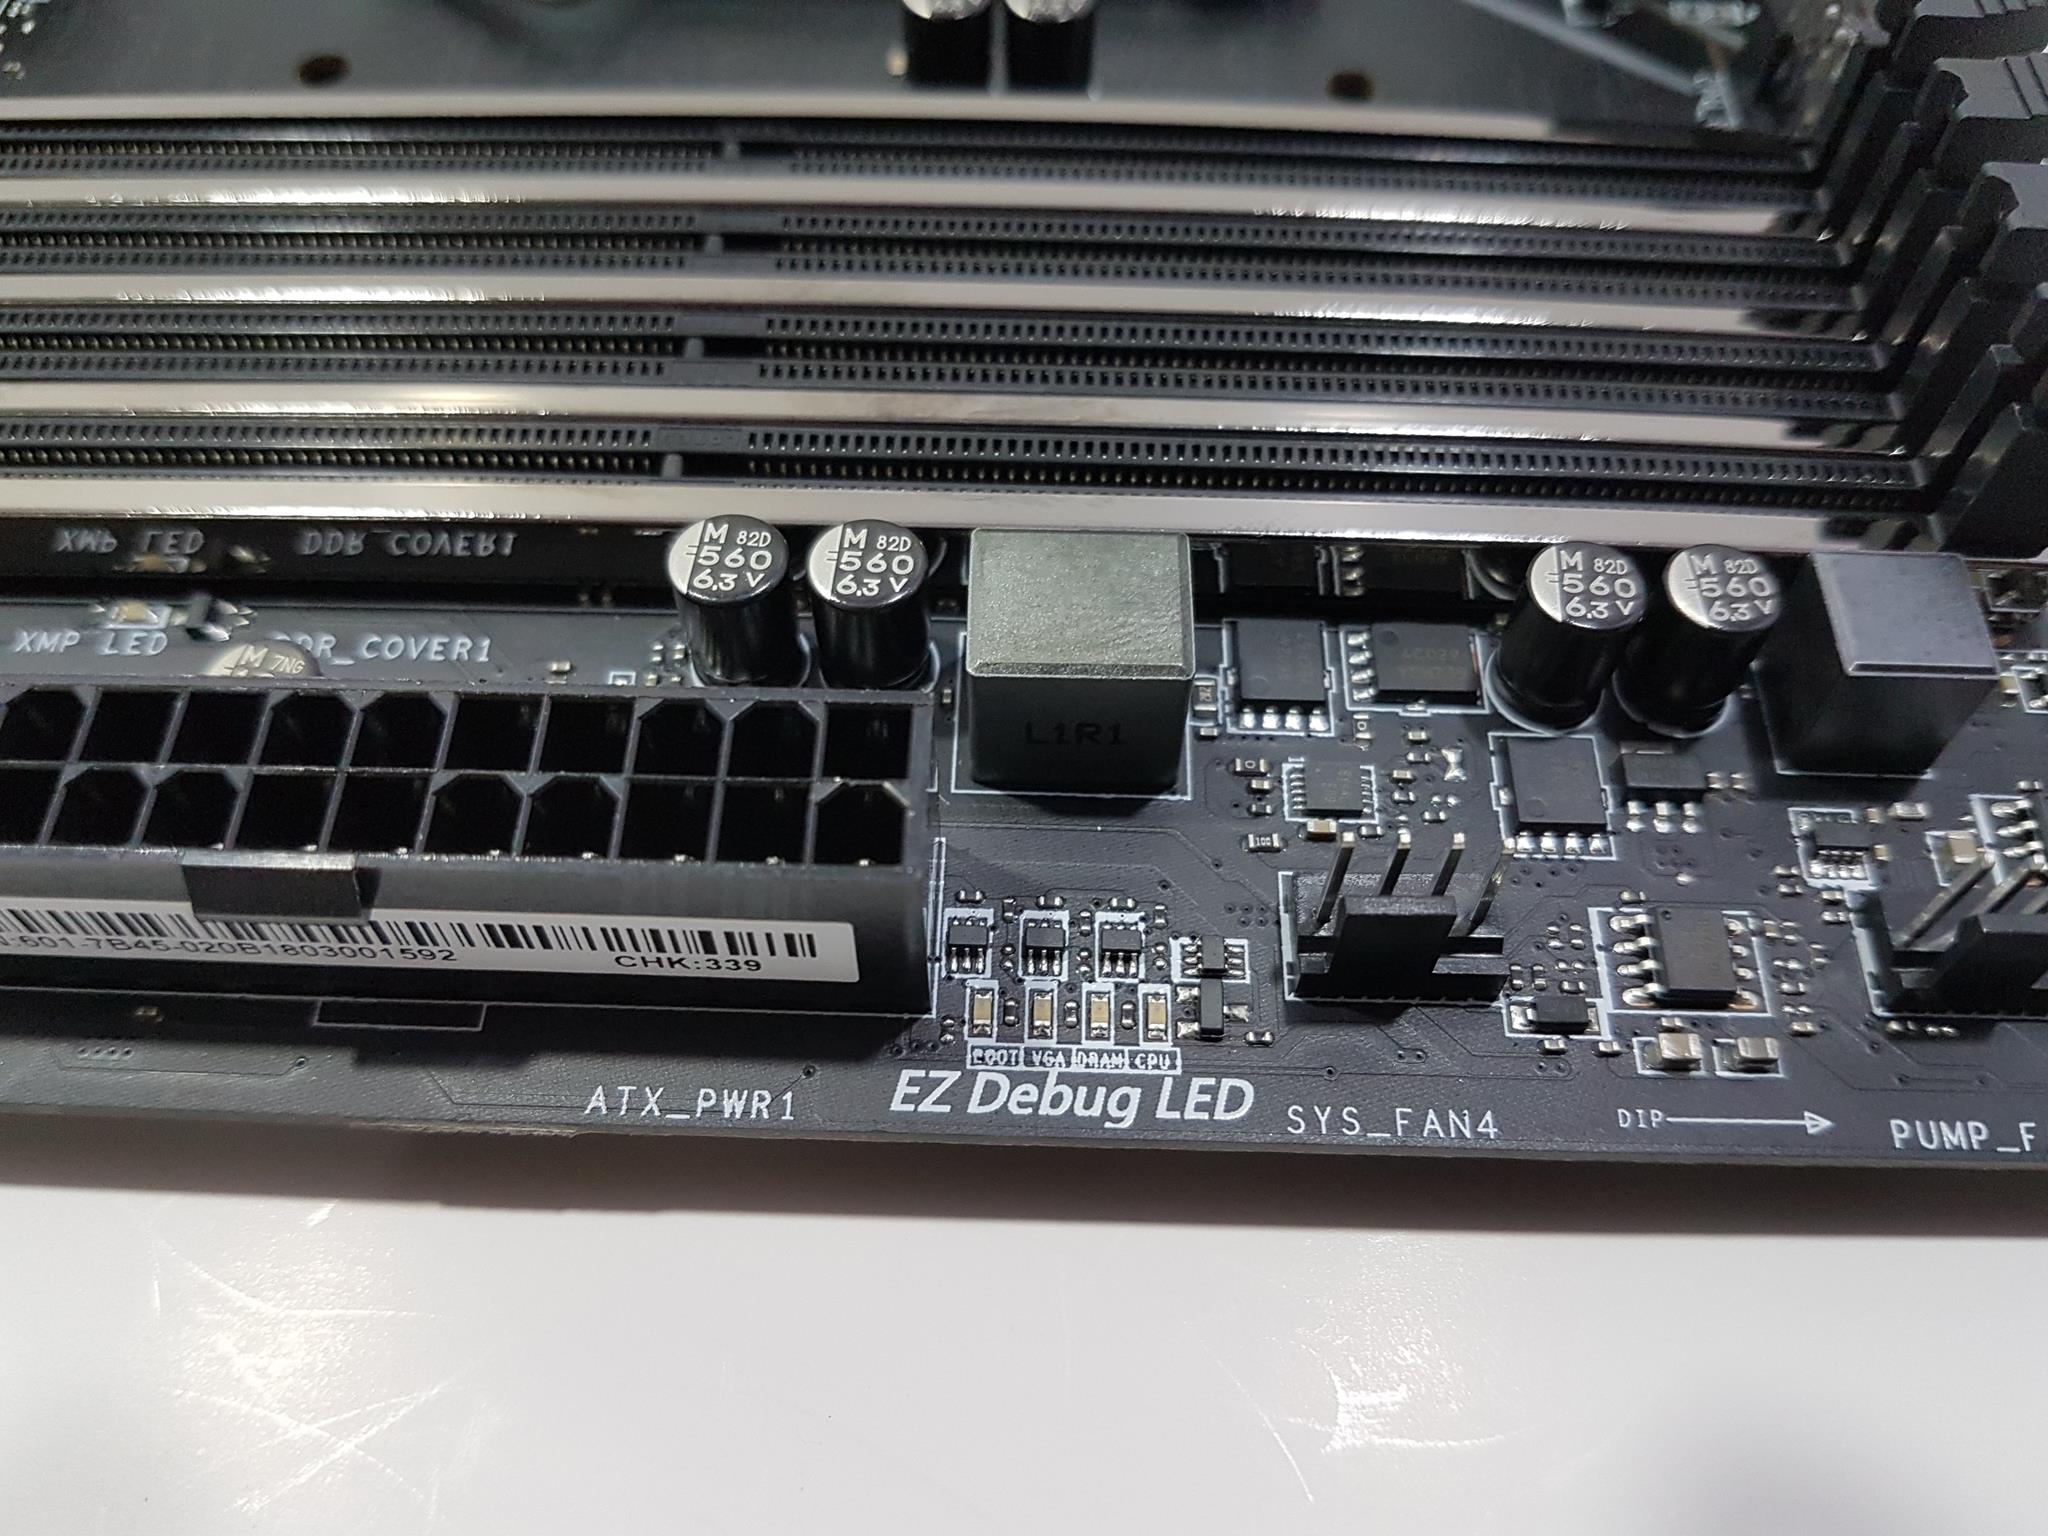
This motherboard does not have a debug LED to display the codes that are very helpful in troubleshooting in case something goes wrong. Similarly, we don’t have clear CMOS dedicated button on the rear I/O or on the board but a two pin jumper configuration. Still, MSI has implemented what they refer to as EZ Debug LED. There are 4 LEDs located on the right side of the ATX power connector. They are labeled as CPU, DRAM, VGA, BOOT in that order starting from the top. This is the troubleshooting mechanism provided on this motherboard. In case of any issue or error, the corresponding LED will lit up continuously until the problem is resolved. This has been my complaint with the motherboard manufacturers as to how expensive the actual debug LED would be that we only get to see them on the high-end offerings alone!
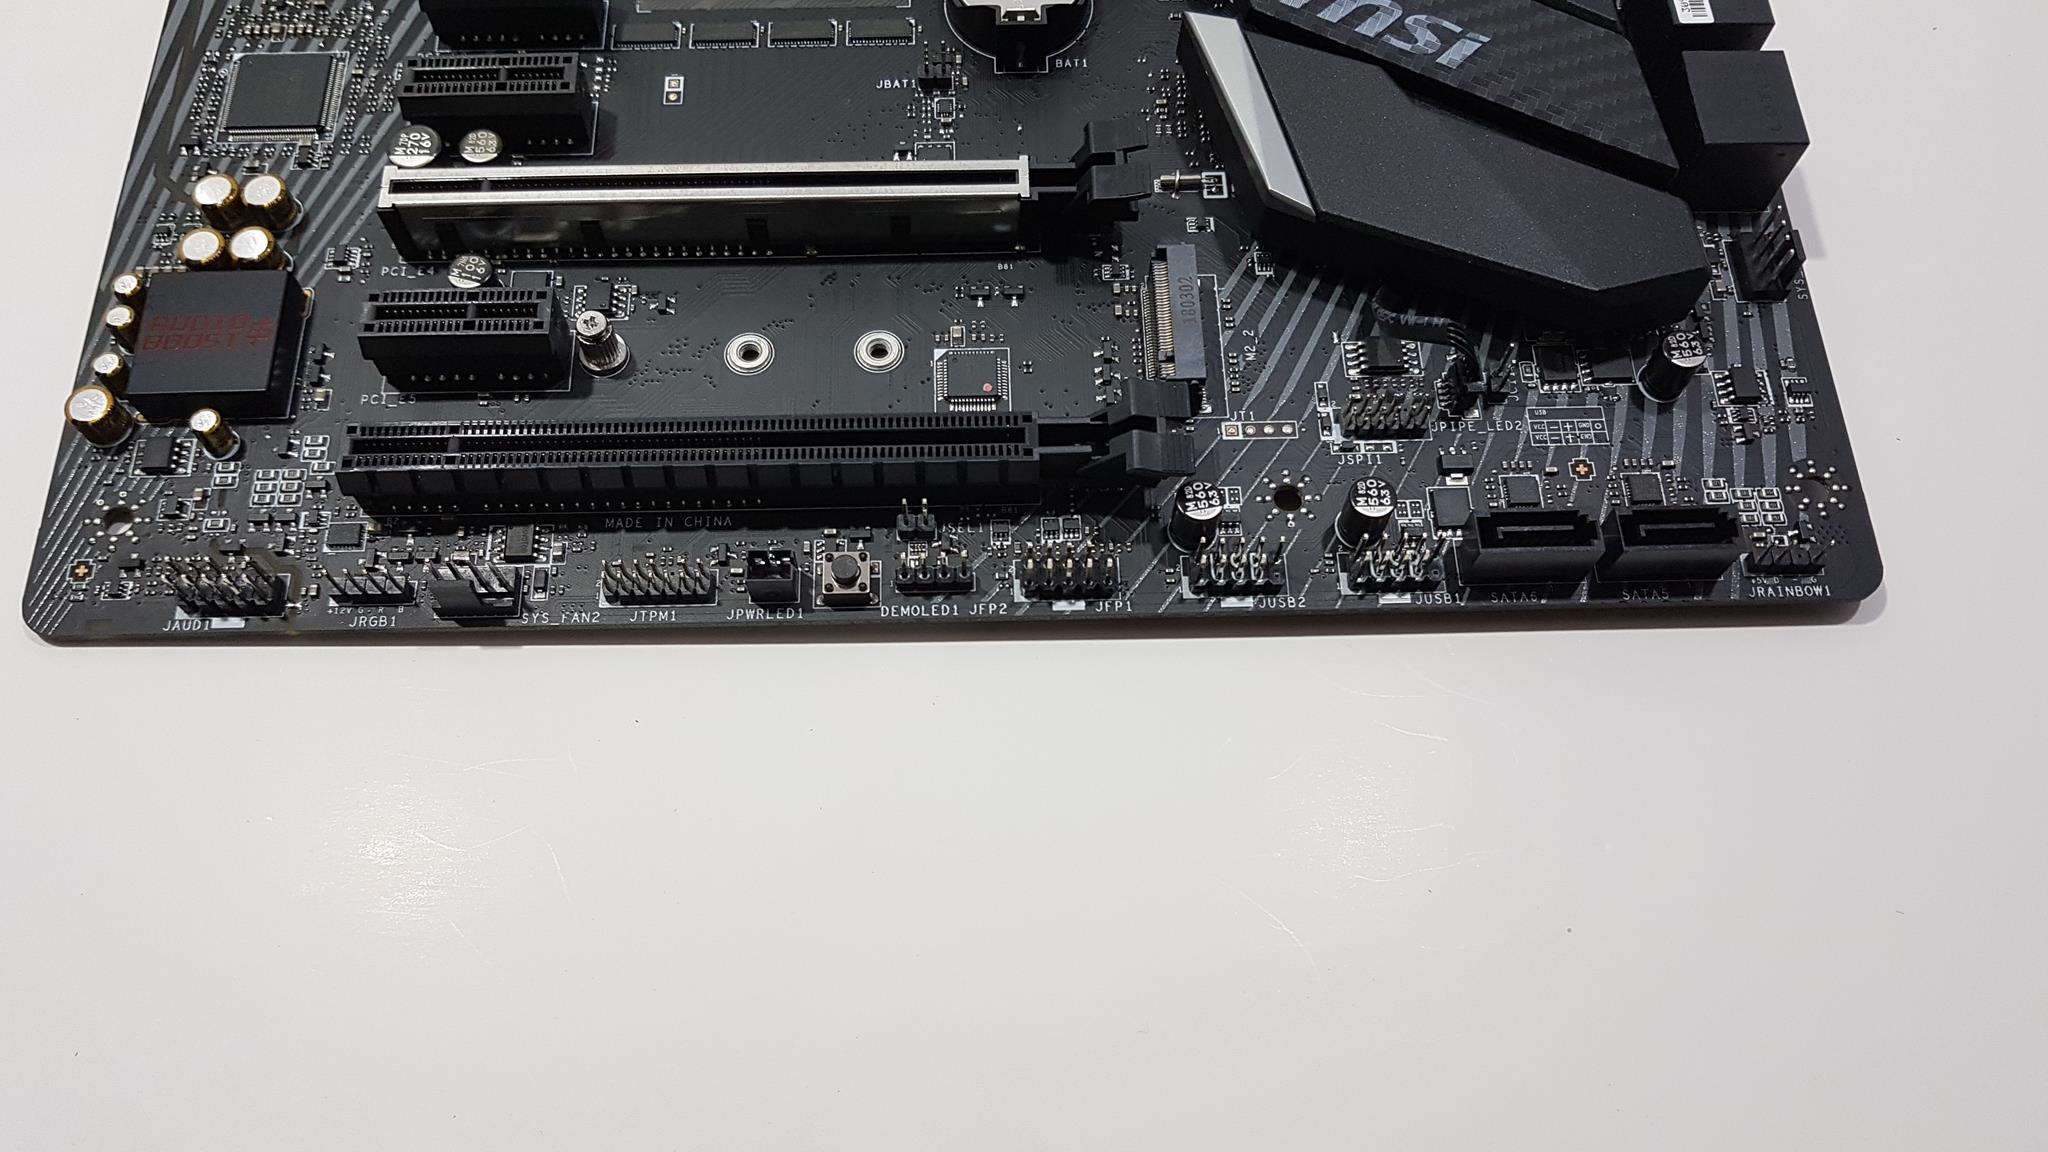
Let’s take a look at the bottom connectivity options of the MSI Z370 Gaming Pro Carbon motherboard. Starting from the right side, we have a JRAINBOW1 lighting header. As the name indicates, this is an addressable RGB header using the pin format of +5V,D,,G. The user can connect addressable RGB LED strips using WS2812B with a maximum power rating of 3A. We have two more SATA ports labeled as SATA 5 and 6 on the left side of the ARGB header. Next, we have two 9-pin USB headers labeled as JUSB1 and JUSB2.
Next, we have two front panel connectors labeled as JFP1 and JFP2. If you are wondering why two then JFP1 will host your chassis’s front panel system cables excluding the speaker. The speaker is to be connected to the JPF2. There is no accessory bundled with this motherboard that would ease the installation of the system panel cables to the front panel header. Even the Gigabyte Z370 HD3 Ultra Durable motherboard has that! Next, we have Demo LED button and LED Power Input header labeled as DEMOLED1 and JPWRLED1. There is also a two-pin jumper labeled as JSEL1 right above the DEMOLED1 button. These are used by retailers to demonstrate onboard LED light effects. If JSEL1 is short then pressing the Demo button will change colors on the onboard lighting zones. If this jumper is open then pressing the Demo button will change lighting effects.
Next, we have 11-pins TPM header followed by Sys_Fan2 PWM fan header. Next, we have JRGB1 RGB lighting header using +12V,G,R,B pin format. The MSI Z370 Gaming Pro Carbon has two +12V RGB lighting headers and one +5V addressable RGB lighting header. The front panel audio connector is located on the leftmost side.
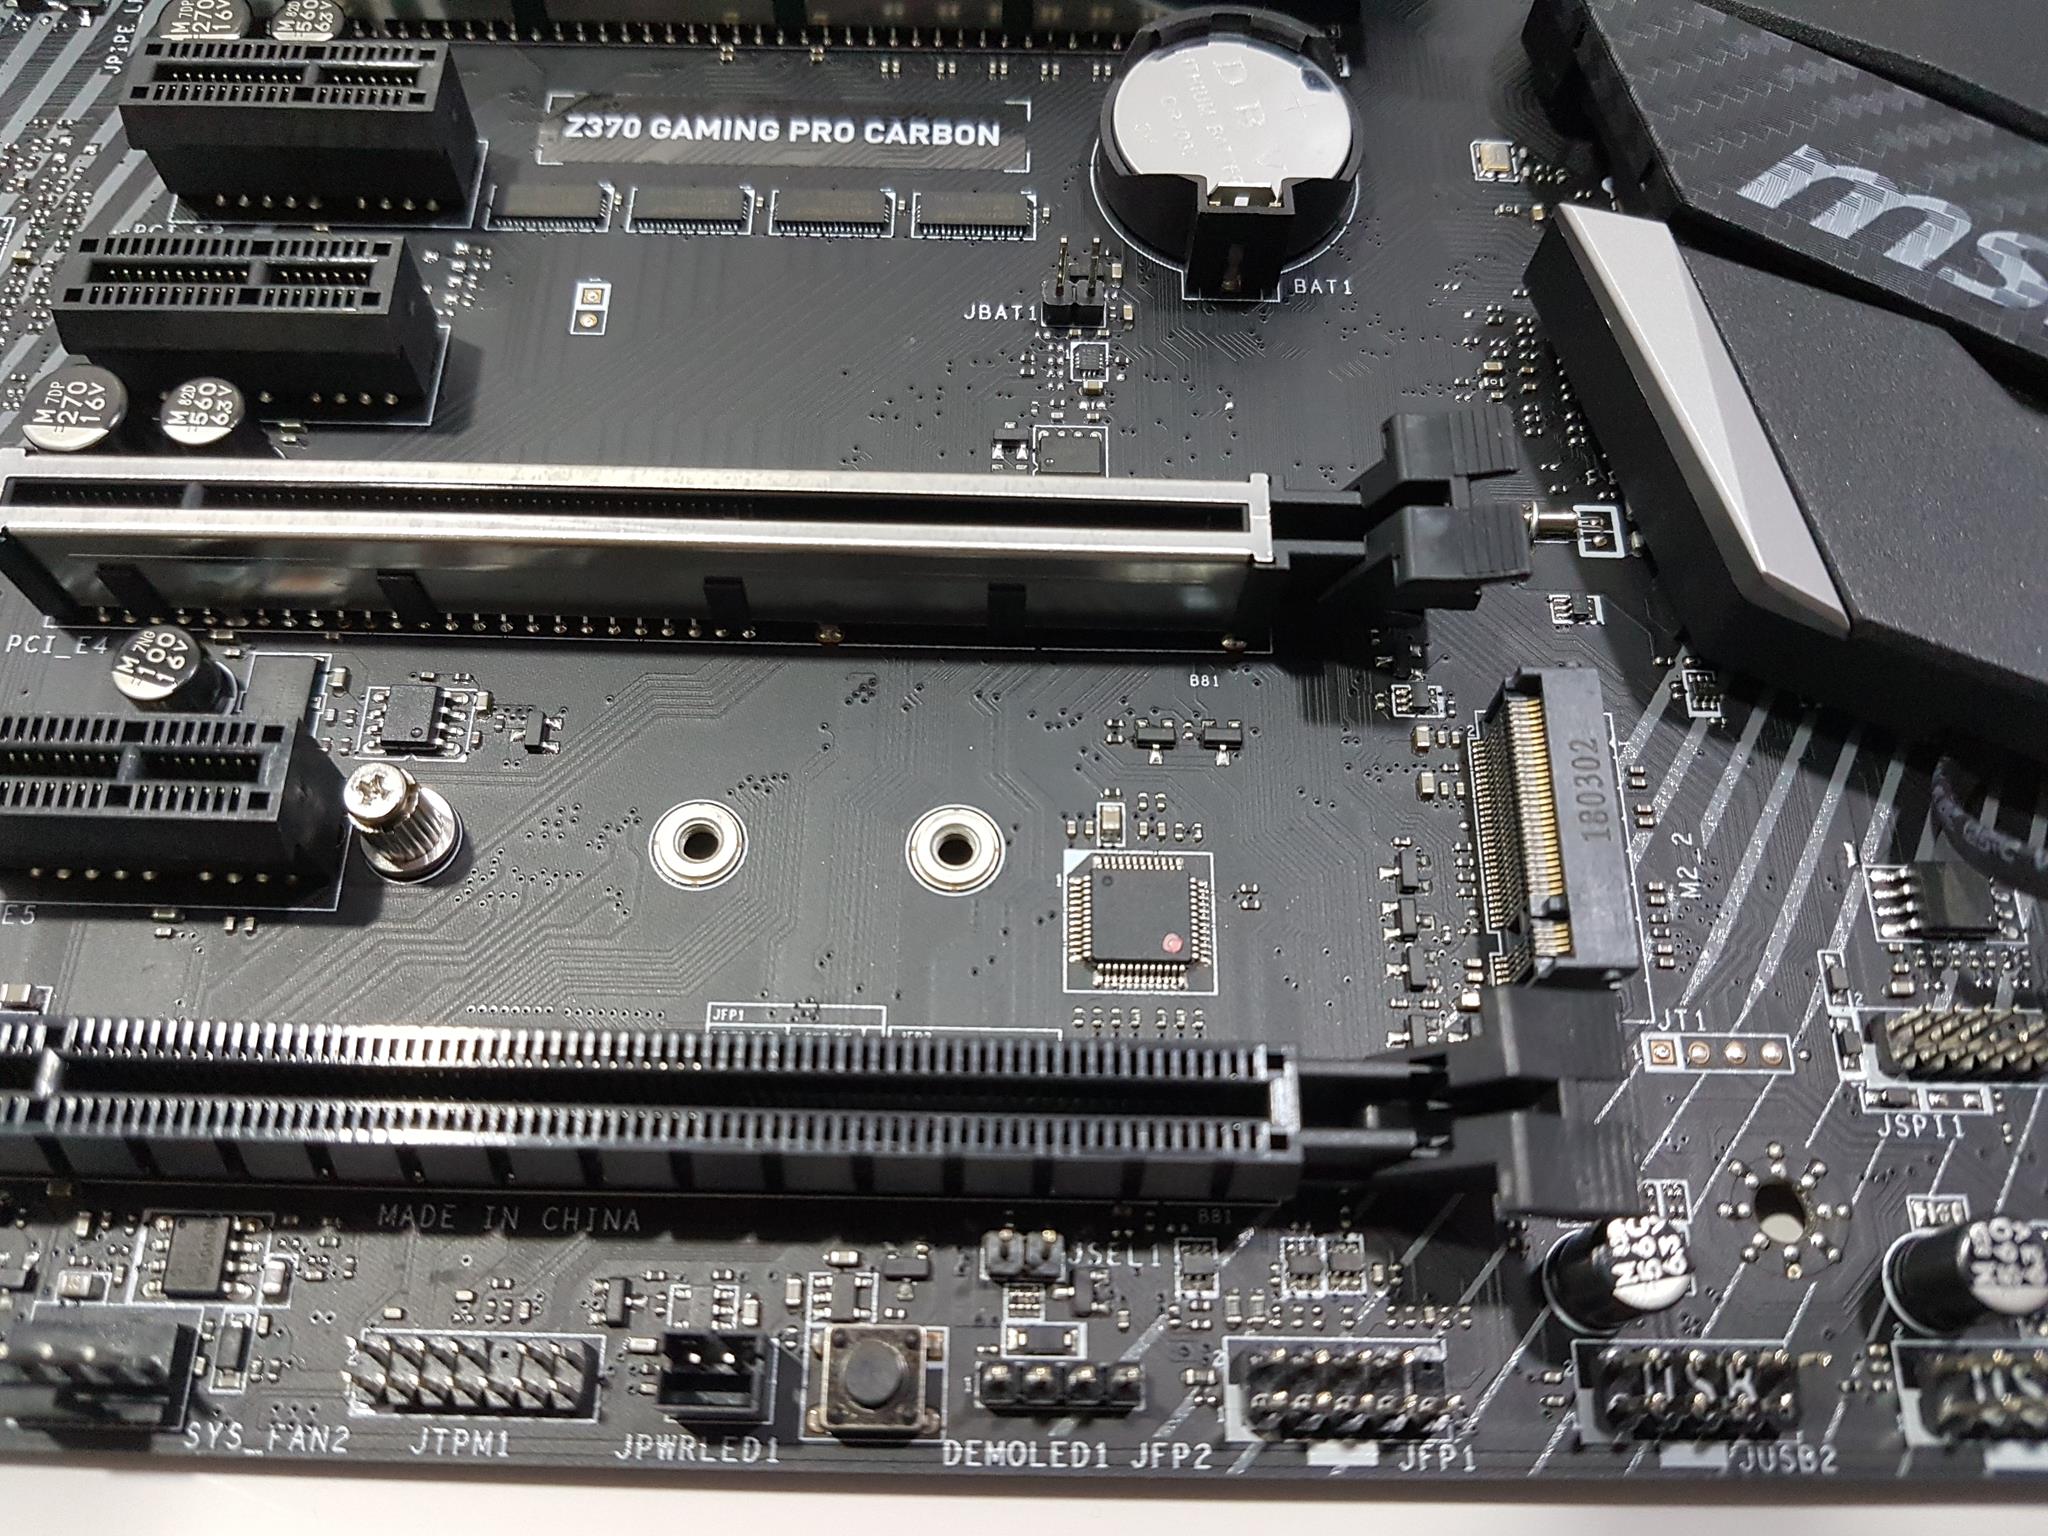
The location of the CMOS jumper is inconvenient as it is located between the first PCIe 3.0 x16/18 full-length slot and second PCIe x8 full-length slot. Using a graphics card with a slot width of 2.5 or more will cover this jumper and the user will have to remove the graphics card to access it. It is labeled as JBAT1There is no dedicated clear CMOS button on the rear I/O. In order to clear the CMOS to reset the settings, shut down the PC, disconnect it from the power source and touch both pins with something like a tip of the screwdriver or by using a jumper if available to short the circuit. Take off the jumper or the screwdriver and power up the PC.
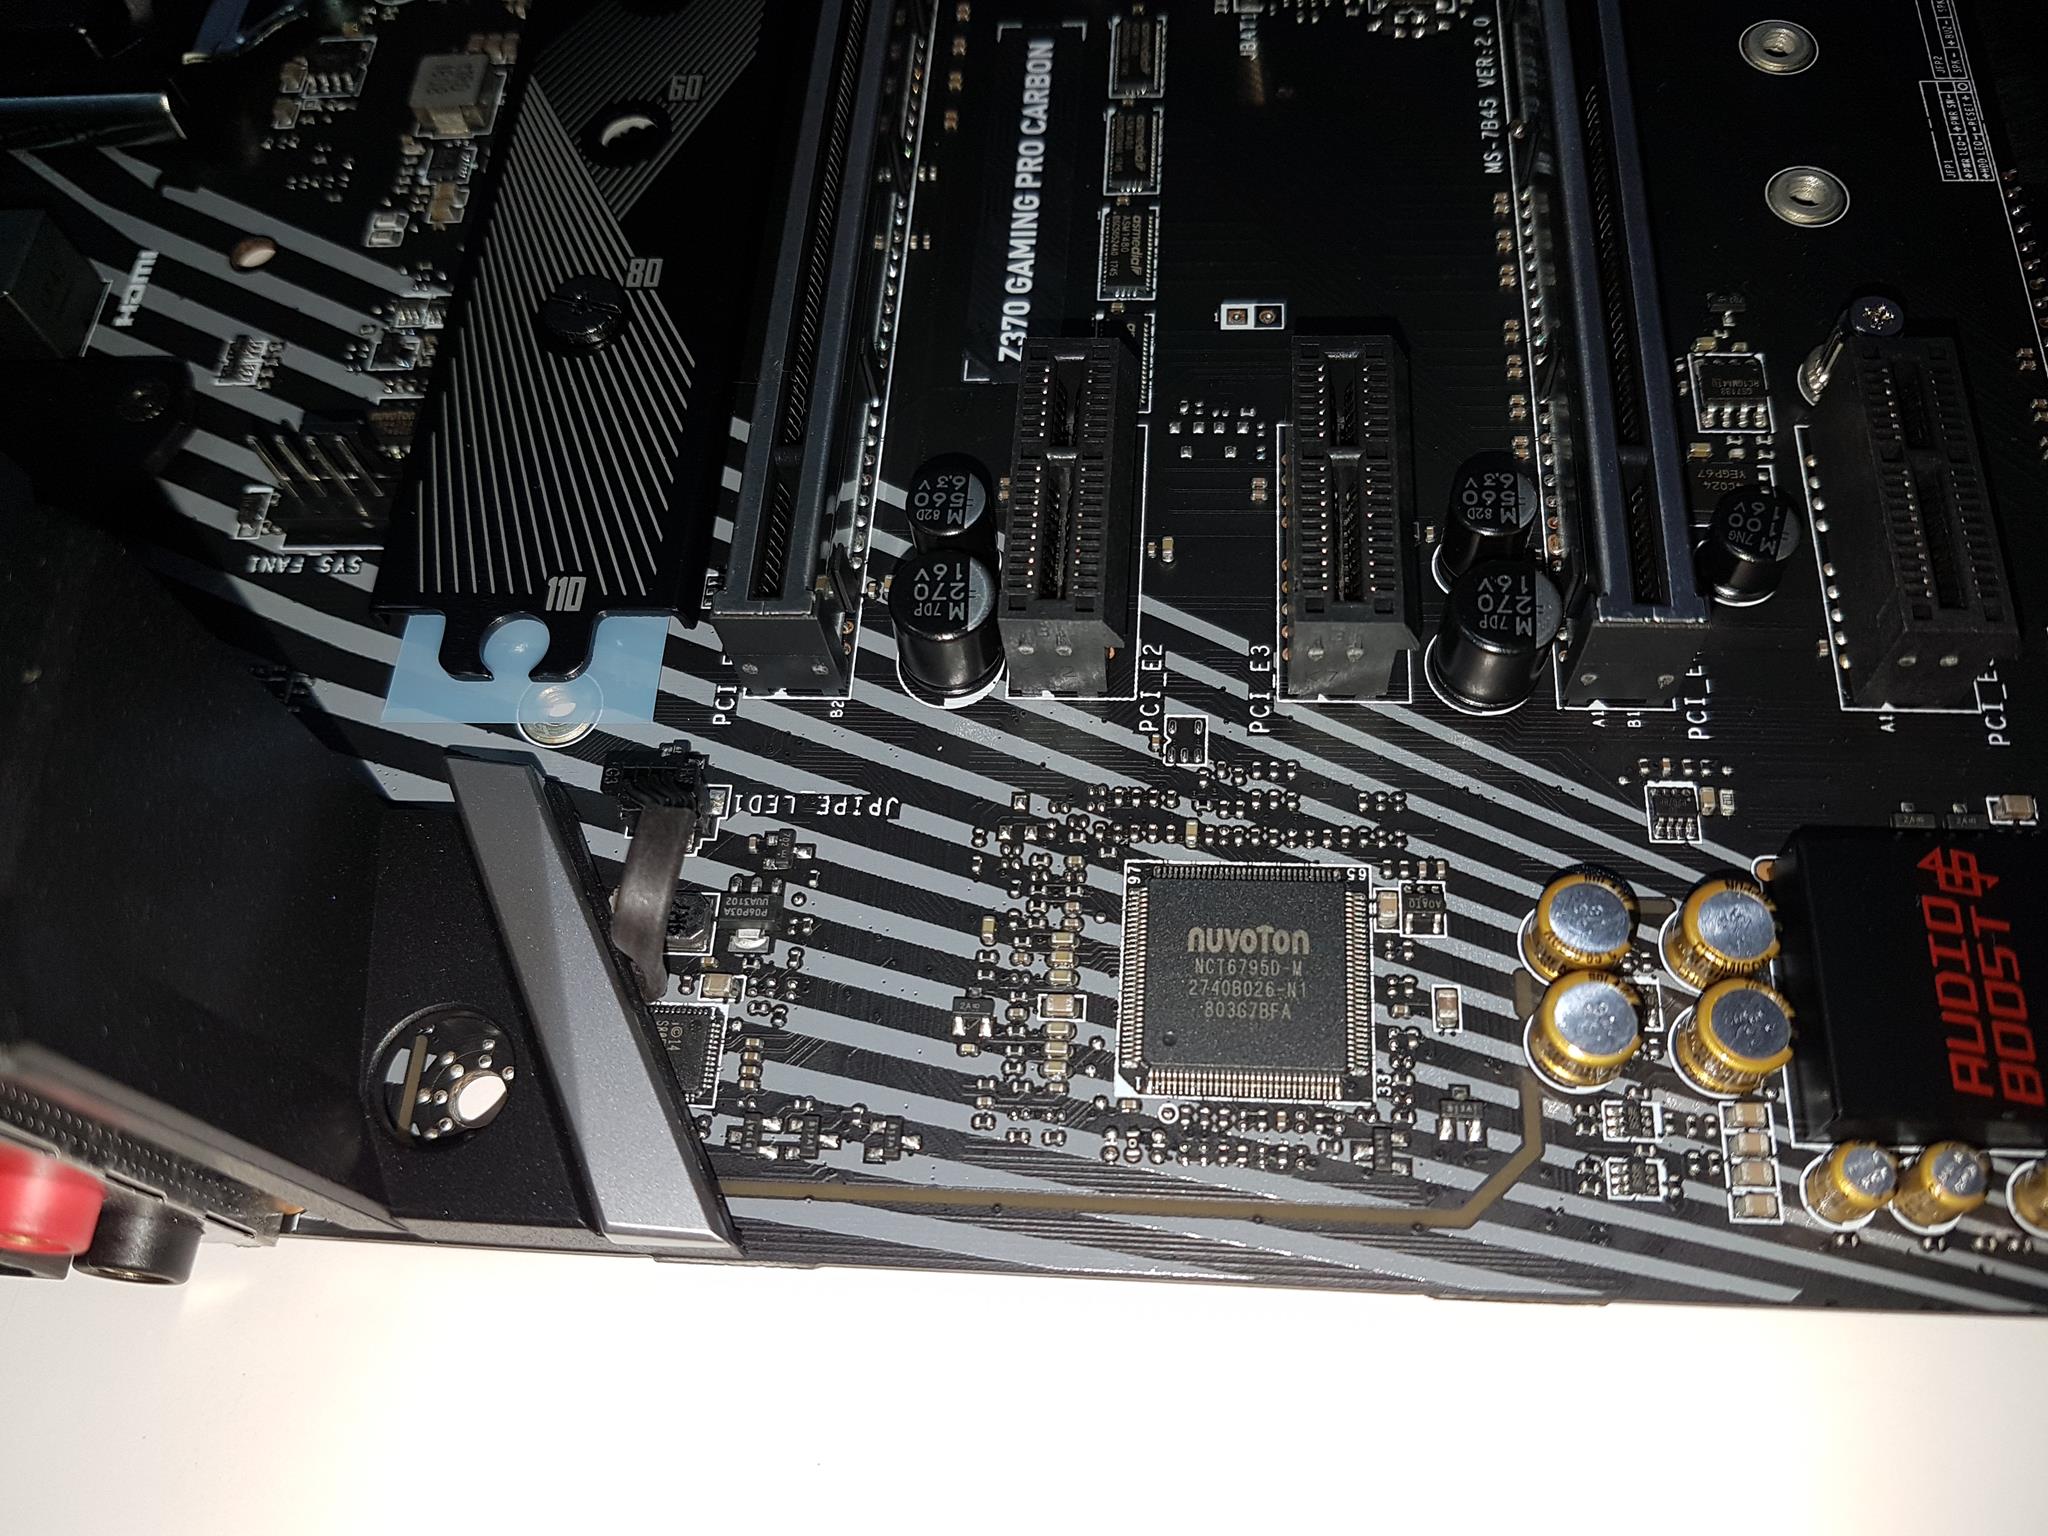
The MSI Z370 Gaming Pro Carbon motherboard is using Nuvoton NCT6795D-M as a super I/O controller chip. The Nuvoton 3947SA chips are located next to each fan header.
USB Ports
The MSI Z370 Gaming Pro Carbon is using ASMedia ASM3142 chipset for USB connectivity provision in addition to the USB support from Intel Z370 chipset. 1x USB 3.1 Gen-2, Type-C, and 1x USB 3.1 Gen-2, Type-A ports on the rear I/O panel are from ASMedia chipset. 8x USB 3.1 Gen-1 ports with 4x Type-A ports on the rear I/O panel and 4x from the mid-board are from the Intel chipset. Similarly, 6x USB 2.0 ports with 2x from the rear I/O panel and 4x from the mid-board are from the Intel Chipset.
PCIe Slots
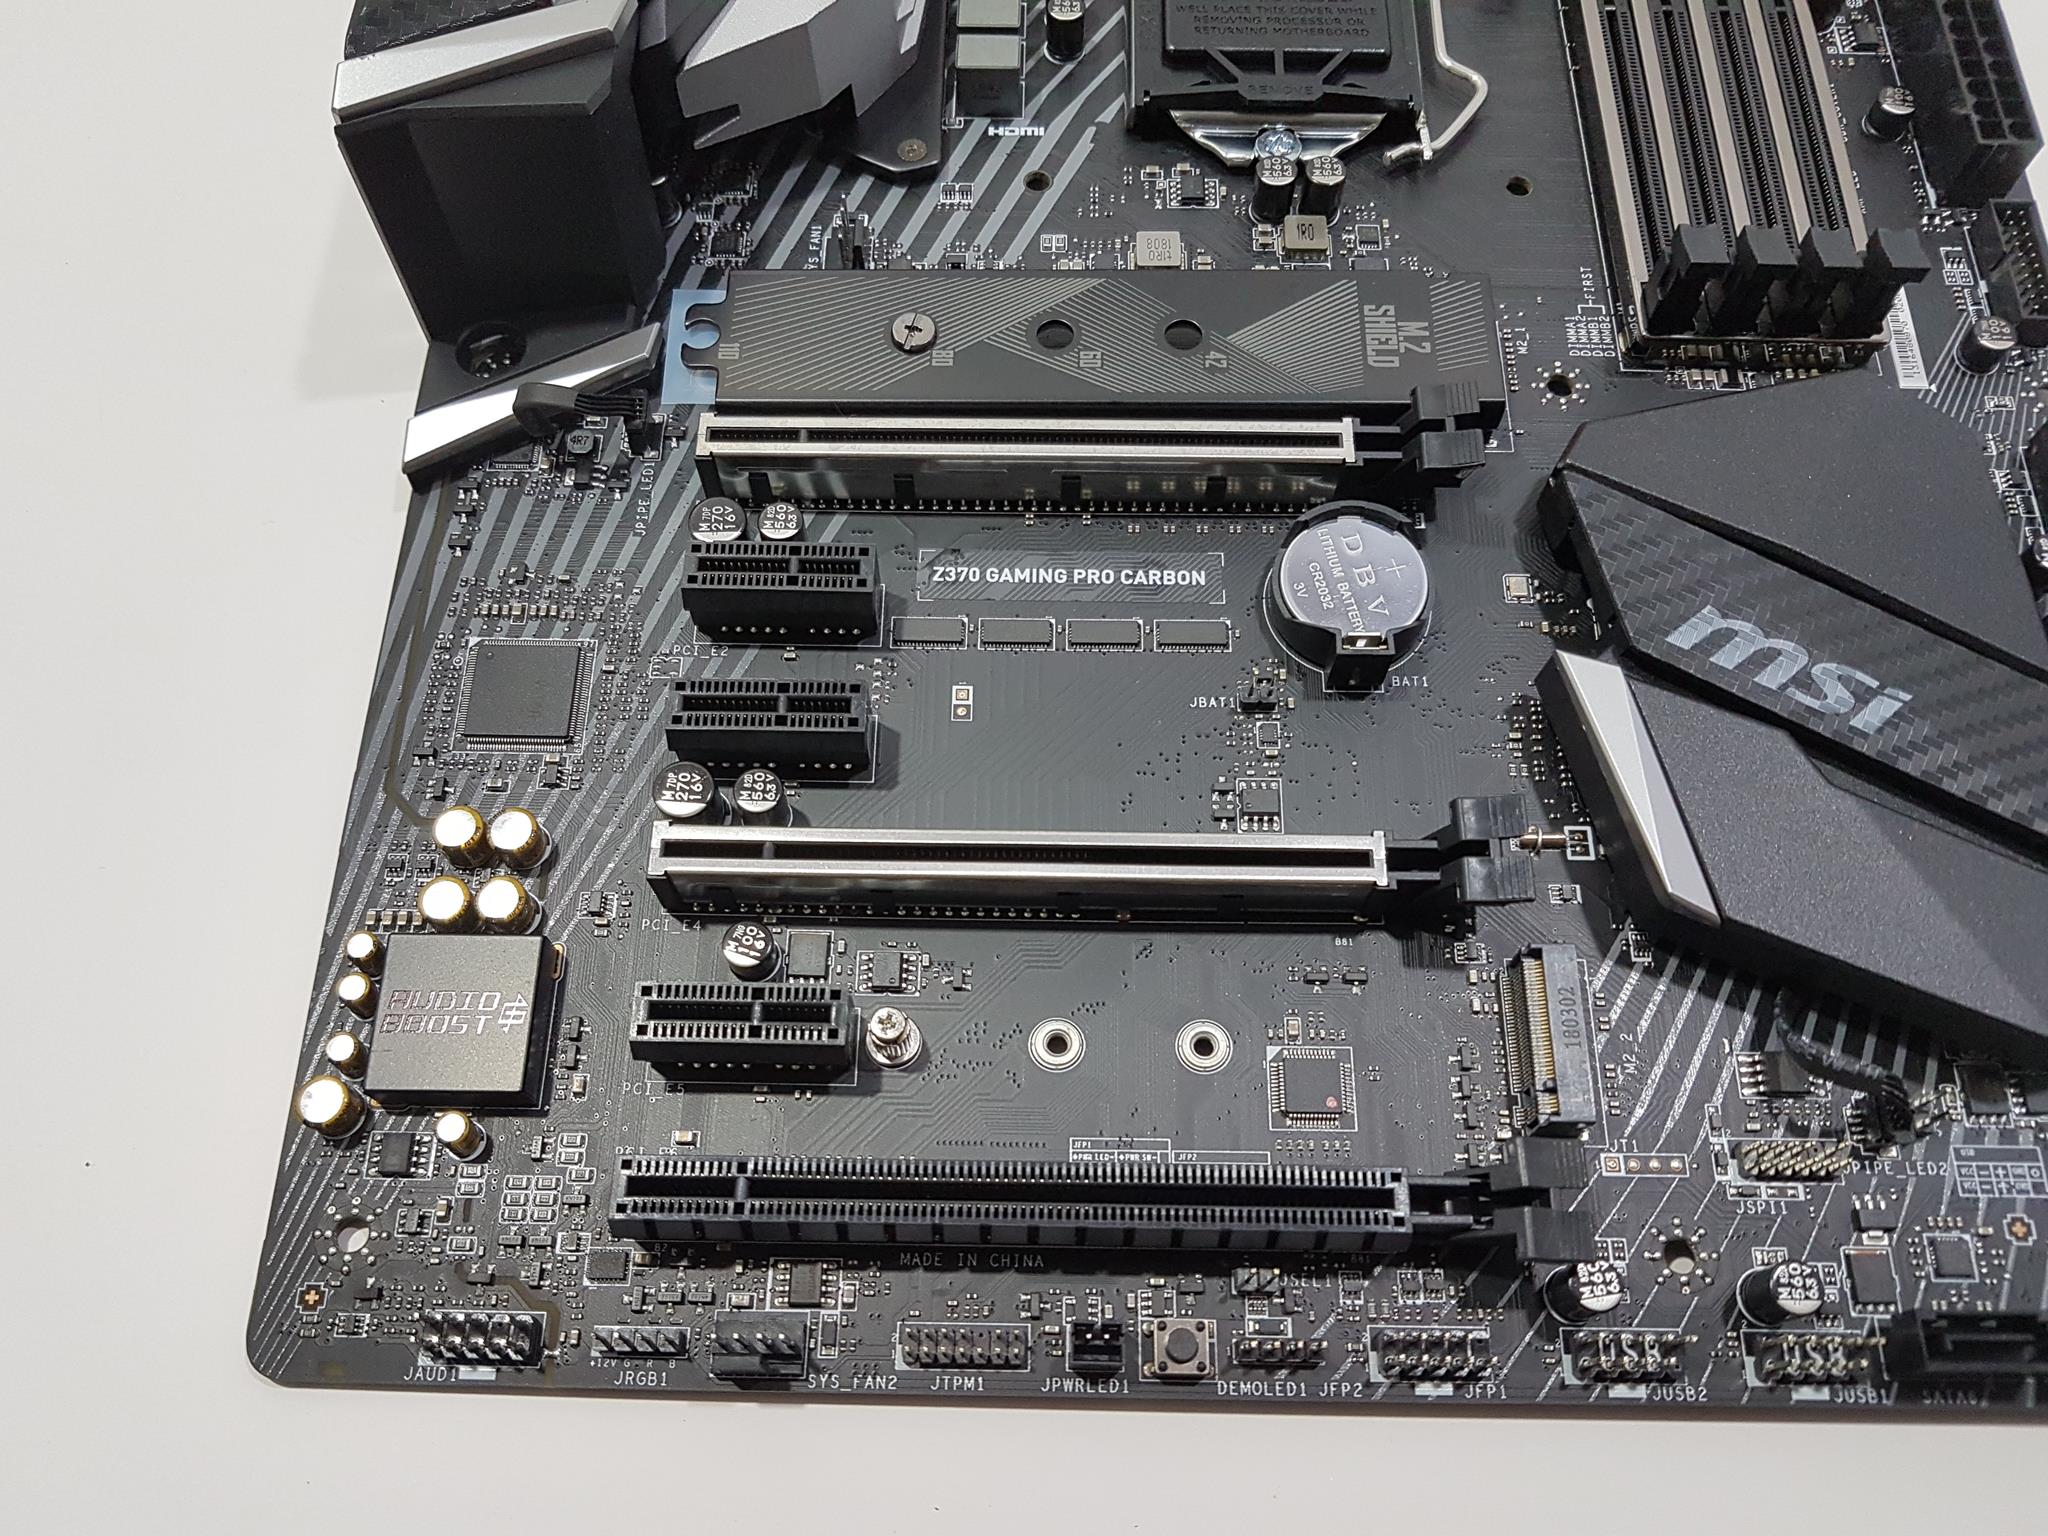
The MSI Z370 Gaming Pro Carbon motherboard has a total of 6 PCIe 3.0 rated slots. Three slots are PCIe 3.0 X1 rated. There is only one dedicated PCIe 3.0 X16 slot which is electrically wired to the CPU socket. The second full slot PCIe 3.0 is x8 whereas the third full slot is X4 rated. The third one is electrically wired to the chipset. The motherboard supports Nvidia two-way SLI and AMD three-way Crossfire. The X16 and X8 rated slots are steel reinforced to provide additional strength to bear the heavyweight graphics card(s). EMI protection is also provided. In two way-SLI, both slots will be in x8/x8 configuration. These slots have LED indicators on them. Red color on the LED means the first slot is in x16 mode. The white color would mean a combination of speed like x8/x8 or x8/x4 is in use.
Audio
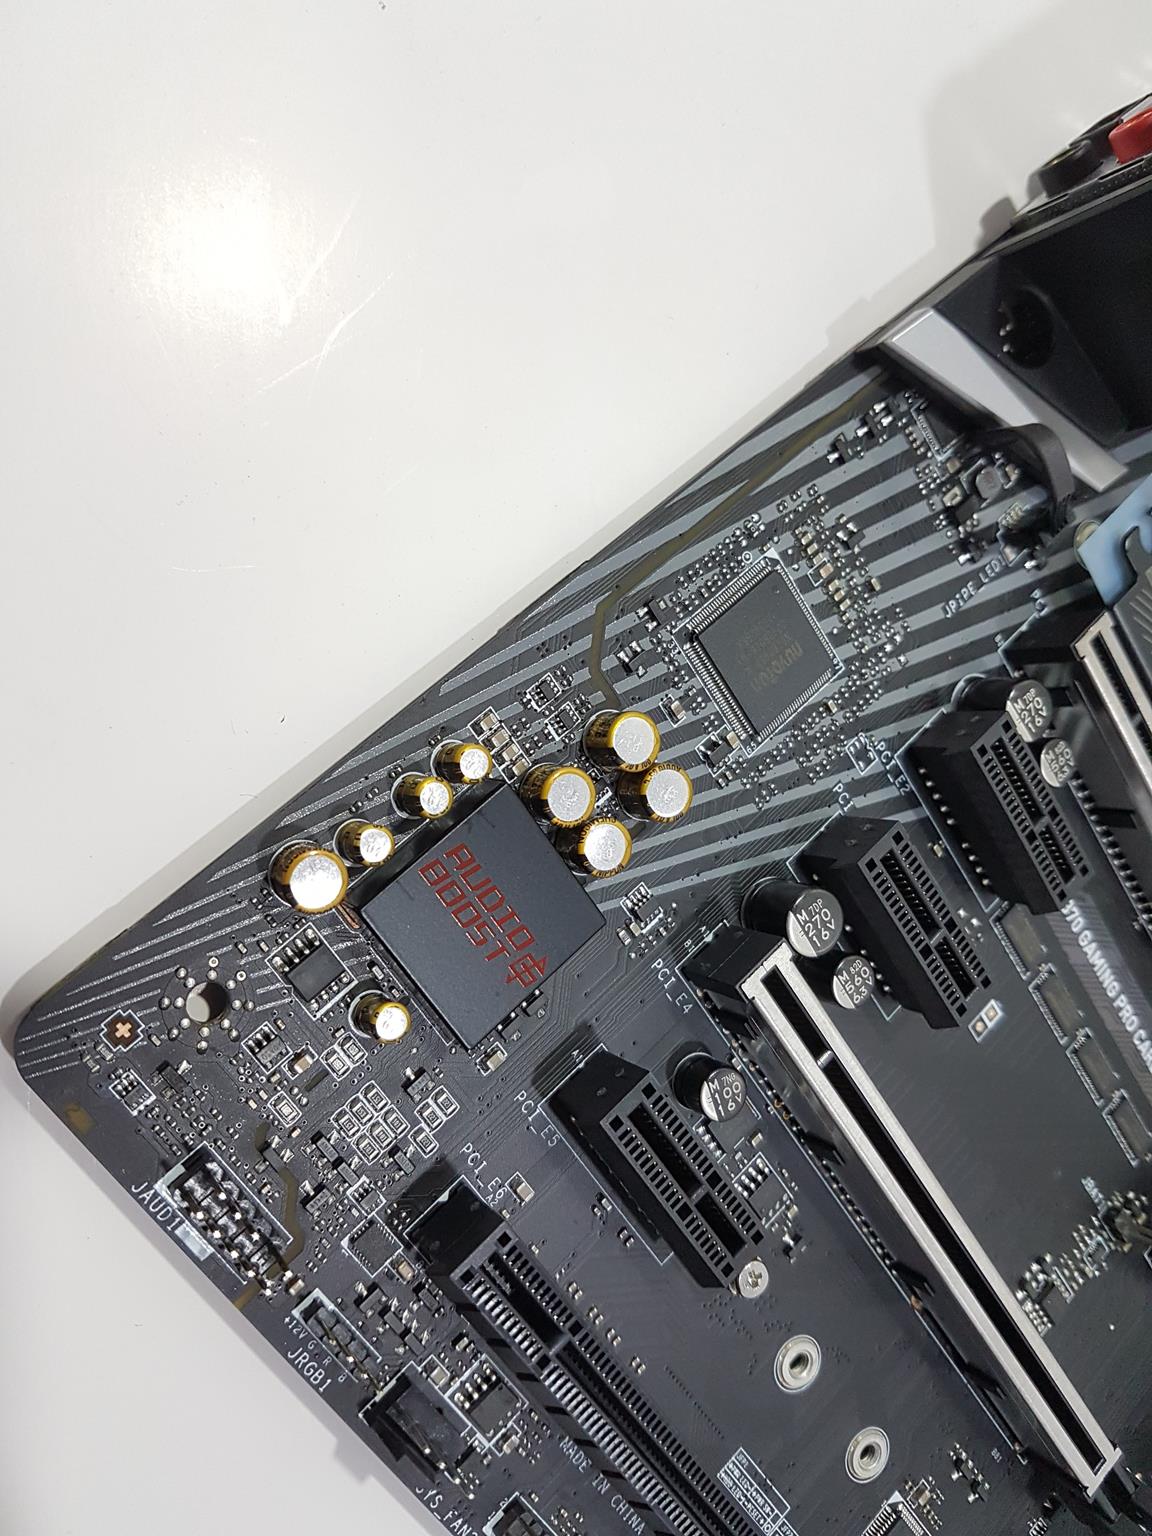
The MSI Z370 Gaming Pro Carbon is using Realtek ALC1220 Codec supporting high definition audio and 2/4/5.1/7.1 channels. It has support for S/PDIF output. The audio section is implemented on two dedicated layered PCBs. Audio Boost 4 is powered by an EMI-shielded High Definition audio processor with built-in DAC, ensuring the purest sound quality in both stereo and surround sound. It has support for 120dB SNR / 32-bit and supports DSD Super Audio CD playback & recording (64x better than regular CD quality). The built-in dedicated headphone amplifier rewards audiophiles with headphones up to 600O impedance by delivering studio-grade sound quality from gaming PC. Audio Boost 4 automatically detects the optimal impedance for your headphones and adjusts the output for the best sound quality. By dedicating golden audio capacitors to the front output, a high fidelity sound experience with exceptional acoustics and realism for studio level headphones is ensured. The circuitry is using Chemi-Con audio capacitors. The rear panel has golden audio connectors to give the best possible signal output with the least chance of distortion. Using gold also prevents any corrosion or oxidation in the long run, which could impact signal quality.
At the core of its sound technology, the MSI is using Nahimic Sound Technology. This tech is known for its quality and precision in projects undertaken by the Military and the Aeronautics Industry. Unique features, including a sound tracker which visually shows where the enemies are making noise in game, truly allows the gamer to get the upper hand on the battlefield. Audio Boost operates like a dedicated soundcard by being physically isolated from the rest of the motherboard circuitry to ensure the purest audio signal possible. A bright border illuminated by LEDs showcases and protects the Hi-Fi audio unit.
LAN Connectivity
The MSI Z370 Gaming Pro Carbon is using Intel NIC with 1219-V LAN controller. This controller is Gigabit rated hence it supports data connectivity speeds of up to 1000 Mbps. There is one LAN port on the rear I/O panel. It has two LEDs on the top left and right sides. The left side LED indicates the link/activity status. If it is off then there is no link, in case of a successful link, it will turn yellow and blinking will show the activity. The right side LED indicates the speed of the link. If it is off then we have 10 Mbps connection. Green would mean 100 Mbps connection and Orange would mean 1 Gbps connection.
M.2 Port
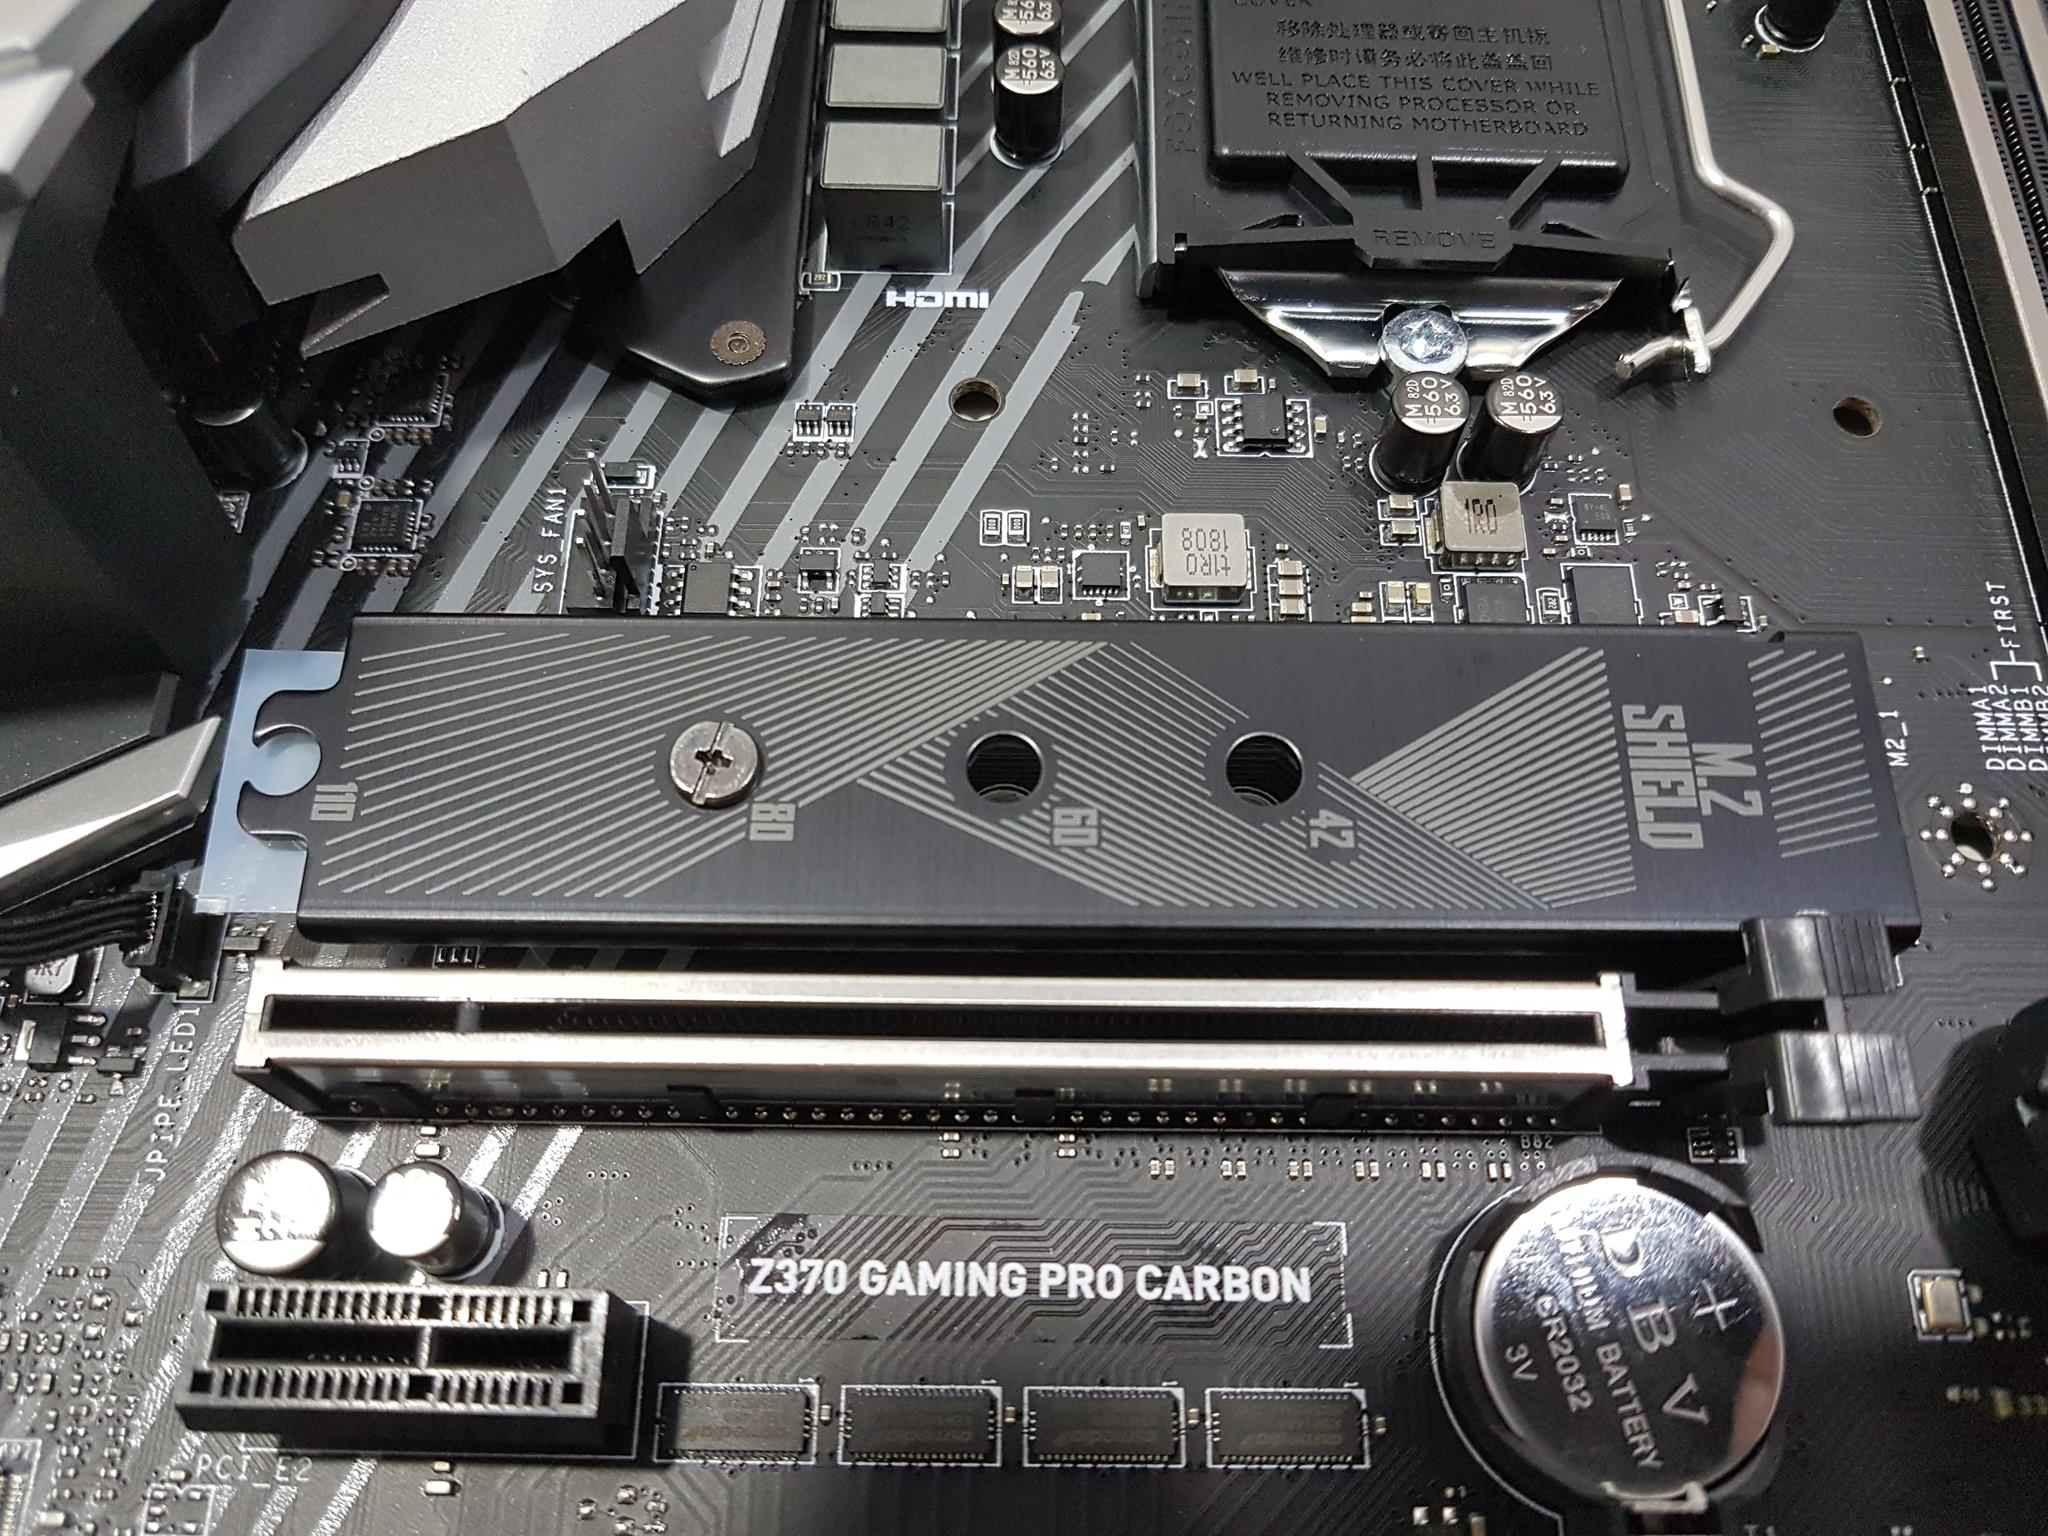
The MSI Z370 Gaming Pro Carbon has two M.2 slots labeled as M2_1 and M2_2. The top slot right below the CPU socket is M2_1 and it has an M.2 shield to keep the thermals of the M.2 drive in check. This shield has a beautifully designed top cover which blends in well with the overall theme of the motherboard. Both slots support M-Key type with support up to PCIe 3.0 x4 as well as SATA 6Gbps. M2_1 supports 2242/2260/2280/22110 type storage devices. The M2_2 supports 2242/2260/2280 type storage devices. Intel Optane memory is support on both slots as well U.2 drives using the Turbo U.2 host card. There are certain limitations in terms of the available SATA connector(s) depending upon the storage drives being used. Here is a rundown of the possible combinations:
- If 1x M.2 PCIe SSD and 1x M.2 SATA SSD are connected at a time then SATA port no 5 will be disabled.
- If 2x M.2 SATA SSDs are connected at a time then SATA 1 and SATA 5 connectors will be disabled.
- If 2x M.2 PCIe SSDs are connected at a time then SATA 5 and SATA 6 connectors will be disabled.
- If 1x M.2 PCIe SSD is connected then all SATA connectors will be available for connectivity.
BIOS
The MSI Z370 Gaming Pro Carbon is using Click BIOS 5. The BIOS is UEFI AMI one using ACPI 6.0, and SMBIOS 3.0. There is a single 128 Mb flash chip hosting the BIOS. There is no dual BIOS on this motherboard. Multi-language support is available in the BIOS.
Thermal Monitoring and Cooling Solution
This motherboard has total of 6 fan headers. One is the dedicated CPU_Fan1 header located on the top right side of the CPU socket and by default, it is in PWM mode. The topmost header on the right side of the PCB is Pump_fan1 header which is also in PWM mode by default. Rest of the headers are labeled as Sys_Fanx where x shows the number corresponding to the header no on the board. These headers are in DC mode by default which is kinda strange. All of these headers are 4-pin ones. The user can switch the header type from DC to PWM and vice versa from the BIOS. This shows the DC control is also available on these headers. There is a dedicated Hardware Monitor section in the BIOS that lets the user monitor the temperature of the CPU and change the control type and speed of the connected fans accordingly. It is good to know that there is a sensor for the VRM temperature on this motherboard. Hardware Monitor will be discussed in the BIOS section later.
Power Components
The MSI Z370 Gaming Pro Carbon has 11 power phases. A fully digital power design allows for faster and undistorted current delivery to the CPU at pin-point precision. Creating the perfect conditions for CPU overclocking. Prevents potential short-circuit damage to the CPU and other critical components. The MSI Z370 Gaming Pro Carbon is using Titanium Chokes that run much cooler and deliver a 30% improvement in power efficiency, allowing for better overclocking and stability. Dark Capacitors are in use having lower Equivalent Series Resistance (ESR) and an increased lifespan of over 10 years. A special core design allows the Dark Choke to run at a lower temperature offering better power efficiency and stability.
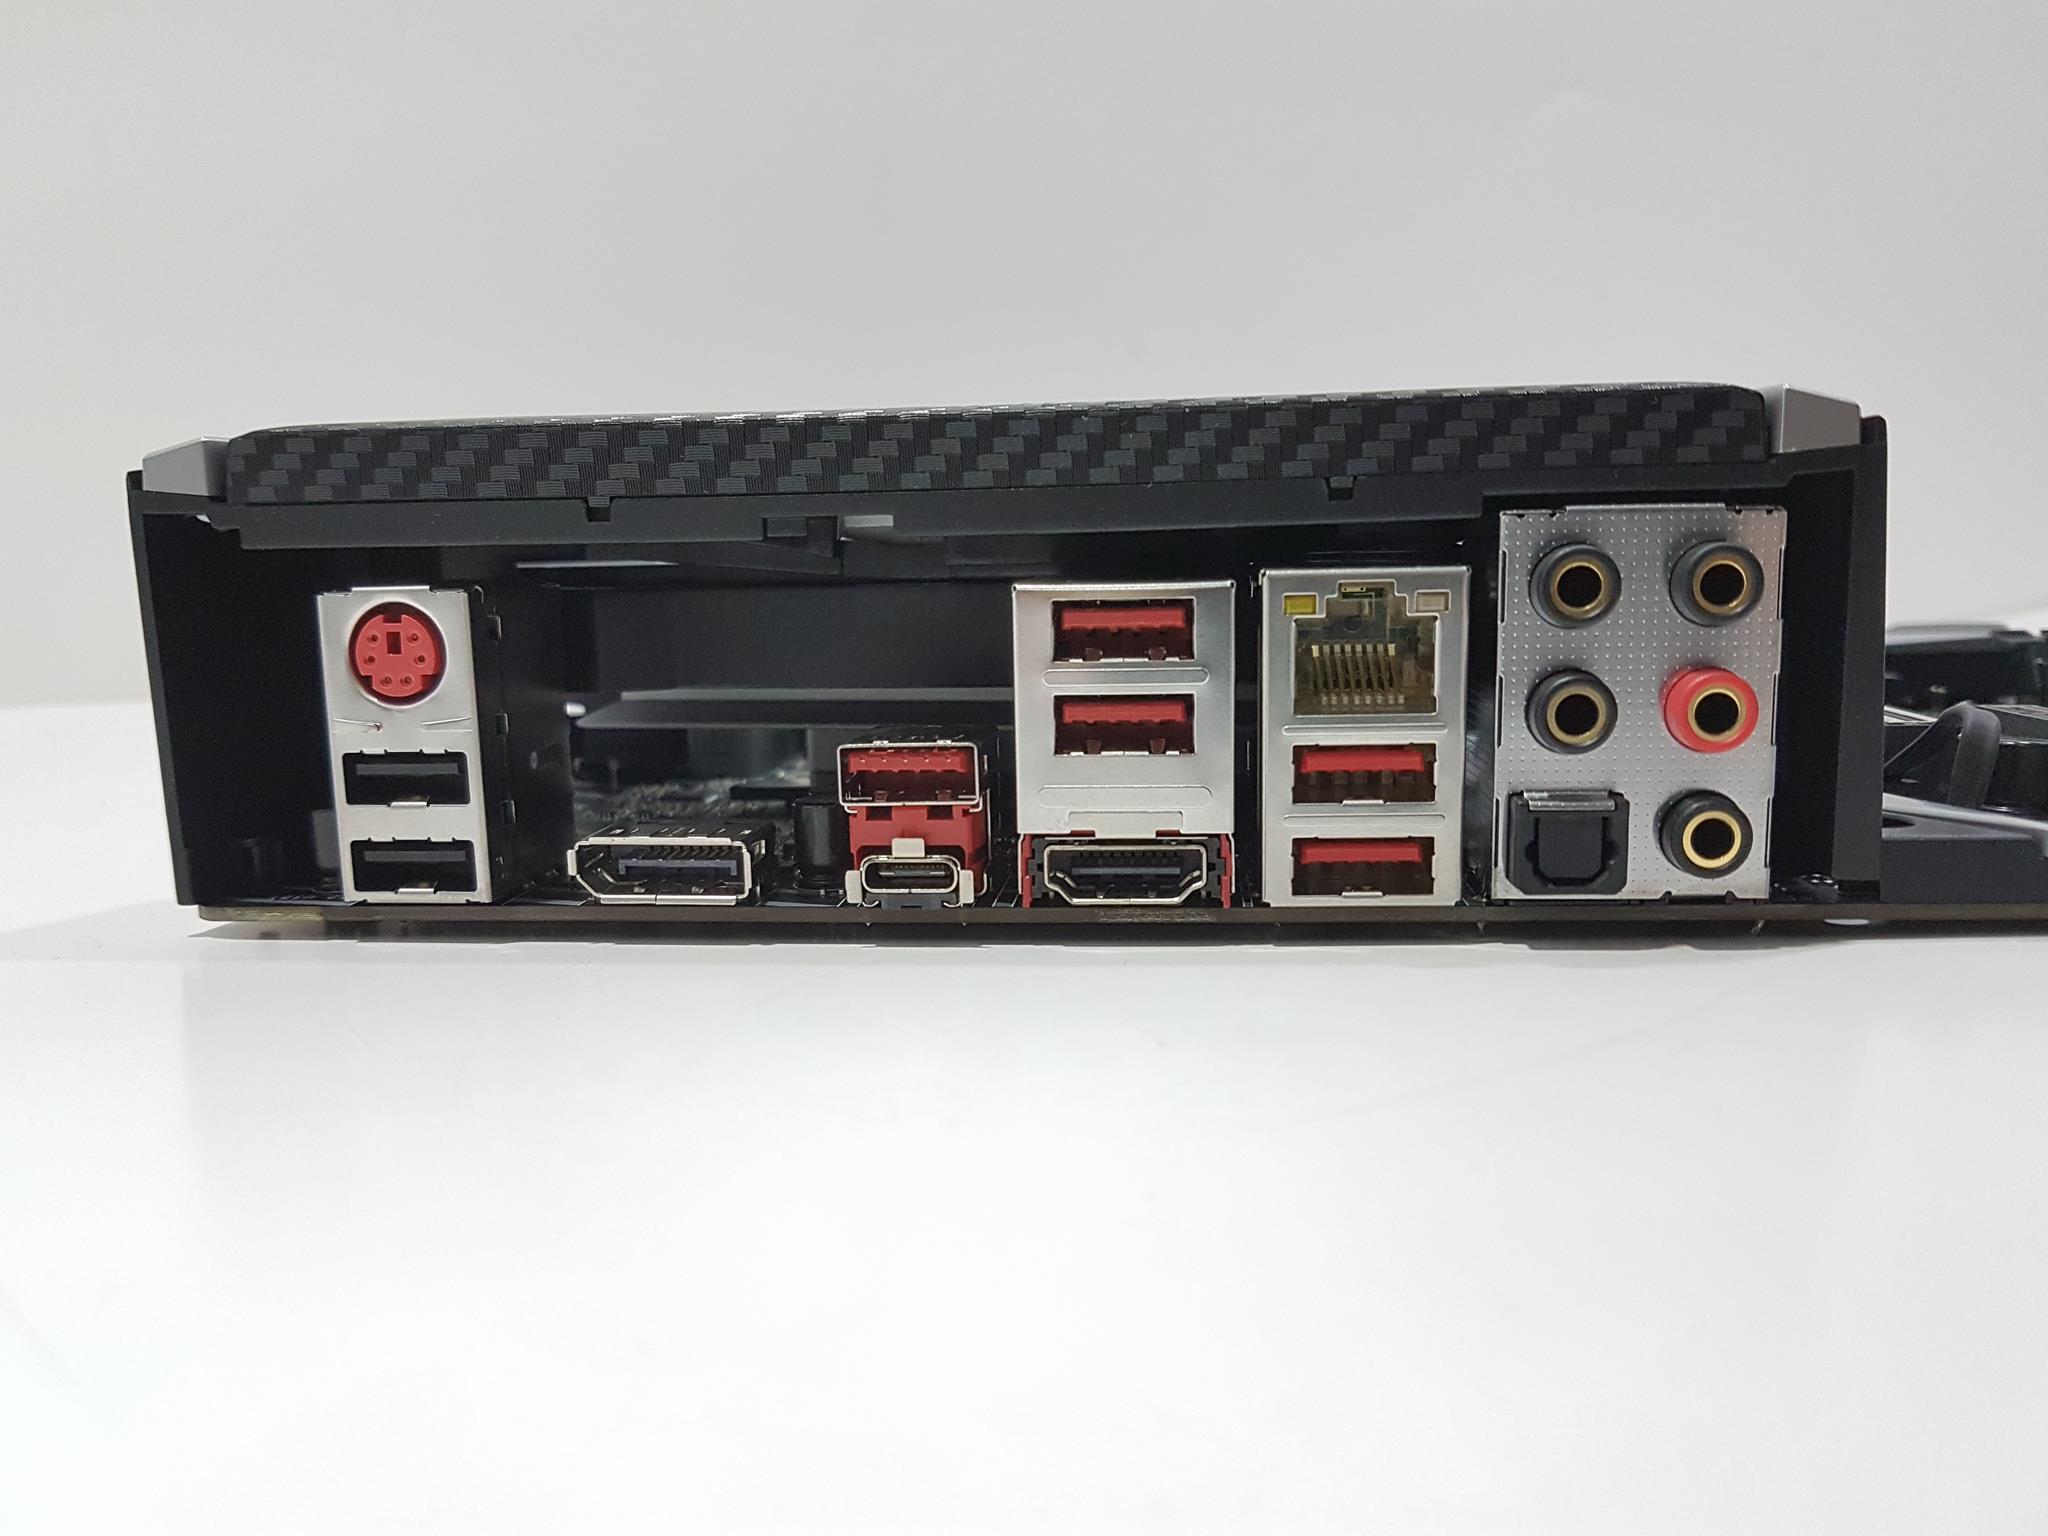
Rear I/O Panel
- 1x PS/2 Port for keyboard/mouse
- 2x USB 2.0 ports
- 1x Display Port
- 1x USB 3.1 Gen-2 Type-A VR-Ready port
- 1x USB 3.1 Gen-2 Type-C VR-Ready port
- 2x USB 3.1 Gen-1 VR-Ready ports
- 1x HDMI Port
- 1x LAN Port
- 2x USB 3.1 Gen-1 Ports
- Audio Ports with Optical S/PDIF
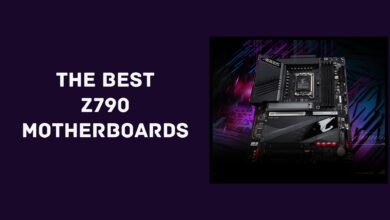
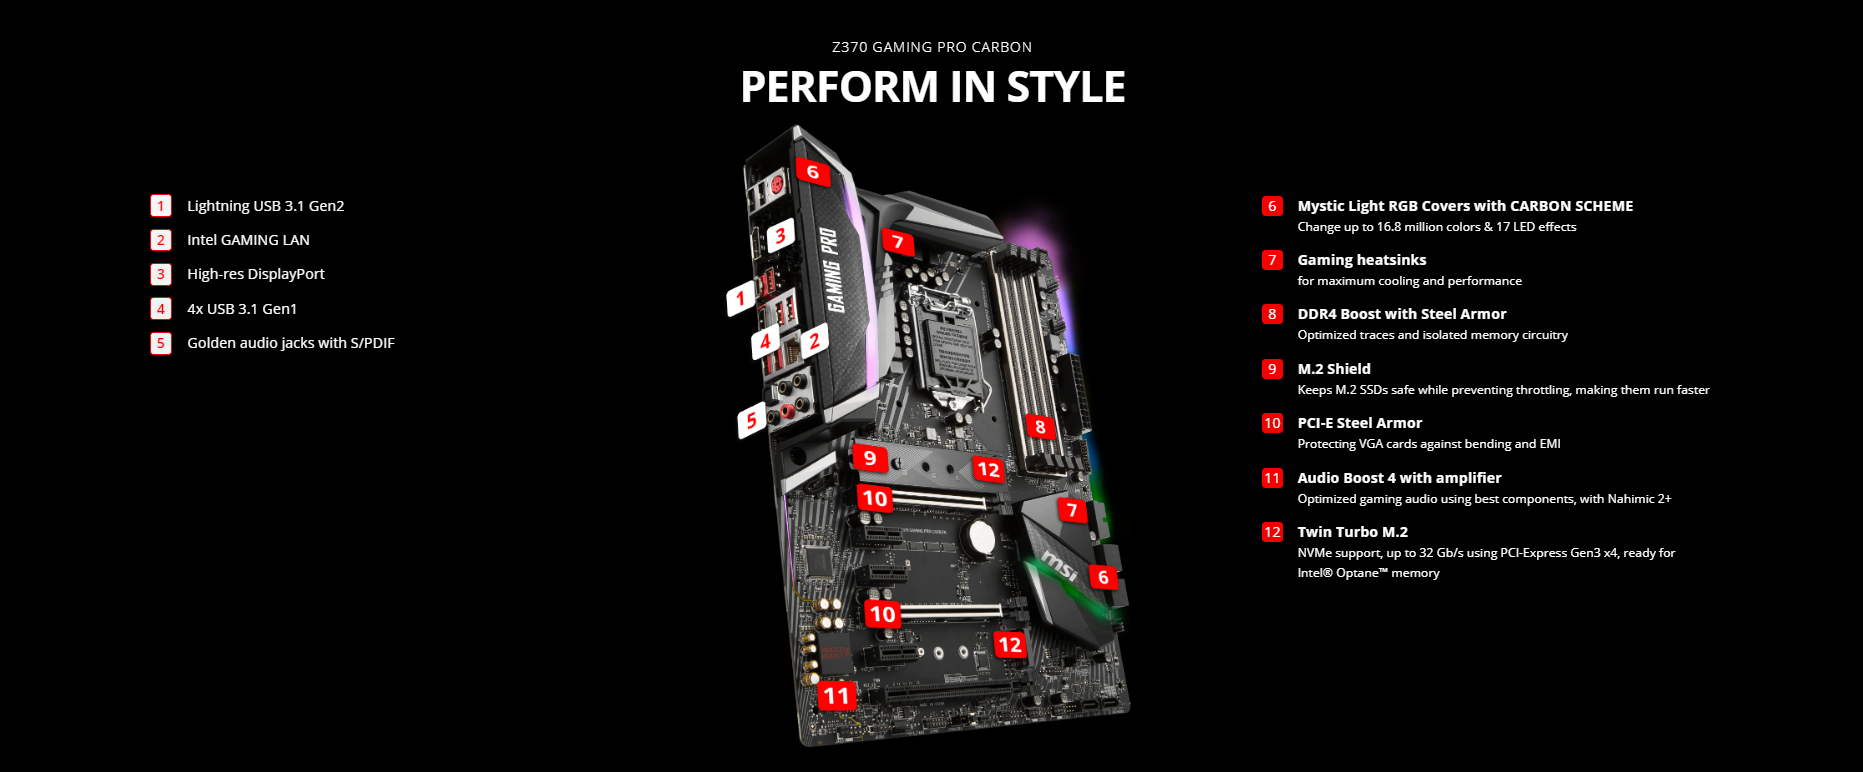
Here is a labeled diagram of the motherboard.
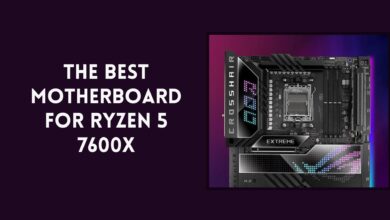
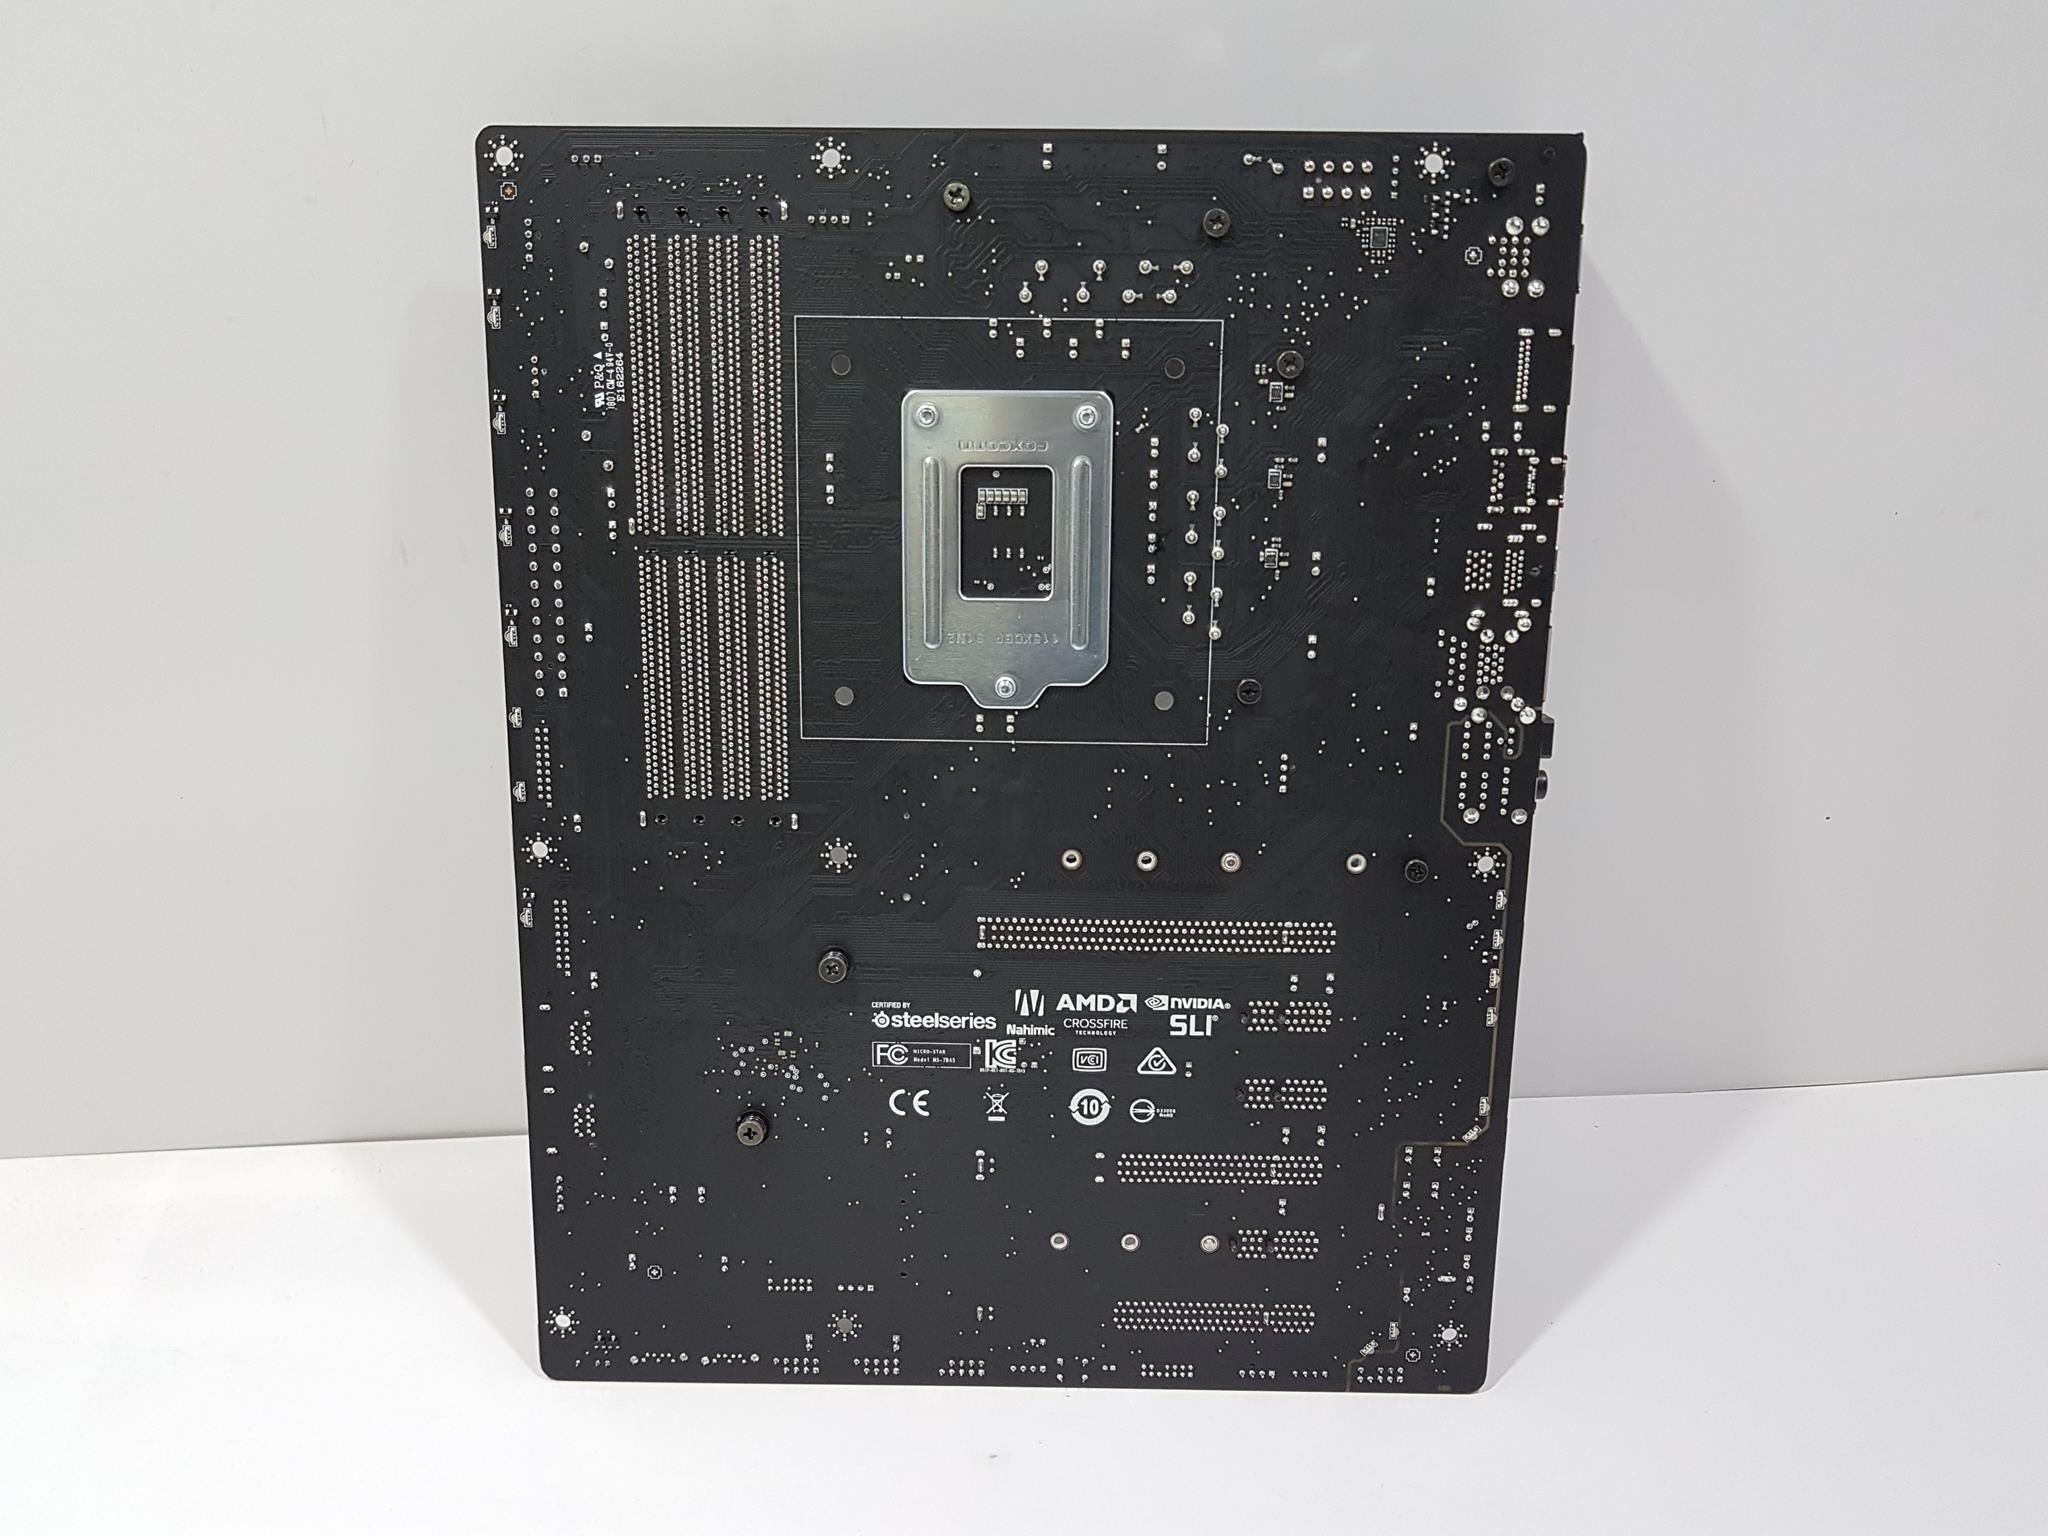
Here is the picture of the motherboard’s backside.
BIOS
This is my first time with the MSI motherboard and I must say, I have found the BIOS interface and layout to be user-friendly and intuitive as I did not find any difficulty in locating the desired setting plus the one-click options for the novice users are spot on.
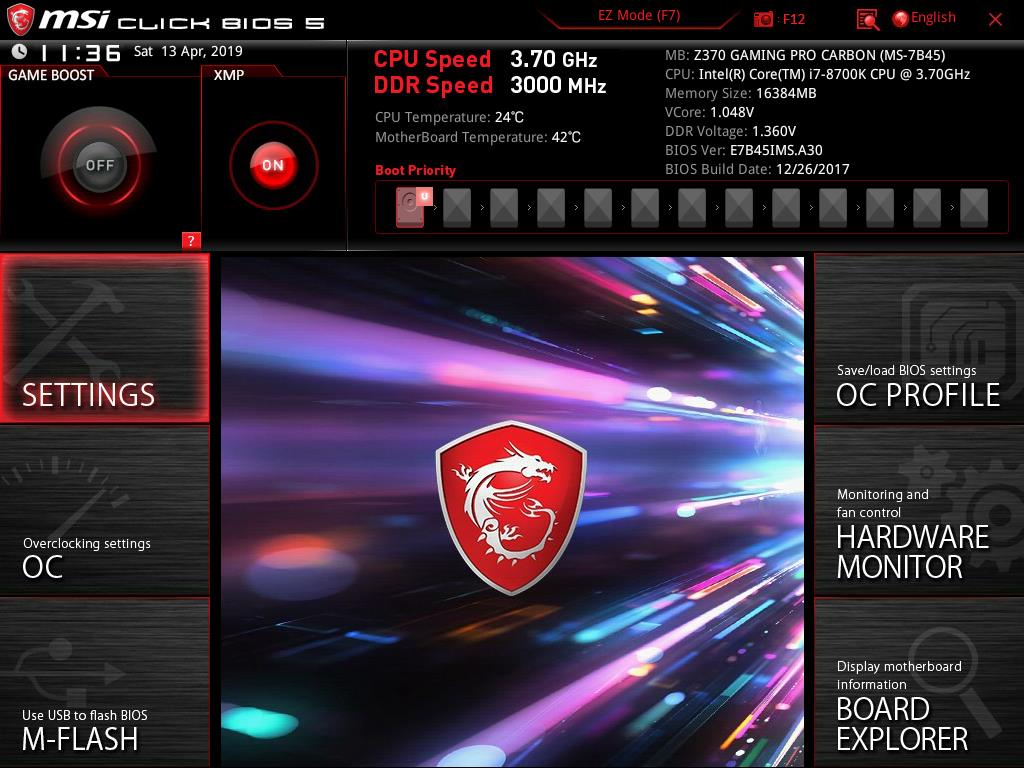
The main interface has a summary of the system being displayed at the top right side. There are two buttons on the left side. One is for the Game Boost which is off by default and the other is the XMP which is also off by default. The user can click on the XMP button to load the XMP profile on the DDR4 kit of the system. It is that easy! The Game Boost will overclock the CPU a bit and will load the performance settings for the system which will boost the gaming performance. This is like one-click overclocking. The total options and settings have been categorized in 6 different categories which are displayed on the left and the right sides of the MSI logo in the main section. Boot priority information is presented in a visually aiding format on the top below the summary. It will display the devices in the first boot preference, second boot preference and so on.
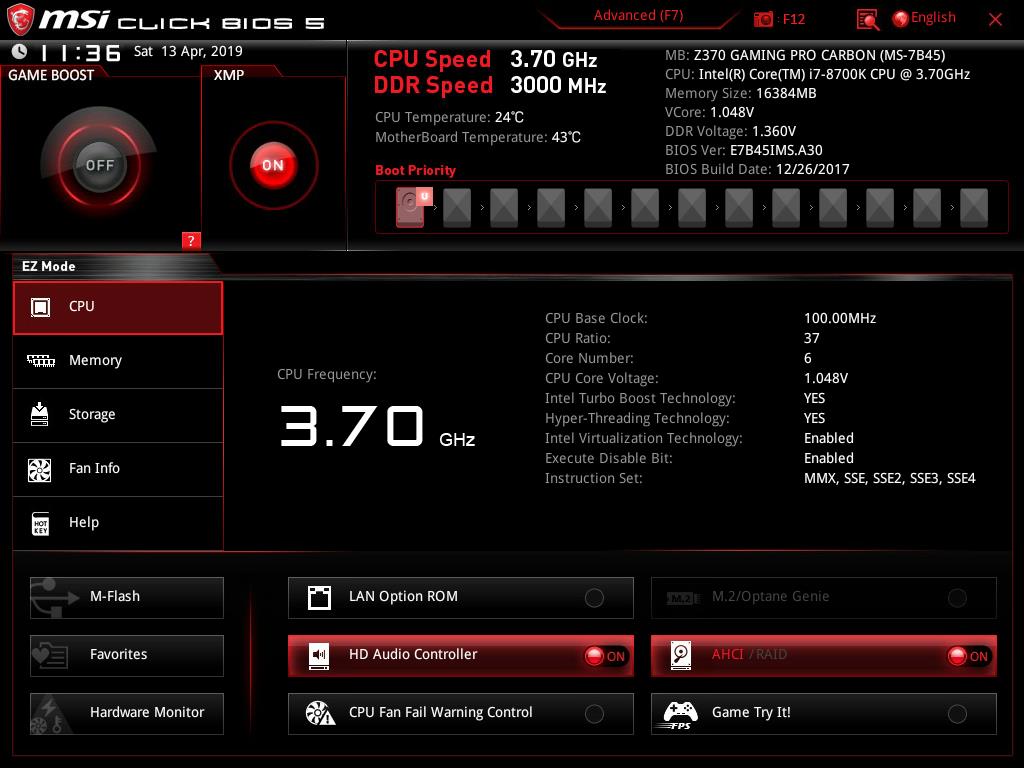
Pressing F7 will load the Easy (EZ) mode which is handy for the novice users. In this interface, the top layout is the same as is on the advanced mode. Clicking on the CPU will show the CPU related information.
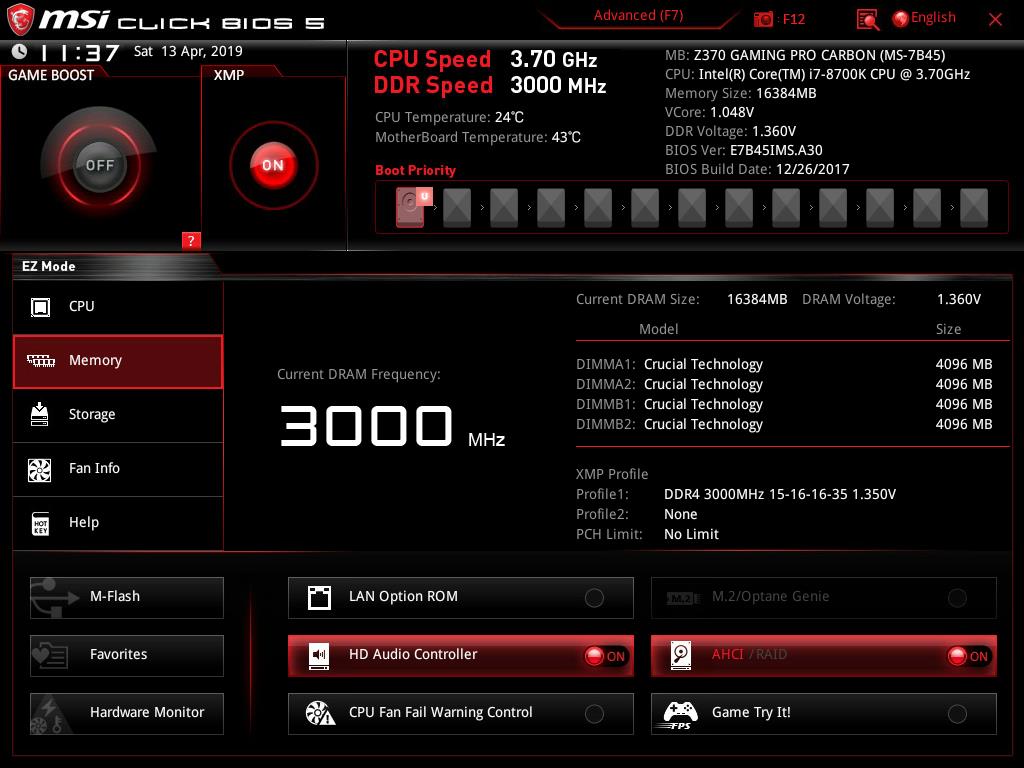
Clicking on the Memory will show the system memory information like populated DIMM slots, XMP information, speed/frequency of the kit, manufacturer of the kit, DRAM capacity and voltage, etc.
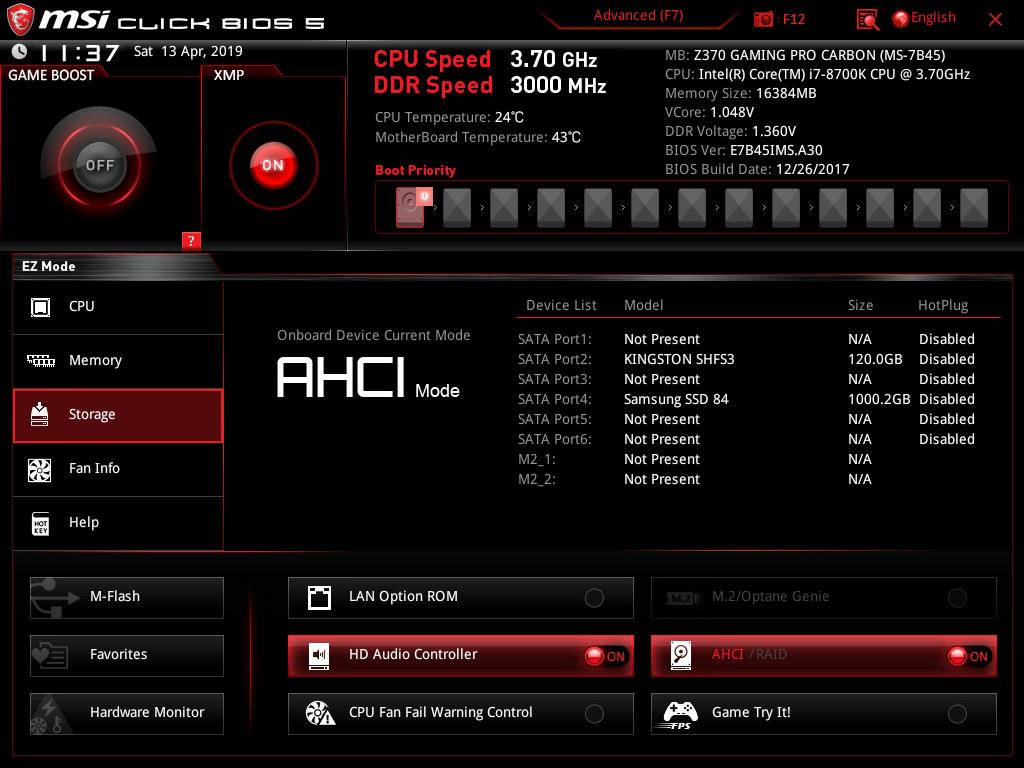
The storage will list the connected the SATA devices on the corresponding SATA ports. AHCI is the default onboard device mode.

Fan info will show the graphs of the connected fans to the motherboard’s fan headers. Clicking on the numbers 1,2,3,4 will load the graph for each of the selected headers. The user can change the settings of the fan as well.
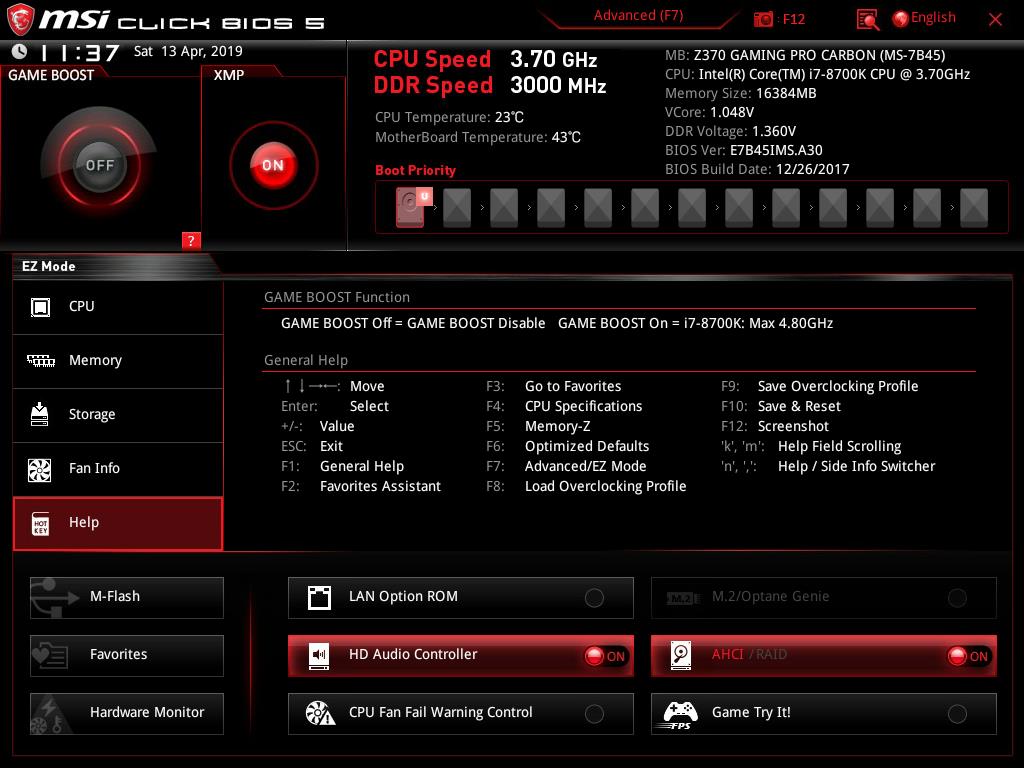
Help will show the list of the shortcuts and their descriptions. In order to take the snapshot of the BIOS current interface, the user is required to press F12. The FAT32 file system is needed on the USB flash drive without which the snapshot won’t be saved. The default file format of these pictures is BMP (Bitmap) which is quite obvious. Notice that, the system is displaying that our Intel i7 8700k could be set at 4.8GHz in the Game Boost mode. This is based on their own algorithm and related settings. The user can still manually overclock the CPU. I am using the same chip that has been used for testing of the other Z370 chipset motherboards and it has achieved 5.0GHz on all. 5.1GHz is also feasible for our chip subject to the adequate cooling solution. I am mentioning this to let the users know that 4.8GHz is not the limit of the chip.
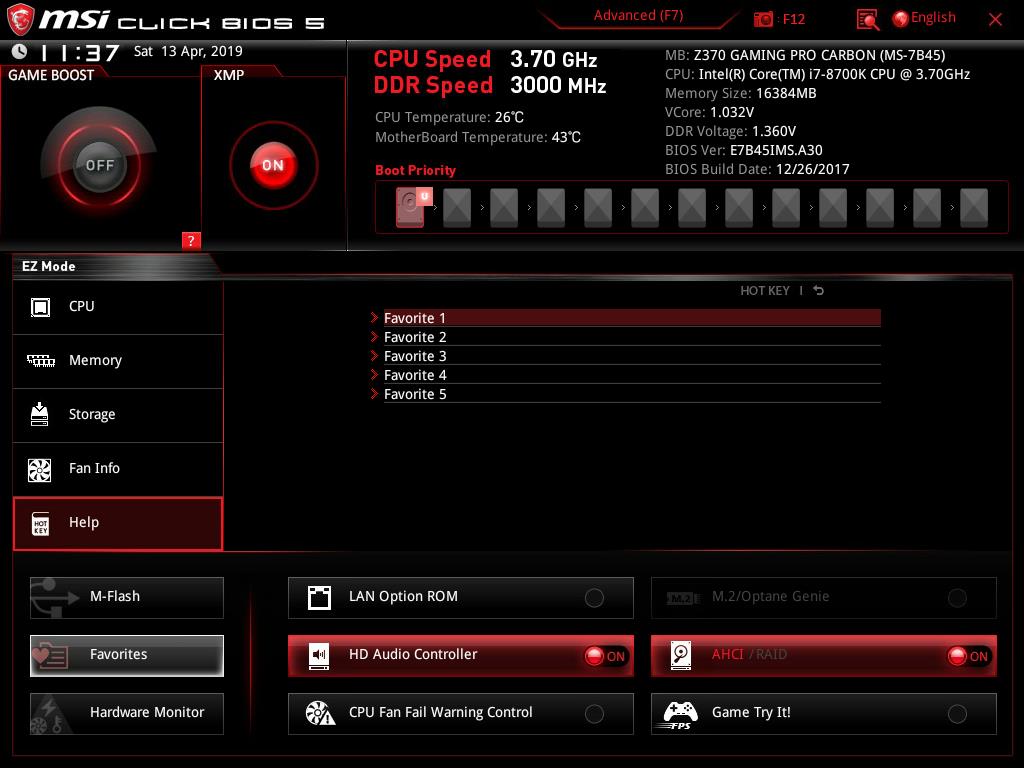
We have more option buttons at the bottom pane of the EZ mode. Clicking on the Favorites will load the list of the saved Favorite settings. The user can save up to 5 different Favorite lists with each having its own corresponding settings. The idea of Favorite is to readily access the frequently used settings. The user can disable/enable the onboard HD Audio controller, AHCI/RAID, select/deselect the M.2/Optane Genie and other settings, etc.
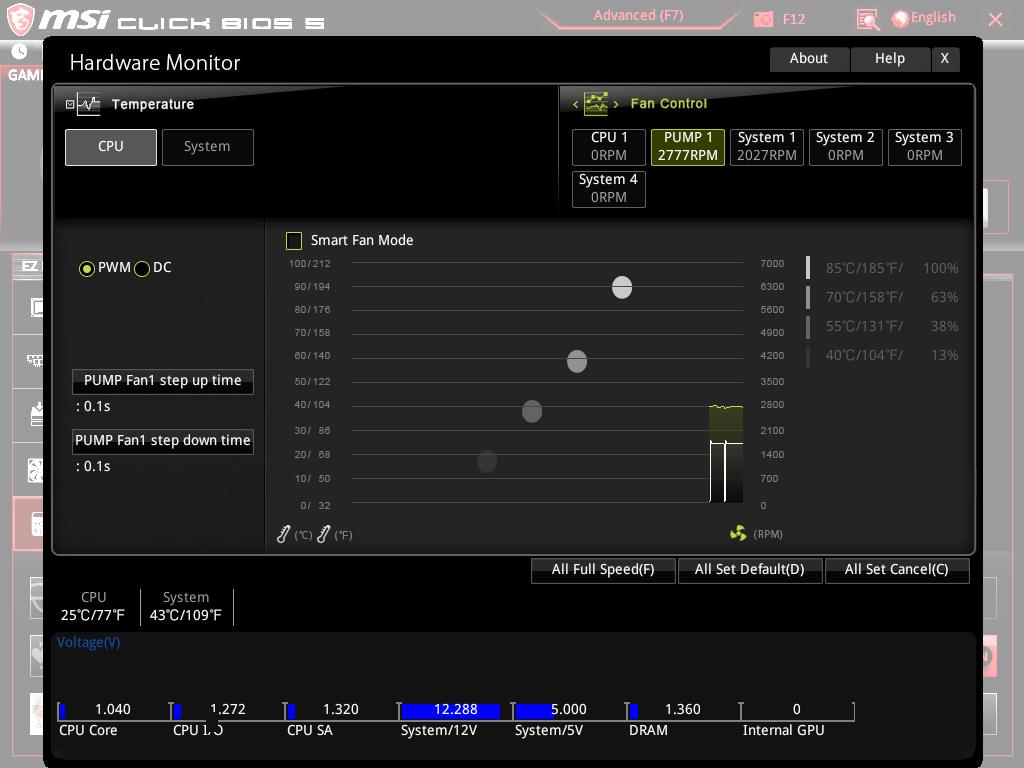
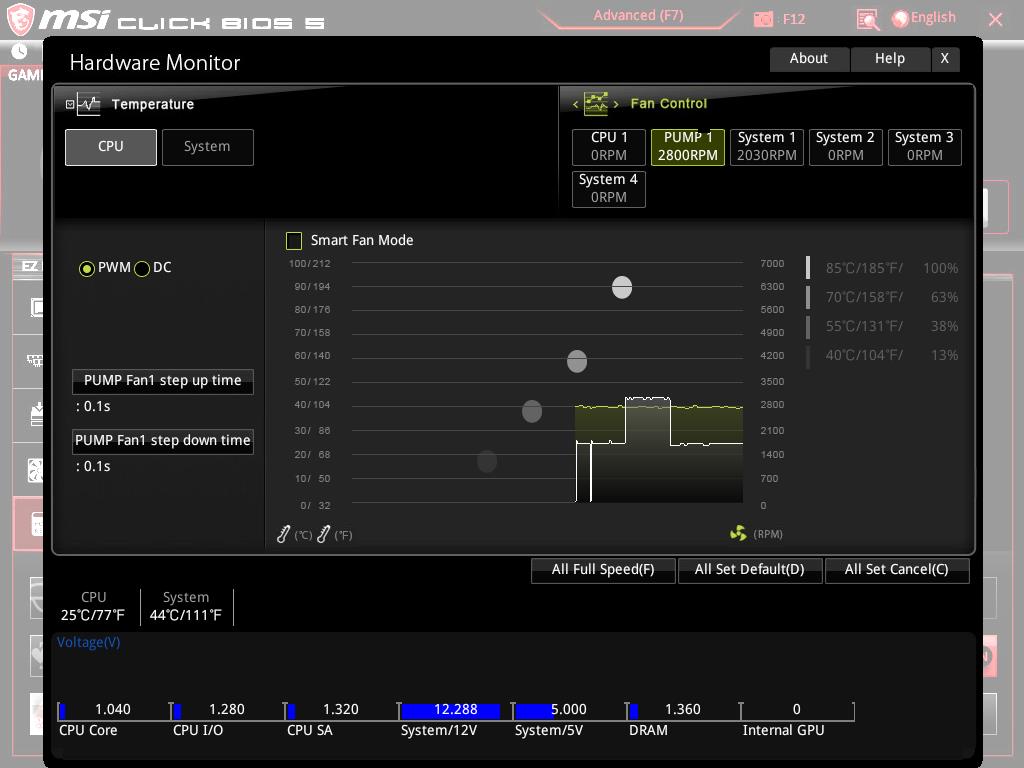
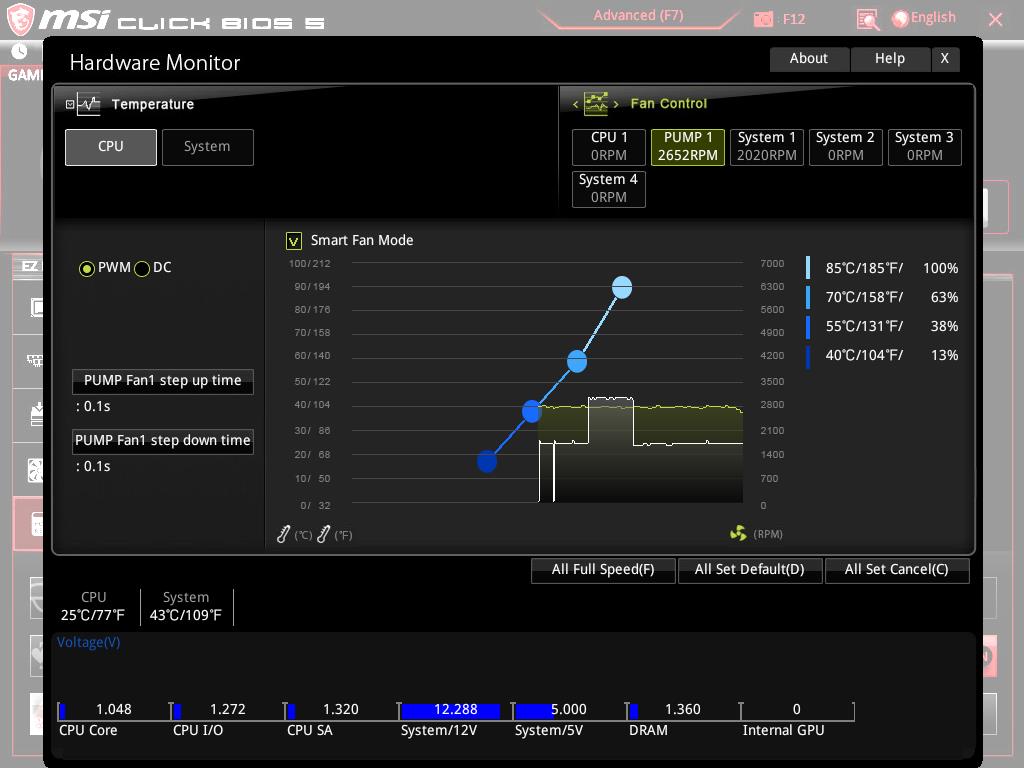
Clicking on the Hardware Monitor will load another interface with tons of the options to customize the fans speed connected to the fan headers. CPU fan header is shown separately whereas the System fan headers are shown as System 1, System 2, System 3, System 4. Each header can be set to PWM/DC mode depending upon the type of the fan connected to the corresponding header. The user can set the Step Up and Step Down speed settings of each fan header. The user can make all the fans to run at full speed which can be done with one click. Similarly, they can be set to run at default or cancel the loaded settings. The smart fan mode will allow the users to customize the fan curve profile for each fan subject to the requirement. For a user like me who loves to control the fan(s) from the BIOS, the MSI has done a good job. At the bottom of the interface, voltage readings are shown. The temperatures are shown in °C/°F.
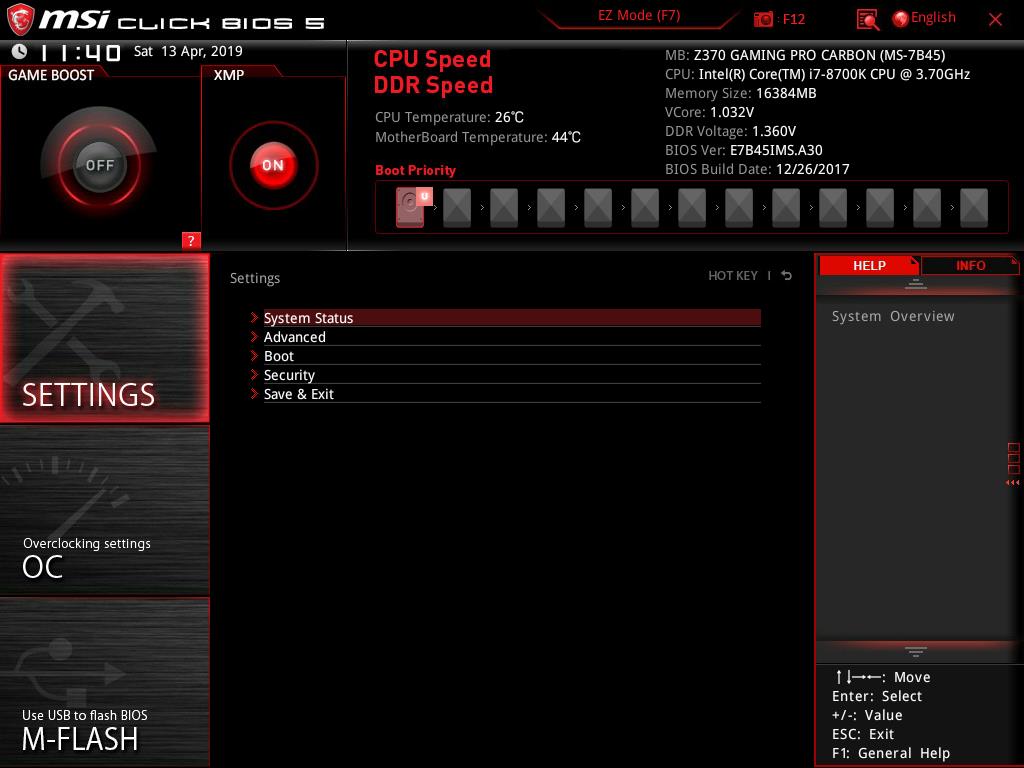
Pressing F7 again will load the Advanced mode with a plethora of options for the advanced/enthusiast users. Clicking on the Settings button will show the related settings in the middle pane.
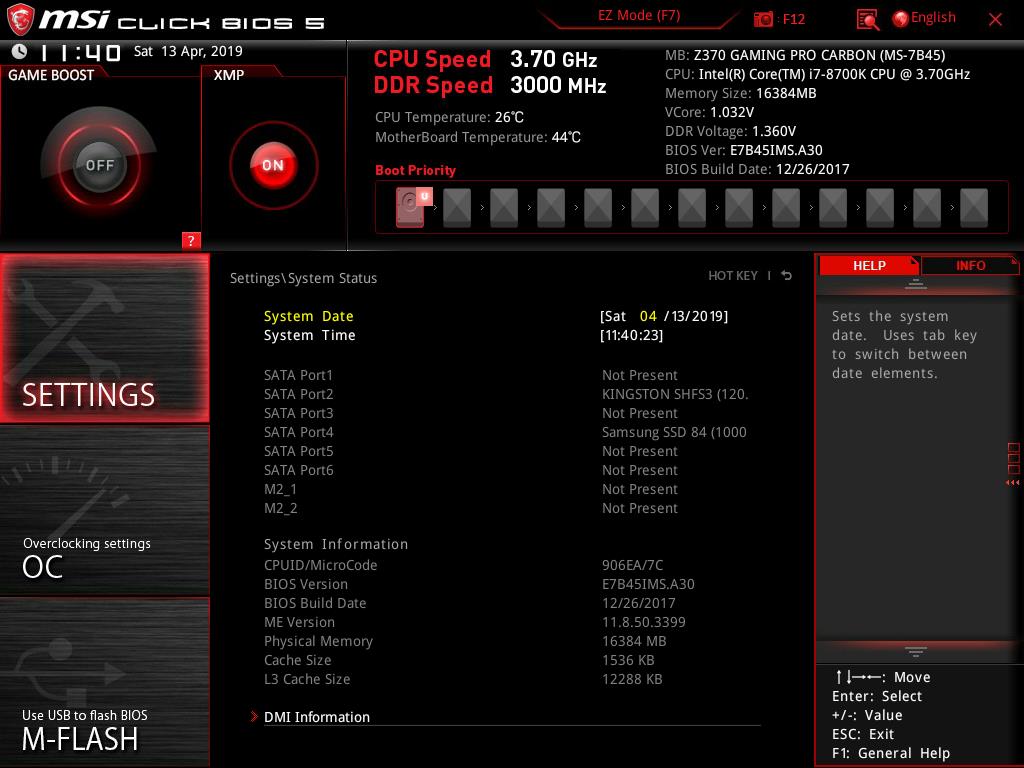
Clicking on System Status will show the summary information of the system at the moment.
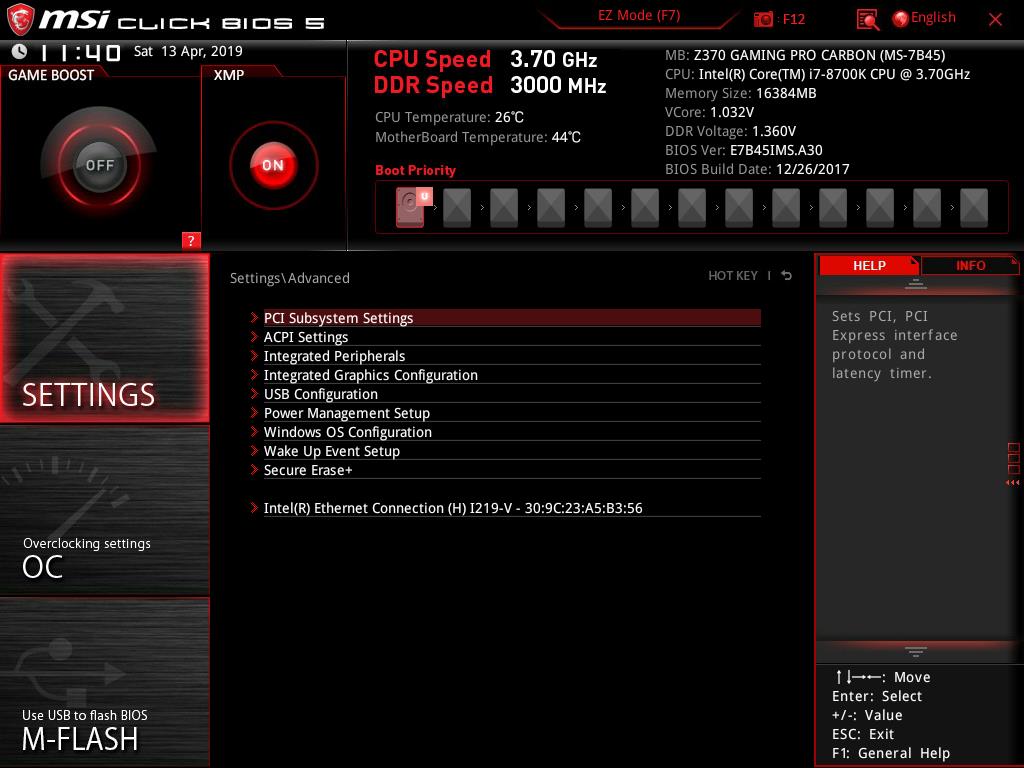
Clicking on Advanced will load more options. We have PCI, ACPI, Power management, onboard peripherals configuration, secure Erase, Wake Up Event startup, Intel LAN port settings under the Advanced menu. This is among the few other settings that the user would need to access while configuring the system.
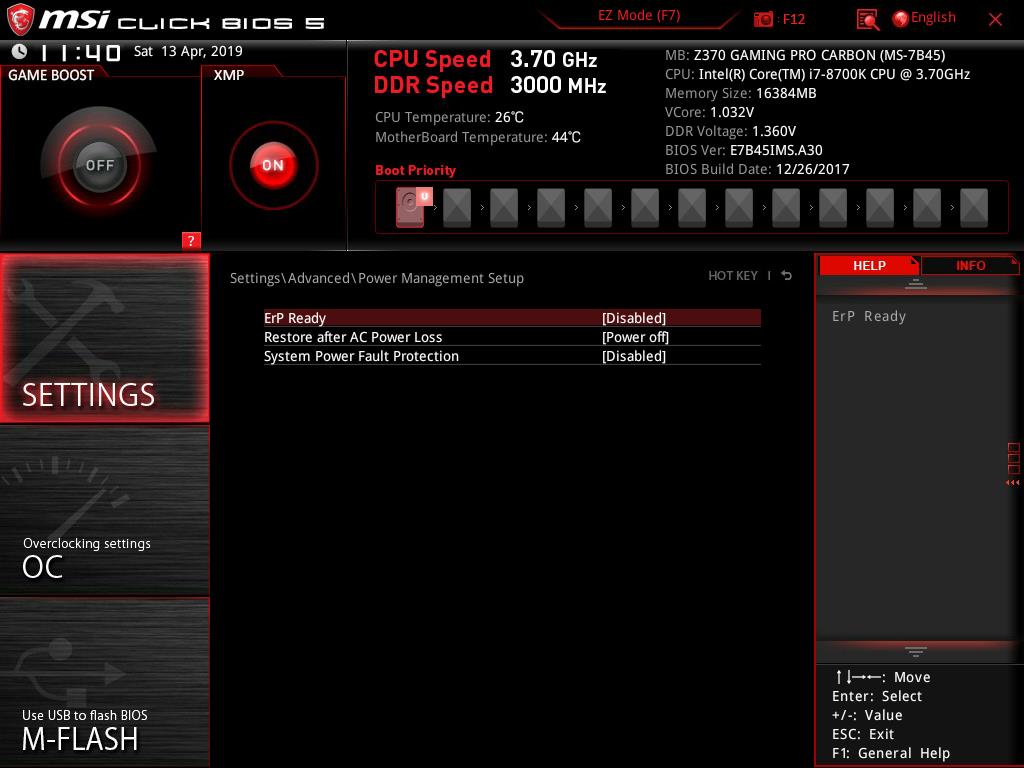
In case you are wondering which option to use to power on the PC as soon as the power is restored then the Power Management Setup under the Advanced menu is for you. Set the Restore after AC Power Loss to Power On.

Fast boot option is located under Windows OS Configuration under the Advanced menu. Besides Fast Boot, there is MSI fast boot option as well which will not detect the SATA, PS2, and USB devices to give the users more loading speed.
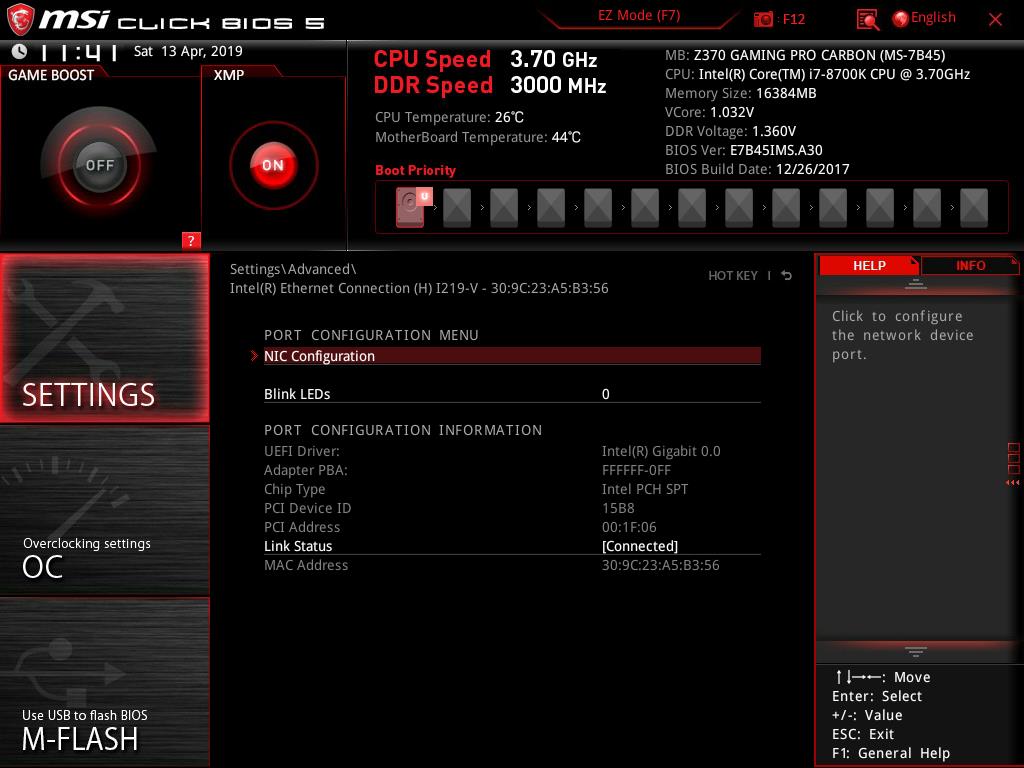
NIC configuration can be accessed through the Advanced/Intel Ethernet Connection menu.
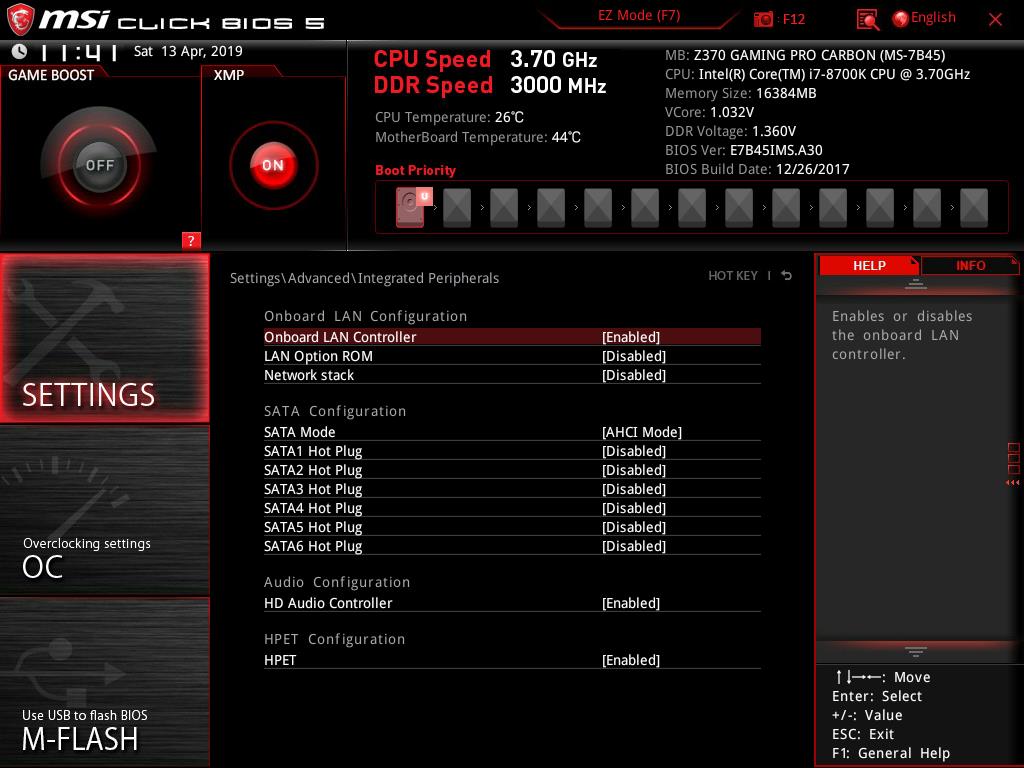
Settings related to the integrated peripherals can be accessed through the Advanced/Integrated Peripherals menu.
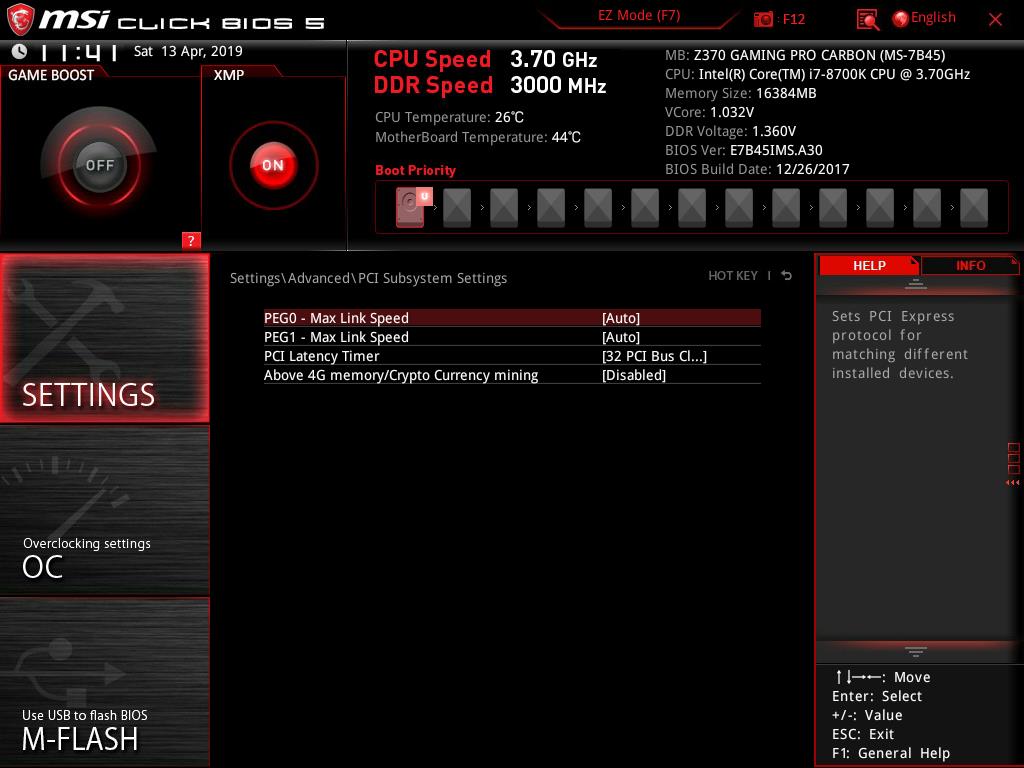
PCIe related settings can be accessed under Advanced/PCI Subsystem Settings.
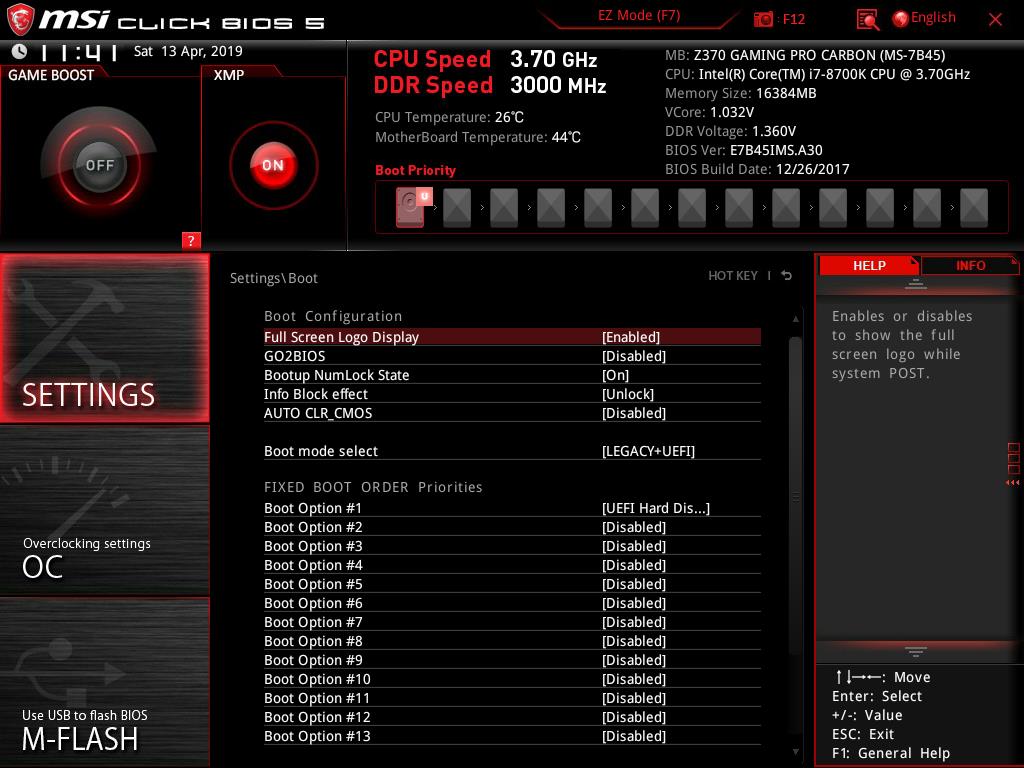
Boot related settings are located in the Settings menu. The user can configure the boot options like Boot Logo display, Boot mode selection [UEFI, Legacy or both], NumLock status during boot, etc. Up to 13 boot order priorities can be defined under the Fixed Boot Order Priority. This is rather strange as the user has to traverse through the 13 options which, frankly speaking, is not needed these days as we are only concerned with the Windows Boot disk. Still, the user has up to 13 options if needed.
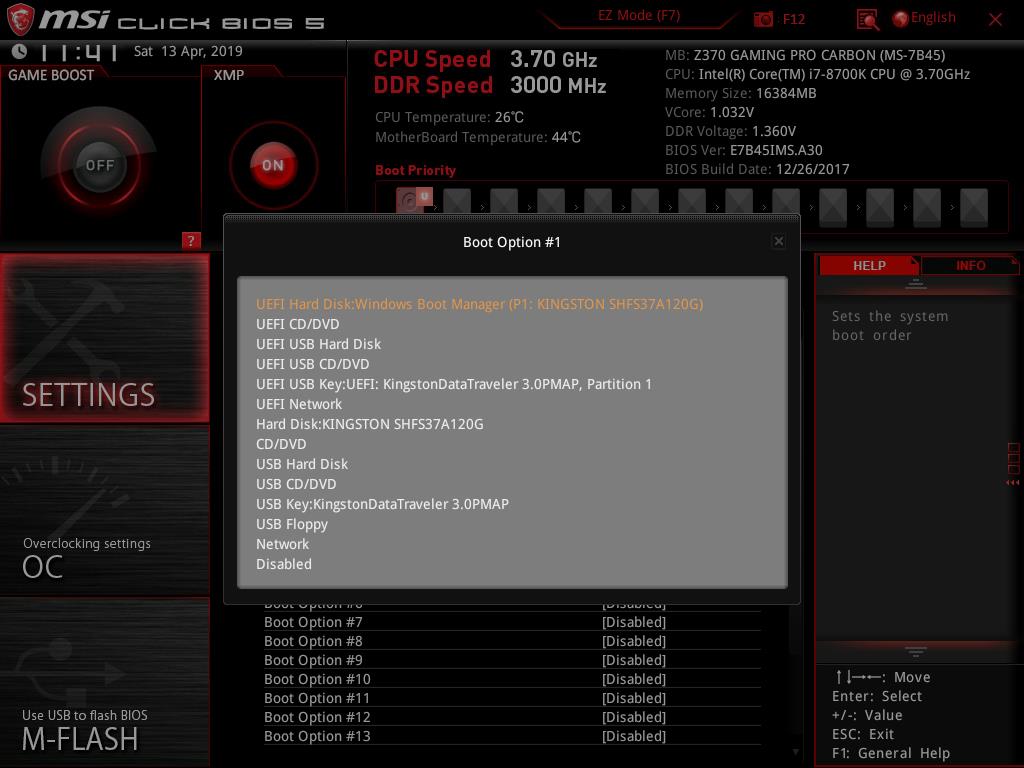
The above picture shows the Boot order sequence along with the different type of media to boot from. The list is definitely exhaustive.
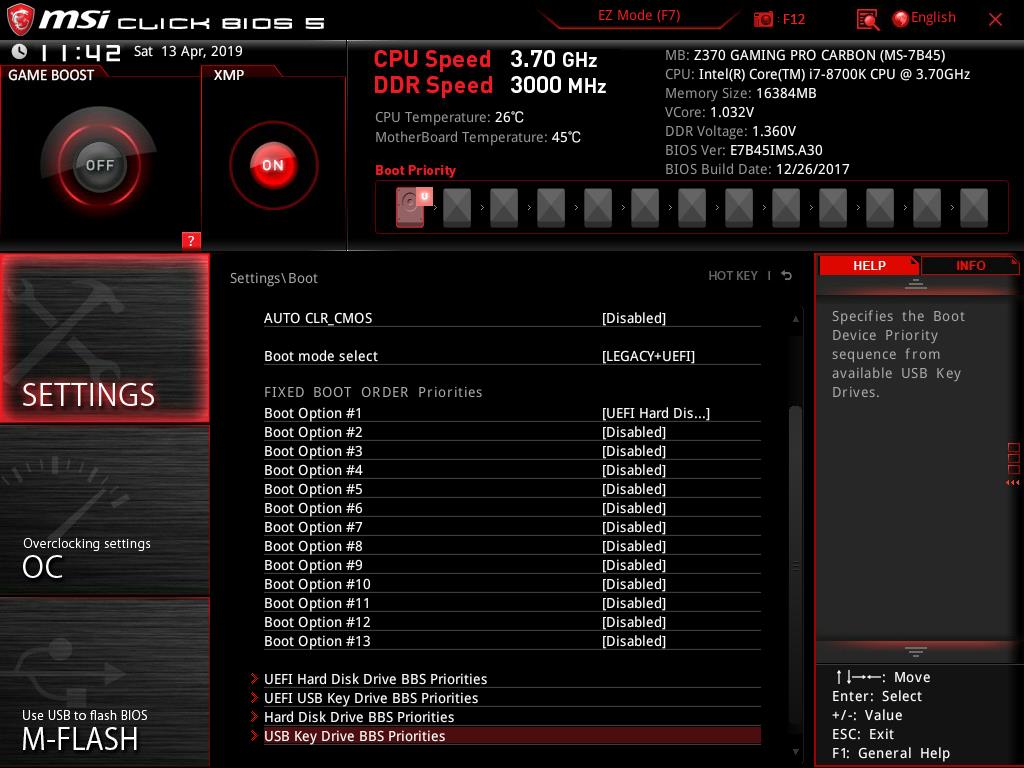
There are more options at the bottom of the page. The user can configure the UEFI Hard disk and USB drives’ BBS priority as well as legacy Hard disk and USB drives’ BBS priority. Remember this works in tandem with the boot mode selection from the same menu.
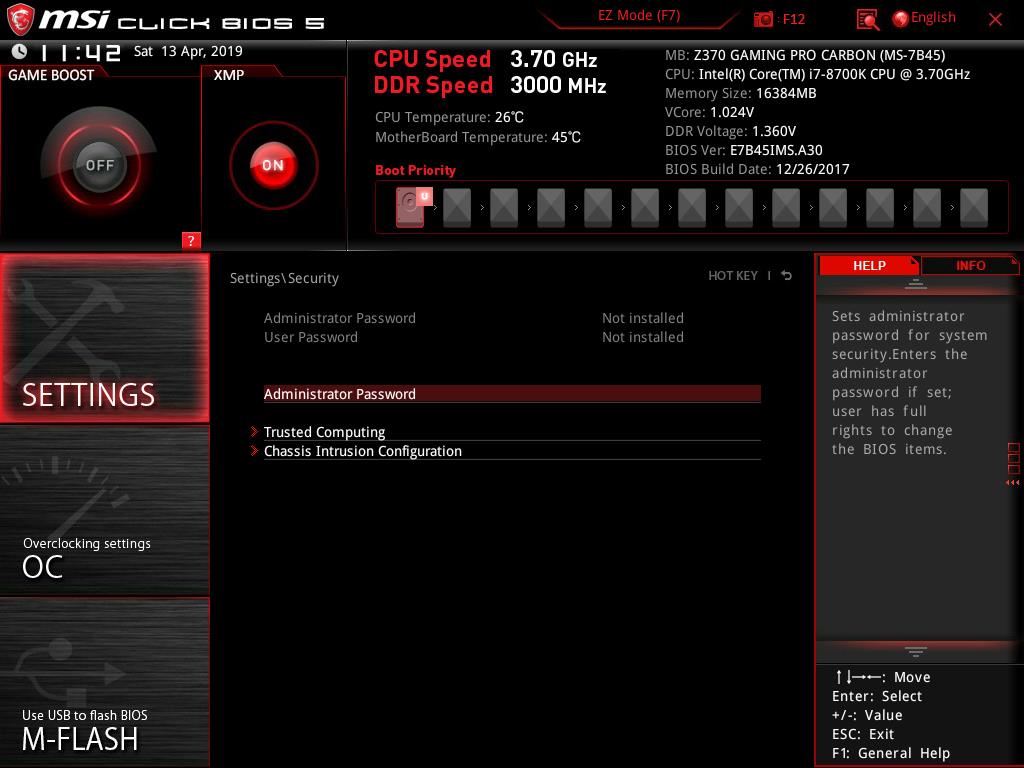
The passwords can be set under the Advanced/Settings menu.
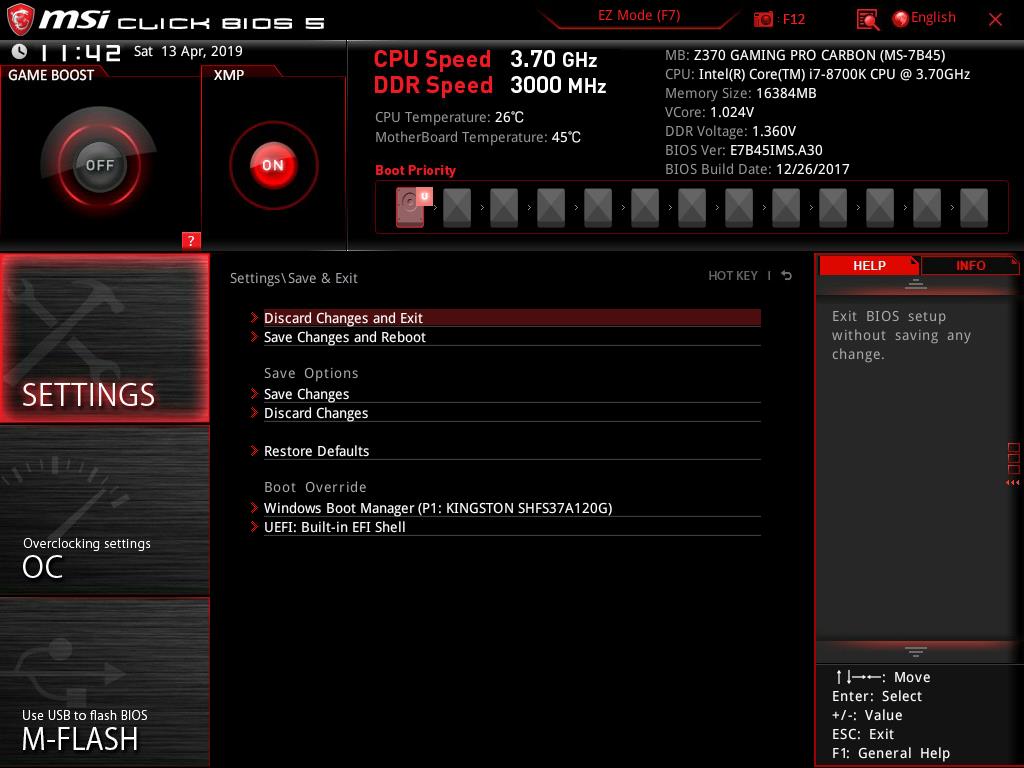
The save and exit options are located under the Settings menu. As can be seen, the Settings menu is comprehensive and covers almost all the major system configuration settings that the user would need.
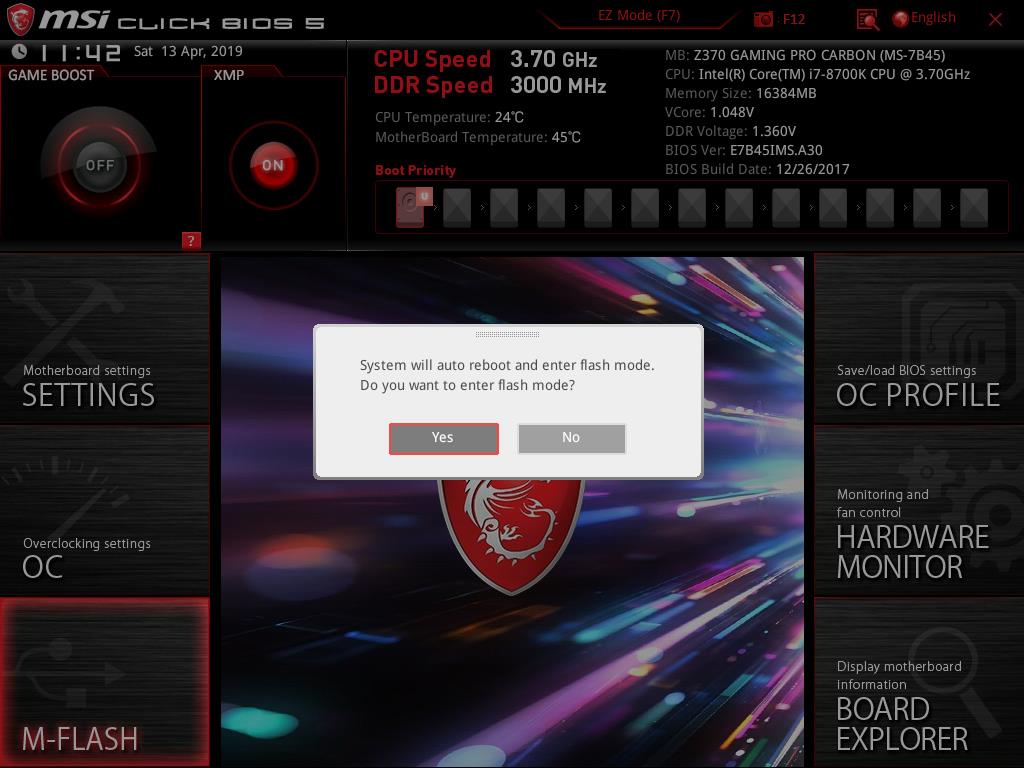
Clicking on the M-Flash button on the main interface will proceed to update the BIOS of the motherboard. We are not suggesting to update the BIOS but only mentioning about this feature in the BIOS as this process is risky and could damage the motherboard in case anything goes wrong. Do it at your own risk!
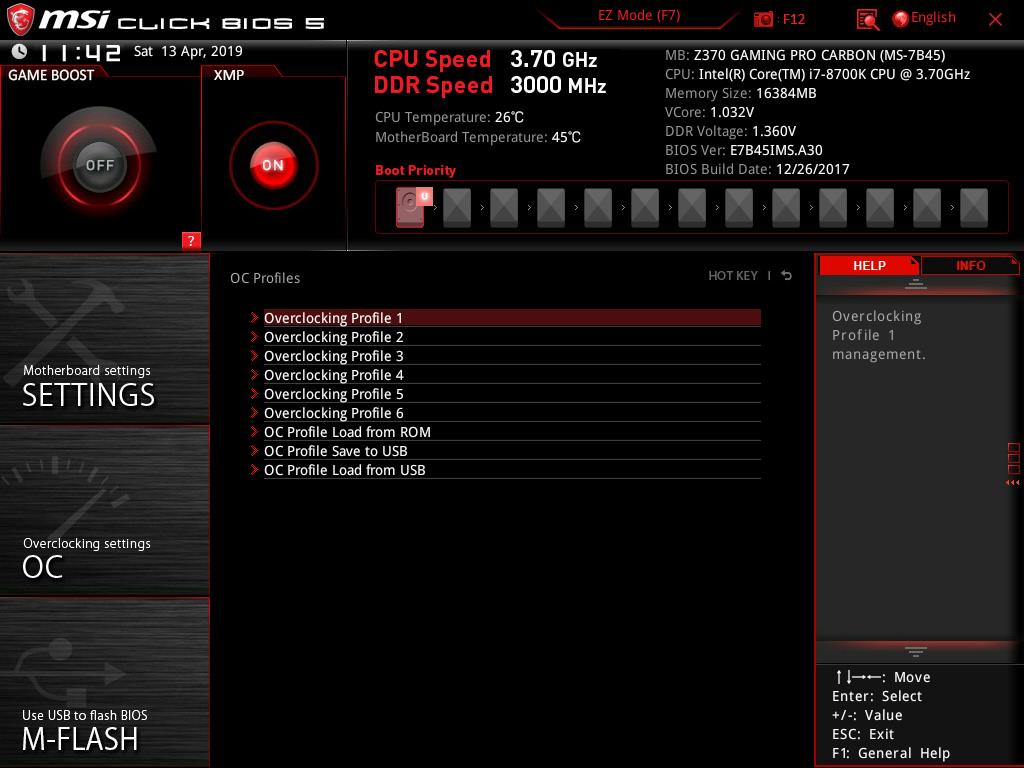
The user can save up to 6 profiles with each having different configuration and settings with respect to the system. MSI has named these profiles as OC profiles. The user can export these profiles to external media and load from external media as well. These can be accessed by clicking on the OC Profile button located on the right side of the main page.
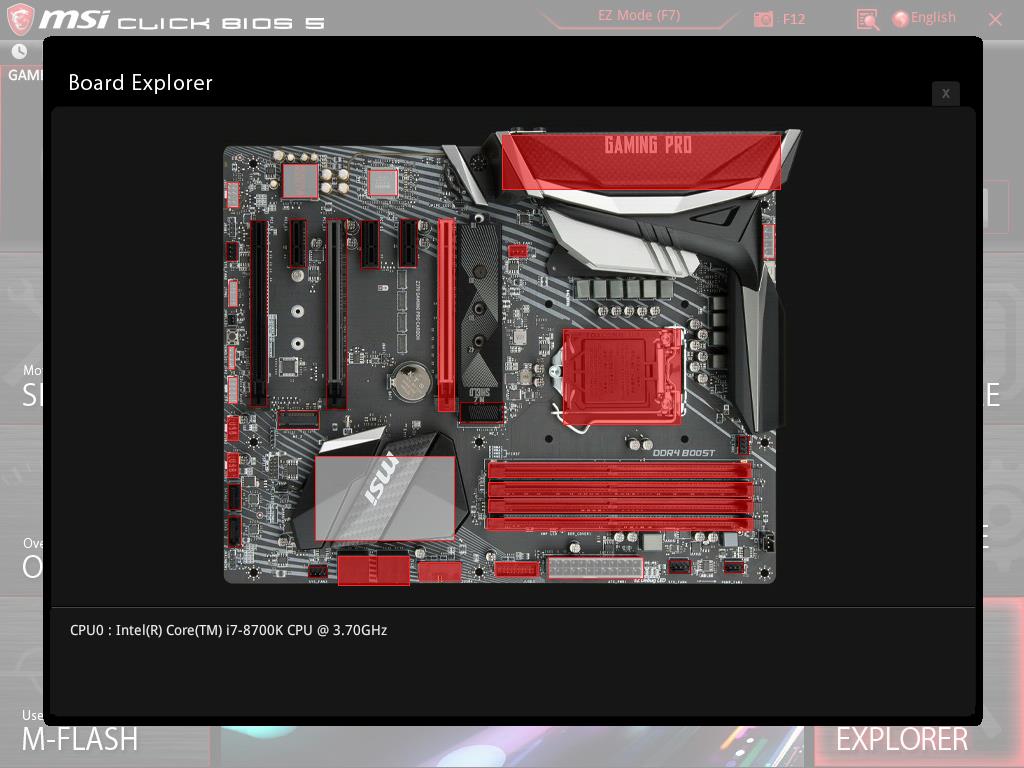
We have already covered the Hardware Monitor above. Let’s explore the Board Explorer feature. Clicking the Board Explorer will load a new interface showing the block diagram of the motherboard with main components highlighted in red. Hovering the mouse on these components would show the description of the component at the bottom like moving the mouse over the CPU socket will show the installed CPU’s information and so on.
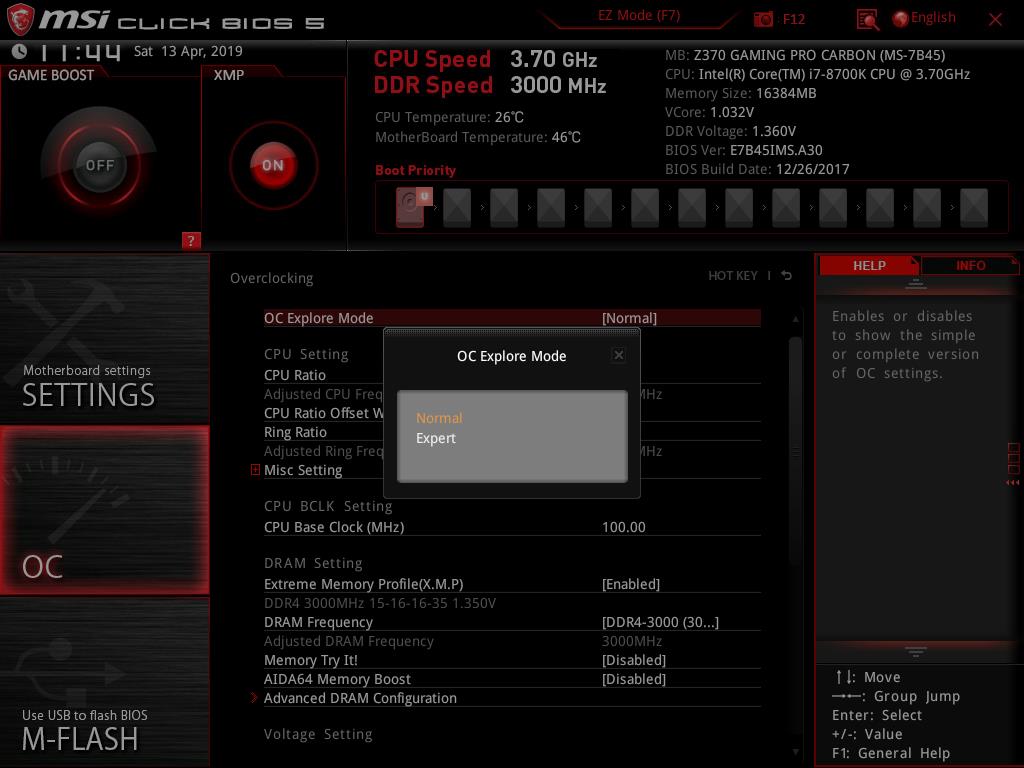
I have been saving the main section related to the overclocking settings for the last. Clicking the OC button on the left side of the main interface will load options that the user can use to control the voltages, frequencies, XPM settings to name a few. OC Explorer Mode has two options; Normal, Expert. We have CPU related settings, DRAM related settings, Voltage related settings here.
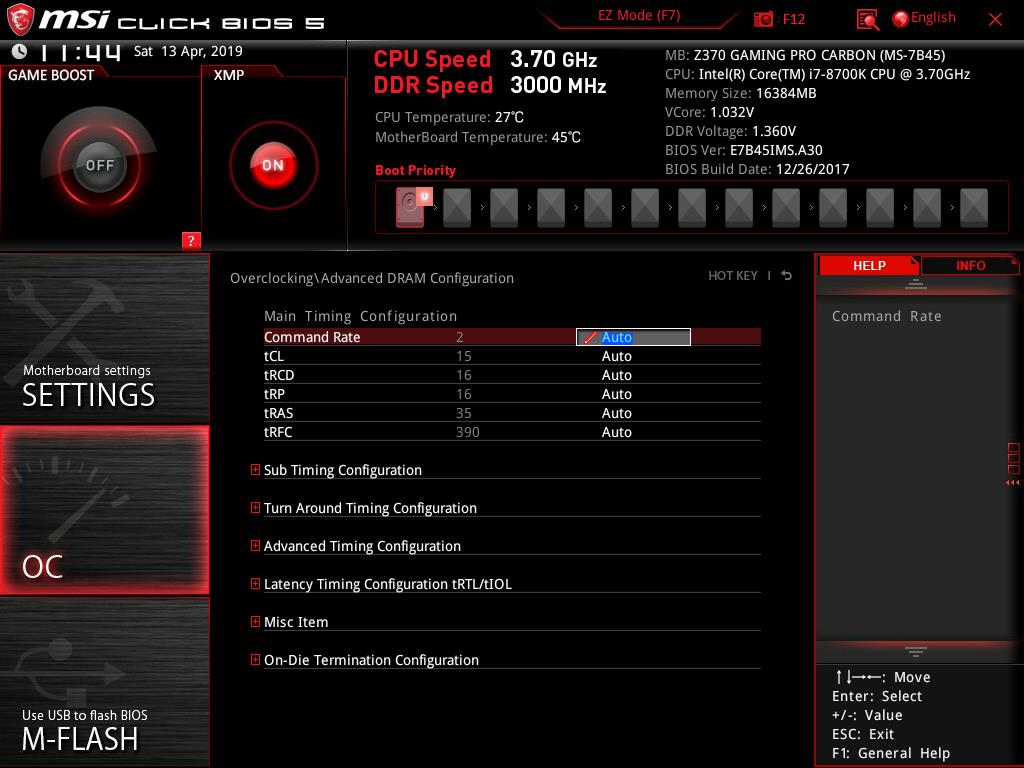
The Advanced DRAM Configuration will allow the users to configure the timings of the RAM manually.

XMP related settings can be seen in the above picture. The DRAM frequency had to be selected manually from the list of the frequencies. The Voltage settings are on Auto by default and the user can configure these manually.
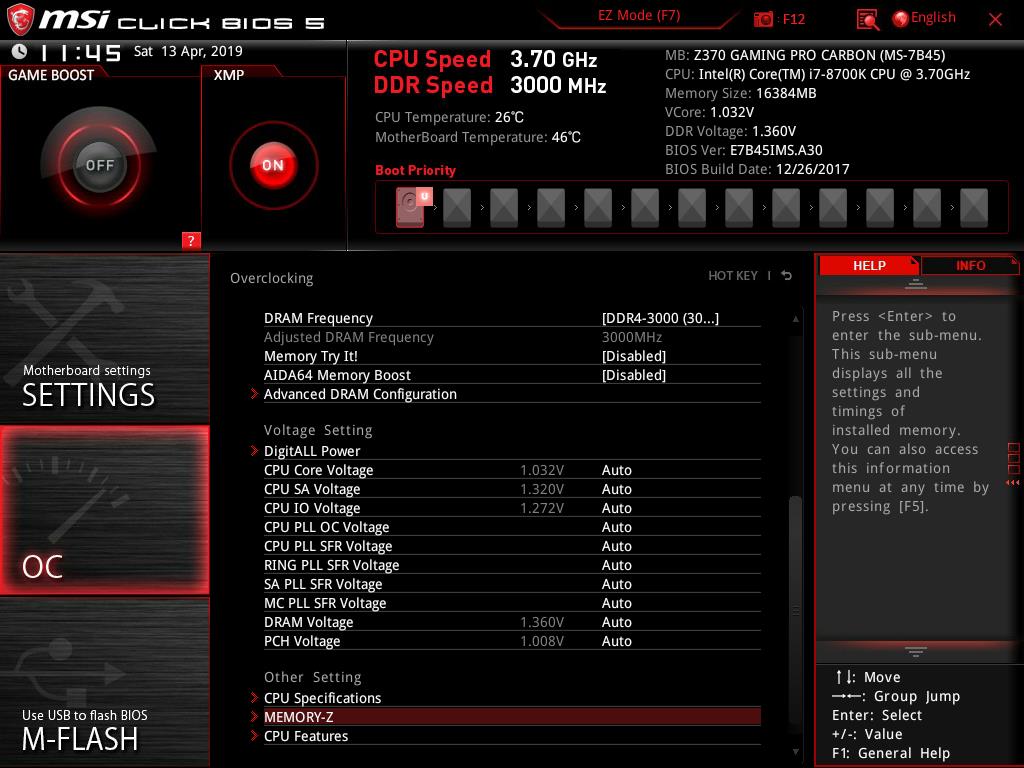
We have CPU Specifications, Memory-Z, and CPU Features listed under the Other Settings.
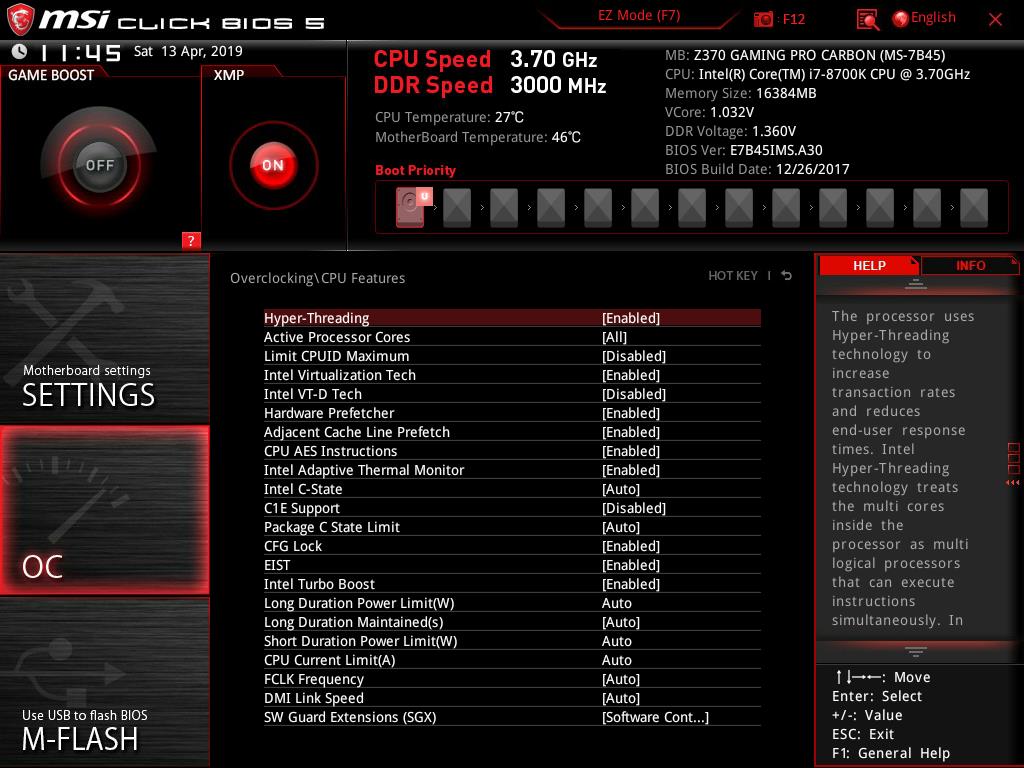
The above picture shows the CPU Features listing. The list is exhaustive and the user can configure each value manually. Hyperthreading and turbo boost can be enabled/disabled from this menu as well as the user can control the no of active cores.
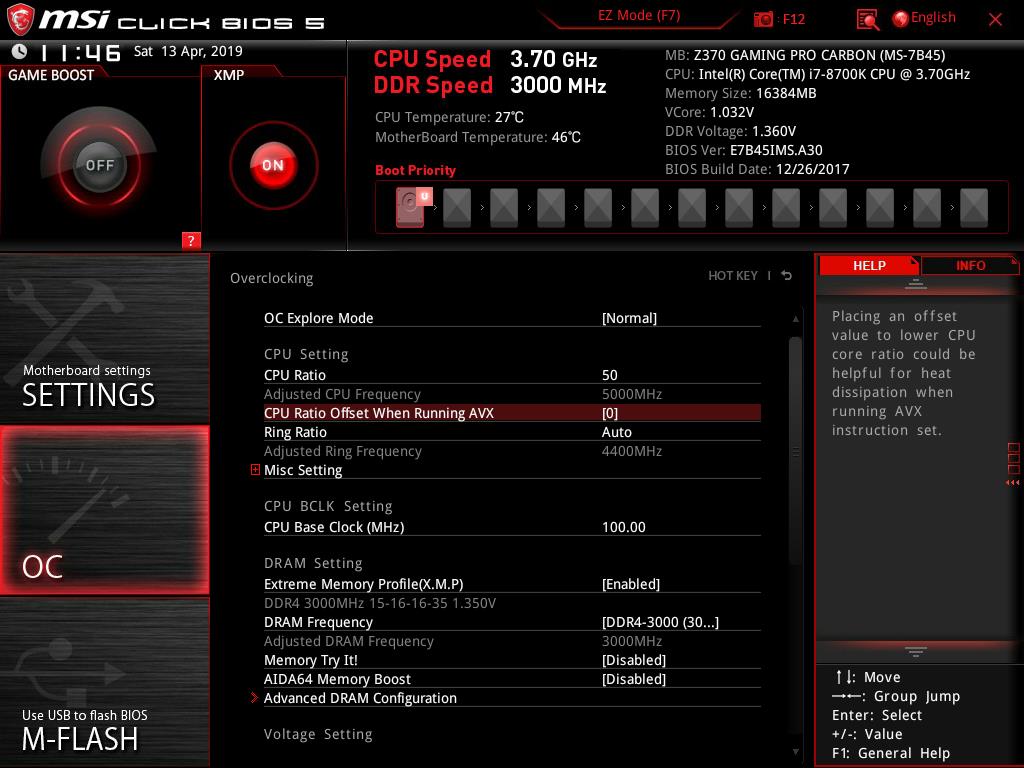
The above picture shows our setting to achieve the 5.0GHz overclock on our Intel i7 8700k by using the Auto voltage settings. This is just for the illustration purpose as I am used to tuning the settings manually. Auto is used to check how much voltage is being fed by the motherboard on Auto to achieve this overclock. Unfortunately, this motherboard was feeding 1.335V for the 5.0GHz which is way above of what I have seen Asus and Gigabyte motherboards doing. The Gigabyte motherboard was feeding 1.30V whereas the Asus motherboards have been feeding 1.257V to achieve the same overclock on Auto settings.
Test Setup
Following test bench setup is used to test the performance of the motherboard:
- Intel i7 8700k
- MSI Z370 Gaming Pro Carbon
- Ballistix Elite 4x4GB @ 3000MHz
- Asus GeForce RTX 2080 O8G
- Asus Ryujin 360 CPU Cooler
- Thermaltake Tough Power RGB 750W 80+ Gold PSU
- HyperX 120GB SSD for OS
- Seagate Barracuda 2TB
Microsoft Windows 10 x64 Pro (1809 update) was used for all the testing. Nvidia 417.35 drivers were used for graphics card testing. Following software were used for performance evaluation: –
Storage Drive Tests:
- AS SSD
- ATTO
- Crystal Disk Mark
CPU Tests:
- Cinebench R15
- GeekBench 4.0.3
- 7-Zip
- Fritz Chess
- SiSandra CPU
- AIDA64
- Super Pi
Memory Tests:
- AIDA64 Extreme
- SiSandra Memory
Overall System Tests:
- PCMark10
- Performance Test
For gaming and synthetic bench of the graphics card following software were used:-
- 3DMark
- Assassin’s Creed Origin
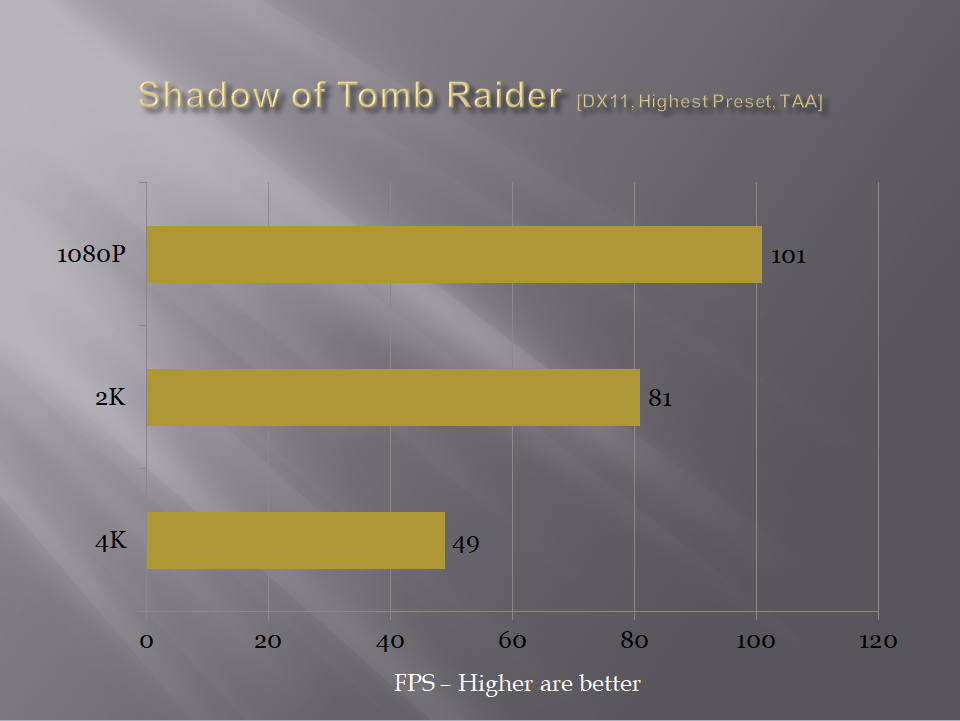
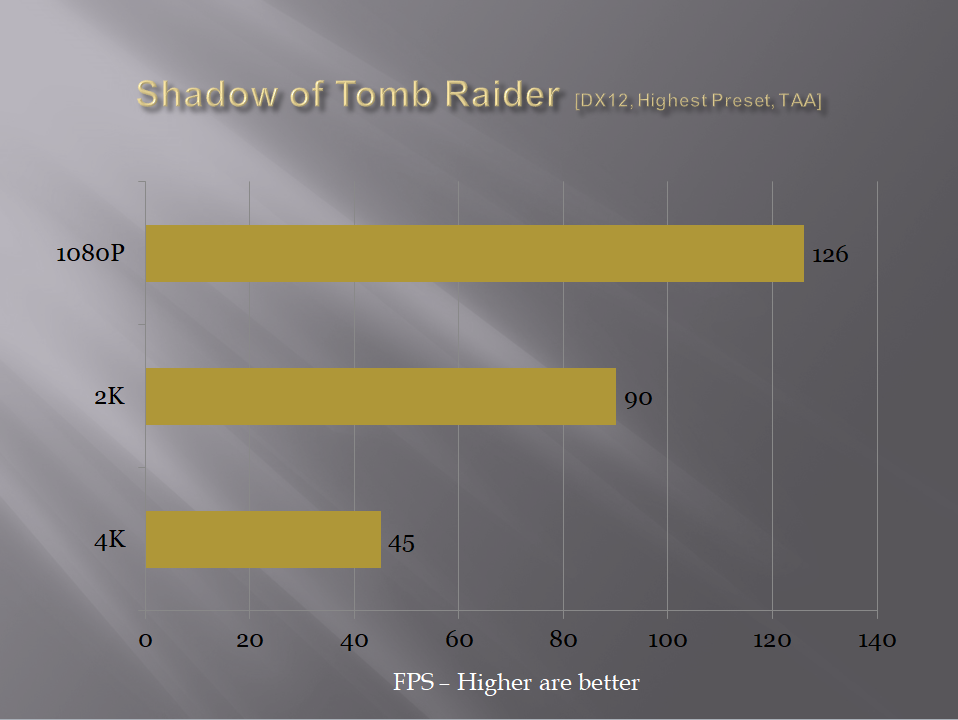
- Shadow of Tomb Raider
- Grand theft Auto V
- Far Cry 5
Testing
This section will show the results of the various test suites and gaming benchmarks that we have run on this motherboard.
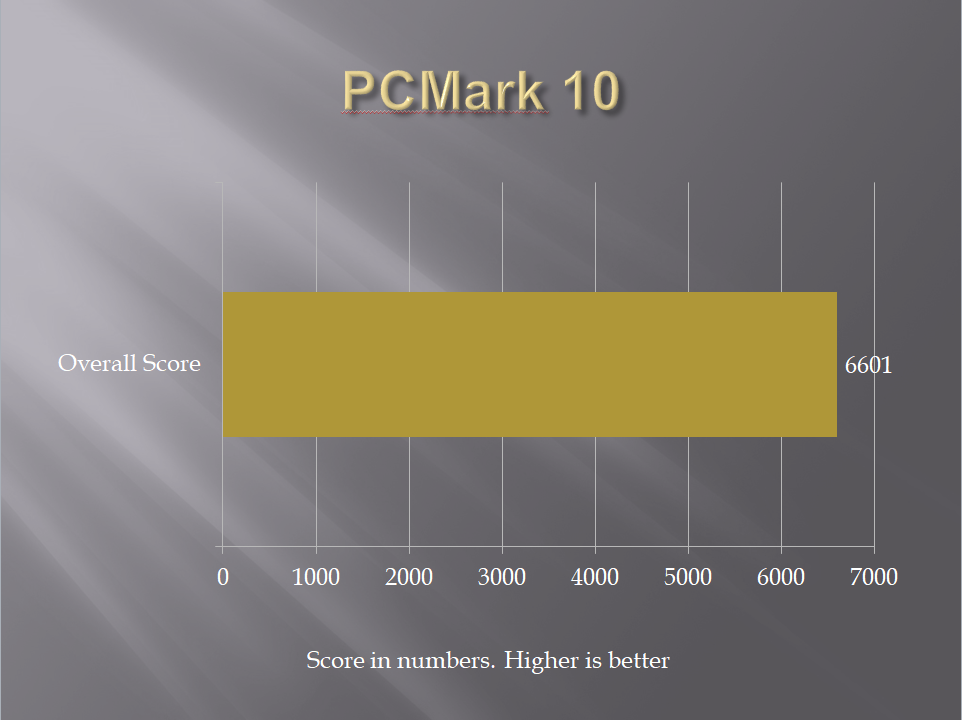
PCMark10 is a comprehensive application suite taking over version 8 to measure the overall performance of the system and the storage devices. Our test build performs relatively well.
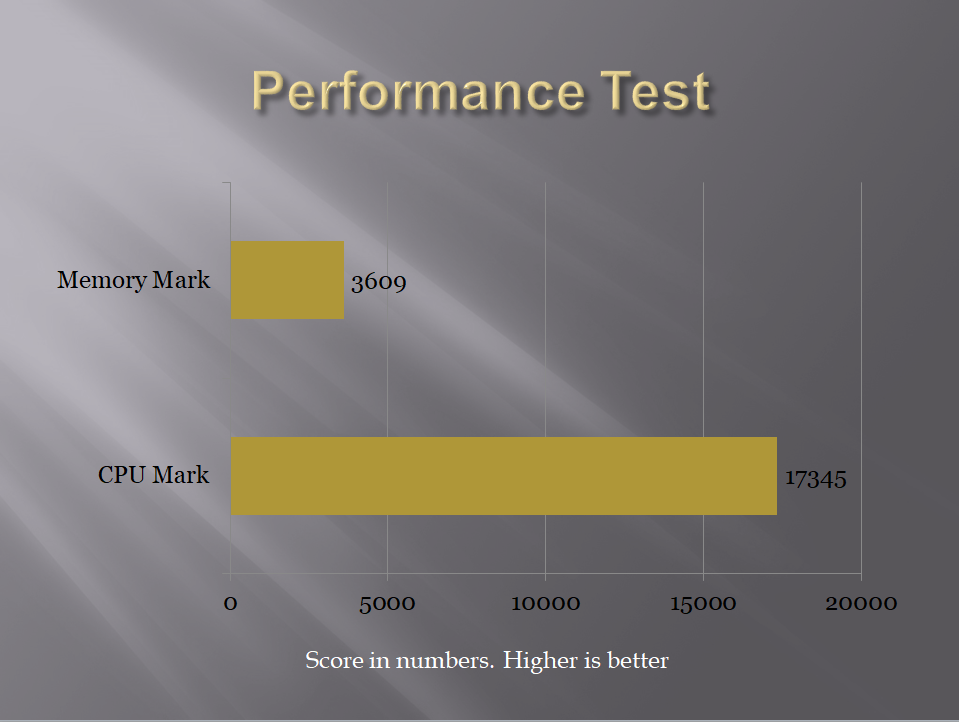
Performance Test or pTest is another comprehensive suite which measures the overall performance of the PC along with detailed tests for each component. I used it to measure the performance of the CPU and the Memory. Scores fall in 95-99% percentile which is a good indication of the performance.
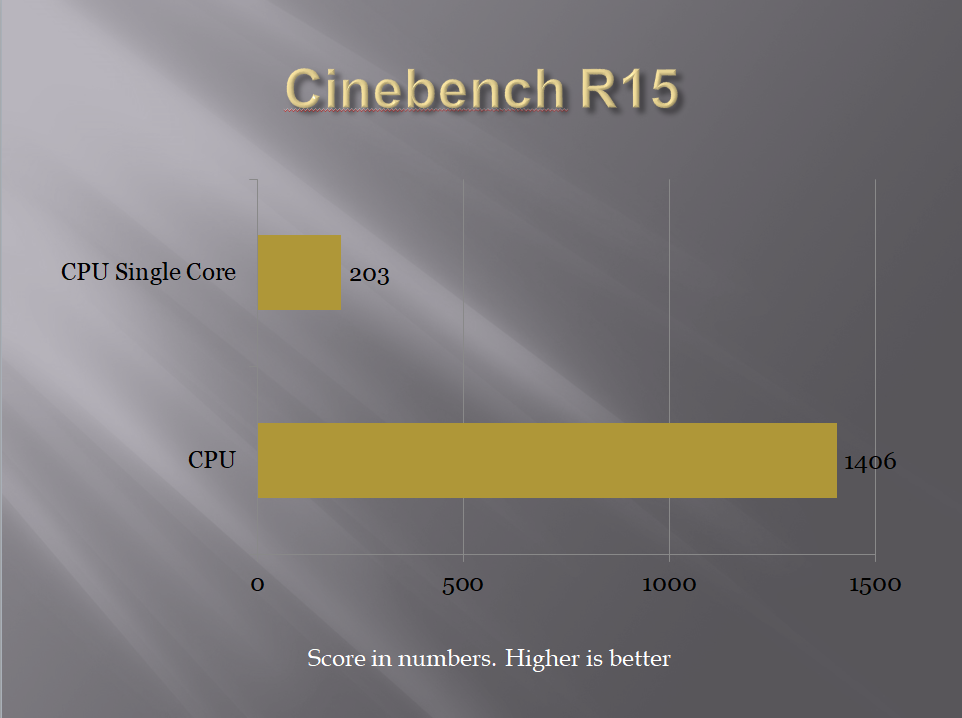
Cinebench is a real-world cross platform test suite that evaluates your computer’s performance capabilities. CINEBENCH is based on MAXON’s award-winning animation software Cinema 4D, which is used extensively by studios and production houses worldwide for 3D content creation. MAXON software has been used in blockbuster movies such as Iron Man 3, Oblivion, Life of Pi or Prometheus and much more. CINEBENCH is the perfect tool to compare CPU and graphics performance across various systems and platforms (Windows and OS X).
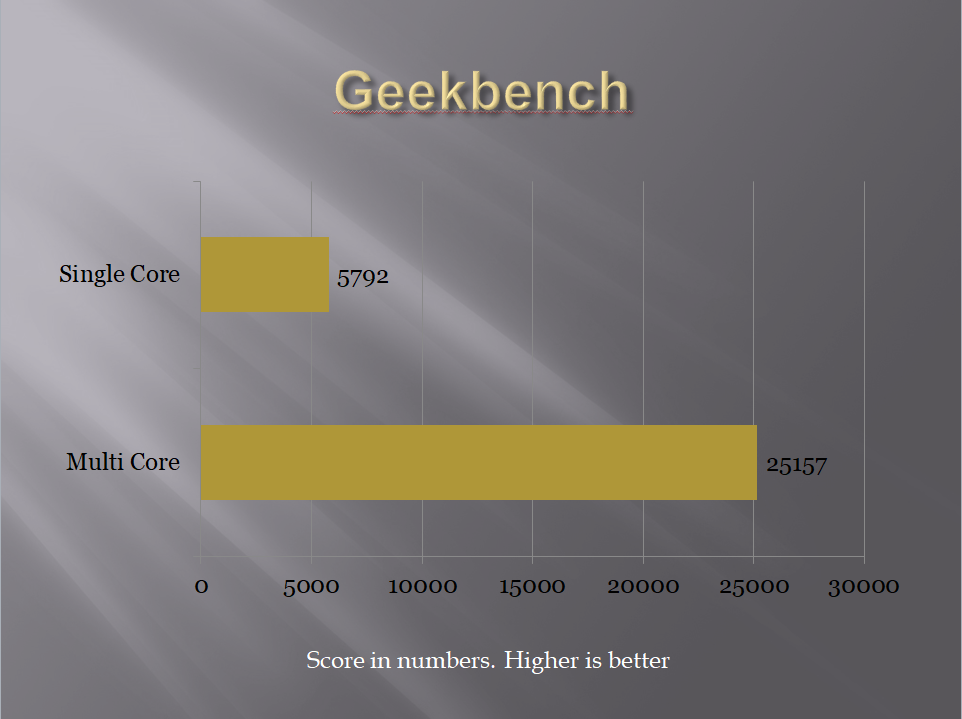
Geekbench 4 measures the system’s performance across multiple platforms. The test build performs well under this test. We have used it to test the single core and multi-core performance of the CPU.
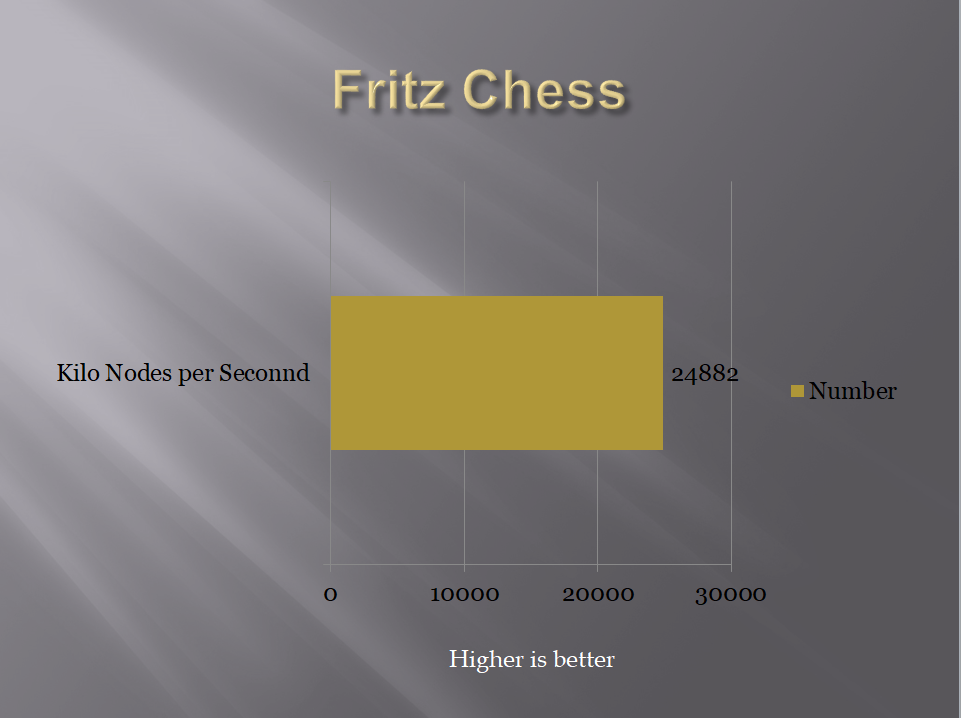
Frtiz Chess Benchmark is a CPU Performance test. It puts the CPU at 100% utilization and scales among the cores and the threads. The score is recorded as Kilo Nodes per Second and Relative speed.
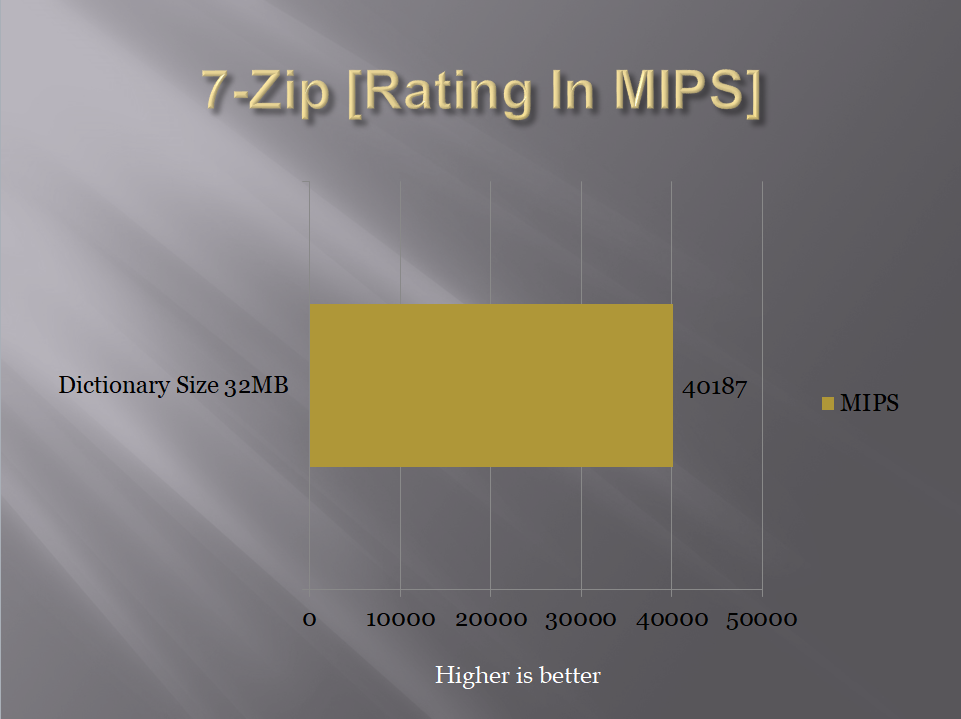
7-Zip is a compression benchmark which utilizes the Memory bandwidth and CPU Cores to measure the performance which is relative. Our graph is showing the overall MIPS.
Super PI is a single threaded benchmark ideal for testing pure, single threaded x86 floating point performance and while most of the computing market has shifted towards multithreaded applications and more modern instruction sets, Super PI still remains quite indicative of CPU capability in specific applications such as computer gaming. The lesser the time is preferable.

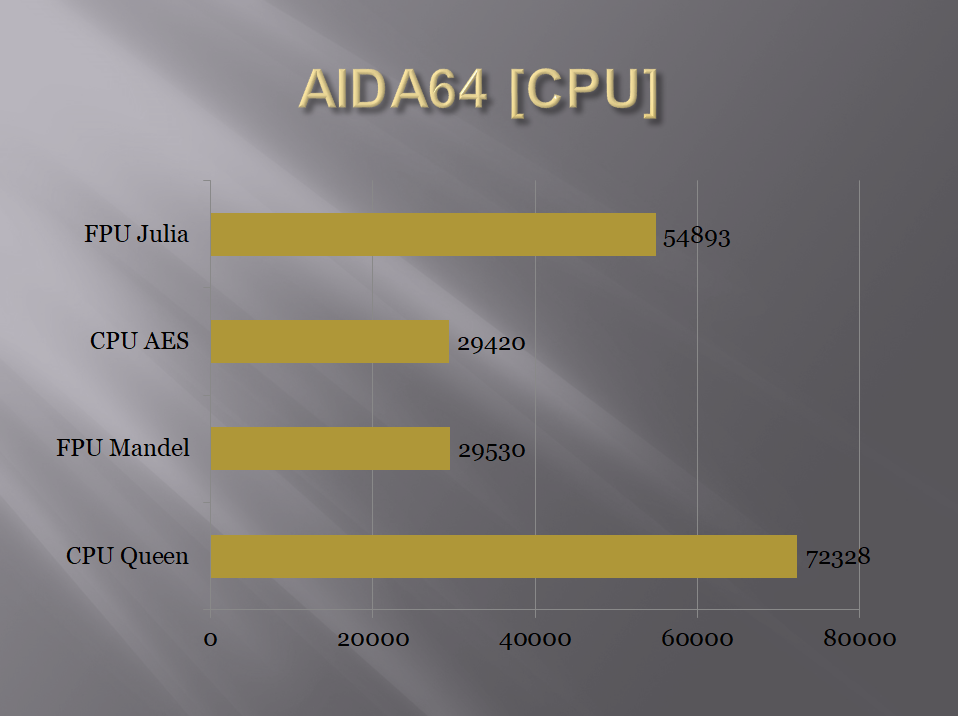
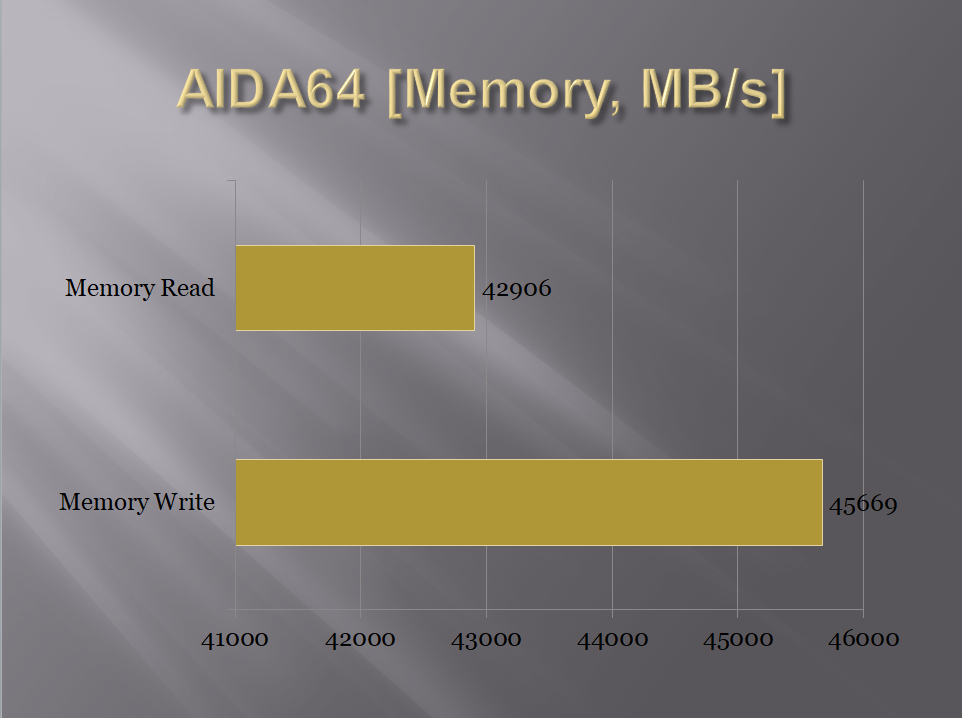
AIDA64 is another extensive application suite to measure the performance and testing of the system’s stability. We used it run some CPU benchmarks and Memory testing.
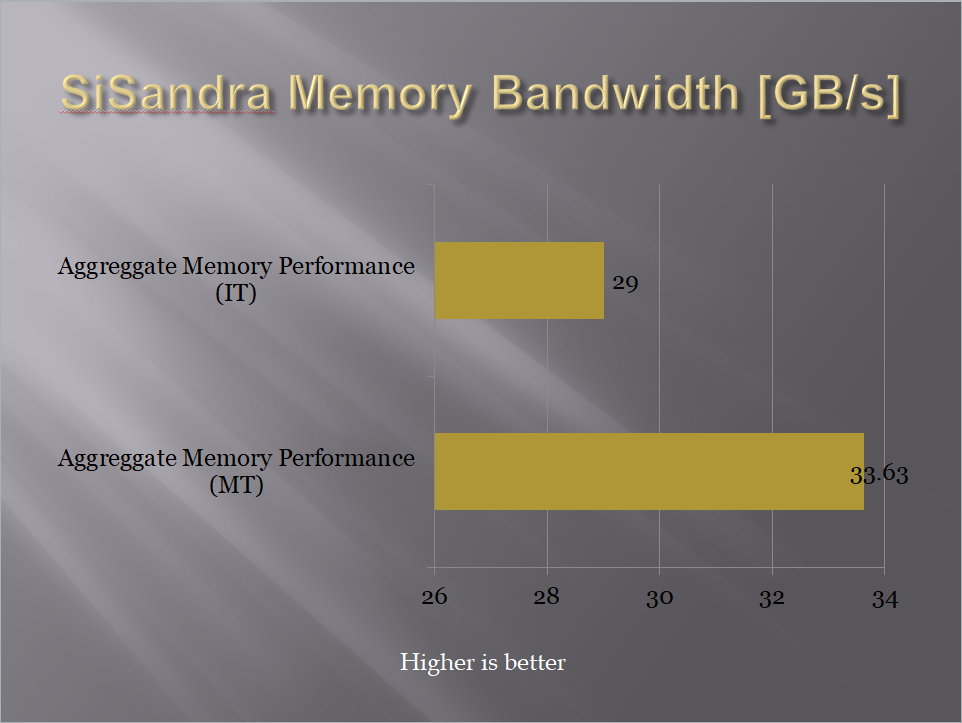
SiSandra is another comprehensive application suite to measure the performance of the various components of the PC and to check for any reported issues with them. It uses a graphical representation as well as the performance measure. We used it for CPU Performance and Memory bandwidth testing.

 CrystalDiskMark is a popular tool to measure the sequential and Random Read and Write speeds of the storage drive(s).
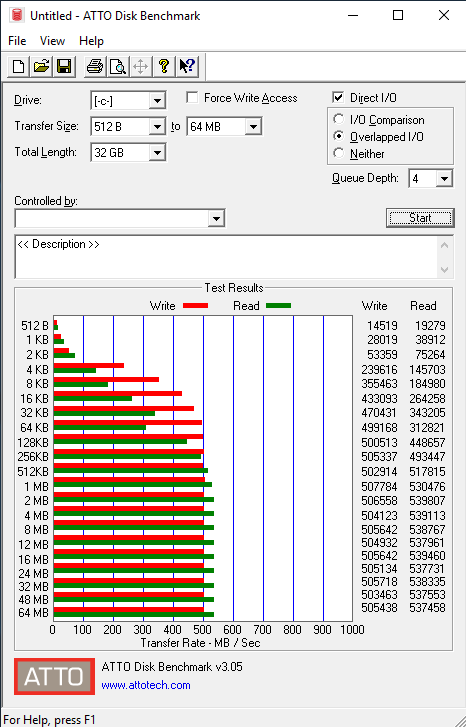
ATTO has created a widely-accepted Disk Benchmark freeware software to help measure storage system performance. As one of the top tools utilized in the industry, Disk Benchmark identifies performance in hard drives, solid state drives, RAID arrays as well as the host connection to attached storage.
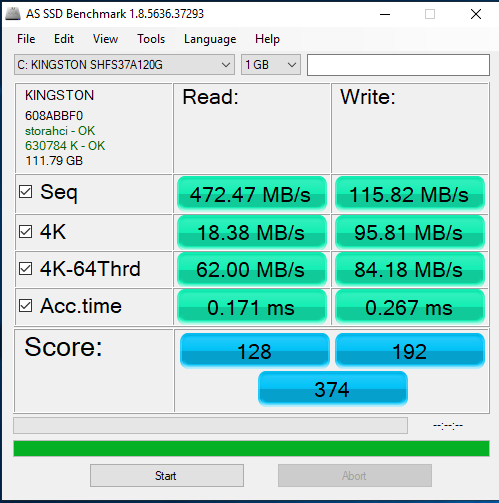
AS SSD software tests the sequential or random read/write performance of the storage drive(s) without using the cache. AS SSD Benchmark reads/writes a 1 GByte file as well as randomly chosen 4K blocks. Additionally, it performs the tests using 1 or 64 threads and it determines the SSD’s access time.
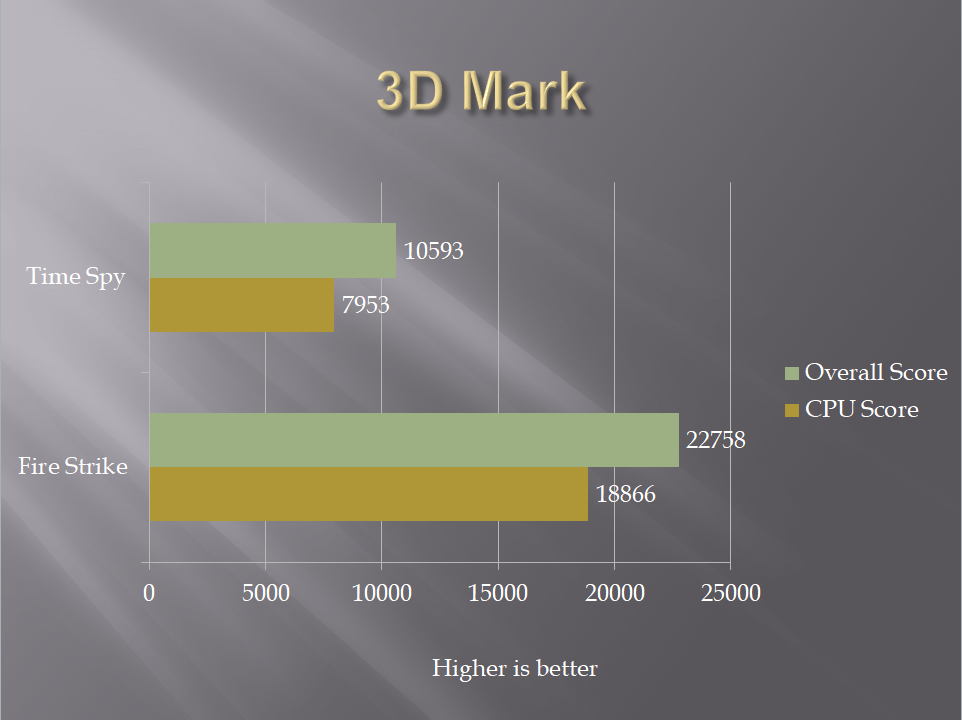
3DMark includes everything you need to benchmark your PC and mobile devices in one app. Whether you’re gaming on a smartphone, tablet, notebook, or a desktop gaming PC, 3DMark includes a benchmark designed specifically for your hardware. We are specifically showing the CPU score only in the graphs.
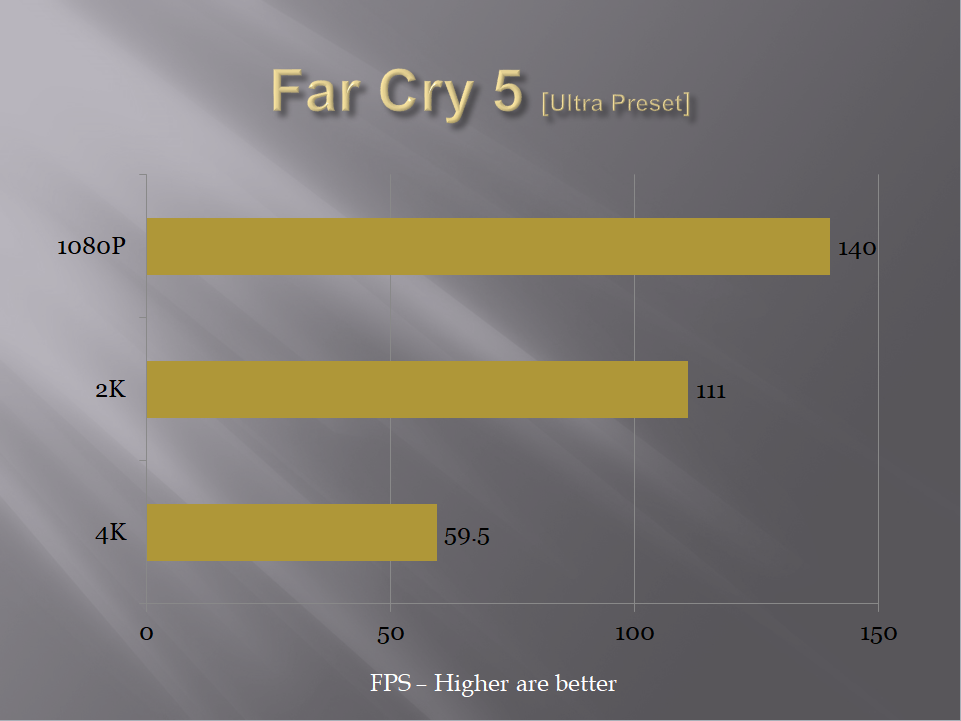
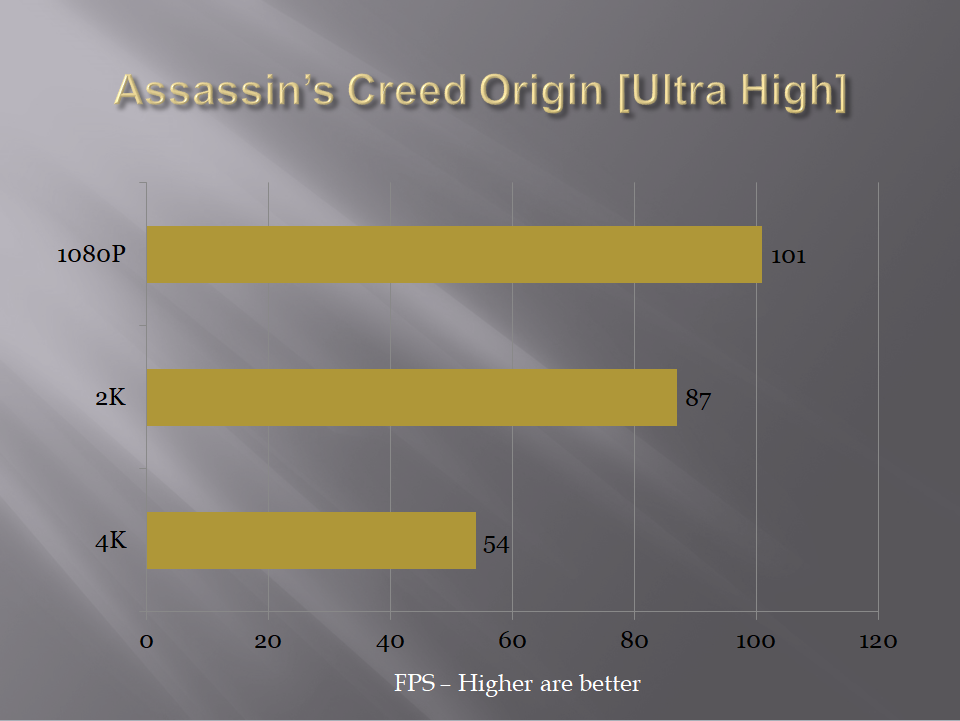
We have tested 4 games on the test build. All the games were tested with their highest graphics settings.

Overclocking, Power Consumption, and Thermals
For the purpose of to the point testing, we disabled the Gigabyte Core enhancement to stay with the Intel default’s. On stock, all the settings were left at Auto. To check the power draw of the PC, I used the Metro Exodus game instead of running a stress test. The game was played for 45 minutes in a session. HWInfo 64 was used to note the power consumption. On stock clocks, the chip was boosting to 4.6GHz using 1.190V VCore. The power consumption of the chip was 89.050W (CPU Power Package) with the system drawing the power of 426.96W under gaming load. The maximum CPU temperature while gaming was 68°C on any core. The ambient temperature was 34°C.
The chip used 1.335V for the 5.0GHz clocks. The power consumption of the chip at 5.0GHz under gaming load was 128.934W and that of the system was 489.185W. The maximum temperature on any core was 88°C with an ambient temperature of 34°C. The VRM temperature of the motherboard crossed 110°C which is still thermal junction of the VRMs but it is relatively higher than what I have seen on the Asus motherboards.
Conclusion
The MSI Z370 Gaming Pro Carbon is a high-end motherboard aimed at masses of medium to high budget users who would want to taste the like of Intel Z370 chipset with a plethora of the features optimized towards better gaming performance without breaking the wallet. For enthusiasts, there are other models like God Like, Meg in the market. The MSI Z370 Gaming Pro Carbon has stylish black/gray colors themed coupled with Carbon wrapping on the I/O shroud and the Chipset’s cover adding a subtle touch and look & feel to the overall design of the motherboard. It looks that good in person.
The motherboard features Intel LGA1151 socket which is a third iteration of the same socket starting from 6th generation named Skylake. This particular socket can host Intel Coffee Lake series CPUs as well as 9th generation Core processors including new i9 dubbed CPU from the Intel. The chipset is Intel 300 series which is different from the 200 and 100 series of the Chipsets on the 7th and 6th generation of the Core processors. The MSI Z370 Gaming Pro Carbon has 4 DDR4 DIMM slots with a maximum supported capacity of 64GB. Non-ECC, un-buffered RAMs are supported on these slots. These slots have steel reinforcement for strength and durability. In addition, these have dedicated circuitry with EMI shielding as well. There is an XMP LED as well that light up to indicate that XMP has been activated. The upper side of these slots has LEDs as well and they only light up when the corresponding slot is populated. The latches on both sides of these slots need to be slide out to populate the RAM.
The MSI Z370 Gaming Pro Carbon has a total of 6 PCIe slots. Three of them are PCIe 3.0 X1. The top slot is PCIe 3.0 x16 one taking PCI lanes from the CPU. The fourth slot is PCIe 3.0 x8 rated and both are steel reinforced for more strength. The last slot is PCIe 3.0 x4 rated and is taking lanes from the chipset. The motherboard supports Nvidia two-way SLI and AMD three-way Crossfire. When two cards are installed then the first and fourth slots will be in x8/x8 configuration. The Clear CMOS jumper is located below the first PCIe slot and this is not a convenient location for this jumper as any card with more than 2 slots width will cover this jumper.
In terms of the storage options, we have total 6x SATA 6 ports on the MSI Z370 Gaming Pro Carbon motherboard. In addition, we have two M.2 slots with the top slot having a beautiful cover/shield with the thermal pad to keep the temperature of the M.2 drive in check. Both slots support M-Key type with support up to PCIe 3.0 x4 as well as SATA 6Gbps. M2_1 supports 2242/2260/2280/22110 type storage devices. The M2_2 supports 2242/2260/2280 type storage devices. Intel Optane memory is support on both slots as well U.2 drives using the Turbo U.2 host card. There are certain limitations in terms of the available SATA connector(s) depending upon the storage drives being used. Please check our Closer Look section for more details.
The MSI Z370 Gaming Pro Carbon has a total of 6 fan headers. One is the dedicated CPU fan header which is PWM by default. One is the dedicated pump header which is also PWM by default. The rest of the fan headers are system fan headers which though are 4-pin but set at DC by default. The user can switch the control type from the BIOS. There is a dedicated Hardware Monitor section in the BIOS which the user can utilize (should utilize in my opinion) to define the fans’ speed according to the temperature readings. The user can define a custom fan curve as well. The good thing is that MSI has provided a thermal sensor to read the VRM temperature readings.
The MSI Z370 Gaming Pro Carbon has 11 power phases. A fully digital power design allows for faster and undistorted current delivery to the CPU at pin-point precision creating the perfect conditions for CPU overclocking. Prevents potential short-circuit damage to the CPU and other critical components. The MSI Z370 Gaming Pro Carbon is using Titanium Chokes that run much cooler and deliver a 30% improvement in power efficiency, allowing for better overclocking and stability. Dark Capacitors are in use having lower Equivalent Series Resistance (ESR) and an increased lifespan of over 10 years. A special core design allows the Dark Choke to run at a lower temperature offering better power efficiency and stability.
The MSI Z370 Gaming Pro Carbon is using Realtek ALC1220 Codec supporting high definition audio and 2/4/5.1/7.1 channels. It has support for S/PDIF output. The audio section is implemented on two dedicated layered PCBs. Audio Boost 4 is powered by an EMI-shielded High Definition audio processor with built-in DAC, ensuring the purest sound quality in both stereo and surround sound. It has support for 120dB SNR / 32-bit and supports DSD Super Audio CD playback & recording (64x better than regular CD quality). The built-in dedicated headphone amplifier rewards audiophiles with headphones up to 600O impedance by delivering studio-grade sound quality from gaming PC. At the core of its sound technology, the MSI is using Nahimic Sound Technology. The MSI Z370 Gaming Pro Carbon is using Intel NIC with 1219-V LAN controller. This controller is Gigabit rated hence it supports data connectivity speeds of up to 1000 Mbps. There is one LAN port on the rear I/O panel. The MSI Z370 Gaming Pro Carbon is using Click BIOS 5. The BIOS is UEFI AMI one using ACPI 6.0, and SMBIOS 3.0. There is a single 128 Mb flash chip hosting the BIOS. There is no dual BIOS on this motherboard. Multi-language support is available in the BIOS.
The MSI Z370 Gaming Pro Carbon is using ASMedia ASM3142 chipset for USB connectivity provision in addition to the USB support from Intel Z370 chipset. 1x USB 3.1 Gen-2, Type-C, and 1x USB 3.1 Gen-2, Type-A ports on the rear I/O panel are from ASMedia chipset. 8x USB 3.1 Gen-1 ports with 4x Type-A ports on the rear I/O panel and 4x from the mid-board are from the Intel chipset. Similarly, 6x USB 2.0 ports with 2x from the rear I/O panel and 4x from the mid-board are from the Intel Chipset.
The MSI Z370 Gaming Pro Carbon is listed at $199.99 and Rs.34500 at the time of the review. I did not observe any hitch in terms of the performance during my testing and experience. Intel i7 8700k was overclocked to 5.0GHz though it does increase the VRM temperatures to cross over the 110°C under stress test though this reading is still well within the thermal junction of the VRM which is usually 150°C.
The MSI Z370 Gaming Pro Carbon is one heck of a complete solution for the gamers looking towards getting a motherboard without breaking their wallet that comes with a plethora of gaming-oriented features, user-intuitive BIOS design, has aesthetically pleasing outlook and packs a performance punch. The MSI Z370 Gaming Pro Carbon comes recommended by us.