How to Fix ‘Memory Error 19 – 1367’ in COD: MW / Warzone 2?
The ‘Memory Error 19 – 1367’ can occur due to several reasons, including your graphics settings, memory overclocking, and more. The error message occurs when you are about to finish a game, forcing the game to restart.
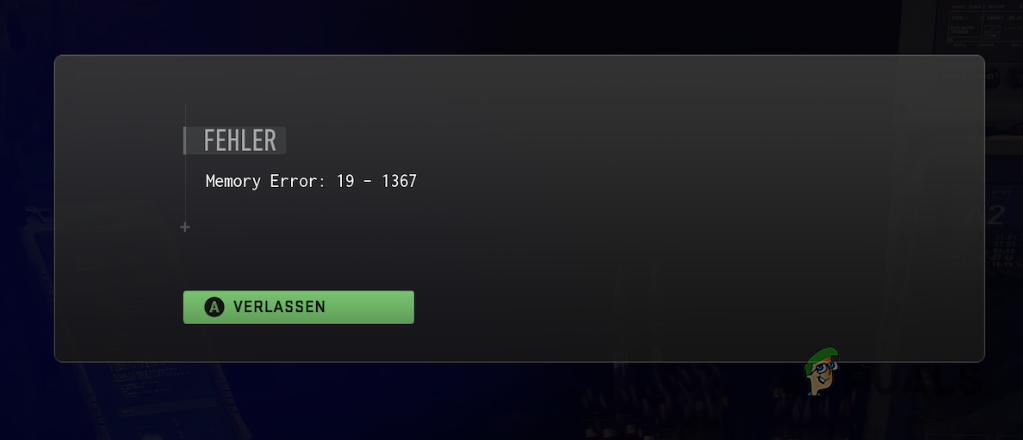
In most cases, the graphics settings of your game tend to cause a memory issue, whereby your video memory allocation is insufficient compared to what the game requires for your selected settings. With that said, we have compiled a list of various methods you can implement to resolve the issue. Let’s get started.
1. Turn off FidelityFX CAS
The first thing you should do when starting to troubleshoot this error message is to turn off FidelityFX CAS in your graphics settings. FidelityFX is an upscaling algorithm from AMD that improves the image quality in the game by sharpening the pixels on your screen.
Call of Duty Modern Warfare 2 supports various AI Upscaling algorithms that are aimed at improving the visual quality of the game. However, in some cases, using these upscaling or sharpening algorithms can cause various issues to arise.
The issue may not just be limited to FidelityFX CAS, as other upscaling algorithms can also result in the memory error occurring. As such, if you are using an upscaling algorithm, follow the instructions below to try changing or turning it off:
- First, launch Call of Duty Modern Warfare 2 on your computer.
- Then, open the Settings menu by clicking on the gear icon in the top-right corner.
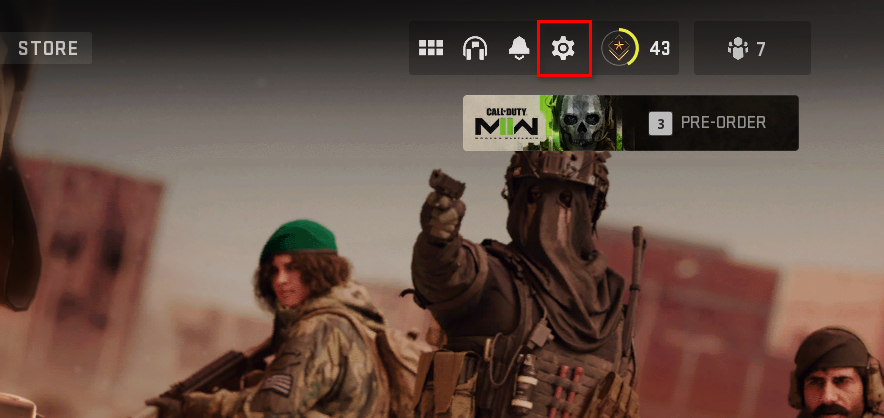
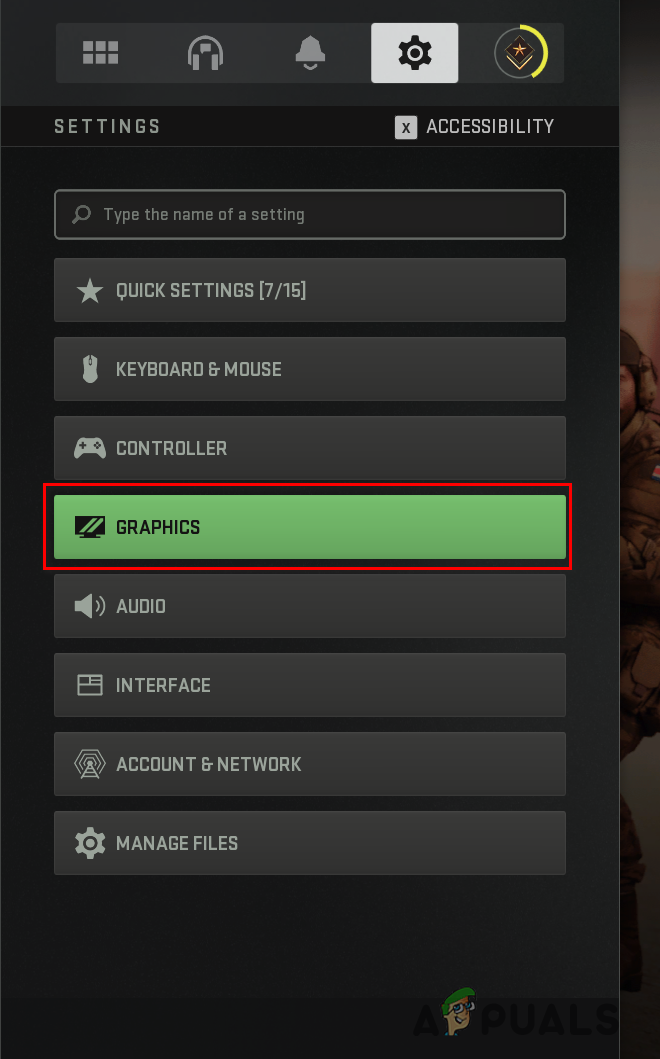
Opening Settings Menu - Navigate to Graphics > Quality via the Settings menu.
Navigating to Graphics Settings - Locate Upscaling / Sharpening and change it from FidelityFX CAS to OFF.
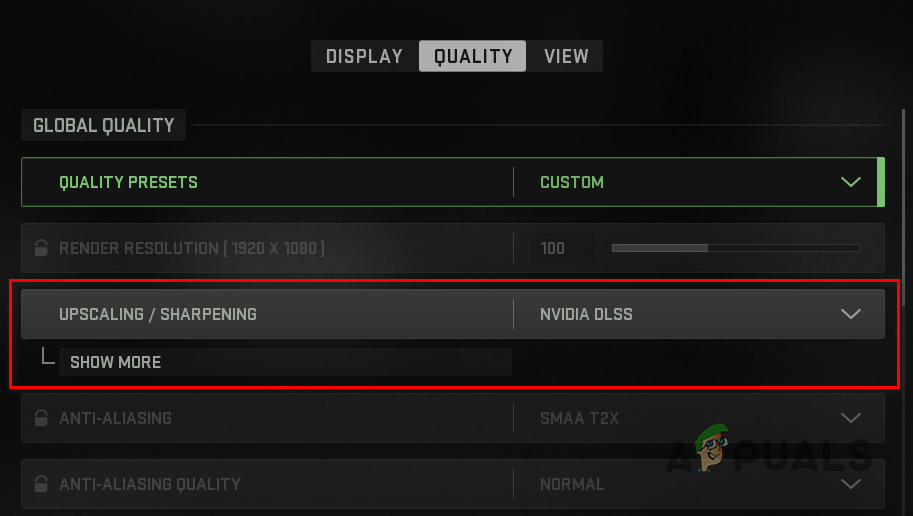
Changing Upscaling Algorithm - You can also try using a different Upscaling algorithm to see if that results in the issue.
- Play the game and see if the error still occurs.
2. Turn off On-Demand Texture Streaming
On-Demand Texture Streaming is a feature in Call of Duty Modern Warfare 2 that allows the game to improve the quality of in-game textures by downloading them from the internet as you play the game.
If you have On-Demand Texture Streaming enabled, it can cause a memory error within the game. If this is the case with your system, you will have to disable On-Demand Texture Streaming to resolve the issue.
By disabling the feature, only the textures on your local hard disk will be shown and your internet will not be used to download additional textures as you play the game. This can also help with any network lag in Call of Duty Warzone 2.
Follow the instructions below to turn off On-Demand Texture Streaming:
- Start by launching the game on your PC.
- After that, open the Settings menu by clicking on the gear icon in the top-right corner.

Opening Settings Menu - Navigate to Quality settings via Graphics > Quality.

Navigating to Graphics Settings - Then, under Quality Settings, scroll down to locate On-Demand Texture Streaming.
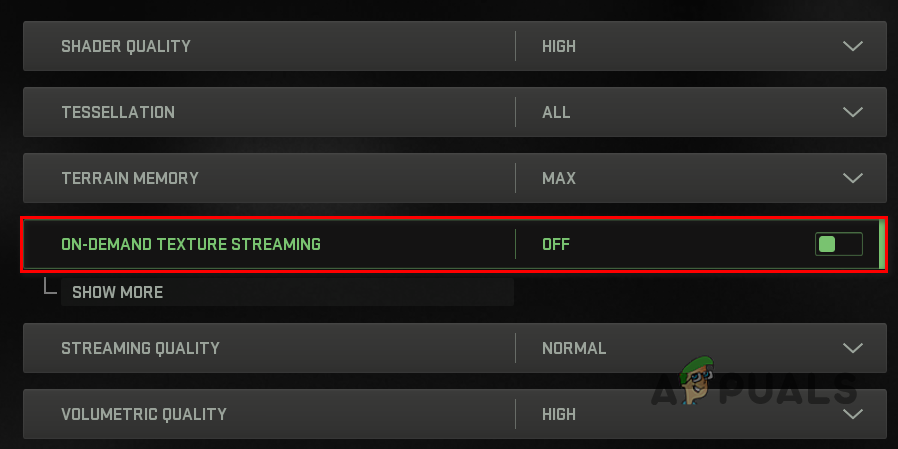
Disabling On-Demand Texture Streaming - Use the slider provided to turn it off.
- Once you do that, play the game to see if the issue goes away.
3. Lower Texture Settings
The texture settings of your game can also result in this error message. This is because the higher your texture settings are, the more VRAM is consumed by the game. Graphics cards have limited memory and if you surpass the available memory of the card by increasing your texture settings, memory errors are bound to occur.
If this scenario is applicable, you will have to lower your texture settings to make sure the game does not require additional memory than the available limit. You can find the texture settings in the Graphics > Quality menu of the game.
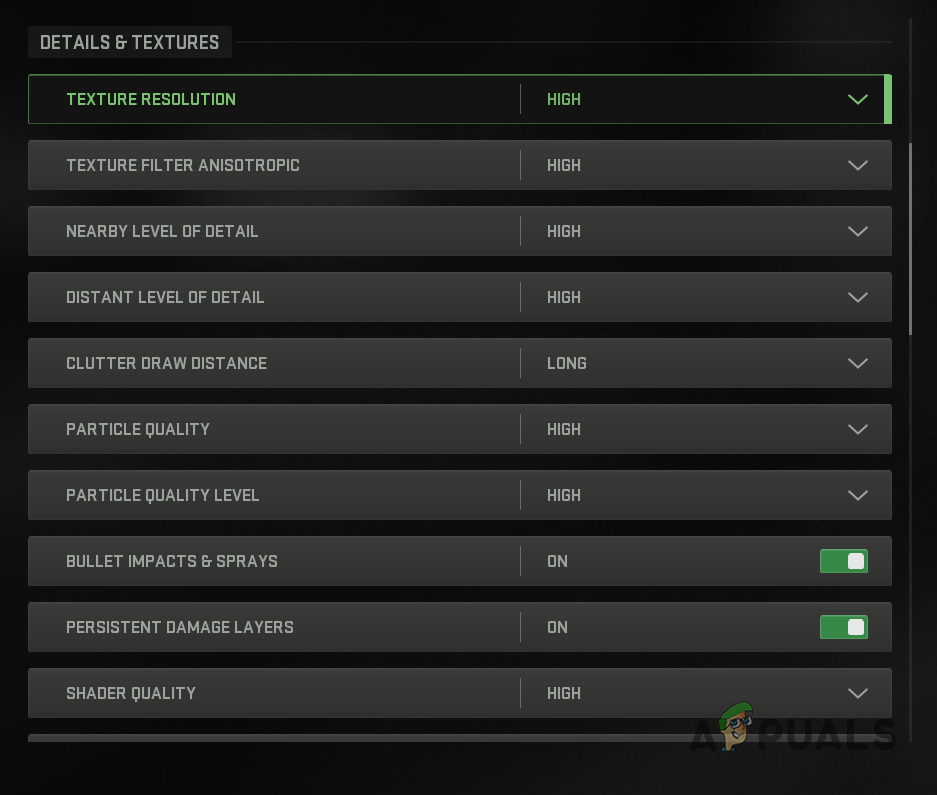
Once you are there, lower your texture settings and then play the game to see if the error message still occurs. If it does, move to the following method below.
4. Update Graphics Drivers
Graphics drivers play a vital role when it comes to gaming on your computer. This is because graphics drivers are used for communication between the graphics card and the motherboard.
If you are using an obsolete graphics driver’s version, it may well be causing the issue for you. Graphics drivers updates are often released for such newer games to address various bugs and issues that are being caused by older versions of the driver.
If this applies to you, you will have to install the latest drivers available for your graphics card on your computer. To do this, you will first have to uninstall the current version of the graphics drivers and then download the latest version available from your manufacturer’s website.
Follow the instructions below to do this:
- Start by downloading the Display Driver Uninstaller (DDU) utility from here.
- Then, extract the files to your desired location.
- Navigate to the directory and run the Display Driver Uninstaller.exe file.
- Once DDU starts, you will be shown a General Options window. Click the Close button to continue.
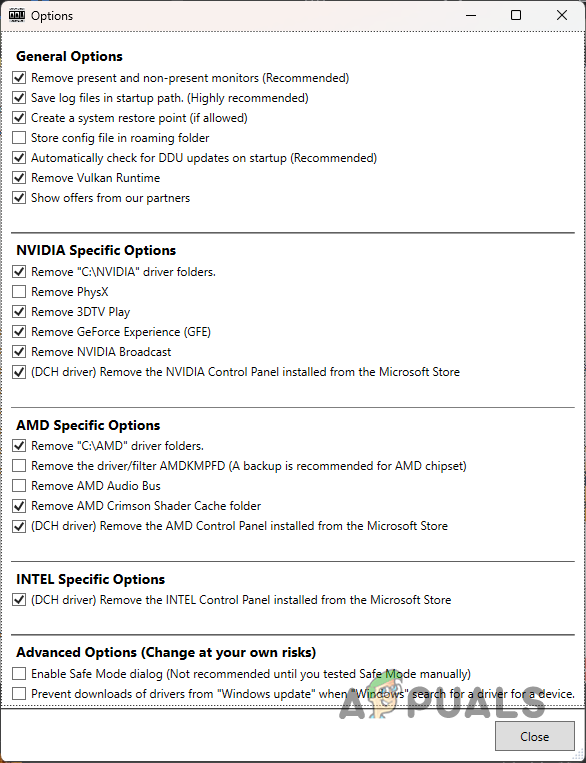
DDU General Options - After that, select GPU as the device type from the Select device type drop-down menu.
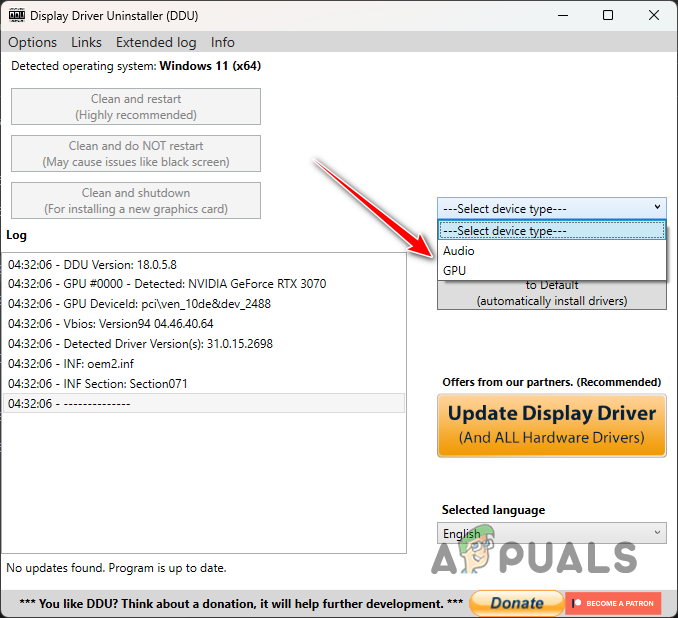
Selecting Device Type - Follow this up by choosing your graphics card manufacturer from the Select device drop-down menu underneath.
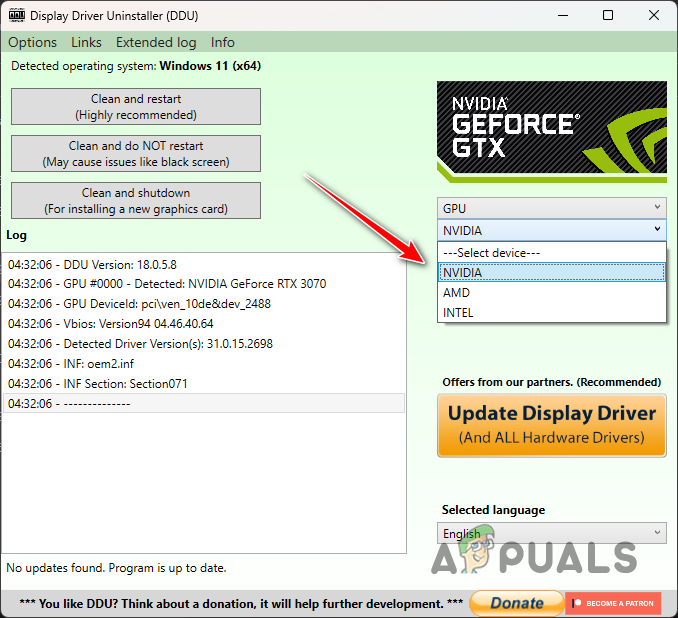
Selecting Graphics Card Manufacturer - Finally, click the Clean and restart button to uninstall your graphics drivers.
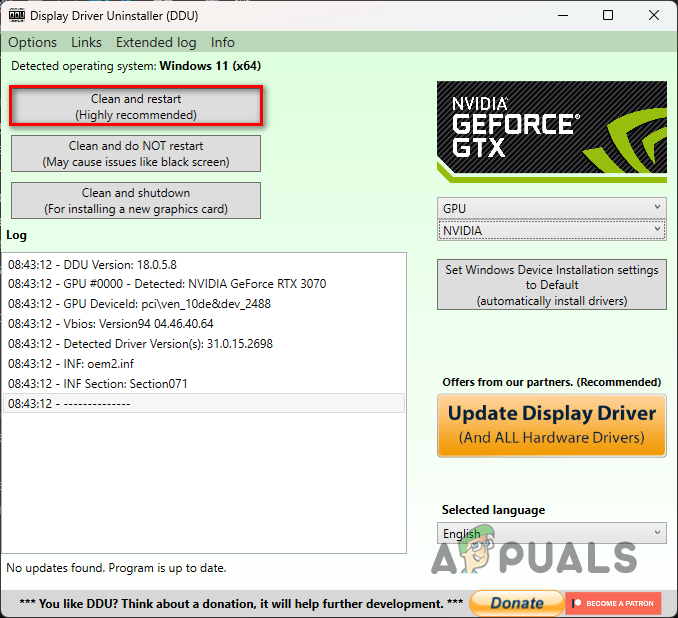
Uninstalling Graphics Drivers - After your PC boots up, head to your manufacturer’s website and download the latest drivers available for your graphics card.
- Install the drivers and then play the game to see if that fixes the problem.
5. Disable XMP
Overclocking the components on your motherboard is usually great as it allows you to use them to their full potential. However, in some cases, overclocking can also cause stability issues which can result in various errors in different games.
XMP or D.O.C.P., if you are using a Ryzen processor, is a feature that overclocks the memory on your motherboard, allowing it to use the proper memory speed. By default, memory speed is capped to a certain limit and you will have to enable XMP or D.O.C.P to reach the advertised speeds.
With that said, if you are using XMP or D.O.C.P., the overclock might be making your RAM unstable, which causes the game to crash. In such a scenario, you will have to disable XMP or D.O.C.P. in your BIOS configuration to resolve the issue.
If disabling XMP or D.O.C.P. does not fix the issue, move to the next method below.
6. Perform Clean Boot
Finally, if none of the methods above has fixed the problem, the memory error might be occurring due to the interference of a third-party application on your computer.
When this happens, you can verify by performing a clean boot. Clean Boot starts your computer with only core services running in the background on startup, meaning all of the third-party applications are stopped from starting automatically.
If the issue goes away after a clean boot, it will be evident that a third-party application on your computer is causing the issue. In such a scenario, you can reenable the services one by one to find the culprit. Follow the instructions below to perform a clean boot:
- First, open the Run dialog box by pressing the Windows key + R on your keyboard.
- In the Run dialog box, type in msconfig and hit Enter. This will bring up the System Configuration window.
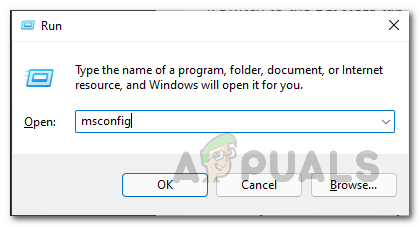
Opening System Configuration Window - After that, switch to the Services tab.
- Tick the Hide all Microsoft services checkbox.
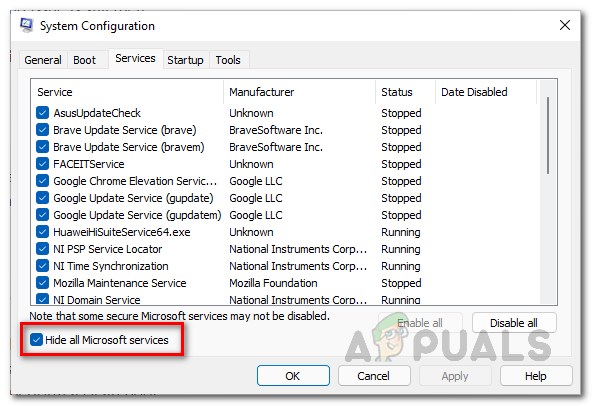
Hiding Microsoft Services - Then, click the Disable button and follow it up by clicking Apply.
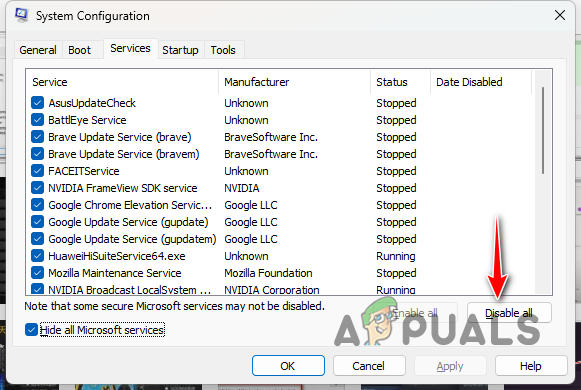
Disabling Third-Party Services - Once you do that, switch to the Startup tab.
- There, click on the Open Task Manager option.
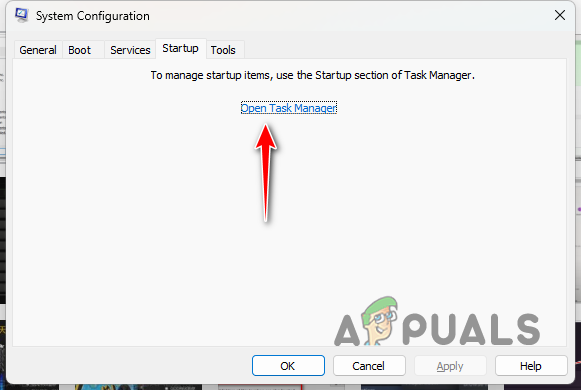
System Configuration Startup Tab - On the Task Manager window, select each app and click the Disable option.
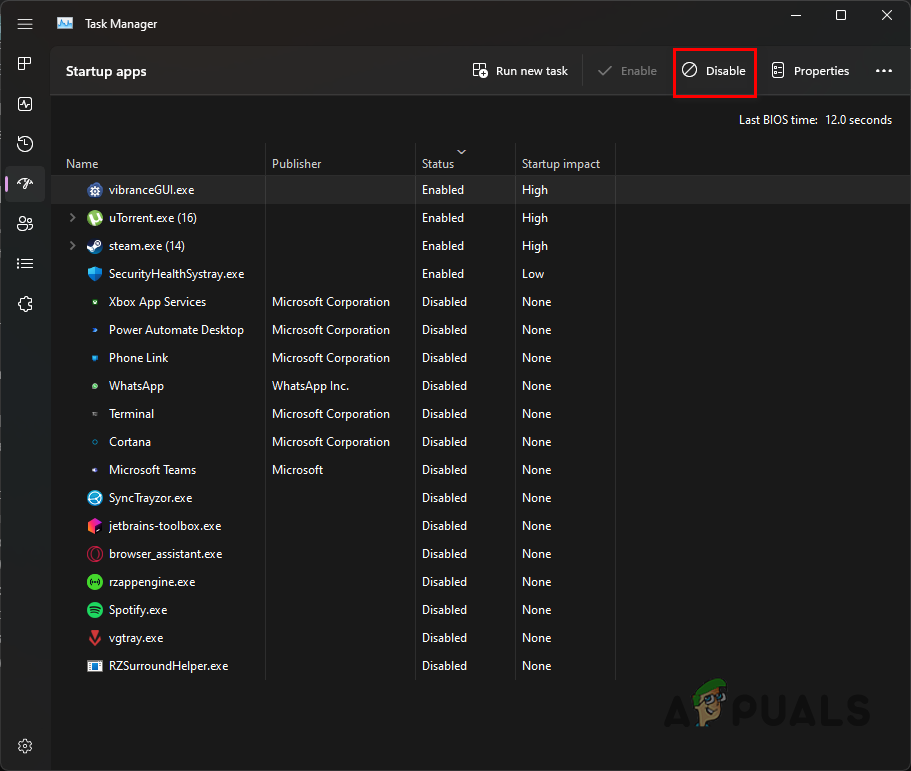
Disabling Third-Party Apps on Startup - With that done, restart your computer.
- Once your PC boots up, launch Call of Duty Modern Warfare 2 and see if the memory error still occurs.


