Fix Marvel’s Midnight Suns from Stuttering and Freezing
It is common for Marvel’s Midnight Suns to stutter, lag, and drop FPS if you use a 2K launcher to open the game. Since 2k Games are the publisher, they have designed the game in a way that first opens the 2k Launcher, then Marvel’s Midnight Suns. However, it is not necessary to launch the game with a 2k launcher as you can directly launch it using its executable file.

Before we move on to the solutions, we want you to ensure that you meet the minimum game requirements because if you don’t have enough system specifications, then your system won’t be able to handle the game, which results in a stutter, and FPS drops.
| Issue | Marvel's Midnight Suns Stuttering |
|---|---|
| Most Common Causes | Interfearence from 2K Launcher Using High Graphics Settings Incompatible System Requirements Outdated and Faulty Graphics Driver |
| Solutions | Disable the 2K Launcher Lower Down Graphics Settings Verify the Integrity of Game Files Run the Game in Administrative Mode |
1. Disable the 2K Launcher
There are two ways to launch Marvel’s Midnight Sun, with a 2K launcher and without a 2K launcher. As we mentioned earlier, opening a game along with a 2K launcher often troubles users to encounter various different issues.
Hence, to prevent the 2K launcher, you can either open the game using the MidnightSuns.exe file, which should be located under the game directory, or disable the 2K launcher by adding the command to the launch options. Launch options are used to open the game with the parameters described by the users.
If you use Steam or Epic Games to launch the game, it will use the MidnightSuns-Win64-Shipping.exe file by default, which opens the game along with a 2K launcher. But if you add the location of the MidnightSuns-Win64-Shipping.exe to the launch options with the command, it will avoid the MidnightSuns-Win64-Shipping.exe and use the MidnightSuns.exe file, which won’t launch the 2K launcher.
To disable the 2K Launcher:
1.1 Steam
- Open Steam and head to the Library.
- Right-click Marvel’s Midnight Suns and hover over Manage and then click Browse Local Files.

Browsing Marvel’s Midnight Suns Local Files - From the Game Folder, navigate to MidnightSuns > Binaries folder– >Win64
to find MidnightSuns-Win64-Shipping.exe. - Once you find it, copy the location of this file from the top address bar.
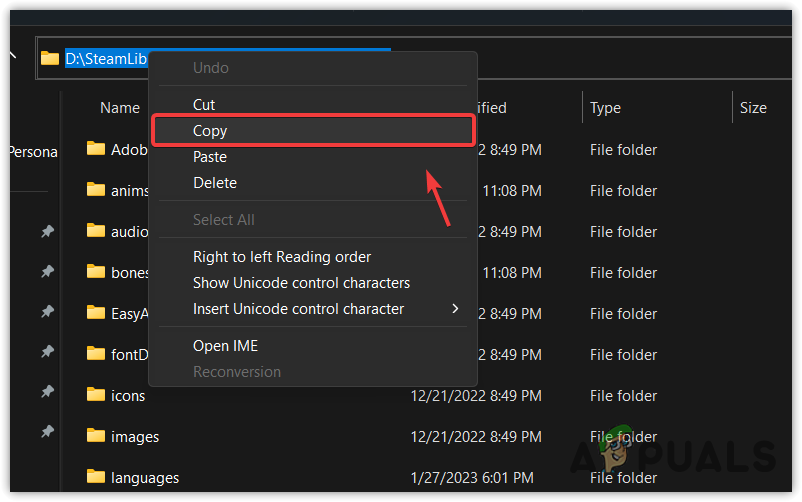
Copying the address of the MidnightSuns-Win64-Shipping.exe file - Come back to Steam, right-click Marvel’s Midnight Suns, and go to Properties.

Opening a Steam game properties - Under Launch Options, paste the copied path with the double quotes and add a space, then type %command% at the end.
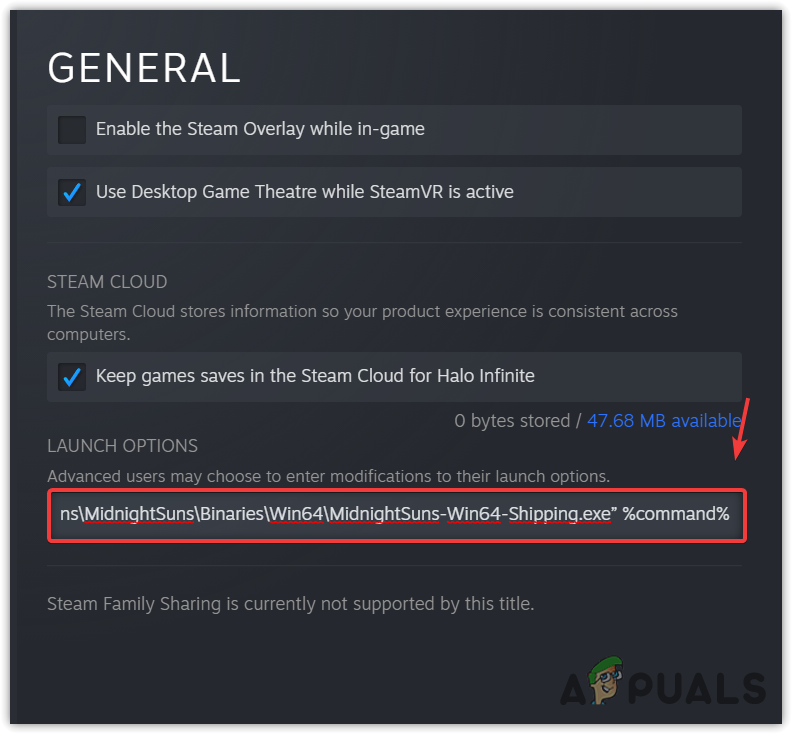
Adding Command to the Steam Launch Option Example with default game directory
“C:\Program Files (x86)\Steam\steamapps\common\\Marvel’s Midnight Suns\MidnightSuns\Binaries\Win64\MidnightSuns-Win64-Shipping.exe” %command%
Example with the specified Steam game directory
“D:\SteamLibrary\steamapps\common\Marvel’s Midnight Suns\MidnightSuns\Binaries\Win64\MidnightSuns-Win64-Shipping.exe” %command% - Once done, close it and launch the game to check whether the issue is fixed or not.
1.2 Epic Games
- Open the Epic Games launcher, and go to Settings from the top.
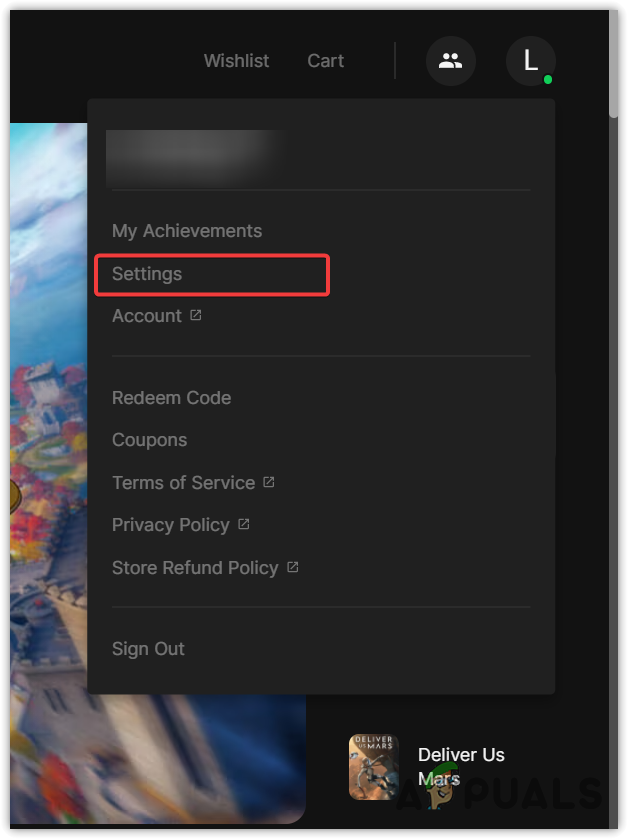
Opening Epic Games Settings - Scroll down to the bottom, and expand Marvel’s Midnight Suns.
- Check Additional Command Line Arguments and paste the following command.
Note: For the specified Steam game directory, replace D with your game directory disk.
Default game directory"C:\Program Files (x86)\Steam\steamapps\common\\Marvel's Midnight Suns\MidnightSuns\Binaries\Win64\MidnightSuns-Win64-Shipping.exe" %command%
Example of the specified Steam game directory
“D:\SteamLibrary\steamapps\common\Marvel’s Midnight Suns\MidnightSuns\Binaries\Win64\MidnightSuns-Win64-Shipping.exe” %command%
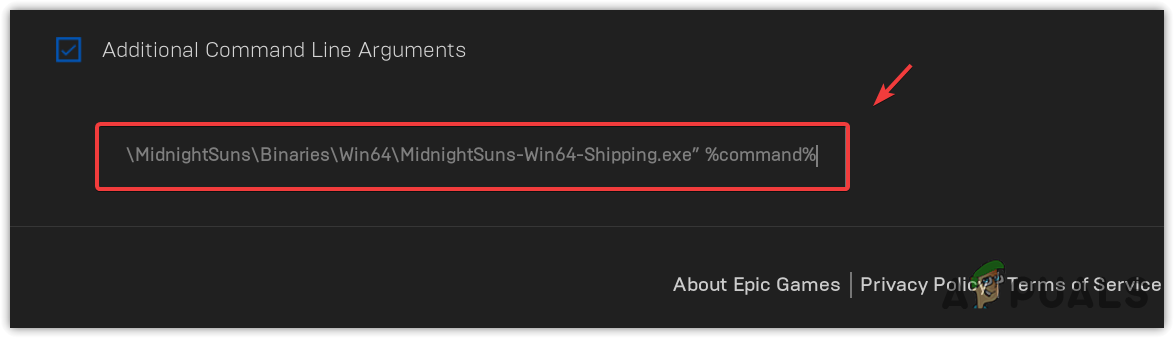
Adding Command to the Epic Games Launch Options - Once done, launch the game and check if it still stutters.
2. Turn off Ray Tracing, and lower down graphics Settings
Ray tracing is used to render the scene realistically because it simulates the lightning of the scene and its object, which is why it requires more GPU power, which definitely dops FPS even with the high and powerful GPU. It can also stutter and freeze the game.
Moreover, if you have high graphics settings, try low settings because it offloads the GPU, which helps run the game without stuttering, lagging, and freezing.
To lower down graphics settings:
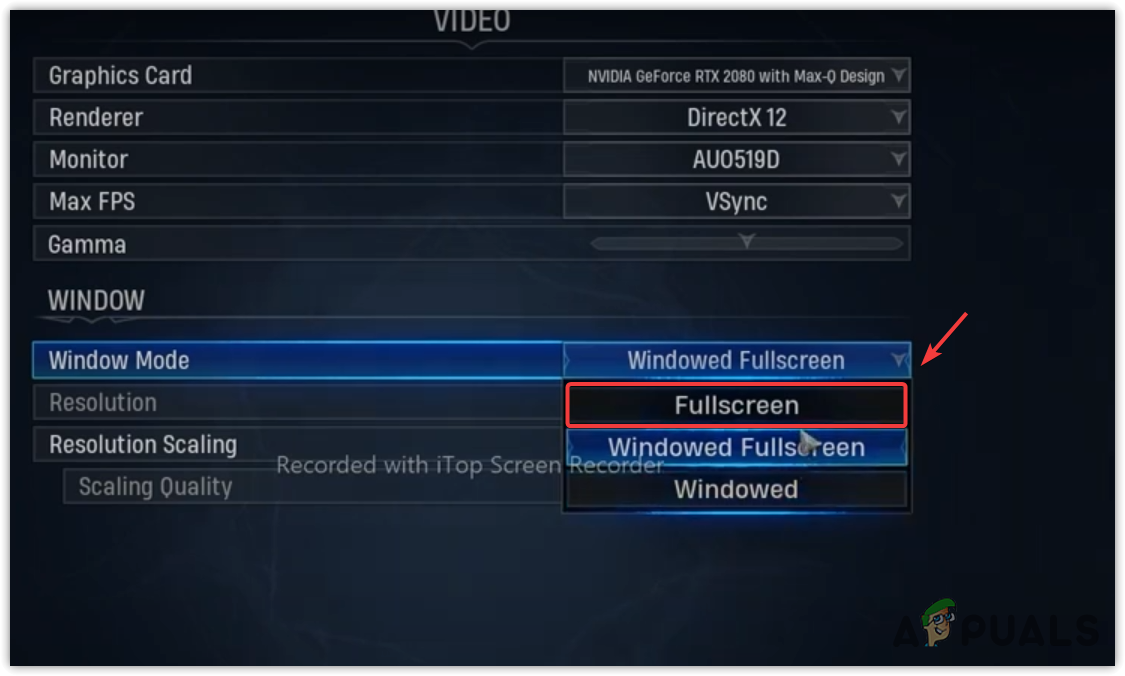
- Launch the game and go to Options.
- Then, go to Video from the top.
- Select Full Screen from the Window Mode, then change Max FPS to your monitor hertz.
Reducing Graphics Settings - After that, go to Graphics from the top.
- Turn off Ray Tracing Reflections, change Depth Of Field and Motion Blur to Epic or low.

Turning Off Ray Tracing, Motion Blue, and Depth Of Field - Once done, restart the game to see if the issue persists.
3. Verify the Integrity of Game Files
Usually, when a game starts bugging and experiencing stutters, it is mostly due to the corrupted game files that need to be replaced or restored. You can verify the game files with the help of the following steps according to your launcher.
3.1 Steam
- Launch Steam and go to Library.
- Right-click Marvel’s Midnight Sun and go to Properties.

Opening Game properties - Then, go to Local Files and click Verify Integrity Of Game Files.
Note: It can take up to several minutes, depending on your internet speed.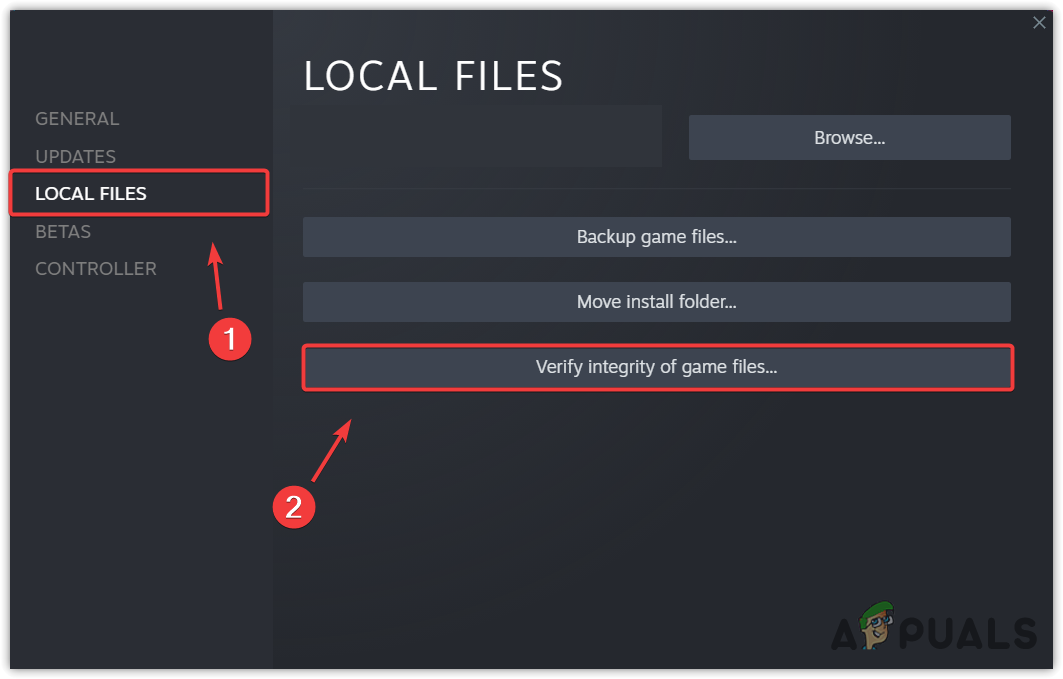
Verifying Integrity Of Game Files - Once done, launch the game to see the changes.
3.2 Epic Games
- Launch Epic Games and navigate to Library.
- Click three dots on Marvel’s Midnight Sun and go to Manage.
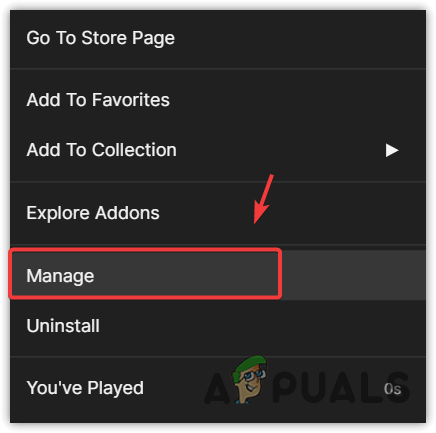
Opening Game Manage Settings - Click Verify and wait for it to finish.
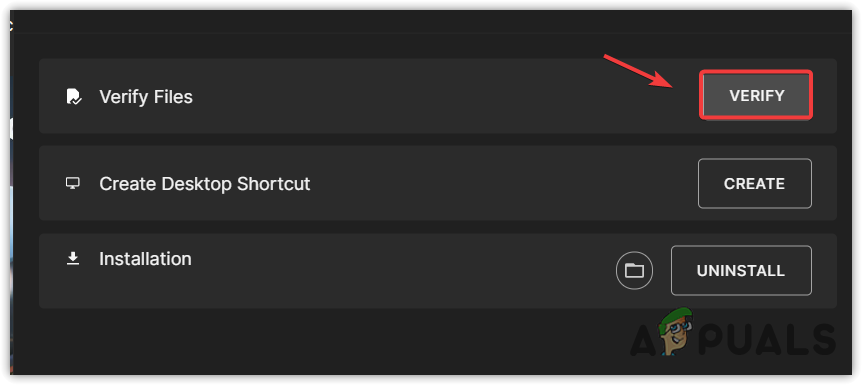
Verifying Marvel’s Midnight Suns Game Files - Once done, launch and see if your problem is resolved.
4. Run the Game in Administrative Mode
Running with administrator privileges helps bypass security issues and also helps access the essential DLL and configuration files required by the game to run properly. Hence, if you haven’t tried running it as an administrator, do it by following the instructions.
To run as administrator:
- Right-click Marvel’s Midnight Sun from the desktop. If you don’t have a shortcut, then open Steam and go to Library.
- Right-click the game, hover over Manage and click Browse Local Files.
- Right-click the MidnightSuns.exe and select Run as administrator.
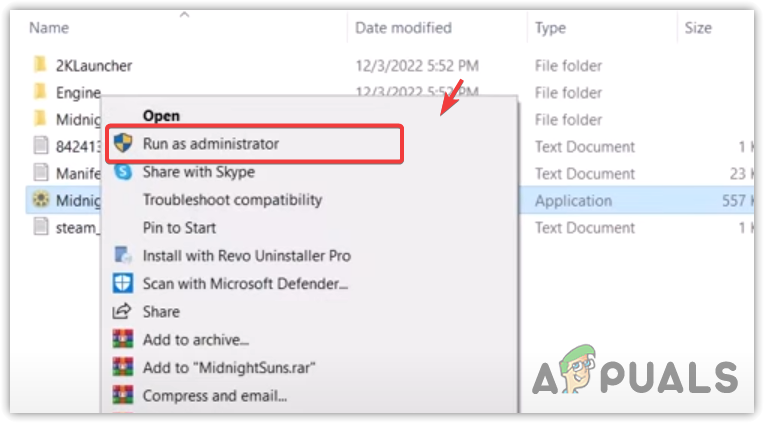
Running Marvel’s Midnight Suns as administrator - Wait for the game to launch, then check if the issue persists. If it is fixed, make right-click on MidnightSuns.exe and go to Properties.
- Then, go to the Compatibility tab and tick Run this program as an administrator.
- Click Apply and click OK.
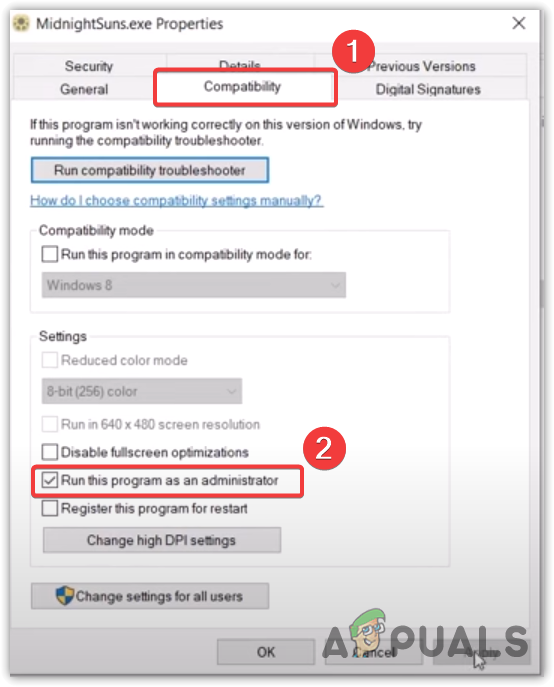
Changing Compatibility Settings to always run Marvel’s Midnight Suns with administrator privileges - If you did not follow the 1st method of this article, then repeat all these steps with a MidnightSuns-Win64-Shipping.exe file which is located in the Binaries\Win64 folder from your game directory.
5. Run the Game with the High Graphics Preference
Graphics Preferences settings allow users to run programs with High Performance or Power Saving. By using high performance, you will be able to run the game with your dedicated GPU with the high performance, which consumes more GPU power. But if you use the Power Saving option, the program will use an integrated GPU, which will consume less power and provides low performance.
If Marvel’s Midnight Suns is running with low performance, it can be a result of running the game with power-saving mode. You can change graphics preferences settings to High Performance to see if the issue is fixed or not.
To change the graphics preferences settings:
- Press the Windows key, and type Graphics Settings.
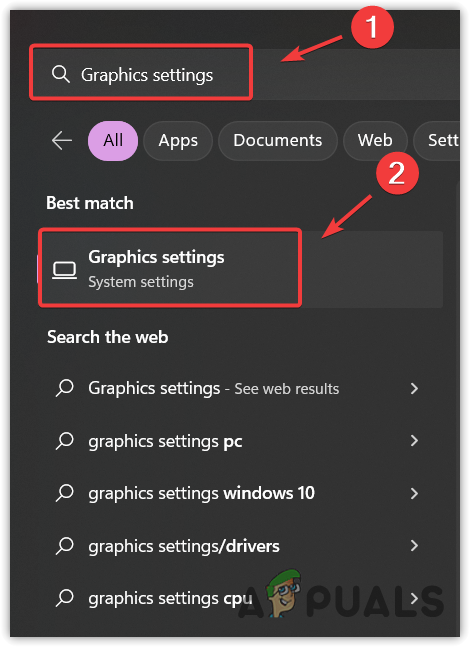
Opening Graphics Preferences Settings - Open the settings and click Browse.
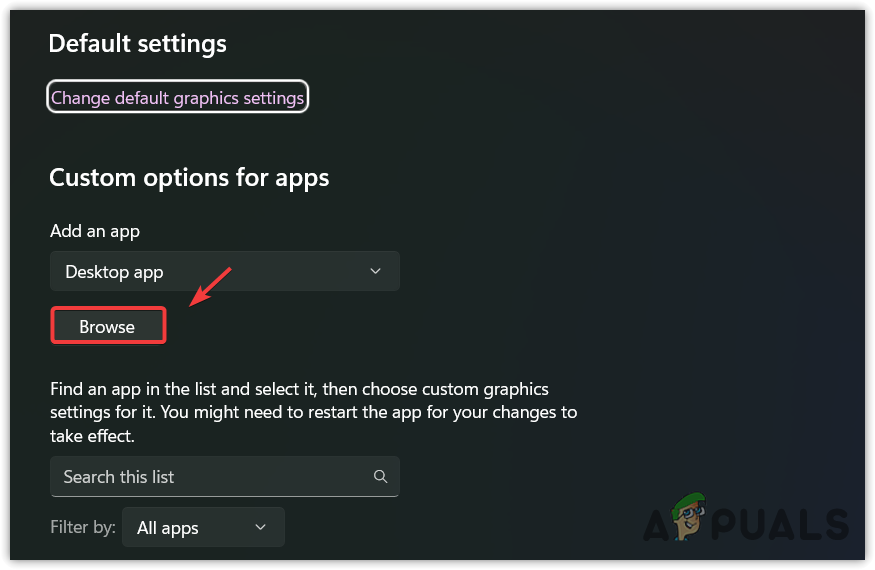
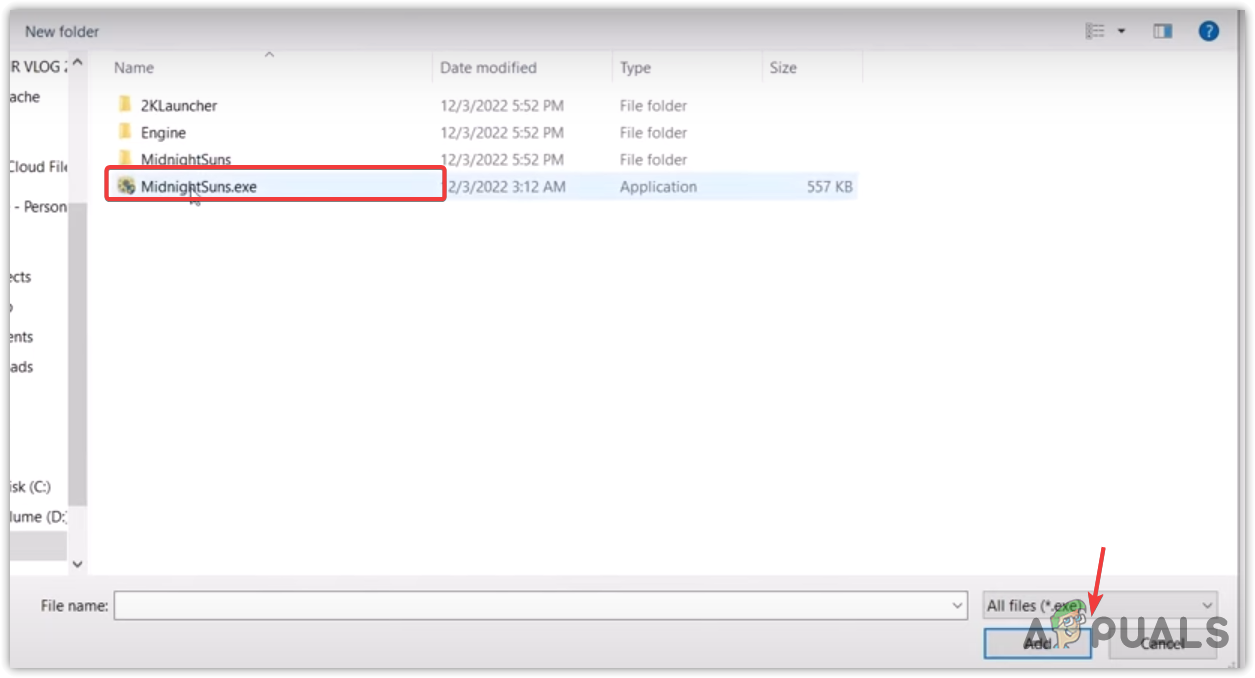
Proceeding to browse the game exe file - Navigate to the game directory and select MidnightSuns.exe.
- Then, click Add.
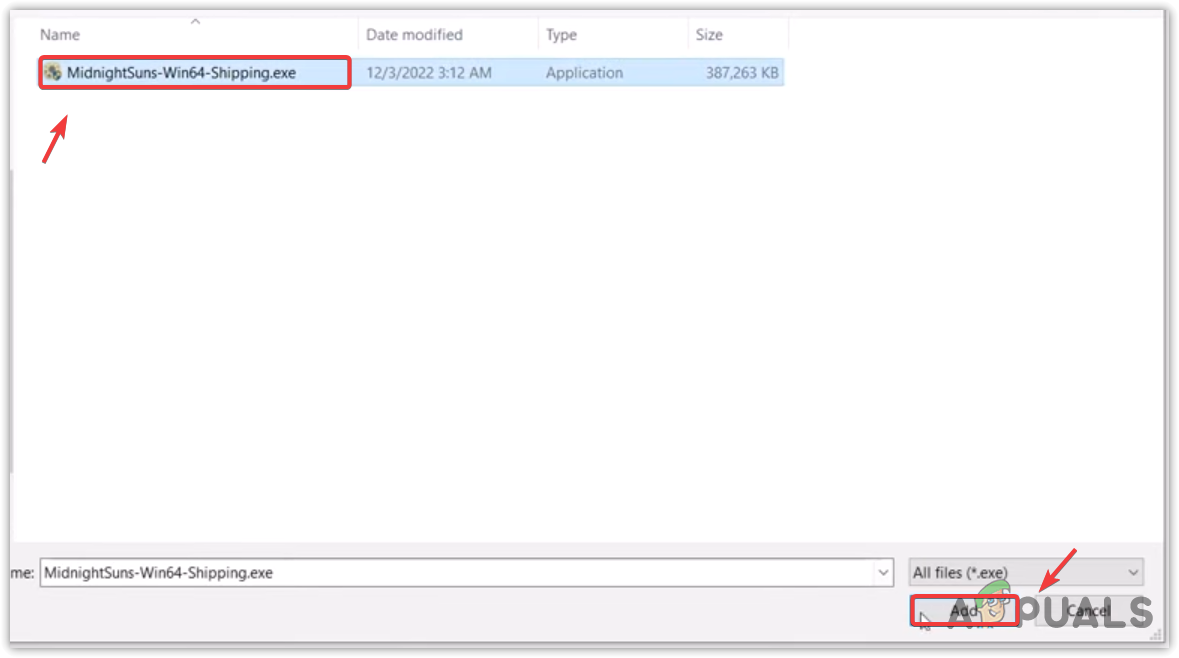
Adding Midnight Suns executable file to graphics preferences settings - Additionally, again, click Browse, and from the game directory, navigate to MidnightSuns > Binaries- >Win64.
- Select MidnightSuns-Win64-Shipping.exe and click Add.
Adding MidnightSuns-Win64-Shipping executable file to graphics preferences settings - Once you added both, select them one by one.
- Click Options and select High Performance.
- Then, click Save.
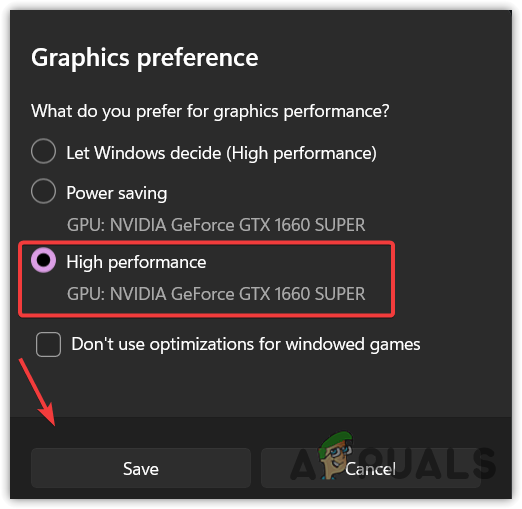
Changing Graphics Preferences Settings for Marvel’s Midnight Suns - Once done, launch the game and check if it is stuttering or not.
6. Do a Clean installation Of GPU Drivers
Outdated graphics drivers cause games to stutter, lag, and freeze. They impact not only PC performance but also cause overall stability issues. If you don’t keep your drivers up to date, the problem can result from outdated drivers. To ensure that, either update or reinstall graphics drivers.
We recommend clean installation of graphics drivers using Display Driver Uninstaller. It is an application used to remove system drivers along with registry files.
To clean install GPU drivers:
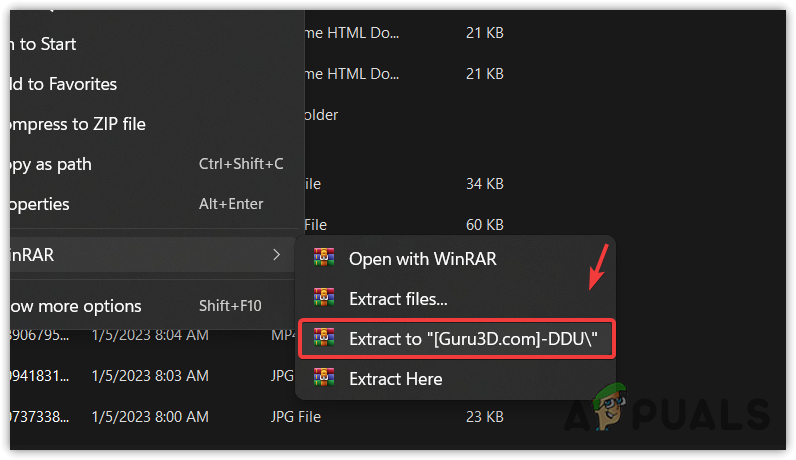
- Download Display Driver Uninstaller using the link.
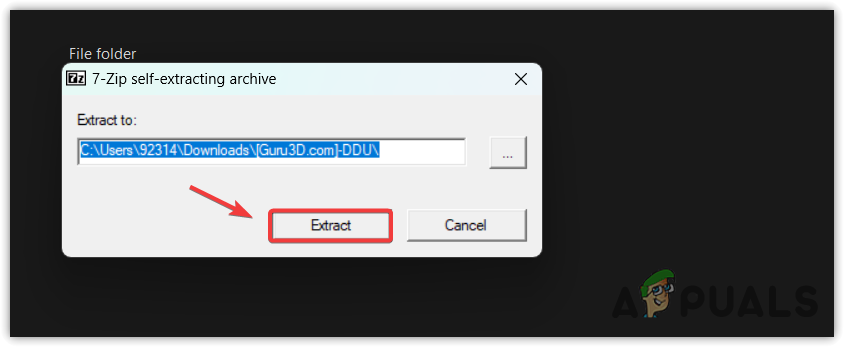
- Once it is finished, right-click the DDU folder and select Extract to DDU.
Extracting DDU zip folder using WinRar - Once the extraction is finished, navigate to the DDU folder.
- Run the Display Driver Uninstaller application extension.
- Click Extract and go to the folder.
Extracting DDU installer - Now launch the Display Driver Uninstaller.
Note: DDU recommends their users uninstall drivers in Safe Mode. - Select the Device Type and GPU vendor from the right side.
- Once done, click Clean and restart.
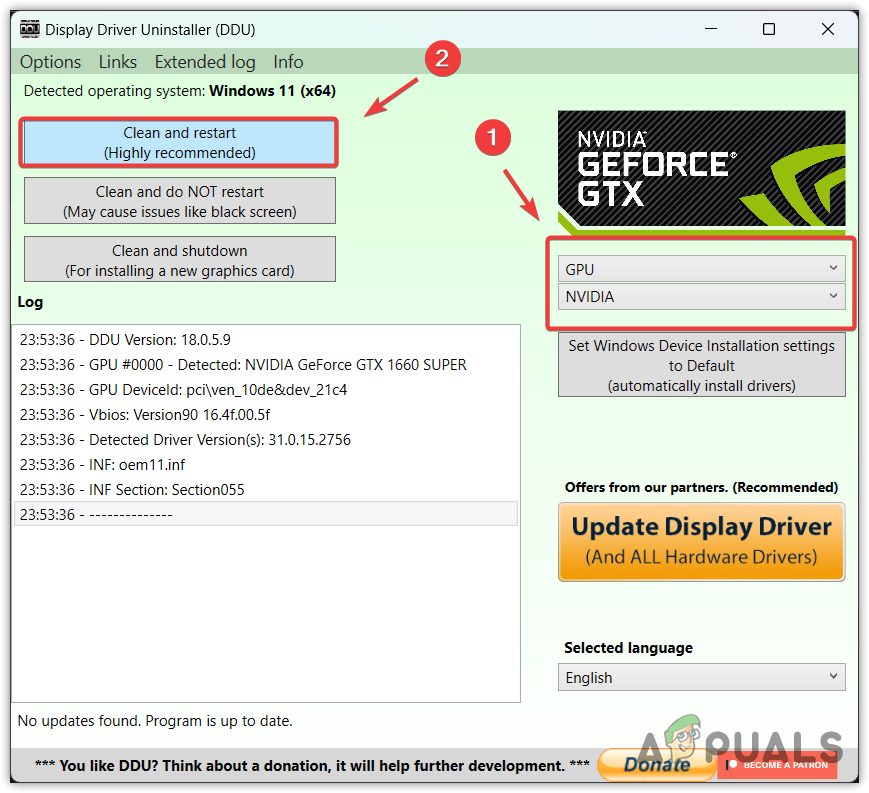
Uninstalling Graphics Driver using DDU - Once your system restarts, go to your GPU manufacturer’s website and download the driver from there.
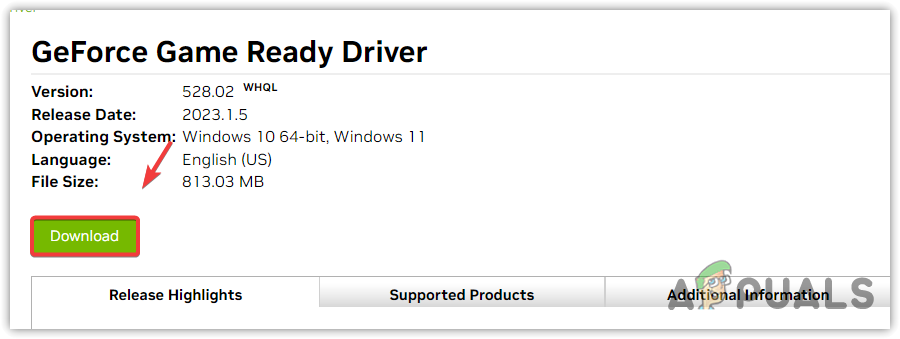
Downloading the Latest Graphics Driver - Once done, install it using the on-screen instructions.
- Again restart your computer and launch the game and check if the stuttering issue is fixed.
7. Give High Priority to the Game in Task Manager
Running a program with high priority means you are telling a computer to give low priority to other processes and focus on running the high-priority task. If your game is lagging, stuttering, and freezing, changing the priority to high can help avoid these issues.
To change the priority of Marvel’s Midnight Suns:
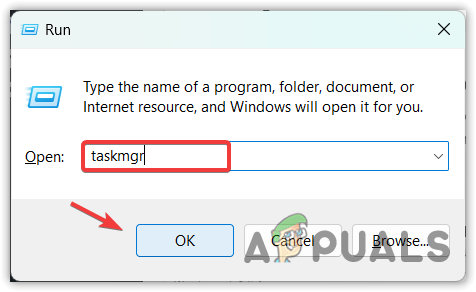
- Press Windows + R to open the Run Program.
- Type taskmgr and hit the Enter Key.
Opening Task Manager - Now go to the Details tab from the Menu bar and select Marvel’s Midnight Suns.
- Right-click on Marvel’s Midnights and then click on Set Priority.
- Select High from the list.
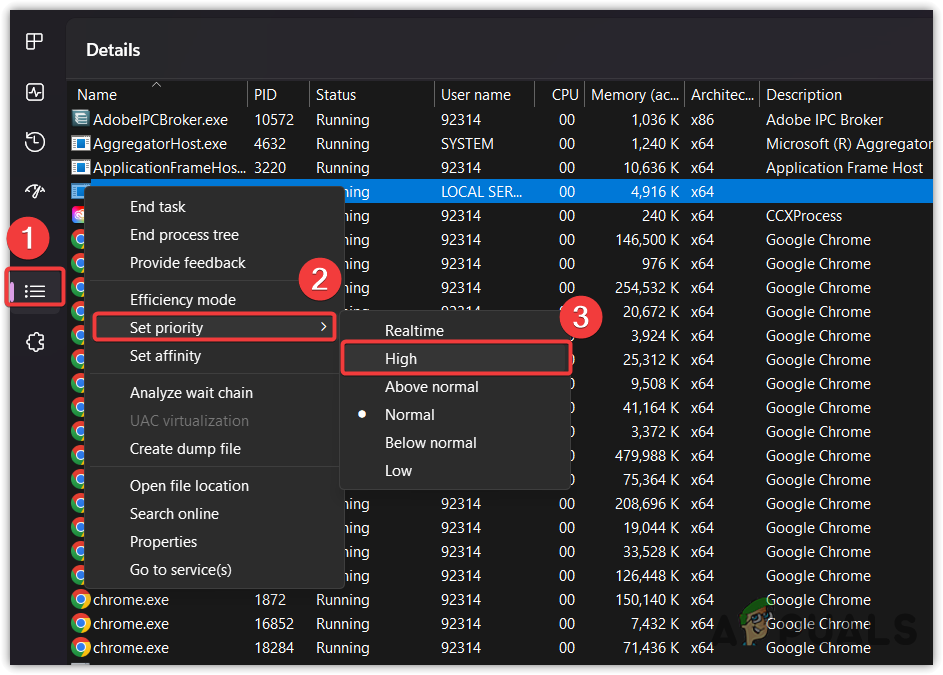
Prioritizing Marvel’s Midnight Suns from Task Manager - Close the Task Manager and relaunch the game.
8. Check for Windows Updates
Typically outdated Windows has old features that can lower the game performance, which can cause the game to stutter and freeze. If you don’t update your Windows, we recommend you update it by following the instructions.
To update the Windows:
- Click Start Menu and type Check for updates.
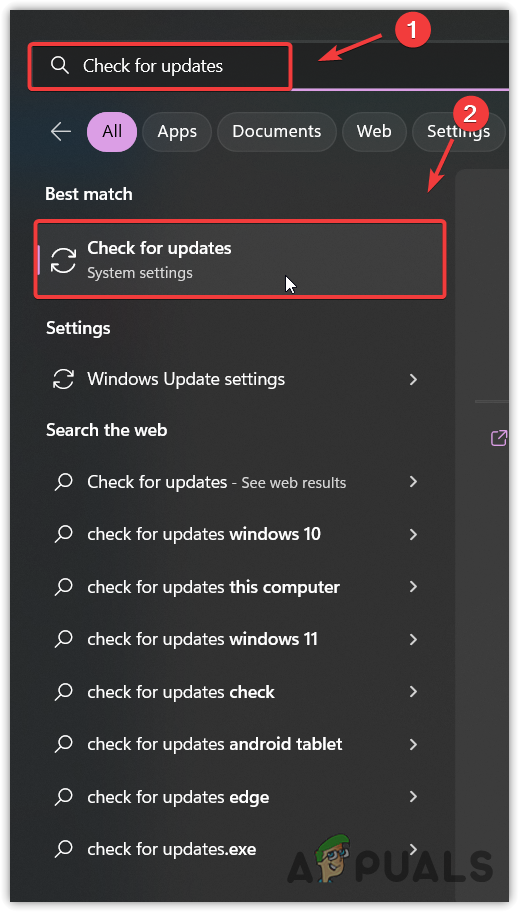
Navigating to Windows Update settings from Start Menu - Open the settings and click Check for updates.
- If Windows find the pending updates, download them.
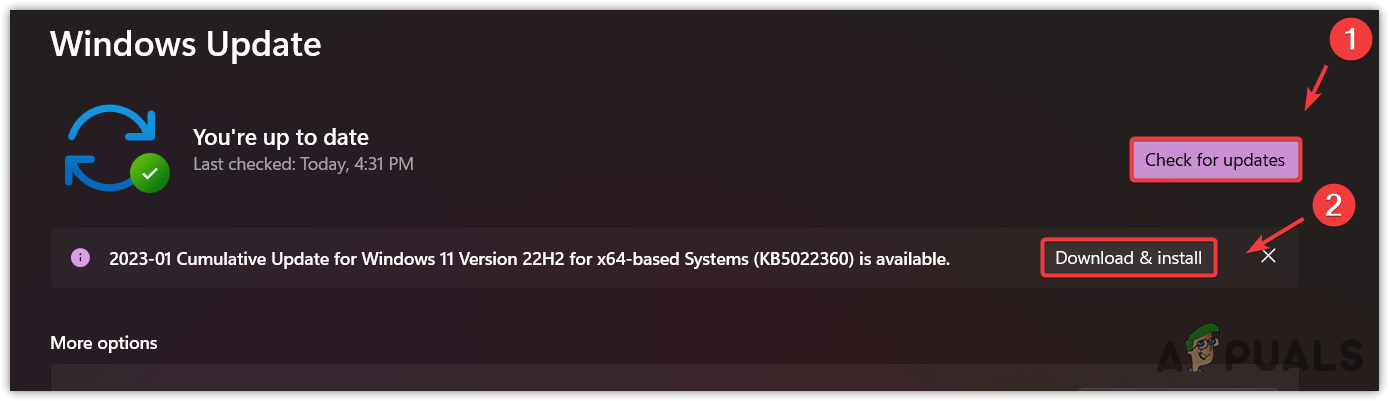
Installing pending Windows Updates - Once done, install them, and restart your computer for the changes to take effect.
- Launch the game and check if the game is still lagging.
9. Disable Steam Overlay and background applications
Running overlay and background applications consumes high memory usage, which can cause RAM to run out of memory, forcing the game to stutter and freeze. Hence after disabling the Steam overlay, make sure to close the unnecessary overlay and background applications.
To disable the Steam overlay:
- Open the Steam application and go to Library.
- Right-click Marvel’s Midnight Suns and go to Properties.
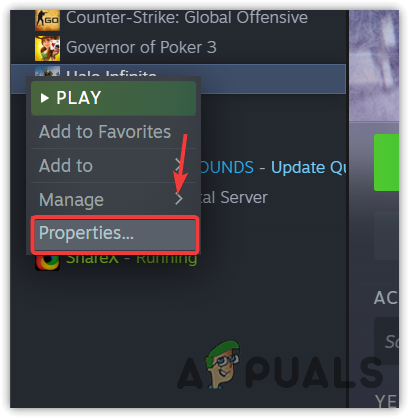
Opening Marvel’s Midnight Suns Properties - Untick Enable the Steam Overlay while in-game.
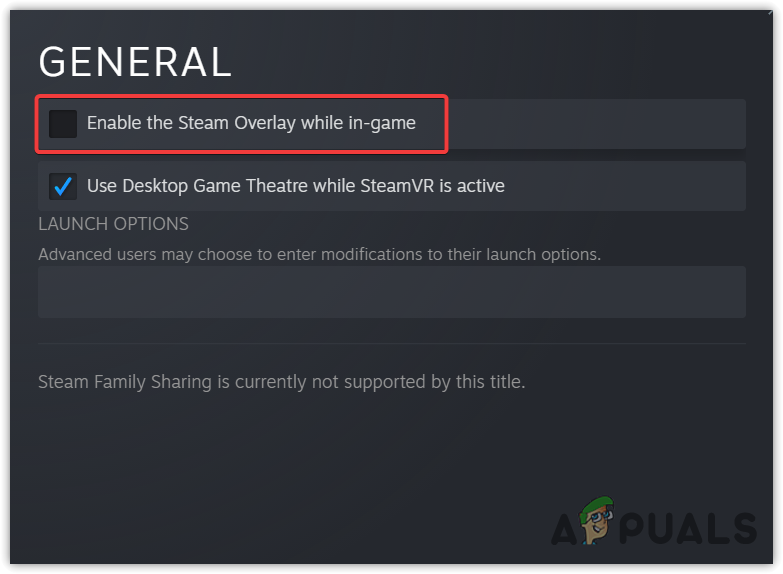
Disabling Steam Overlay - Once done, close the Window and launch the game to see whether the issue is fixed or not.
10. Reinstall Marvel’s Midnight Suns
If all the solutions have failed to fix your issue, the final method is to reinstall Marvel’s Midnight Suns. If you have installed the game on a hard disk, try to transfer it to SSD if you are facing lag in your game. Moreover, you can try upgrading your Graphics Card and RAM to at least minimum game requirements.
To reinstall Marvel’s Midnight Suns:
10.1 Steam
- Open Steam, go to Library.
- Right-click Marvel’s Midnight Suns, hover Manage and click Uninstall.
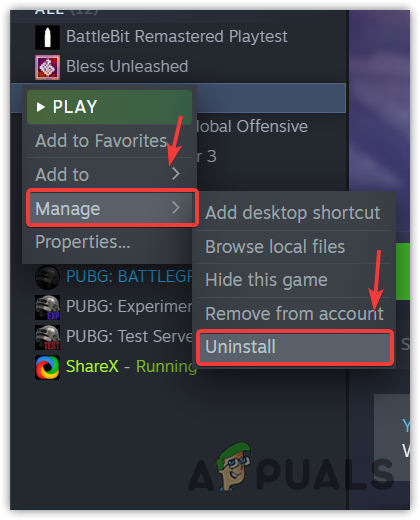
Uninstalling Marvel’s Midnight Suns - Again, click Uninstall.
- Once done, install it and see if the problem is resolved.
10.2 Epic Games
- Launch Steam and go to Library.
- Click Three dots on Marvel’s Midnight Suns and select Uninstall.
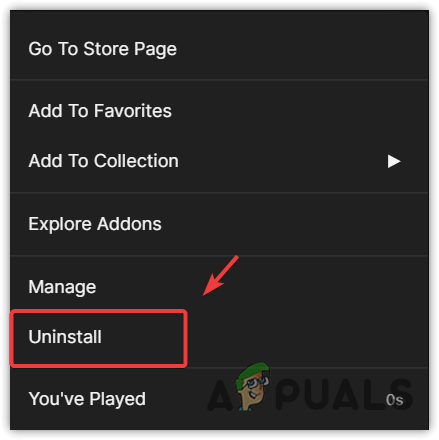
Uninstalling Marvel’s Midnight Suns on Epic Games - Finally, click Uninstall.
- Once done, install the game to check if the issue persists.
Marvel's Midnight Suns from Stuttering - FAQs
Marvel’s Midnight Suns stutter when it is launched through the 2K launcher. If you launch the game through Steam or Epic Games, it will open the 2K launcher first, which causes the game to stutter.
Running Marvel’s Midnight Suns with the 2K launcher is the leading cause that triggers the stuttering issue. However, using high graphics settings, such as enabled Ray Tracing and using Motion Blur or Depth Of Field with max settings, overloads the GPU, which primarily causes the game to stutter.
To fix the stuttering issue on Marvel’s Midnight, you will have to go to your game directory and then launch the game by clicking the MidnightSuns.exe file. This will only open the game without a 2K launcher, which will prevent the game from stuttering.


