How to Fix iTunes cannot connect error 0x80090302 on Windows 10?
Make sure your network connection is active and try again
Some Windows users are reporting that they are seeing the 0x80090302 error ‘Make sure your network connection is active and try again’ code every time they attempt to use the iTunes application to do download podcasts or other types of audio media in order to play them locally. For some users, the issue occurs during the sign-in procedure (immediately after they open iTunes).

Since the issue might very well be caused by a conflict between iTunes and a pending Windows 10 update, start this troubleshooting guide by updating iTunes to the latest version. If that doesn’t work or you already have the latest version, run the Windows App Troubleshooter or do a complete iTunes reinstall.
Method 1: Updating iTunes to the latest version
This issue might be the result of a conflict between the desktop version of iTunes and a Windows 10 update. Fortunately, Apple already fixed this incompatibility via an update that was pushed automatically to iTunes.
If the Auto-Updating function is disabled, you should be able to get the issue resolved by performing the update manually.
To update iTunes to the latest version, click on Help (from the ribbon bar at the top), then click on Check for updates.
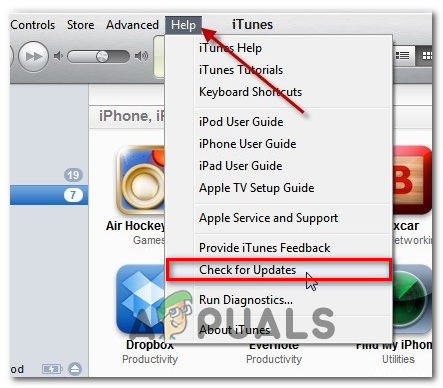
If a new version of iTunes is available, the utility will automatically download & install it. After this happens, restart iTunes and return to Help > Check to see if you still have the latest version.
If you already had the latest iTunes version, move down to the next method below.
Method 2: Running Windows Apps Troubleshooter
As it’s been confirmed by several different users that encountered this same issue, the 0x80090302 error will most likely appear due to some type of file corruption inside the iTunes folder.
Fortunately, there’s one way of fixing this automatically – By running the Windows App troubleshooter in order to identify the problem and then by applying the recommended fix.
Note: This fix is only applicable if you are encountering the 0x80090302 error with the Universal Windows Platform (UWP) version of iTunes.
Several affected users have confirmed that this operation allowed them to fix the issue automatically. After going through all the steps, they were able to sign in to iTunes successfully and download audio media locally without issues.
Here’s a quick guide on running the Windows Apps Troubleshooter in order to fix the issue:
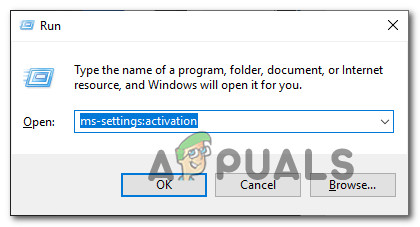
- Press Windows key + R to open up a Run dialog box. Next, type ”’ms-settings:troubleshoot” inside the text box and press Enter to open up the Troubleshooting tab of the Settings menu.
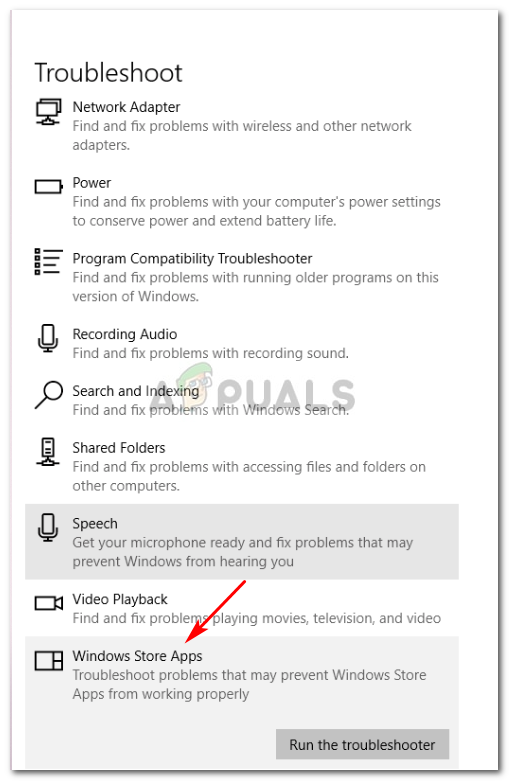
Accessing the Activation troubleshooter - From the Windows Troubleshooting tab, move to the right section of the screen and scroll all the way down to the Find and Fix other problems section. Next, click on Windows Store Apps and click on the Run the Troubleshooter to open up the utility.
Run Windows Store Apps troubleshooter - Once you’re inside the Windows Store Apps utility, wait patiently until the initial scan is complete. If a viable repair strategy is found, follow the on-screen prompts to apply the recommended fix (depending on the issue that you’re dealing with). Click on Apply this fix to apply the recommended fix.
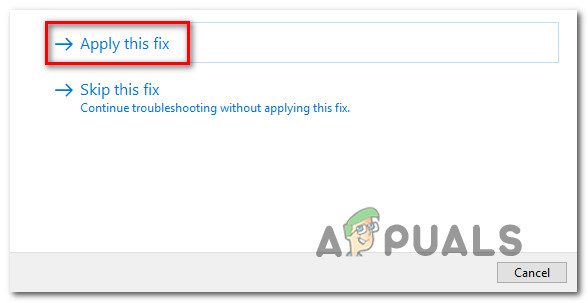
Apply this fix Note: Depending on the problem that is identified, you might need to do a series of manual adjustments.
- Once the fix is successfully applied, restart your computer and see if the problem is resolved once the next startup is complete.
In case the same problem is persisting, move to the next potential fix below.
Method 2: Reinstalling iTunes
Since the 0x80090302 error is most likely caused by some type of file corruption originating from the iTunes folder, you should be able to fix the issue by reinstalling the iTunes app – updating the app might not do the trick.
Corruption problems like this one usually appear after a malware infection or after an antivirus scan ended up quarantining some files from the iTunes installation folder. If this scenario is applicable, you will be able to fix the issue by uninstalling iTunes and redownloading the latest version.
But keep in mind that the steps of doing this will be different depending on the iTunes version that you’re using on your Windows computer – desktop version or UWP (Universal Windows Platform).
To accommodate both types of users, we created two separate guides that will help you reinstall the iTunes app. Follow whichever guide is applicable to the iTunes application that you are using.
Option 1: Reinstalling iTunes UWP
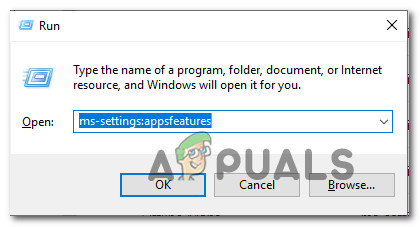
- Open up a Run dialog box by pressing Windows key + R. Next, type ‘ms-settings:appsfeatures’ and hit Enter to open up the Apps & Features tab of the Settings app.
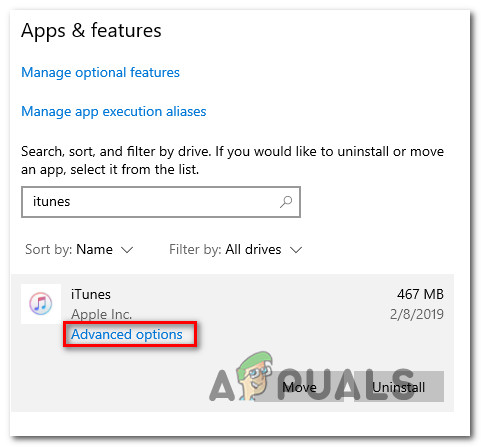
Accessing the Apps & Features Menu - Once you’re inside the Apps & Features menu, make use of the search function directly under Apps & Features to search for ‘iTunes’. Next, click on the Advanced options.
Accessing the Advanced Options menu of iTunes - Once you’re inside the Advanced options menu of iTunes, scroll all the way down to the Reset tab and click on the Reset button.
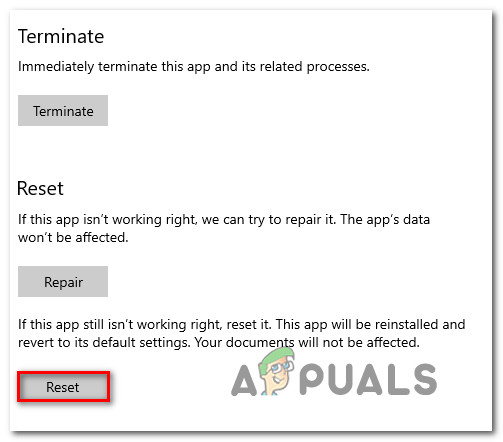
Resetting the iTunes app - Click Reset at the final confirmation prompt to start the resetting process, then wait for the operation to complete. The state of the iTunes app will be reverted back to its default status and every component will be reinstalled.
Note: Any iTunes media that you are storing locally will not be affected by this reset operation. - After the process is complete, open iTunes again and see if the issue is now resolved.
Option 2: Reinstalling iTunes (desktop version)
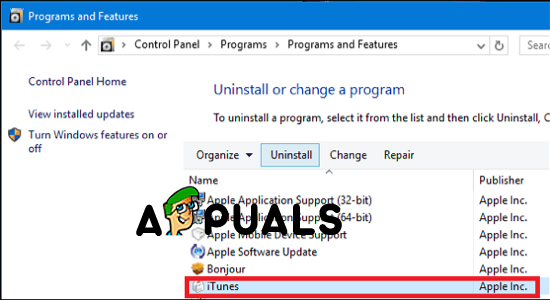
- Open up a Run dialog box by pressing Windows key + R. Next, type ‘appwiz.cpl’ inside the text box and press Enter to open up the Programs and Features window.

Type appwiz.cpl And Press Enter to Open Installed Programs Page on Windows - Once you’re inside the Programs and Features screen, scroll down through the list of applications, right-click on the iTunes app and choose Uninstall. Next, follow the on-screen instructions to complete the uninstallation process.
- After the main iTunes application is uninstalled, repeat the same uninstallation procedure with the rest of Apple’s complementary software. You can filter the list of programs via Publisher and uninstall everything signed by Apple Inc.
- Once everything relevant is uninstalled, restart your computer and wait for the next startup to complete.
- After the next successful boot, visit this link (here) from your default browser and click on Windows (under Looking for other versions).

Downloading the desktop version of iTunes - After the executable is successfully downloaded, open it and follow the on-screen prompts to reinstall iTunes on your computer.
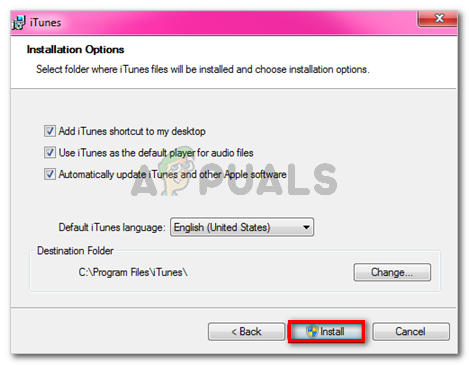
Installing iTunes on your computer Note: This operation will also install the complementary software that you previously uninstalled at step 3.
- As soon as the installation is complete, reboot your machine and see if the problem is resolved at the next system startup.