How to Tune an AMD Ryzen 3000 series CPU with CTR – Advanced Guide
On September 29th, 2020, Yuri Bubily (who goes by the handle @1usmus) launched his amazing new tool known as Clock Tuner for Ryzen. This tool was expected to be an incredible auto-overclocking tool that could use the built-in testing features to find out the ideal overclocking and undervolting values for your CPU. CTR was specifically designed to fine-tune AMD Ryzen 3000 series processors based on the Zen 2 architecture. The tool could also estimate the silicon quality of a particular Ryzen 3000 series processor based on the potential for overclocking or undervolting that the tool calculated.
This opened a large number of doors for people who were previously unwilling to manually overclock or undervolt their Zen 2 based Ryzen processors. Overclocking using the BIOS can be a tedious and somewhat difficult process especially if you’re new to the whole overclocking world. CTR takes away that tiresome process and allows the users to experience an auto-overclocking tool that actually works well for the first time.
Performance and Architecture of Ryzen 3000
The AMD Ryzen 3000 series is based on the Zen 2 architecture. The series was tremendously successful among mainstream gamers and content creators due to its excellent value and higher core counts at lower prices as compared to Intel’s offerings. AMD’s Ryzen processors are also unlocked across the board which means that they are ready for overclocking or undervolting provided you have a B or X series motherboard like a B450, B550, X470, or X570 chipset motherboard. To successfully use the CTR tool we must understand the basics of the AMD Zen 2 architecture behind these Ryzen 3000 series chips.
Core CompleX Design
AMD’s Zen 2 architecture uses a chiplet based design which means that the CPU itself is actually made up of smaller silicon clusters called chiplets. Each chiplet is actually a Core CompleX or CCX, which means that each chiplet contains a certain number of cores. In Zen 2, each chiplet could hold up to 4 cores, while Zen 3 increased this number up to 8. These cores share the 32 MB of L3 cache, so one chiplet in a Zen 2 CPU could communicate with 16MB of L3 cache at a time. The chiplets or CCXs were interconnected with each other through a high-speed link called the Infinity Fabric.
When it comes to overclocking it is important to pay attention to the individual cores inside each CCX. Now due to the variation in silicon quality, each core will have different maximum boosting potential. If we take an 8 core CPU split across 2 CCXs, we can find the fastest overall core and a slowest overall core in those 8 cores. The key here is that we will always be limited by our slowest core in each CCX. That’s why the distribution of cores matters in AMD Ryzen processors using the CCX configuration. CTR by 1usmus automatically finds the fastest and slowest cores of each CCX and suggests overclocking and undervolting values according to the CCXs boosting potential.

Precision Boost
Another thing to keep in mind before we start overclocking using CTR is the pre-existing auto overclocking feature of Ryzen processors known as Precision Boost. This technology is similar to GPU Boost in the modern graphics cards, where it auto overclocks the processor to as high as it can go before it reaches thermal or power limits. Precision Boost is a built-in feature of Ryzen processors and can be enhanced even more if a feature known as Precision Boost Overdrive (PBO) is enabled in the BIOS. It is important to keep in mind that CTR takes over from that algorithm, and provides a locked all-core (dependent on CCXs) boost frequency when overclocking.
Silicon Quality
The auto-overclocking feature of the CTR tool by 1usmus depends heavily on the silicon quality of your CPU. Not all CPUs with the same name are actually the same. The actual silicon inside the CPUs of the same family can vary from one to the next. This is what gives us the variable boosting potential and the resulting variable overclocking abilities. This can also simultaneously have an impact on how much voltage you need to sustain a particular boost clock, thus affecting temperatures.
Silicon Lottery
One of the major contributors to a higher successful overclock in CTR is just silicon lottery. In case you’re not familiar with this term, silicon lottery means that the quality of the silicon that you receive within your CPU (or graphics card for that matter) depends on a randomized sequence resulting in a luck-of-the-draw situation. Some buyers might receive CPUs that do not overclock well at all, while some may have CPUs that overclock very high at low voltages. The latter is said to be a situation in which the user “won the silicon lottery”. CTR definitely benefits from a chip with better quality silicon.
The silicon quality also tends to get better with the maturation of the manufacturing process. As the manufacturing process gets older, it tends to get more mature, resulting in higher yields and a better quality silicon. AMD’s 3000 series Ryzen processors are built on TSMC’s 7nm manufacturing process which AMD has been using for 2 years now at the time of writing. This is more than enough time for a process to get mature, which means that the CPUs produced during the later period of the manufacturing process will tend to have a higher silicon quality, and can thus produce higher and more stable overclocks with CTR.
What does CTR by 1usmus do?
Following are some of the important things that ClockTuner for Ryzen can help the user do:
- CTR can provide specific overclocking (or undervolting) values for each specific CCX in the CPU by testing the boosting potential of each core in the CCXs.
- CTR can allow the user to fine-tune the clock speeds to their liking even after it provides recommended overclocking values.
- It can also find the optimal voltage settings for your CPU based on the stress tests that it performs during the auto-overclocking stage.
- CTR displays the CPU sample information, allowing the user to know information about their silicon quality by categorizing CPUs into Bronze, Silver, Gold, and Platinum sample categories.
- It can help tremendously in lowering the temperatures of your CPU without even undervolting the processor. Locking the cores to an all-core consistent boost and optimizing the voltage helps lower the temperatures significantly.
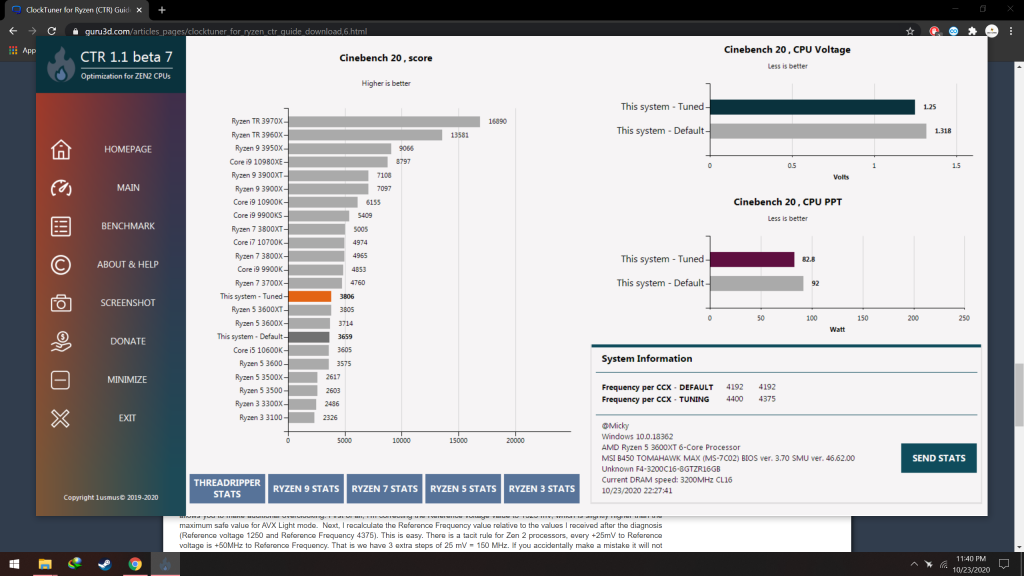
- CTR tends to increase the performance of the CPU by providing optimal boost values and the lowest voltage necessary to achieve those boost targets. It also displays a “Before/After” performance comparison using Cinebench R20.
- CTR can also stress-test your final overclock using the built-in Prime95 test.
- Finally, CTR is an auto-overclocker. This means that it allows the user to kick back and grab a cup of coffee while it finds the ideal overclocking and voltage settings for your CPU.
Requirements
1usmus lists the following necessary requirements for different categories. It is important to comply with these requirements exactly.
Hardware Requirements
Make sure that your PC hardware is actually compatible with CTR by 1usmus. Remember, the tool is still new so there will be some compatibility caveats.
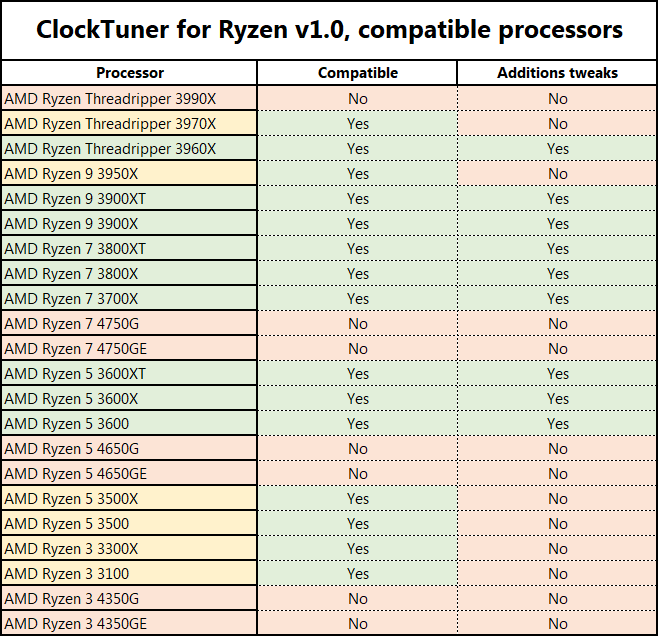
- An AMD Ryzen 3000 series CPU based on the Zen 2 architecture. This means that APUs like the Ryzen 3 3200G etc will not be supported because they’re actually based on the Zen+ architecture. You’ll also want to avoid the AMD Ryzen Threadripper 3990X as it is also not compatible with CTR as of the time of writing.
- An AM4 socket motherboard based on the chipsets 350/370/450/470/550/570.
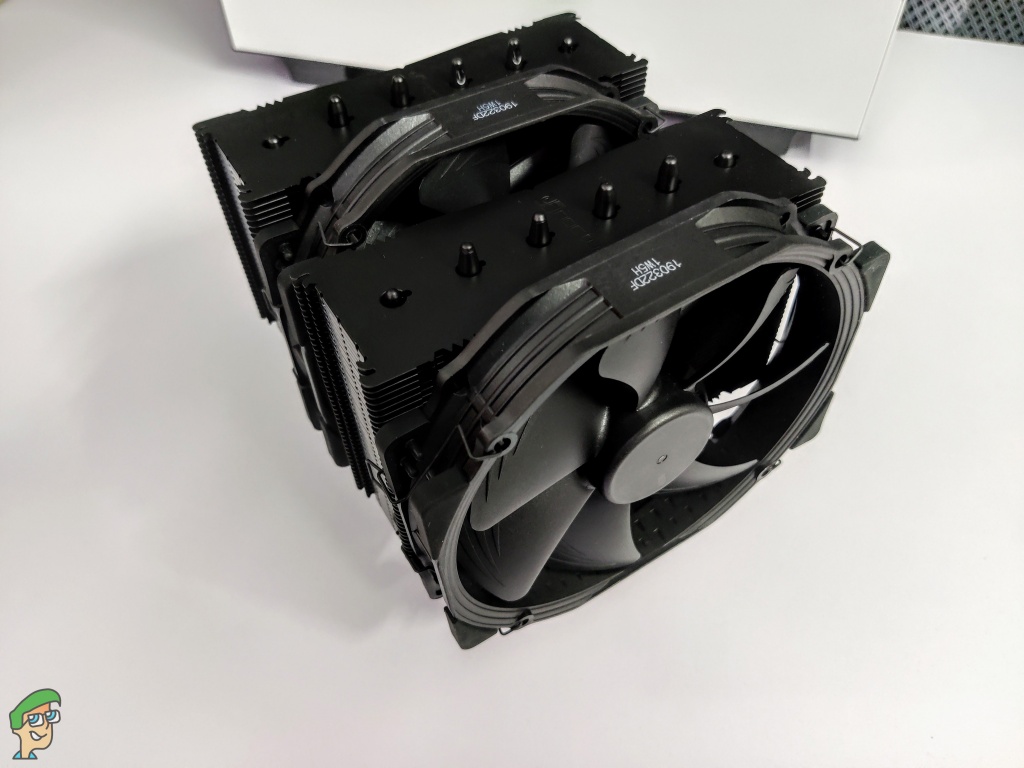
- An adequate cooling solution. It is recommended to attempt overclocking using only aftermarket coolers as the stock coolers may not be able to dissipate the extra heat if the overclock demands more power.
General Requirements
Here are some other requirements that need to be kept in mind:
- Windows 10 x64 1909-2004 build and newer (type ‘winver’ in Run to quickly reveal your OS build)
- .NET Framework 4.6 (and newer)
- Any power profile is compatible with CTR.
- Stable RAM overclocking or Stable XMP profile
BIOS Requirements
Some of the most crucial requirements are related to the BIOS. Double-check these settings before proceeding.
- BIOS with AGESA Combo AM4 1.0.0.4 (and newer); check with CPU-Z
- CPU Voltage – Auto
- CPU Multiplier – Auto
- SVM (Virtualization) – disabled
Load Line Calibration (LLC) settings:
- ASUS – LLC 3 (Level 3)
- MSI – LLC 3
- Gigabyte – in most cases Turbo, but it can also be Auto
- ASRock is Auto or LLC 2; Importantly, CTR is mediocre compatible with ASRock motherboards, as all LLC modes show abnormally high Vdroop
- Biostar – Level 4
It is recommended to use the following additional settings for ASUS motherboards
- Phase mode – Standard
- Current capability mode – 100%
Software Requirements
The following software needs to be installed (Links are provided):
- CTR Archive
- Ryzen Master 2.3
- Cinebench R20, (put the downloaded extracted contents into the CB20 folder of the CTR Archive, CTR will use CB for testing). You should also run the CB R20 app, accept the license agreement, and then close the app before starting the process with CTR.
Impact of Motherboard and Cooling
It is important to keep in mind that your final overclocking or undervolting results can depend heavily on your system configuration. Mainly, the quality of VRMs on your motherboard, and the amount of cooling potential of your CPU cooler, can have a big impact on the final values.
Motherboards with better VRMs and power delivery system like the higher-end X570 boards will likely provide a higher final boost clock to the CPU at lower voltages. The difference is not significant to warrant a motherboard upgrade, but it is worth mentioning.
Similarly, a custom loop cooler or an all-in-one liquid cooler can unlock significantly more overclocking potential than a normal air cooler. It is advised to at least acquire a decent tower air cooler, or a similarly performing liquid AiO, before attempting the overclocking using CTR for the best results.
Method
Now that we have established an understanding of the mechanism behind the process and its pre-requisites, let’s jump right into the actual method of using CTR.
Understanding CTR software
The ClockTuner software is pretty straightforward in operation, however, it might seem a bit confusing when viewed for the first time. 1usmus has done a pretty good job of categorizing the various options that CTR offers. Let’s dissect the UI and the various tabs offered by the CTR Software.
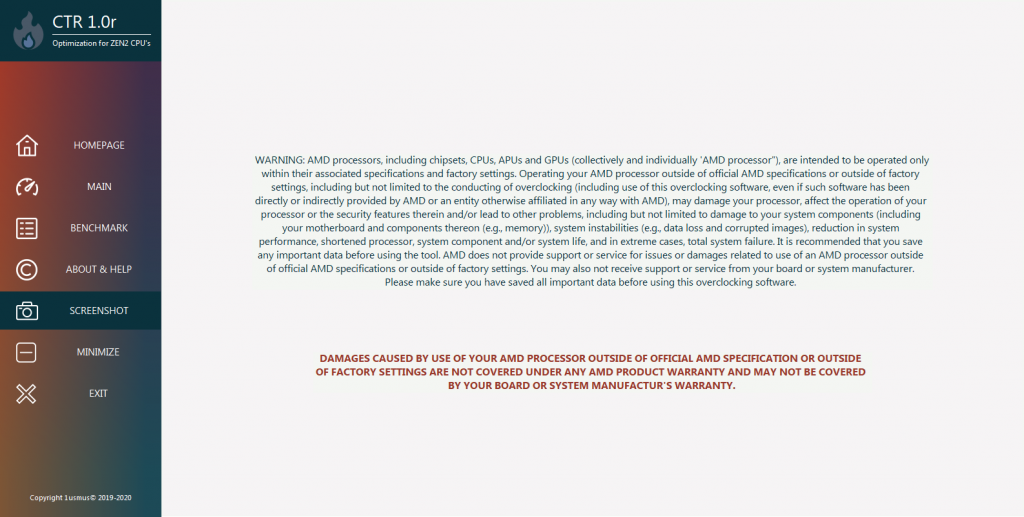
- Firstly, when you open the CTR software, you’ll be greeted by an ominous warning that overclocking using this software may damage your motherboard or CPU. Not to worry though, this is a standard text that must be present on all software with similar features.
- The main tab of the software is aptly named the MAIN tab, and it contains the major controls and information clusters that you will need for overclocking or undervolting.
- There is also a tab named BENCHMARK in the left sidebar. Opening the benchmark tab leads us to the built-in Cinebench R20 test that CTR uses to validate overclocks and compare scores.
Technical Information:
1usmus explains the different parameters that are found in the MAIN tab as follows:
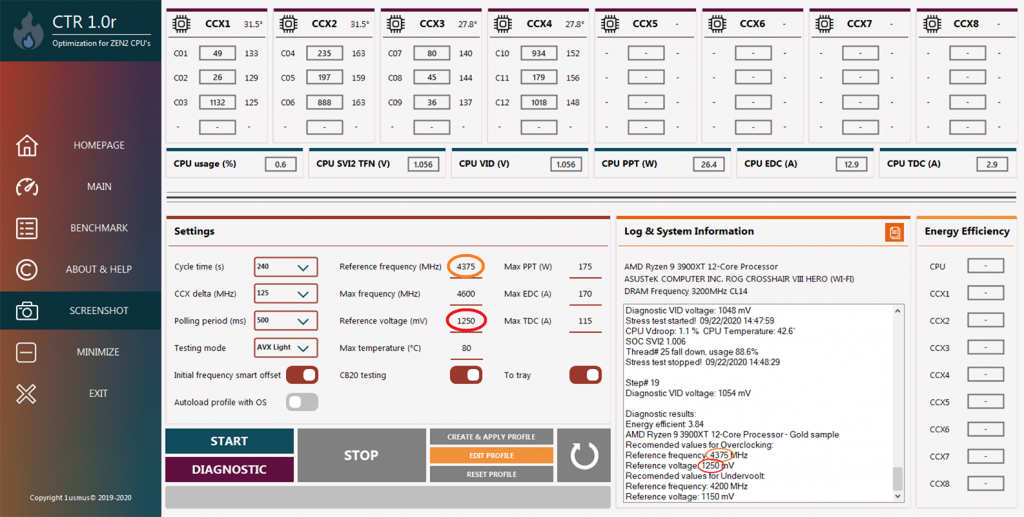
- In the MAIN tab, the upper information bar informs the user about the number of CCXs, cores in the CCX, the frequency of each core (3), the temperature of the CCD (1), and CPPC tags (2). It should be noted that CPPC tags are a kind of indicator of core quality. C01 is a kernel sequence number.
- Then comes a strip with information about the current energy parameters of the processor (PPT, EDC, TDC, CPU VID Voltage, and CPU SVI2 Voltage). The monitoring of these parameters as well as the protection system is always active.
- At the moment there is a bug that does not allow it to display the correct EDC value in some scenarios. At a certain value, it just goes off the charts. This is due to an error in the microcode.
- There are a variety of settings in the SETTINGS section in the bottom left of the window. It is important to know their functions too. These explanations are given directly by the developer of the CTR tool.
- Cycle time – defines the time of stress tests for each cycle. The longer a cycle lasts, the more accurate the CTR result will be.
- CCX delta – the condition for termination of the overclocking or undervolting algorithm. It is the value (MHz) of the frequency difference between the best CCX and the worst CCX. This value allows the energy load to be equalized between all CCXs. Each processor class (Ryzen 5, 7, 9, etc.) has an individual value. At the first start, CTR will automatically offer the best option. The user can also customize this value for his own experiments.
- Recommended values:
Ryzen 5: 25 MHz
Ryzen 7: 25 MHz
Ryzen 9: 150-175 MHz for X-Suffix processors and 100-150 for XT-Suffix processors
Threadripper: 75 – 100 MHz
- Testing mode – defines the load level that CCXs receive during CTR operation. For most users, the AVX Light mode will be optimal. Specially designed AVX presets combine low processor temperature with high-efficiency diagnostics.
- Initial frequency smart offset – is a technology that saves time during overclocking or undervolting. The mechanism of operation is the intelligent shift “Reference frequency” relative to CPPC tags. It is supported only by 3900X, 3900XT, 3950X, 3960X and 3970X processors.
- Reference frequency is the base frequency from which the first overclocking or undervolting step will start. The value must always be a multiple of 25, i.e. 4100, 4125, and so on.
- Max frequency is the maximum frequency value at which any CCX will complete the overclocking or undervolting process. The value should always be a multiple of 25, i.e. 4100, 4125, and so on.
- Reference voltage – the voltage value at which the overclocking or undervolting will be performed. Step 6 mV. The Protection System automatically corrects this value so that the processor always receives only the correct commands.
- The owners of processors 3600XT, 3800XT, and 3900XT should take note that the voltage above 1250 mV can cause BSOD during the CTR. It is recommended not to exceed this value temporarily.
- Polling period – the time of interrogation of sensors (temperature, voltage, frequency, and so on). Also, this value determines the reaction speed of the CTR protection system. The protection system functions from the moment of the program start to the moment of its completion. Its purpose is to monitor all processes that occur during the CTR and in case of which to automatically stop and consult the user.
- Max temperature – the value of temperature at which the protection system will stop all processes that take place in the CTR.
- Max PPT, Max EDC, Max TDC – consumption and current values, which also relate to the settings of the protection system. When one of the values is reached, all CTR processes will be stopped.
- CB20 test – a switcher that allows the user to activate or deactivate the Cinebench R20 test. This test is only for overclocking or undervolting evaluation.
- To tray – activation allows minimizing the CTR window into the tray.
- Autoload profile with OS – automatic loading of the overclocking or undervolting profile at startup of the operating system. It is possible to activate it only after the user has saved the profile. Please note that the user will be offered to create a profile only after the overclocking/undervolting process is finished.
Below the SETTINGS group, there are a group of buttons for control.
- The START button is used to begin the overclocking or undervolting process as per the user settings.
- The DIAGNOSTIC button is used to start the evaluation of the overclocking potential and the sample quality of the CPU.
- The STOP button stops all processes.
- CREATE and APPLY PROFILE are used to save and load profiles in order to remember the settings.
- EDIT and RESET PROFILE allow you to make changes to the saved profiles.

Process of Tuning:
Now we come to the actual step-by-step tutorial of using the CTR software which is surprisingly straightforward.
First, you should re-confirm the motherboard settings. The provided settings are essential for getting the best OC results. Also, it is important to note that an unstable or custom RAM overclock can interfere with the stability of your CPU overclock. For CTR, it is best to leave the RAM at a stable XMP profile, or just turn off the OC completely.
Open CTR.exe and check the values that are being displayed. CTR is pulling the monitoring values from Ryzen Master, so if you see problems in those values, reinstall Ryzen Master. The windows with frequency should not have 0 and the core tags should not have 100.
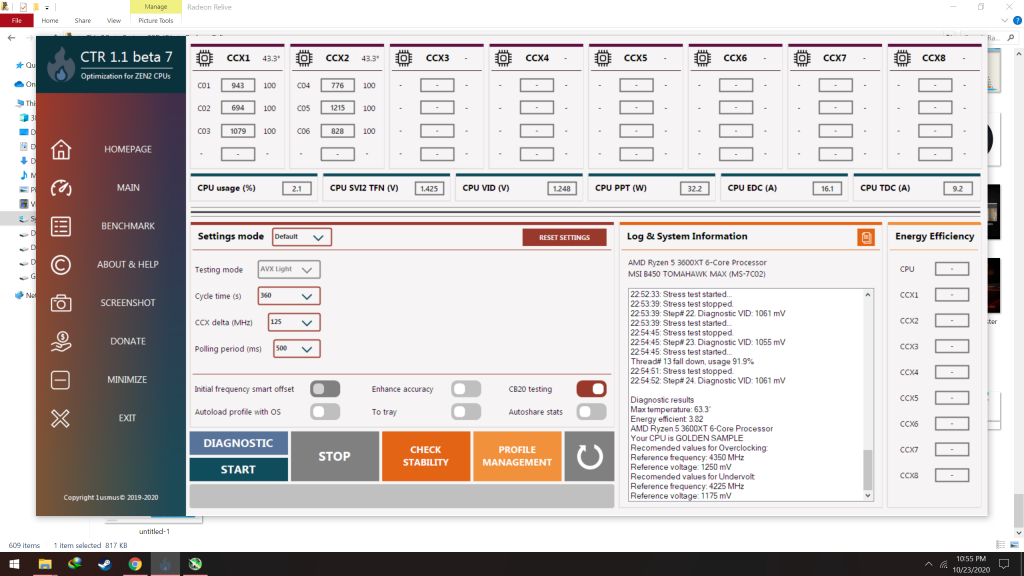
Now, we need to perform a Diagnostic check of our processor. This process will give CTR the information it needs to properly tune your CPU. Click on the “DIAGNOSTIC” button in the main window, and let it run. After a few minutes, CTR will form a diagnostic report and also provide recommended values for overclocking and undervolting.
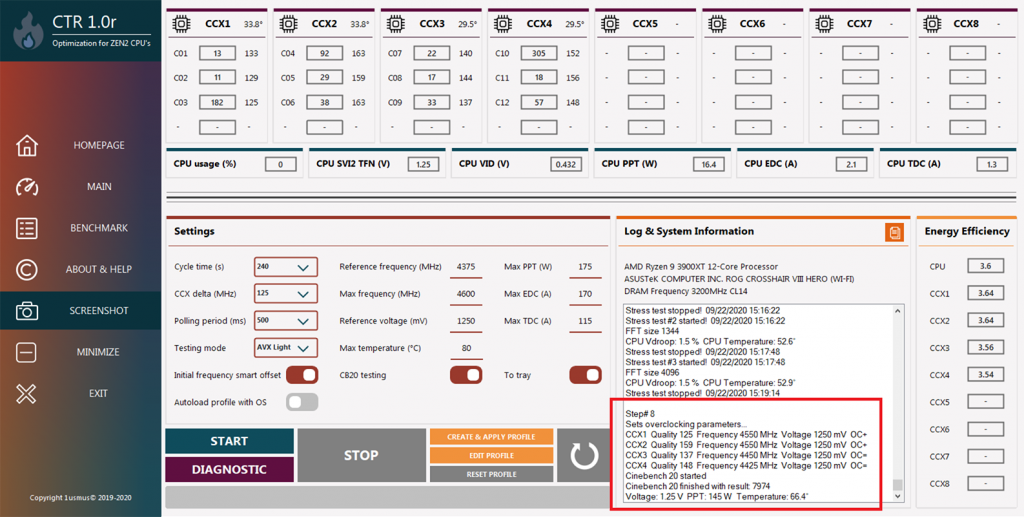
Now, we start the overclocking process. Click the “START” button and let it go through the required steps. It will first open and run Cinebench R20 to get a baseline reading. Then, it will go through a large number of steps where it will try to find the perfect balance of clock speed and voltage. Patience is required because it has to go through a large number of steps in this process. When it is finished, the results will appear in the log. The Cinebench R20 test will run again and will provide the user with a comparison of the original performance and new performance.
After this step, you may choose to fine-tune settings some more to suit your own preference. However, tuning further may result in highly increased power draw without substantial gains. It is recommended to use the values provided by CTR.
You can activate and save the overclock/undervolt profile by clicking the “CREATE AND APPLY PROFILE” button. The tool also gives you an option to apply the profile when the system boots up, which can be useful to those who choose to run the tuned profile on a daily basis.
Final Words
ClockTuner for Ryzen is an incredibly useful tool and it is one of the first and only auto-overclocking tools that really seems to work well. Not only is it useful in gathering information about the sample quality and boosting potential of your CPU, but it can also be quite effective in finding the perfect balance of clock speed and voltage for your processor. CTR also offers some handy comparison features, and we find that it is a well-rounded piece of software.
Users with Ryzen 3000 series CPUs based on the ZEN 2 architecture should definitely give it a try at least once.