How To Remap Keys And Work Around A Broken Keyboard
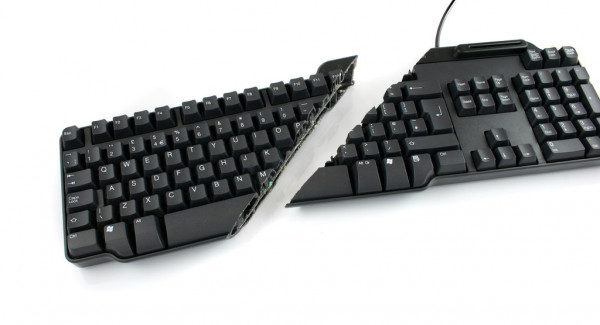
If you have managed to break one of the keys on your keyboard, you can assess the damage and get the key cap replaced if that’s all the damage you managed to inflict onto your device. If you’ve damaged some of the circuitry underneath and have permanently blocked out the functionality of a critical keyboard key, then you may need to replace the keyboard unit entirely. If you have got a key that is temporarily acting up and seems fine, you may have some dust lodged under it that may need to be removed through a deep clean. Whatever the issue is that you’re facing, whether you are going to carry out some of those permanent (and not free) solutions above or whether you never intend to, remapping a key on your keyboard can allow you to continue to use its functionality in the meanwhile.
You may have a perfectly well functioning keyboard and may just want a particular key to be accessible through another one. You may want to remap your keys to match a foreign keyboard layout. You may want to map them to make them better suitable for your gaming or any other keyboard intensive activity that you do on your PC. You may simply want to increase productivity or re-purpose an unused key. Whatever your situation is, remapping the keys on your keyboard can be done rather simply with one of the following 3 tools. While there are numerous other tools out there that perform similar tasks, these three are tried and tested ones that we recommend for going about your key remapping agenda.
How Does Key Remapping Work?
Computers do their data processing between inputs, outputs, and the main processing interface through encoded signals. Every time you press a key, depending upon the function that it has been assigned, it transmits the pulse signal specific to that particular task code to your system. Your system then processes that instruction and carries it out. For example, the “A” key on your keyboard may correspond to a particular signal, let’s arbitrarily call it “0001.” Every time your CPU picks up a “0001” signal, it types out an “A.”
Remapping the keys on your keyboard utilizes this fact to switch up the assigned signals of each key. If you wanted to use the “X” key, for example, to type out an “A,” you could assign the “0001” signal to it (which in effect means “enter the character A”). Every time you press your “X” key, then, your system will pick up a “0001” signal and execute the “enter the character A” command, typing out the letter “A.” The following key mapping tools simplify this signal exchange by giving you a workable user interface to simply switch around the keys you want to modify. You don’t have to worry about the back end coding and signal assignment that goes into this process.
KeyTweak
The KeyTweak tool is a widely used key remapping tool that lets you reassign the functionality of your keyboard’s keys.
-
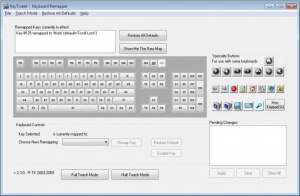
The KeyTweak Remapping Interface: the virtual on screen keyboard allows you to select the key you would like to remap and assign a functionality of your choice to it. Download and install the KeyTweak tool from here. The installer will prompt instructions on screen that you will need to follow till the installation is complete.
- Launch the KeyTweak tool from your Start Menu.
- On the main screen interface, identify the key that you would like to remap on the on screen keyboard and select it. Ensure that the key listed beside “Key Selected” on the screen corresponds with the one that you selected on the on-screen keyboard.
- In the drop down menu beside “Choose New Remapping,” select the key functionality you would like to assign to it. Ensure that the key that appears in the “Pending Changes” area on the screen matches the key you assigned.
- Click Apply.
- Reboot your system to have the newly remapped settings take effect.
SharpKeys
Unlike the other tools we will discuss here, SharpKeys does not give you a visual keyboard representation. The visualization of what is going to go where is entirely your own responsibility. The tool works to the same effect as the others, nonetheless, allowing you to change the function mapping of a key to any other desired key. To use SharpKeys, you must carry out the following:
-
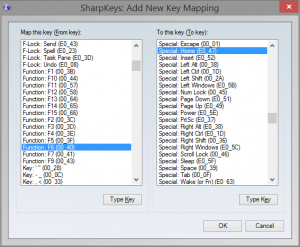
The SharpKeys Mapping Interface: the left hand portion allows you to select a key and the right hand portion allows you to assign its functionality. Download and install the SharpKeys tool from here. The installer will prompt instructions on screen that you will need to follow till the installation is complete.
- Launch the SharpKeys tool by finding it in your Start Menu. Unless there has been an error in the installation, the tool should launch easily. If it does not, you may need to uninstall it and reprocess the installation.
- In the application interface, you can choose to create a new mapping or modify one that already exists. You can click on either and select the keys you would like to map or modify. Once you have mapped them to the functionality you would like, hit “Write To Registry” to implement the changes.
- To bring your newly mapped keys into effect, restart your system. Once it boots up, it will follow the mapping that you’ve manually set for your keyboard keys.
Microsoft Keyboard Layout
Microsoft has its own downloadable utility for key remapping. To use the Microsoft Keyboard Layout tool on your computer, download its installation file from this link. Follow the on screen instructions to process the installation. Once the installation completes, find the tool in your PC’s Start Menu, launch it, and follow these steps:
-
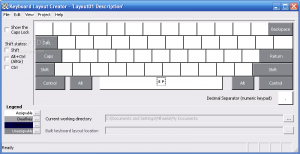
Microsoft’s Keyboard Layout Creator Tool also features an on screen virtual keyboard for selecting the keys you would like to map to a distinct and custom functionality. Click on the “File” tab and then select “Load Existing Keyboard.” Find the keyboard closest to the one you would like to have in its final form from the available options. For example, if you would like to keep your keyboard as the standard US QWERTY keyboard but would like to swap a few keys around, choose “US” as your loading layout and then perform the minor manipulations you’d like in the next few steps. If you wanted to switch entirely to another layout, you could choose another keyboard layout closest to it.
- Head back into the “File” tab and select “Save Source File As.” Save your layout to a location on your computer.
- Head into the “Project” tab and then select “Properties.” Amend the properties in this section, you can rename this keyboard layout, add a description, change its type direction, and then click “Okay” to save.
- Click on any key to select which key functionality to assign to it. Be weary of keyboard replacements affecting common combination functionalities. For example, if you were to map the “A” key to a Greek letter Unicode ALT key code, you may lose out on the CTRL + A functionality of your keyboard. Use the least used keys for swaps to avoid disrupting your combination operations.
- Once you have made your changes, head into the “Project” tab and select “Validate Layout.”
- Head back into the “Project” tab and now select “Test Keyboard Layout.”
- Head into the “Project” tab a third time and select “Build DLL and Setup Package.”
- If you’d like to output your new keyboard layout as an image file for reference, head into the “File” tab and click on “Save As Image.”
- Find the location on your computer where you saved your keyboard layout. In its folder, you will find a “Setup.exe” file. Run this and then restart your system.
- Once your system restarts, your new keyboard layout will take effect.
- If you have multiple keyboard layouts loaded, you can switch between them from the taskbar at the bottom right of your screen.
Final Thoughts
While there are hundreds of key remapping tools out there, the three discussed above are the easiest and most user-friendly ones to use. They are simple to work around and offer you a range of customization from remapping a broken key to adding additional characters to adding multiple languages into a single keyboard to concatenating functional combinations into a single keystroke. Whatever your motivation for key remapping is, these tools are your best bet at easily and safely carrying out your key remapping adjustments.