How to Manage and Uninstall Software on Local and Remote Computers?
As we dive deeper into the modern and digital world, everything is becoming online and for everything, there exists a software. This is almost convenient for the huge rise in online activity and is probably something that needs to be done. This has significantly made the tasks of various people very easy and more fun. One of the jobs that come in this category is, without a doubt, that of a network and system administrator.
If done manually, the task of a network or a system administrator was really tough to say the least. This is because networks are becoming complex and the more devices you add into your network, the harder it gets to manage without the right tools. However, this is no longer a worry as there are tons of network tools and utilities available now that makes the daily tasks way easier.
One of the things that used to be a hurdle is patch management. It is basically managing the updates and software on the computers in your personal area or a network. Fortunately, this has been made way easier due to various patch management software available on the internet. Remote computing is one of the factors that have been also included in one of the patch managers that we have listed. There are tons of tools on the internet that let you access and manage your remote computers but why go through the trouble of downloading an additional software if you can have it integrated in a patch management software.
Downloading the Solarwinds Patch Manager
One of the best patch management software available, Solarwinds Patch Manager (download here) is a tool that comes packed with several features which makes your patch deployment way easier than it is. The tool integrates with WSUS and SCCM and further improves the scalability provided by the said services along with third-party patching.
The tool includes a list of third-party packages tested by default such as Adobe, Java, Mozilla and many more so that you can keep them up to date automatically. As the technology evolves, vulnerabilities are bound to exist and you cannot stop them from existing. However, what you can do is have a tool like Solarwinds Patch Manager which comes with a Vulnerability Management feature that allows the product to scan your systems for any flaws as well as any missing patches that need to be installed. And of course, it comes with a remote management feature using which you can manage your remote systems and uninstall software you wish to.
That is why, we will be using the Solarwinds Patch Manager in this guide so make sure you go ahead and download the tool from the link provided above. Once you have downloaded the tool, extract the .zip file and then proceed to running the installer. During the installation, you will be asked to either install the administrator console, the server components of the Patch Manager or both. It is recommended that you install the administrator console on the systems that you can easily access and the server components go on the systems that you wish to manage with the product.
Adding your Devices to Patch Manager
Once you have installed the Patch Manager, you will have to add your computers to the software. After adding your computers, you will be able to manage them by deploying updates to the managed computers as well as uninstall any software that you wish. To add your computers to the Patch Manager, do the following:
- First of all, open up the Patch Manager Administrator Console.
- After that, make your way to Enterprise > Managed Computers.
- On the left-hand side, in the Actions pane, click on the New Patch Manager Computer Group option.
- This will open up a new window. Here, give the group a name and click on the Add Computer option add your devices. Once you have added all of your devices, click on the Save button.

Adding Devices to Patch Manager
Managing Local and Remote Computers
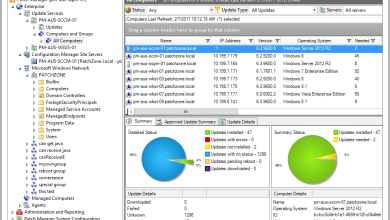
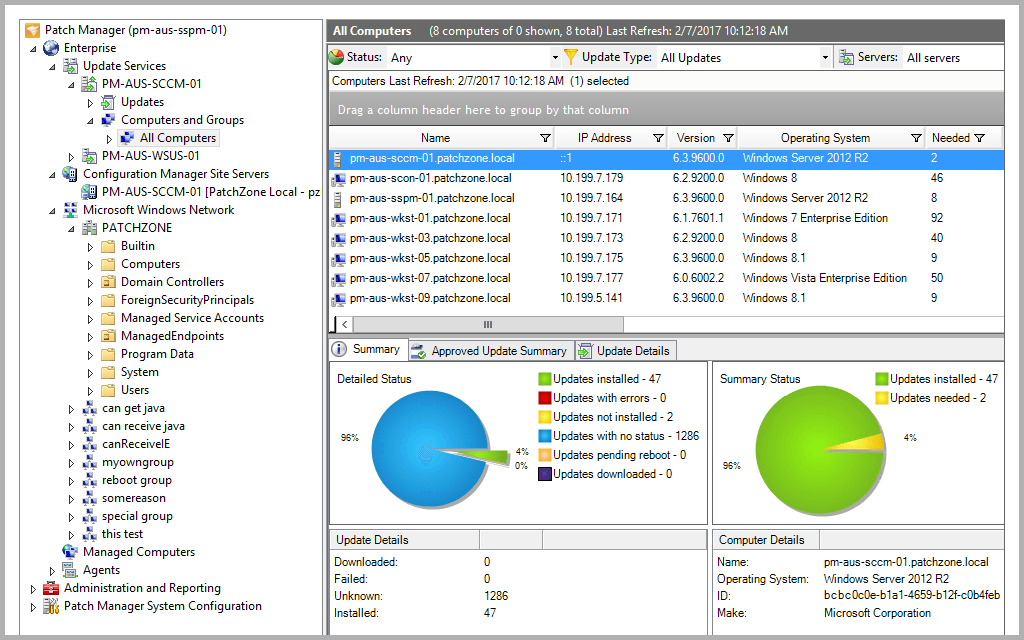
Now that you have added your computer devices to the Patch Manager, you will be able to manage the said devices. This lets you have a look at the details of the devices, deploy any updates to the systems as well as have a look at the list of installed updates on the system. Other than that, you can also have a look at the services running on your system, the Windows Firewall, network adapters and so much more.
To manage your computers, do the following:
- On the Patch Manager Administrator Console, expand the Enterprise category and then go to Managed Computers.
- There, select the computer that you wish to manage and then click on the Computer Explorer option in the Actions pane. Alternatively, you can just right-click on the computer and then select Computer Explorer from the drop-down menu.
- After that, you can have a look at the various tabs to manage your computers such as Windows Update History and many more.
Accessing Computer Explorer
Uninstalling Software on Local and Remote Computers
One of the neat features of the Solarwinds Patch Manager is that it lets you uninstall software on your managed computers, even those that are remote. This can be helpful in many ways to system administrators. If you wish to uninstall any software that is no longer needed on one of the computers, you can do so with the Patch Manager instead of having to download an additional remote desktop software for the same purpose.
To do this, follow the instructions provided below.
- On the Patch Manager Administrator Console, make your way to Enterprise and then Managed Computers.
- Once there, if your computer is in a group, locate it and then right-click on the said system. Then, from the drop-down menu provided, click on the Computer Explorer Option provided. You can also access the Computer Explorer feature by selecting the computer and then clicking Computer Explorer in the Actions pane on the left-hand side.
- On the Computer Explorer, switch to the Installed Software tab.
- Now, select the software that you wish to uninstall and then click on the Uninstall Software option located above.
- If you wish to continue uninstalling the selected software, click on the Uninstall button provided. In case you wish to uninstall a different software, you can provide the custom details.

Uninstalling Software - Now, you can select more than one computer to uninstall the software on. This saves you the trouble of doing this again and again for individual systems.
- After that, click the Next button. Here, you can have the task run immediately or have it scheduled for a specific time. Click the Next button.
- Finally, click the Finish button to either create the scheduled task or initiate the task.