Deploy Updates on multiple computers at same time [Full Guide]
Updating your system is something that we all have to do at one point or the other. Some of you might not like the updates and that’s for some real reasons as some of the updates, at times, break a random functionality in your computer. However, despite the obvious reasons that you might have, you still have to install the updates on your system even if it is rare.
When we mention updates, it is not limited to Windows updates only. There are third-party apps that we use all the time in our daily lives which need to be updated. Nonetheless, there is no running from updates as they usually contain security updates that are very important to organizations or other networks. It even can be your own little space with multiple computers that need updating.

As it turns out, having to install updates on multiple computers can become quite the task. Imagine having to do the same task over and over again on multiple computers just to keep them up to date. This, fortunately, has been made very easy with the help of modern tools that have been developed. This specific task is often referred to as Patch Management in technical jorgan. Patch management is basically the process of deploying different patches on your machines with the help of patch management software that have been developed just for the said purpose.
Downloading Solarwinds Patch Manager
One of the things that comes with the progression of the internet is the existence of multiple software for the same purpose. For some, this is something good as it provides variety, however, at the same time, it also causes difficulties in finding the right tool which many people have to face. Solarwinds is one of the biggest companies when it comes down to network and system management. Every system or network administrator has used their products in their career at least once.
Solarwinds Patch Manager (download here) is patch management software that gives you the ability of managing the patch deployment on your various machines with ease. It provides a simplified patch management experience and can also be integrated with SCCM while also supporting WSUS (Windows Server Update Services). With the help of Patch Manager, you will be able to stay on top of any vulnerabilities in your systems as well as the updates that you are missing out on.
In this guide, we will be using the Solarwinds Patch Manager so go ahead and download the tool from the link provided. If you do not wish to pay directly, you can go for the free trial period offered by Solarwinds during which the tool stays fully functional so that you can have a chance of evaluating the product. Once you have the tool downloaded, unzip it to a location of your liking and then install it. During the installation, you will be asked if you wish to install only the administrator console or the server components. It is recommended that you install the administrator console only on your local system so that you can handle the computers easily. The rest of the installation is pretty straightforward and easy.
Deploying Updates on Multiple Computers
Using Patch Manager, you will be able to deploy updates on multiple computers at the same time. There are two ways of doing this, you can either select individual updates that are to be deployed per a schedule on a machine or a group of selected computers. The other way is to instruct the targeted machines to install all updates that meet a certain criteria provided. We will be going through both the methods, so just follow along.
Deploying Individual Updates
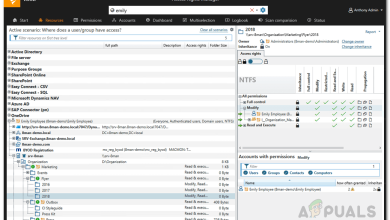
In order to deploy a specific update or a few selected updates to a group of computers, you will have to use the Update Management feature in the Solarwinds Patch Manager. One of the neat things about Patch Manager is that it categorizes the updates by their type so that you can easily navigate and find the important updates. To deploy individual updates, do the following:
- Open up the Patch Manager Administrator Console.
- After that, expand Enterprise > Update Services > WSUS Server > Updates.
- Once you have done that, you will be able to view four options that are categorized for your ease.
- Click on whatever type of update you wish to deploy and then select an update from the list. Right-click the update and then click the Update Management option from the drop-down menu.
- On the first page, you will be able to choose the behavior of the machine before and after the update. You can have it restart if the update requires it to. Then, click OK.
- Now, you will have to add your machines to which the update is to be deployed. For this, click on the Add Computer option provided. After that, provide the required details and then click the Add button.
- This will add your computer to the list. If you wish to add more computers, do so and once finished, click the Next button.
- Here, you can schedule the deployment of the updates to happen weekly, monthly or even daily. It all depends on your requirements. Once you have done that, click the Finish button.

Deploying Individual Updates - You will be shown a summary of update details. If you wish to change anything, click the Back button. Otherwise, click the Finish button.
Deploying Updates Based on a Certain Criteria
Another way of deploying updates is specifying a certain criteria depending on which updates are installed. The Patch Manager issues a generalized message to the targeted machines and instructs to install any updates that meet the provided criteria. This can be done via the Update Management Wizard. Here’s how to do it:
- Open up the Patch Manager Administrator Console.
- Then, expand the Enterprise > Update Services > WSUS Server > Computers and Groups > All Computers categories.
- After that, select a computer or a group of machines and then right-click to display the drop-down menu. Click the Update Management Wizard from the drop-down menu.
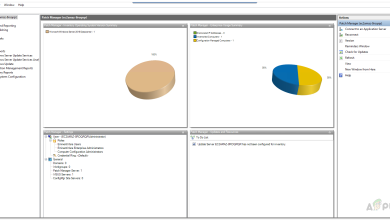
- Now, you can select a rule already provided from the list or specify your own criteria. To do that, click on the bottom option and then click the Next button.
- To add a rule, click on the Add Rule drop-down menu and select an option for your need. In this guide, we will be using the Product Rule to instruct the computers to install all updates for a certain product.
- Once you have specified your own rules, click the Next button.
- After that, you will be able to manage the before and after update behavior of the machine along with some other options that you might fancy so make sure to go over them. Then, click the Finish button.
- On the next page, you will have to select the computers again and then click Next.
- Finally, you will be able to schedule this task to occur daily, weekly or on a monthly basis if you want. After that, click the Next button.
Deploying Updates Based on Criteria - You will be provided an overview of the task containing the details of the task. Once you are sure of everything, click the Finish button.