How to Fix the ‘Failed to Acquire the VirtualBox COM Object’ Error
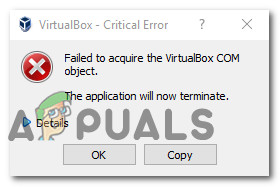
Several users are reporting that they are unable to launch VirtualBox. The critical error message that comes up is “Failed to acquire the VirtualBox COM object. The application will terminate”. In some cases, the error is also accompanied by a second error message pointing towards the problem. The issue does not seem to be specific to a certain Windows version since it’s confirmed to occur on both Windows 8.1 and Windows 10.
What is causing the ‘Failed to Acquire the VirtualBox COM Object’ error?
We investigated this issue by looking at various user reports and the repair strategies that are commonly deployed successfully in this particular scenario. As it turns out, there are multiple culprits that might end up triggering this issue:
- VirtualBox is not installed with admin access – Virtualbox is one of those software products that will require you to install them with admin privileges in order to be able to set up all the necessary services. Failing to do so might mean that some services will not be enabled by default. In this case, the easiest way to resolve the issue is to install Virtualbox the correct way.
- Malformed Master Guest Registry – In some cases, this particular error will occur due to a possibly malformed master guest registry. If this particular scenario is applicable, you should be able to resolve the issue by moving the .VirtualBox folder onto the desktop, forcing the application to create a new healthy version.
- Insufficient permissions – Even if VirtualBox is installed with administrative access, it might still need admin privileges in order to start some services that are needed for VM operations. Several affected users have managed to resolve the issue by configuring the VirtualBox shortcut to run with administrative privileges.
If you’re currently looking for a fix that will resolve this issue, this article will provide you with several troubleshooting steps that might just resolve the issue. Down below, you’ll find several methods that other users in a similar situation have successfully used to resolve the issue. Each potential fix mentioned below is confirmed to work by at least one affected user.
For the best results, we advise you to follow the methods in the order that they are presented since they are ordered by efficiency and severity. Regardless of the culprit that’s triggering the “Failed to acquire the VirtualBox COM object” error, one of the following potential fixes should help you fix the problem.
Method 1: Launching VirtualBox with admin privileges
It’s possible that you’re encountering this issue because you’re trying to launch VirtualBox from a shortcut that isn’t configured to run with admin access. Several affected users have reported that they managed to resolve the “Failed to acquire the VirtualBox COM object” error by configuring the VirtualBox shortcut to launch with admin access.
Here’s a quick guide on how to do this:
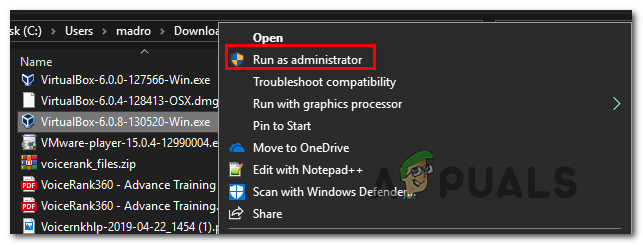
- First, let’s test if this theory is true by right-clicking on the Virtualbox shortcut and choosing Run as administrator.
Note: If these steps have eliminated the error, continue with the next steps below to make the changes permanent. - Right-click on the same VirtualBox shortcut and choose Properties from the context menu.
- From the Properties screen of Oracle VM VirtualBox, select the Compatibility tab and check the box associated with Run this program as an administrator (from the Settings screen)
- Click on Apply to make the change permanent.
- Restart Virtualbox and see if the issue has been resolved.
If you’re still encountering the “Failed to acquire the VirtualBox COM object” error, move down to the next method below.
Method 2: Installing VirtualBox with admin privileges
VirtualBox is one of those programs that need to be installed with admin privileges in order to function privileges. If you don’t grant admin access to VirtualBox installer, some critical services will not be configured properly. Several affected users that were also encountering the “Failed to acquire the VirtualBox COM object” error have reported that the issue was no longer occurring after they uninstalled their current VirtualBox installation and then re-installed it properly.
Here’s a quick guide on how to do this:
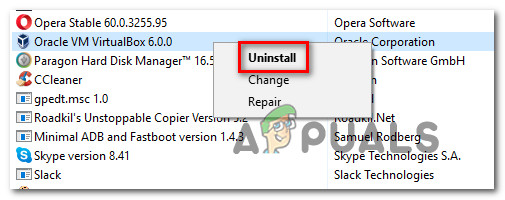
- Press Windows key + R to open up a Run dialog box. Then, type “appwiz.cpl” and hit Enter to open up the Programs and Features window.

Type appwiz.cpl and Press Enter to Open Installed Programs List - Inside Programs and Features, scroll through the list of applications and locate Oracle VM VirtualBox. Once you see it, right-click on it and click Uninstall.
Uninstalling VirtualBox - Next, follow the on-screen prompts to complete the uninstallation and restart your computer.
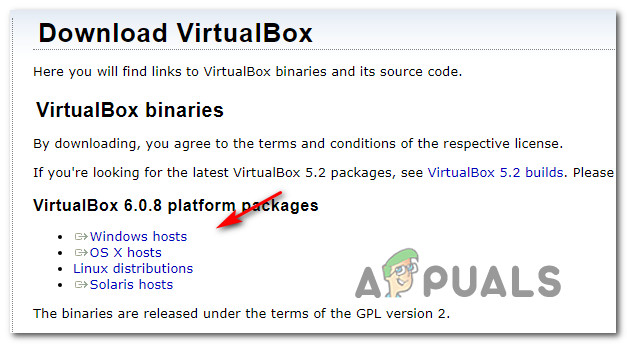
- When the next startup sequence is complete, visit this link (here). Once you get there, click on Windows hosts (under VirtualBox platform packages) to initiate the download.
Downloading the latest Virtualbox installer - Once the installer is downloaded successfully, don’t double-click it as you normally would do. Instead, right-click on it from the download bar of your browser and click on Show in Folder.
- In the location of the VirtualBox installer, right-click on it and choose Run as administrator.
Running the Virtualbox installer as administrator - Follow the on-screen prompts to complete the re-installation of Virtualbox.
- Restart your computer and see if VirtualBox is not launching without the error message.
If you’re still seeing the “Failed to acquire the VirtualBox COM object” error when launching the program, move down to the next method below.
Method 3: Moving the .Virtualbox folder to a different location
This particular issue can also occur due to malformed master guest registry. It’s possible that the “Failed to acquire the VirtualBox COM object” error is caused by a bad Virtualbox.xml file or some other corrupted file from the .VirtualBox folder.
Several affected users have reported that they’ve been able to resolve the issue by moving the entire .VirtualBox folder to a different location. This procedure will force Virtualbox to create a new healthy folder from scratch, which will end up resolving any corruption issue located inside the Virtualbox folder.
Here’s a quick guide on how to move the .Virtualbox folder to a different location.
- First things first, make sure that VirtualBox is completely closed.
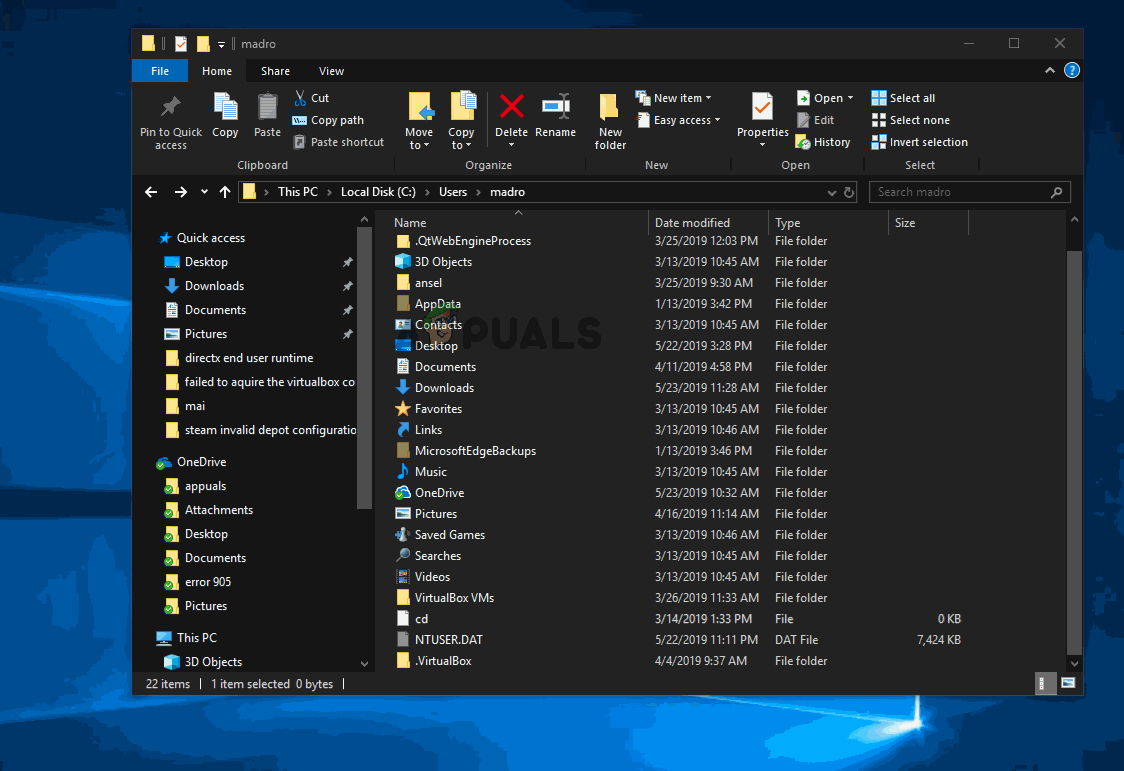
- Open File Explorer and navigate to the following location:
C:\Users\*Your UserName*
Note: *Your UserName* is simply a placeholder for your personal Windows user account. Please replace it with your own name.
- Once you get to this location, right-click on .VirtualBox and choose Cut from the context menu. Additionally, you can press Ctrl + X to cut the file directly.
- Paste the .Virtualbox folder in a convenable location such as the desktop.
Note: You can also delete the .Virtualbox folder. But moving the folder is a better alternative since it will allow you to move it back in case it doesn’t end up resolving the issue. - Once the folder is moved to a different location, launch VirtualBox again and see if the program is starting without the “Failed to acquire the VirtualBox COM object” error.
For MacOS Users:
It is advised that you reinstall VirtualBox. In most cases, reinstalling the latest release fixes the issue.


i am getting problem that my ubuntu is not installing anything ,please help me