How to Fix Steam Needs to be Online to Update
The “Steam needs to be online to update” error often occurs due to network connectivity issues or misconfigured system settings. This error prevents Steam from updating properly, even if your internet connection is working fine.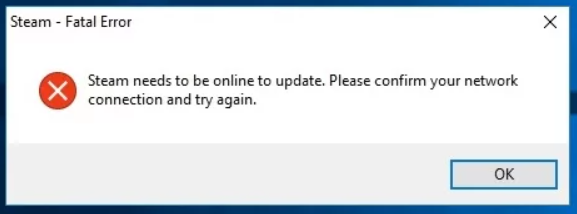
One of the primary causes of this issue is incorrect LAN settings, which can interfere with Steam’s ability to establish a stable connection. Additionally, misconfigured DNS settings, having Steam installed in the Program Files directory, or using a proxy can also contribute to this problem.
After discussing the causes, let’s explore the solutions to resolve this issue.
1. Adjust LAN Settings
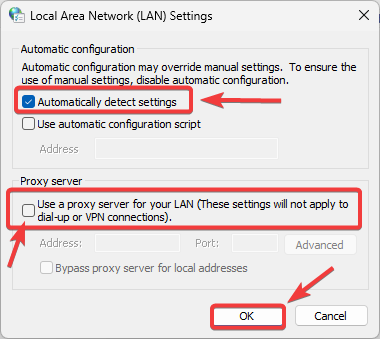
Adjusting the LAN settings involves ensuring that the “Automatically detect settings” option is enabled (checked) and that no proxy server is being used. If a proxy is configured—either manually or through auto-detection—it can interfere with Steam’s ability to connect to its update servers.
When this setting is enabled, Windows uses the Web Proxy Auto-Discovery Protocol (WPAD) to configure your network connection. However, this can sometimes cause issues, such as Steam being unable to connect to its servers for updates. Disabling this setting ensures that Steam is not incorrectly routed or delayed due to failures in the auto-detection process.
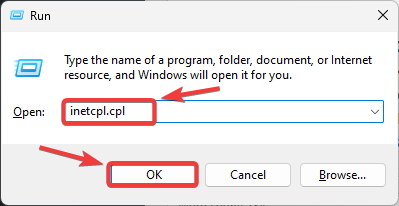
- Press Windows + R to open the Run dialog box.
- In the Run dialog box, type inetcpl.cpl and click OK.
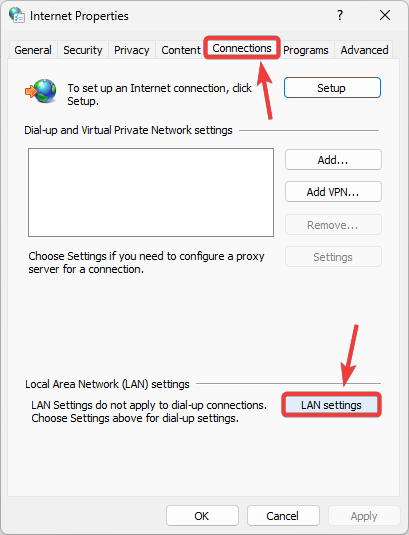
- Navigate to the Connections tab and click on LAN settings.
- If the option “Use a proxy server for your LAN” is checked, uncheck it. Ensure that “Automatically detect settings” is checked.
- Click OK to save the changes.
2. Change DNS Settings
Every application relies on a DNS (Domain Name System) to connect to its servers for tasks such as accessing data or downloading content. Steam also depends on DNS to download updates. If your current DNS server is slow or misconfigured, Steam may struggle to resolve its update server addresses, resulting in the “Steam needs to be online to update” error.
- Press Win + R to open the Run dialog box.
- Type ncpa.cpl and click OK.

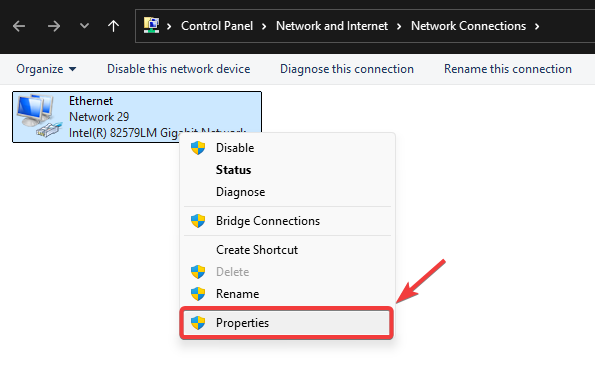
- Right-click on your network connection and select Properties.
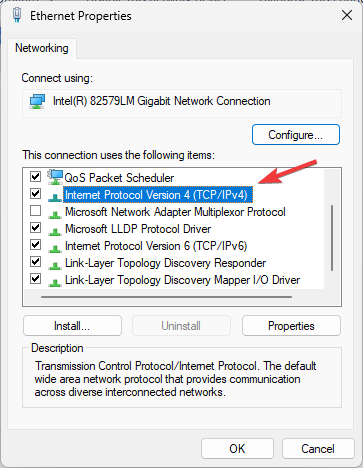
- Scroll down and double-click Internet Protocol Version 4 (TCP/IPv4).
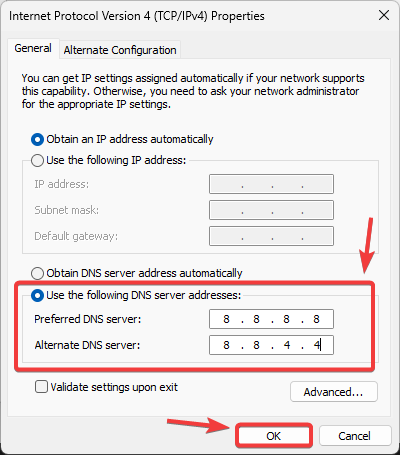
- Select “Use the following DNS server addresses” and enter the following:
Preferred DNS server: 8.8.8.8
Alternate DNS server: 8.8.4.4
- Click OK to save the settings.
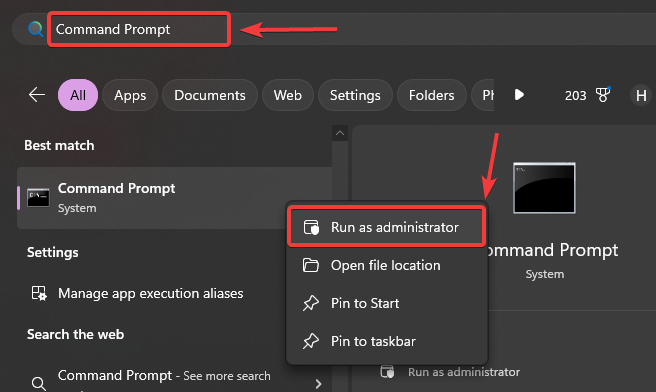
- Click the Start Menu, type Command Prompt, right-click on it, and select Run as administrator.
- In the Command Prompt window, type the following command and press Enter:
ipconfig /flushdns

- Once done, check if the issue is resolved.
3. Move the Steam Installation Folder
If Steam is installed in the Program Files or Program Files (x86) directories, Windows may impose strict permission rules due to User Account Control (UAC). These restrictions can prevent Steam from modifying essential files or network components during updates. As a result, Steam might struggle to connect to update servers, triggering the “Steam needs to be online to update” error.
Moving the Steam folder to a more open location like C:\Steam helps bypass these restrictions, ensuring Steam can write files and access the network without interference.
- Open the system tray located in the bottom-right corner of your screen.
- Right-click on the Steam icon and select Exit to close Steam completely.
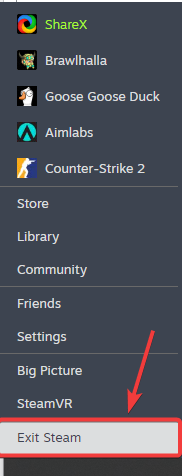
- Navigate to the Steam installation folder (usually located at C:\Program Files (x86)\Steam).
- Copy the entire Steam folder and paste it into a different location (e.g., another drive or directory).
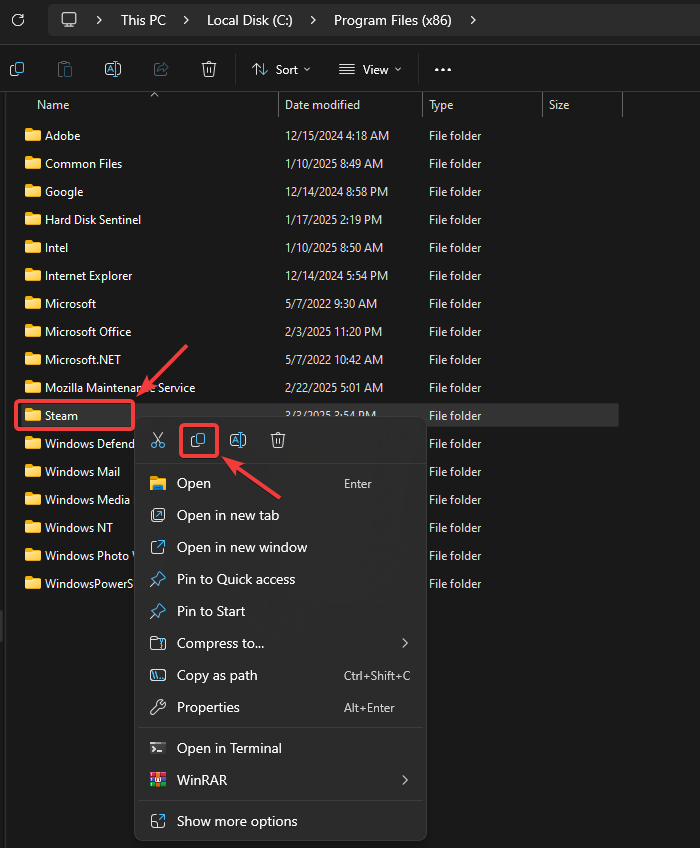
- Once the folder has been copied, try launching Steam again to check if the issue is resolved.
Steam will automatically recognize the new path—you don’t need to reinstall or log in again, and all your games will remain intact. Just ensure the old folder isn’t running in the background, and update any desktop or start menu shortcuts if necessary.
4. Use a VPN
A Virtual Private Network (VPN) can help bypass regional restrictions or ISP-level blocks that may be preventing Steam from accessing its servers. In some cases, certain geographic regions or ISPs may throttle or block connections to specific ports or services. Using a VPN routes your traffic through a different location, which can restore access.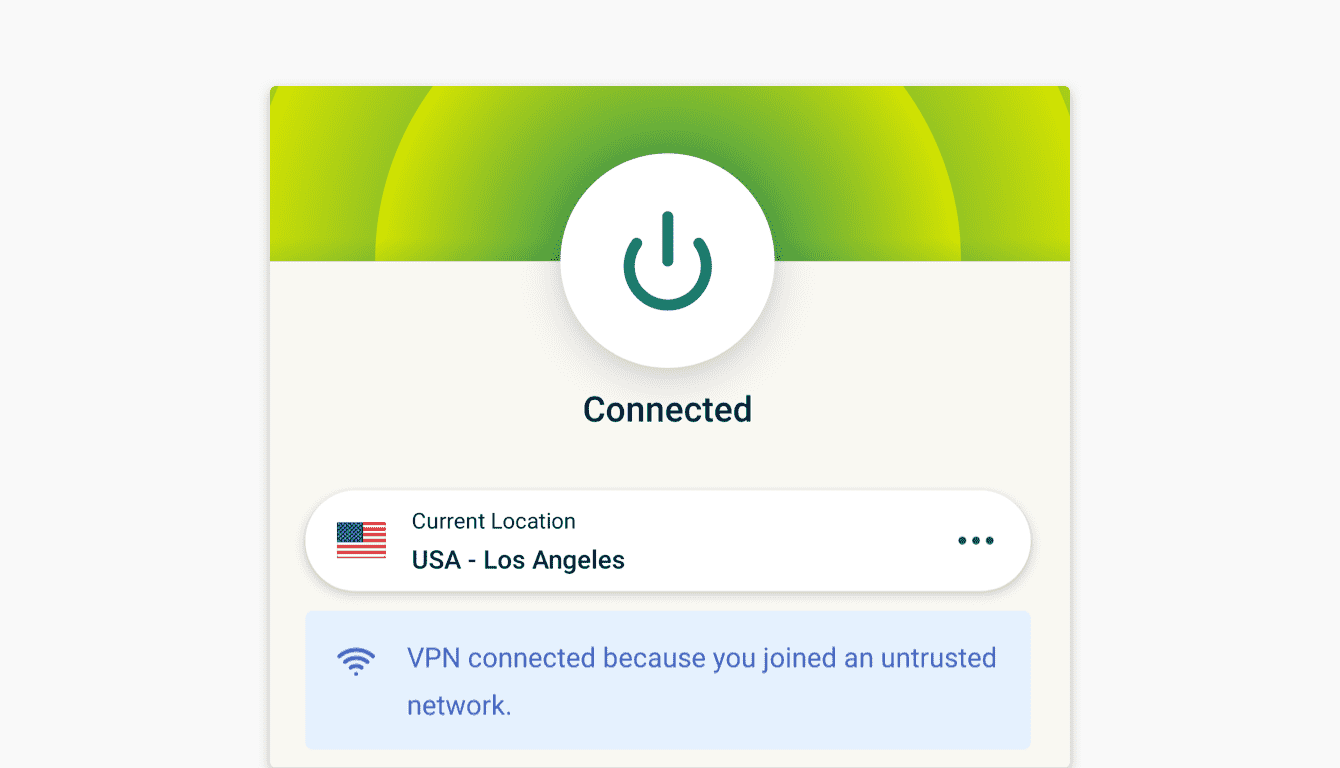
Even if you’re unsure whether your region is the issue, using a VPN is a quick way to test it—if Steam works after enabling a VPN, it’s a strong sign that your ISP or region is restricting access in some way.
If you don’t already use one, here are a few free VPN options you can try for testing:
- Proton VPN (Free Plan) – Reliable, no data caps, and secure.
- Windscribe (Free Plan) – Offers 10GB/month and access to multiple servers.
- TunnelBear (Free Plan) – Provides 500MB/month and is beginner-friendly.
Note: Free VPNs are useful for troubleshooting but may have speed or location limitations. If a VPN resolves the issue, consider switching to a more reliable paid VPN for long-term use.
Once connected to the VPN, restart Steam and check if the update proceeds without the error.
5. Reset Network Settings
Since the error is caused by misconfigured network settings, we can try resetting the network settings. This will clear out any incorrect configurations, such as proxy or DNS settings, that may be preventing Steam from connecting to its servers to get updated. Therefore, it is advisable to reset the network settings.
- Click the Start button and type Command Prompt.
- Right-click on it and select Run as administrator.
- In the Command Prompt window, enter the following commands one by one, pressing Enter after each:
netsh winsock reset
netsh int ip reset
ipconfig /release
ipconfig /renew
ipconfig /flushdns
- Once all the commands have been executed, restart your PC and open Steam to check if the issue is resolved.
As a last resort, we highly recommend checking for any proxy setup on your device by navigating to Settings > Network & Internet > Proxy. If you find any proxy, remove it and try again. If the issue persists, reinstall Steam and ensure that you install it outside the Program Files and Program Files (x86) directories.
another way, sure work:
download software name: WARP (by cloudflare https://developers.cloudflare.com/warp-client/setting-up/windows)
Run it
Then run Steam. Sure work