How to Fix OBS not Capturing Game Audio Error on Windows?
OBS is a free-to-use open-source tool used for screen recording and live streaming. It’s available for Windows, macOS, and Linux at the moment. It’s a popular choice by more experienced users since there are many different things you can tweak inside the software.

However, many users have reported that they are unable to capture in-game audio using OBS. It can successfully pick up your microphone but in-game audio is simply missing from the video or the live stream. Luckily, there are quite a few different things you can try out to resolve the problem. We have gathered several methods that have helped other users so make sure you check them out below!
What Causes OBS to Fail to Capture Game Audio on Windows?
The main causes of this problem are often difficult to pinpoint and they are often quite unexpected. Still, we have managed to create a shortlist of them for you to check out! It will make your troubleshooting process faster and easier.
- Sound settings – there are quite a few sound settings that need to be set up properly if you want OBS to work properly. You will need to set your speakers as default, tweak Stereo Mix, and even enable some enhancements to get OBS to work properly on your computer.
- Nahimic – Nahimic is an HD audio manager made by MSI. It does not work well along with OBS and your safest bet is to simply uninstall it from your computer.
- Default Desktop audio device not set properly – This is an in-app setting for OBS. If the default Desktop audio device is not set correctly, the audio will not be recorded. Make sure you change it!
Solution 1: Tweak Certain Sound Settings
Some of your sound settings may be simply not set up to use OBS properly. In the set of steps presented below, we will go over these settings so make sure you follow the instructions properly and your audio should be set up in no time! Good luck in resolving the problem.
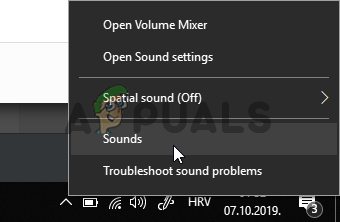
- Open Sound settings on your computer by right-clicking the volume icon at the system tray (right-part of your taskbar or the bottom left corner of your screen) and choose Sounds from the menu which will appear.
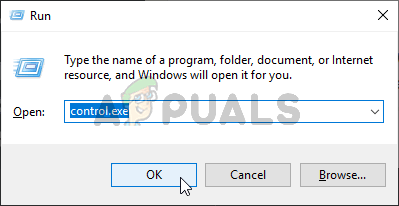
- Alternatively, use the Windows Key + R key combination to start the Run Type “control.exe” in the Open text box and click OK to open the Control Panel. You can also search for it in the Start menu.
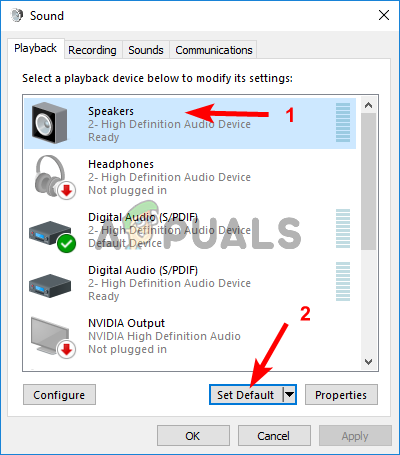
- Navigate to the Playback tab inside Sound settings, locate the Speakers This device should be set as the default device. Left-click its entry and click the Set Default button at the bottom of the window.
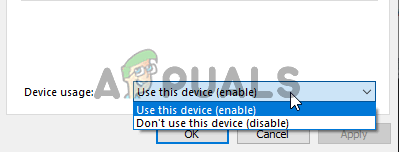
- After that, head over to the Recording tab and check for the Stereo Mix If you can’t see it, right-click anywhere inside the window and check the options next to Show disabled devices and Show disconnected devices. If you still can’t see it, try to Restore Missing Stereo Mix.
- Left-click its entry in the Recording tab of Sound settings and click the Properties button at the bottom. Under the Device usage menu, choose to Use this device (enable).
- Navigate to the Listen tab and check the box next to the Listen to this device Under the Playback through this device, choose the device for which you wish the sound should be played through. It might be your speakers or your headset.
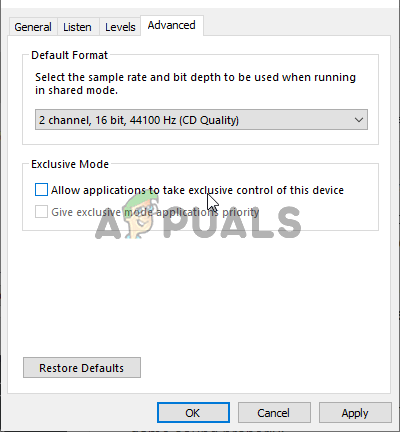
- After that, head over to the Advanced tab and check the Exclusive mode Uncheck the box next to the Allow applications to take exclusive control of this device option.
- Click OK and OK again to confirm all changes and head back to OBS to see if it’s able to pick up the game sound properly!
Solution 2: Uninstall Nahimic
Many users have reported that Nahimic doesn’t play along well with OBS. Nahimic is an audio manager and it’s not exactly a must-have app on your computer. There are many alternatives as well. It all comes down to which app you prefer to keep on your computer. Check out our steps below to uninstall Nahimic from your computer!
Windows 10:
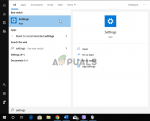
- Open Windows 10 Settings. You can open them in several different ways. You can use the Windows Key + I key combination. An alternative is to click the Start menu button followed by the cog icon at the bottom left corner of the Start menu.
- Finally, you can simply search for “Settings” and left-click the first available result.
- Once inside, click the Apps section to open it. A list of all installed programs on your computer will open. Scroll until you reach Nahimic, left-click its entry in the list, and click the Uninstall button which will appear. Follow the instructions which will appear on-screen to follow through with the process.
Other versions of Windows:
- Open the Control Panel by searching for it in the Start menu. Simply type “Control Panel” with the Start menu You can also run it by using the Windows Key + R key combination, typing “control.exe” and clicking the OK button in the Run dialog box.
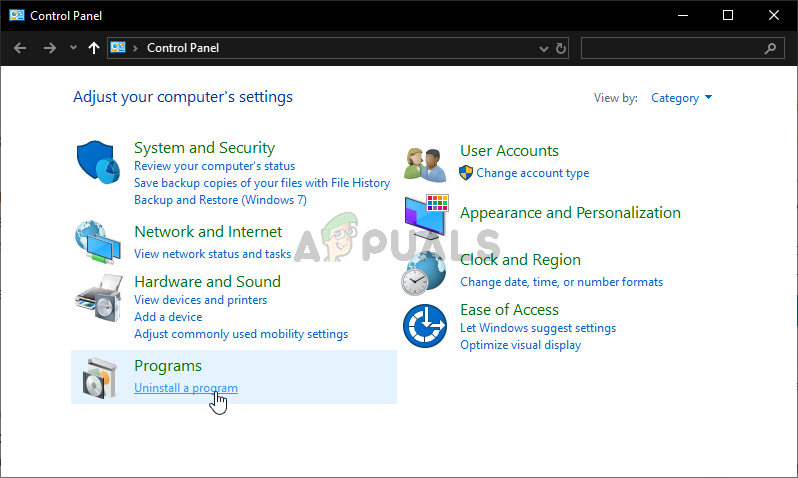
- Click the View by option and set it to Category. It’s located at the top right part of the screen. Click the Uninstall a program button under the Programs
- A list of all installed programs on your computer should appear. Scroll until you reach the Nahimic entry in the list, right-click it, and choose Uninstall from the context menu which will appear.
- Follow the instructions on-screen to follow through with the uninstallation and check to see if the OBS problem ceases to appear on your computer!
Solution 3: Set up Enhancements for Your Speaker
Even though you might have thought that this problem doesn’t have anything do to with your speakers, plenty of users have benefitted from a fix which deals with disabled enhancements in the Properties of your Speakers device. It may appear as a weird way to resolve this problem but you have nothing to lose and it can help you as it did for many other users! Follow the steps below!
- Open Sound settings on your computer by right-clicking the volume icon at the system tray (right-part of your taskbar or the bottom left corner of your screen) and choose Sounds from the menu which will appear.
- Alternatively, use the Windows Key + R key combination to start the Run Type “control.exe” in the Open text box and click OK to open the Control Panel. You can also search for it in the Start menu.
- Navigate to the Playback tab inside Sound settings, locate the Speakers Right-click your Speakers and choose Properties from the context menu which will appear.
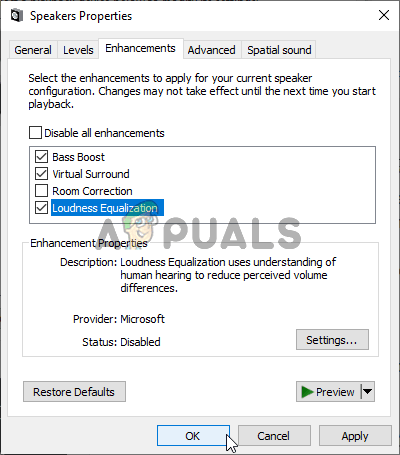
- Once inside Speakers Properties, navigate to the Enhancements In the list of available enhancements, make sure you check the boxes next to Bass Boost, Virtual Surround, and Loudness Equalization.
- Click the OK button and OK again to confirm all the changes you have made. Reopen OBS and check to see if it’s now able to pick up game audio while live streaming or recording!
Solution 4: Change the Desktop Audio Device
If you are using multiple audio devices on your computer at the same time, you might run into trouble as OBS doesn’t know which one of these devices you want to use. That is why it’s important to select them properly inside the app’s settings. Follow the instructions below to change the default Desktop audio device!
- Open OBS by double-clicking its icon on the Desktop. If there is no such icon, click the Start menu button or simply tap the Windows Key on your keyboard, type OBS, and left-click the first available result.
- Click the Settings button available in the bottom-right corner. Once inside the Settings window, navigate to the Audio tab at the left-side navigation menu.

- Click the dropdown menu at the Desktop Audio Device entry and set it to Default. If it’s already set to default, make sure you set it to the other device which will appear on the menu. Apply the changes and check to see if the game audio capturing problem is resolved in OBS!
Solution 5: Checking correct Audio Track
Another setting which users should check is whether the correct Audio Track is being set up in the OBS application. Audio tracks allow users to access which Audio gets input in the software. If an incorrect track is set up in OBS, you will not be able to record the game sound when recording. In this solution, we will navigate to the Audio tracks option in settings and change the relevant options.
- Click on Files and then select Settings/Output.
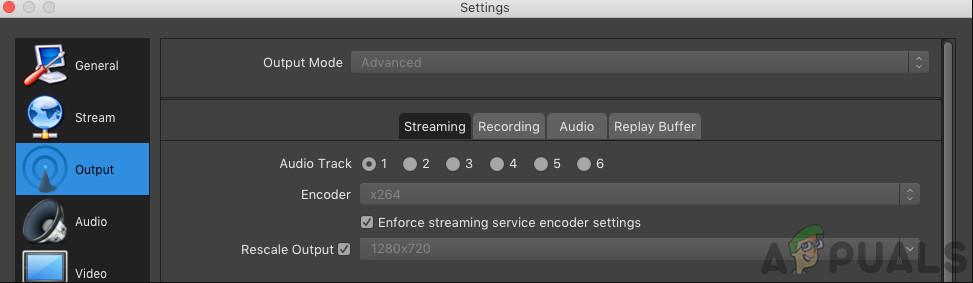
Audio options – OBS - Now, click the Recording tab and see which audio track is selected. Select the correct one, save changes, and exit.
Selecting Audio Source – OBS - Restart your computer and see if this fixed the problem.
Solution 6: Checking Volume Mixer
Volume Mixer is a feature in the Windows operating system which allows you to choose how much volume from each application or system should be outputted (especially if there are multiple sound outputting devices). Here, you have to make sure that OBS isn’t muted because of any reason.
- Right-click on the Sound icon present in your taskbar and select Open Volume Mixer.
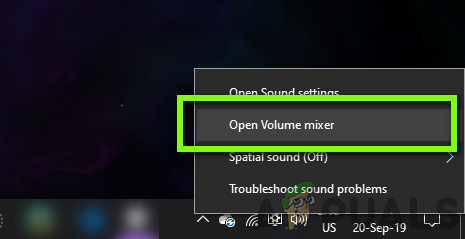
Volume Mixer – Sound settings - Now, make sure the configurations are correct.
- After making changes, restart OBS and the game and see if the problem is resolved.
Solution 7: Disabling GX in Xonar Sound Cards
Xonar Sound Cards have an option of GX mode. This allows users to enable EAX support when playing games. EAX is also known as Environmental Audio Extensions and only specific games are calibrated to run with it. However, we came across instances where the GX mode was interfering with OBS recording utility. Disable the GX mode, power cycle your computer, and check if the problem is resolved.
Solution 8: Adding Audio Device
There are also instances where the Audio device itself isn’t added to OBS. An Audio device is a device that is considered to allow output to any software or operating system. If the Audio device itself isn’t added, you will not be able to record anything.
Make sure that you go to the Audio options in your setting and add the relevant Audio device from. It can be Desktop or Window Audio. After adding the correct audio, power cycle your computer and check again if the recording issue has been resolved.


When I check the box next to “Listen to this device” in Stereo Mix, I get a horrible ringing noise because of feedback. Why does that box need to be checked and how do I stop the feedback?