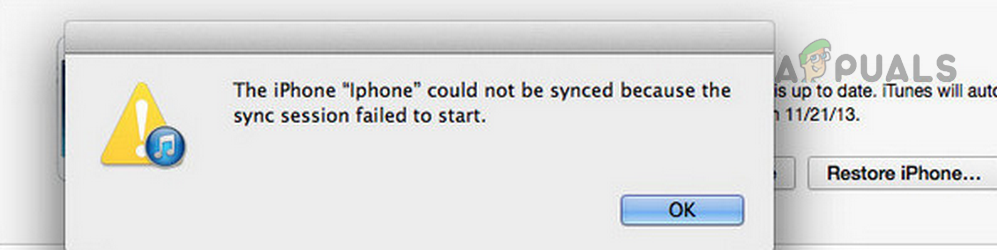
Fix: The iPhone could not be synced because the sync session failed to start
An iTunes sync session may not start if iTunes is not properly installed, or if the system or device modules responsible for processing the sync are invalid. This prevents syncing content or music between your device and system, although backup creation in iTunes or Mac’s Finder may still work. Reinstall iTunes or reset the Apple device/system to factory defaults to replace the invalid modules.
Before troubleshooting, try plugging your Apple device into a different USB port using an original cable and retry the sync. Make sure the device is directly connected to your system, without USB extension cables or hubs. Additionally, ensure there’s enough space on both devices for the content you’re trying to sync.
First, disconnect the phone from the system, close all running apps on the mobile device, restart both devices and retry the sync. For Windows PCs, set Autoplay for your Apple device in Windows Settings to “Take no Action.”
1. Update iTunes and OS of Mobile Device/System to the Latest Builds
If iTunes or your device’s OS is outdated, incompatibilities may arise, preventing iTunes from accessing a module needed for syncing. Updating iTunes and the device’s OS to the latest versions should resolve the issue.
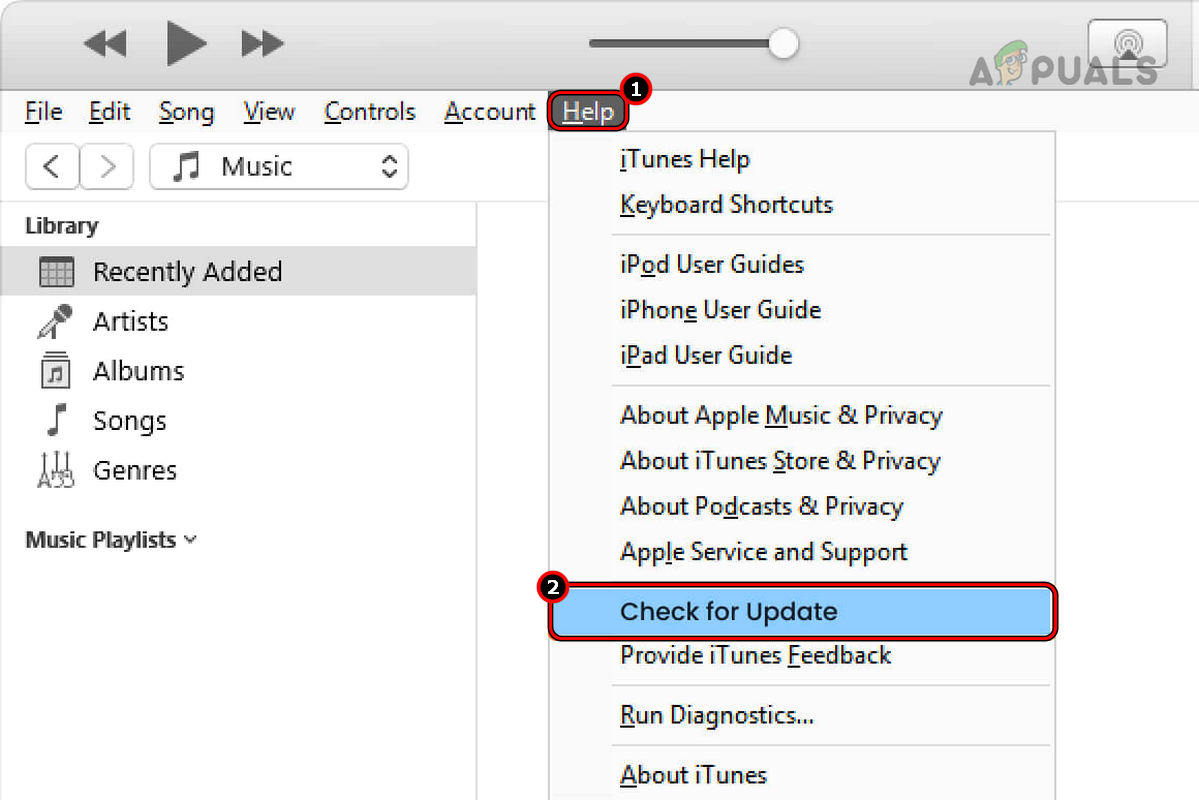
Update iTunes
- Launch iTunes and open the Help menu.
- Select Check for Updates and if an update is shown, download and install the update.
Check for iTunes Updates - Once done, restart your system and launch iTunes (without connecting your mobile device).
- Wait for a minute and exit iTunes.
- Connect your device to the system and launch iTunes (if not launched automatically).
- Start the sync process and check if it is working properly.
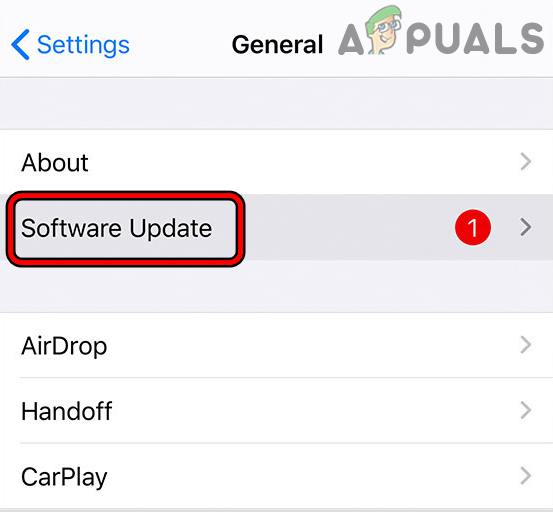
Update the OS of the Mobile Device
Before updating, fully charge your mobile device and connect it to a Wi-Fi network. Also, create a backup of your device. On your iPhone:
- Navigate to Settings > General > Software Update.
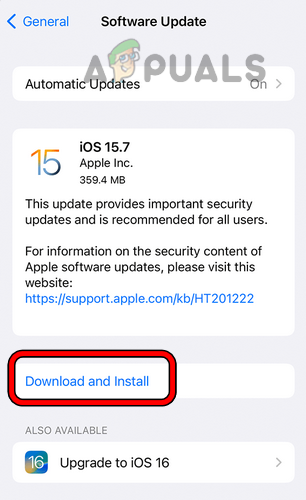
Open Software Update in the General Settings of the iPhone - Download and install an iOS update (if shown).
14. Download and Install the Latest iOS Update on the iPhone.png - Once done, restart your iPhone and check if the iTunes sync is working properly.
Update the System’s OS
To update a Windows PC:
- Right-click Windows and open Settings.
Open Windows Settings Through the Quick Access Menu - Navigate to the Windows Update tab and click on Check for Updates.
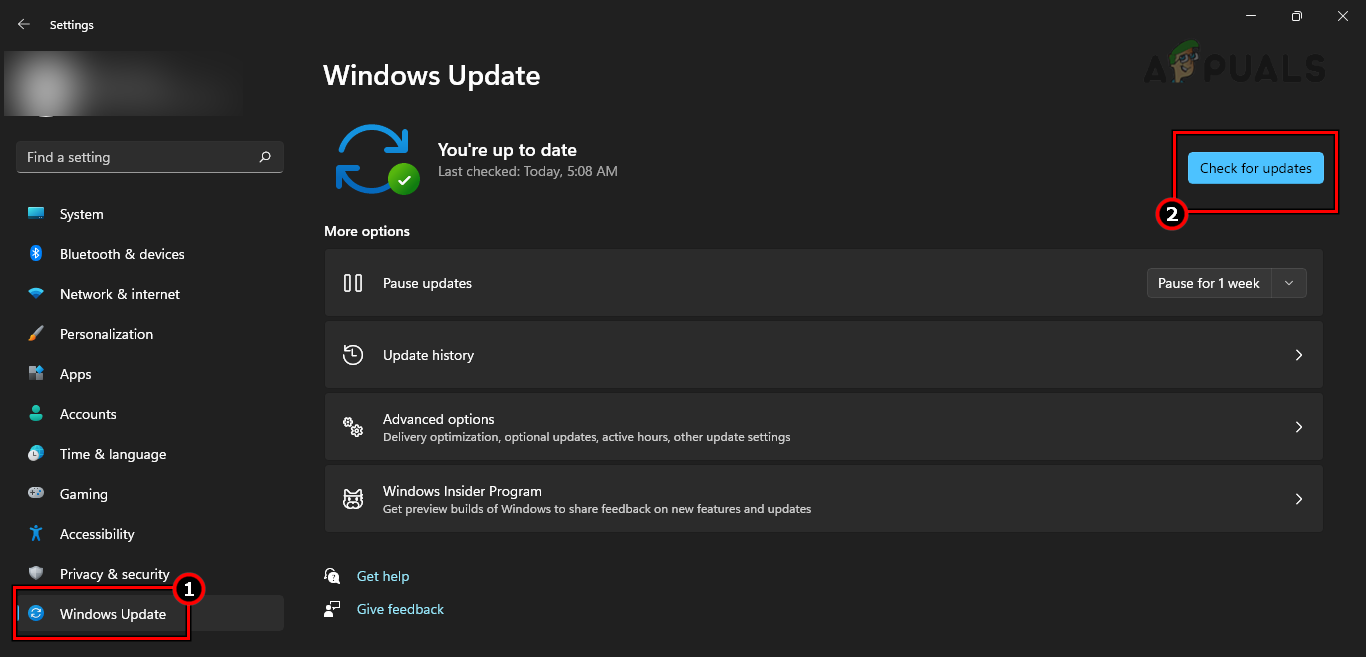
Check for Windows Updates - Install updates (if shown) and once done, restart your PC. Check if the iTunes sync problem is solved.
2. Enable “Open Photos for This Device” and Disable “iCloud Sync of Photos”
If iTunes is not allowed to handle photos on your connected device, it won’t sync photos between the device and the system. Enable “Open Photos for This Device” in iTunes to fix the problem.
- Connect your phone to the system and launch iTunes.
- Select your device and checkmark Open Photos for This Device.
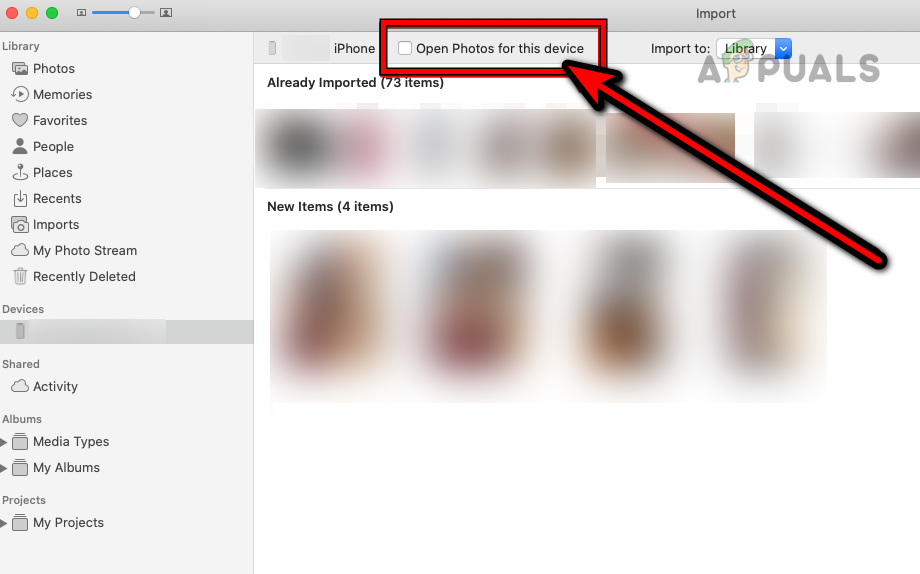
Enable Open Photos for This Device - Eject the device in iTunes and restart the phone.
- Restart the system and connect the phone to the system.
- Launch iTunes and check if it is syncing properly.
- If not, navigate to iPhone Settings > your Apple ID > iCloud > Photos.

Disable iCloud Sync of Photos - Disable iCloud sync of photos and connect the phone with the system.
- Launch iTunes or Finder and check if the sync session problem is solved.
- If this does not work, open iCloud in the iPhone Settings and disable Find My iPhone.
- Retry the sync and check if it is working properly.
3. Disable Automatic and Wi-Fi Syncing of the Device
Enabling Wi-Fi syncing in iTunes can cause resource conflicts when trying to sync the same device with a cable. Disabling Wi-Fi syncing should resolve the issue. Similarly, disable automatic syncing if it’s enabled, as it can prevent manual syncing from starting.
The same is the issue with automatic syncing, if it is enabled, manual syncing will not start, and disabling automatic syncing will do the trick.
- Connect your device to the system and launch iTunes.
- Select your device in iTunes and in the Options section of the Summary tab, uncheck Sync with this <device> over Wi-Fi.
- Again, in the Options section, disable Automatically Sync When This iPhone is Connected and Manually Manage Music and Videos.
- Click on Apply and Done.
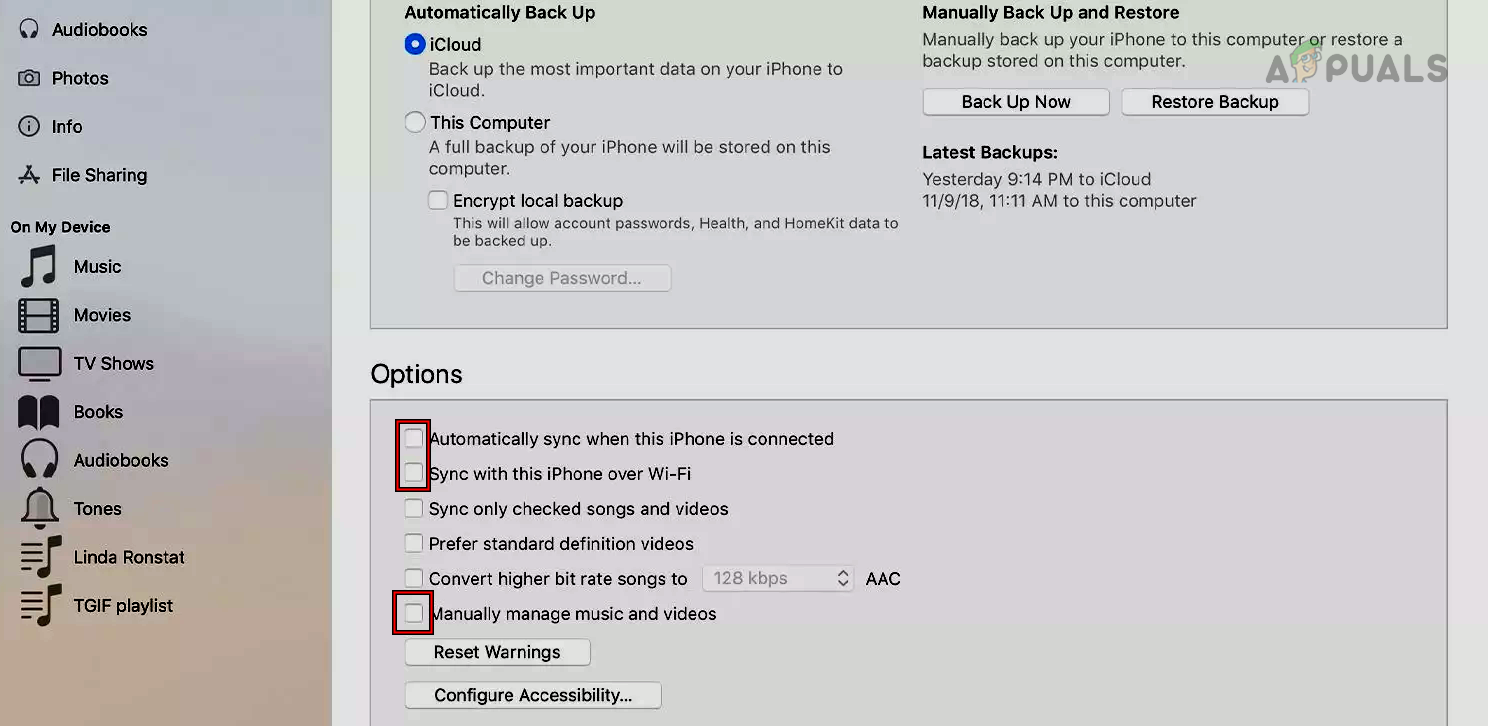
Disable Sync with this iPhone over Wi-Fi, Automatically Sync When This iPhone is Connected, and Manually Manage Music and Videos in iTunes - Disconnect your phone from the system and restart both.
- Connect back the phone to the system and launch iTunes. Check if it is syncing without any issues.
- If this does not work, check if syncing wirelessly solves the problem.
4. Change the Sync Settings of iTunes
Invalid or inaccessible content items can cause iTunes to fail to sync between devices. Change the sync settings in iTunes to fix the issue.
- Connect your phone to the system and launch iTunes.
- Select your device and open the type of content (such as Audiobooks) that you want to disable. Audiobooks, Photos, and Smart Albums in Photos are reported to cause issues while syncing. In the case of Smart Albums, convert the Smart Albums into Normal Albums and delete Smart Albums in Photos.
- Uncheck the sync checkbox of the content type and check if the sync problem is solved.
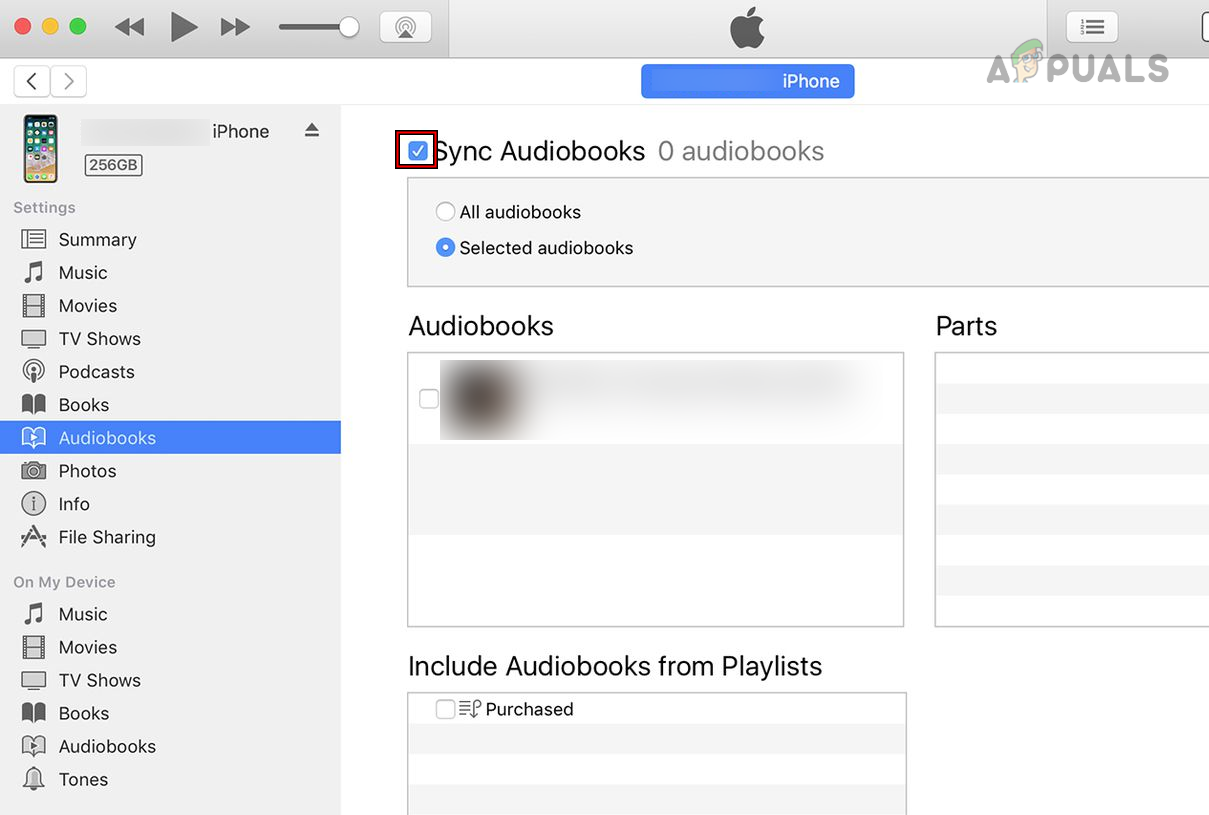
Uncheck Sync Audiobooks in iTunes Sync Settings - If this does not work, connect your phone to the system and launch iTunes or Finder.
- Select your Apple device and open Photos.
- Disable Sync Photos to Your Device and apply the changes.
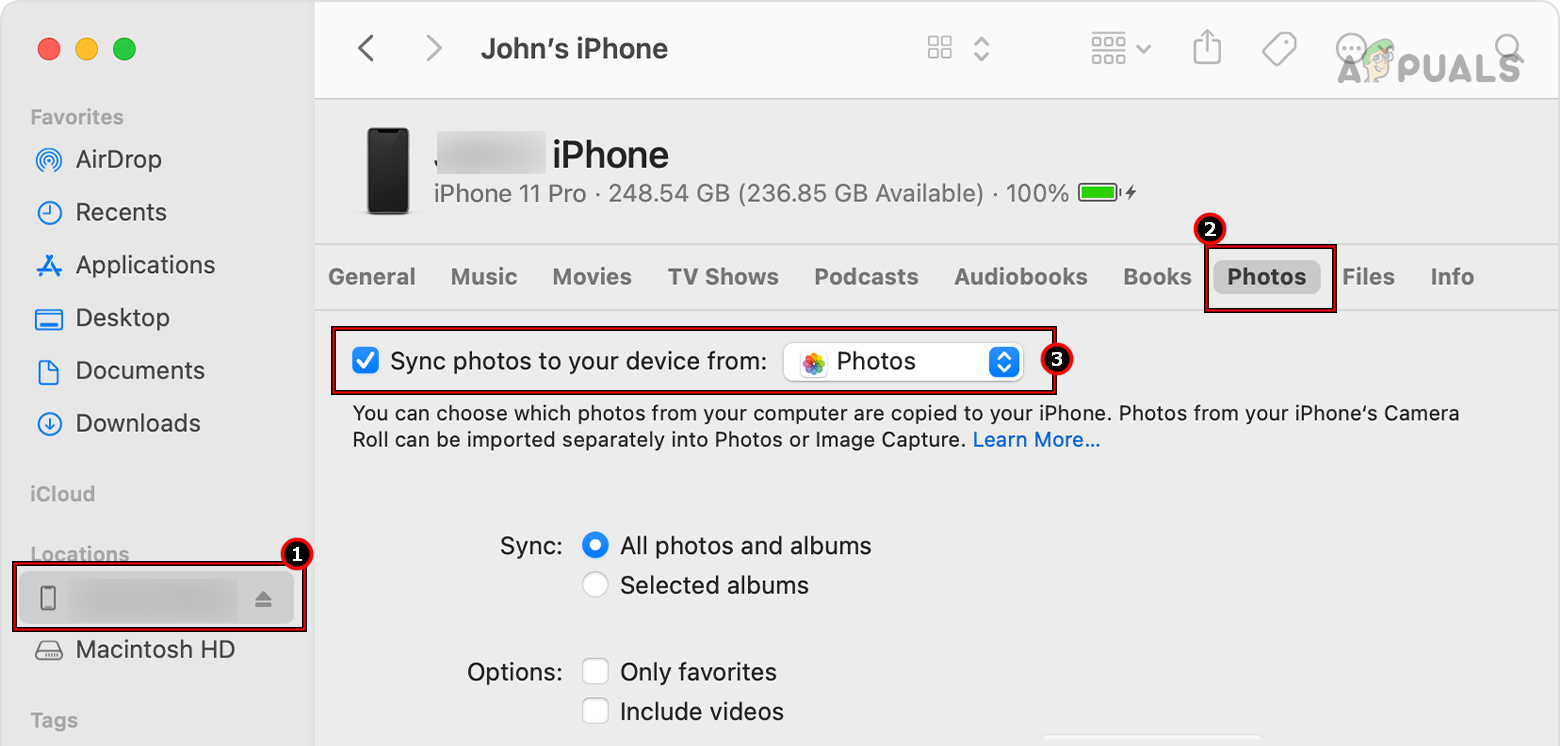
Disable Sync Photos to Your Device from iTunes - On the warning, select Delete All Synced Photos from My Device. A copy will be kept on your Mac and photos will be kept that were made with your Apple device and were not synced. However, it will be better to make a copy of these photos (by using another method) to avoid any unwanted situation.
- Wait and enable Sync Photos to Your Device.
- Sync again and check if the problem is solved.
6. Check Music Selection in iTunes or Delete the iTunes Library
If your iTunes music selection or library is invalid or inaccessible, iTunes won’t sync with your phone, preventing the sync session from starting. Check your iTunes music selection or delete the iTunes library to resolve the issue.
Before deleting, back up the data in your iTunes library.
- Navigate to your music list in iTunes and make sure each item you want to sync has a checkmark against it. You can also select all the items by using Ctrl + A or Command + A.
- Right-click on these and select Check Selection.
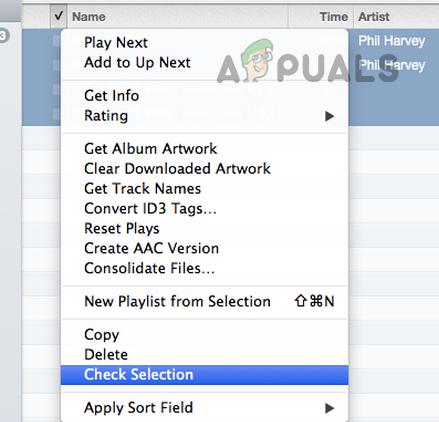
Check Selection in iTunes - Try syncing again and check if the issue is resolved.
- If this does not work, navigate to Music under the “on my device” section in iTunes and check if there are circles or exclamation marks next to the items shown.
- If so, iTunes is failing to access these files. Although, these files may be present and useable in the actual iTunes library folder of your system.
- In iTunes, select all the items by using Ctrl + A or Command + A and delete them.
- Once done, open File > Add Folder to Library > iTunes (directory) to reload all the items again.
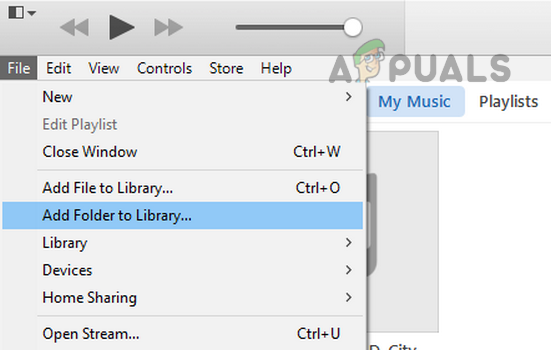
Add Folder to Library in iTunes - Try to fill in or correct info for the items without artist names and delete any duplicates.
- Retry the sync and check if the issue is resolved.
- If this does not work and any of the synced items are located in a shared location on your network, delete that item in iTunes or move the item to the local storage of your system and retry sync. Check if the problem is solved.
7. Re Log into iTunes
Sync issues can arise if the Apple ID used on iTunes is different from the one on the connected device, or if you’re logged out of iTunes. Additionally, errors in required device authorization modules can cause several unseen problems. Relogging into iTunes should fix the issue.
- Disconnect the phone from the system.
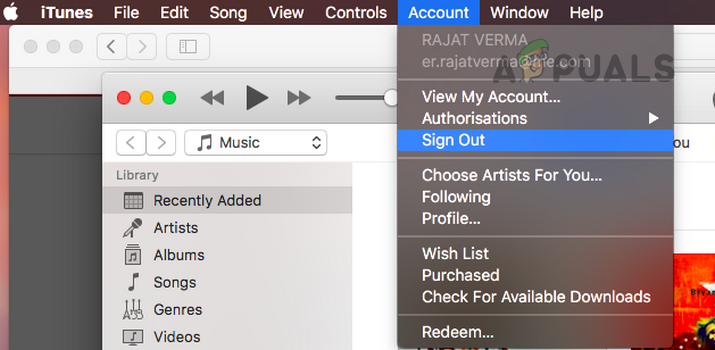
- Launch iTunes and open the Account menu.
- Select Deauthorize This Computer and confirm to deauthorize the system.

Deauthorize This Computer in iTunes - Again, open the Account menu and select Sign Out.
Sign Out of iTunes - Once done, restart your system and launch iTunes.
- Open Account and select Sign in.
- Log in using your credentials and relaunch iTunes.
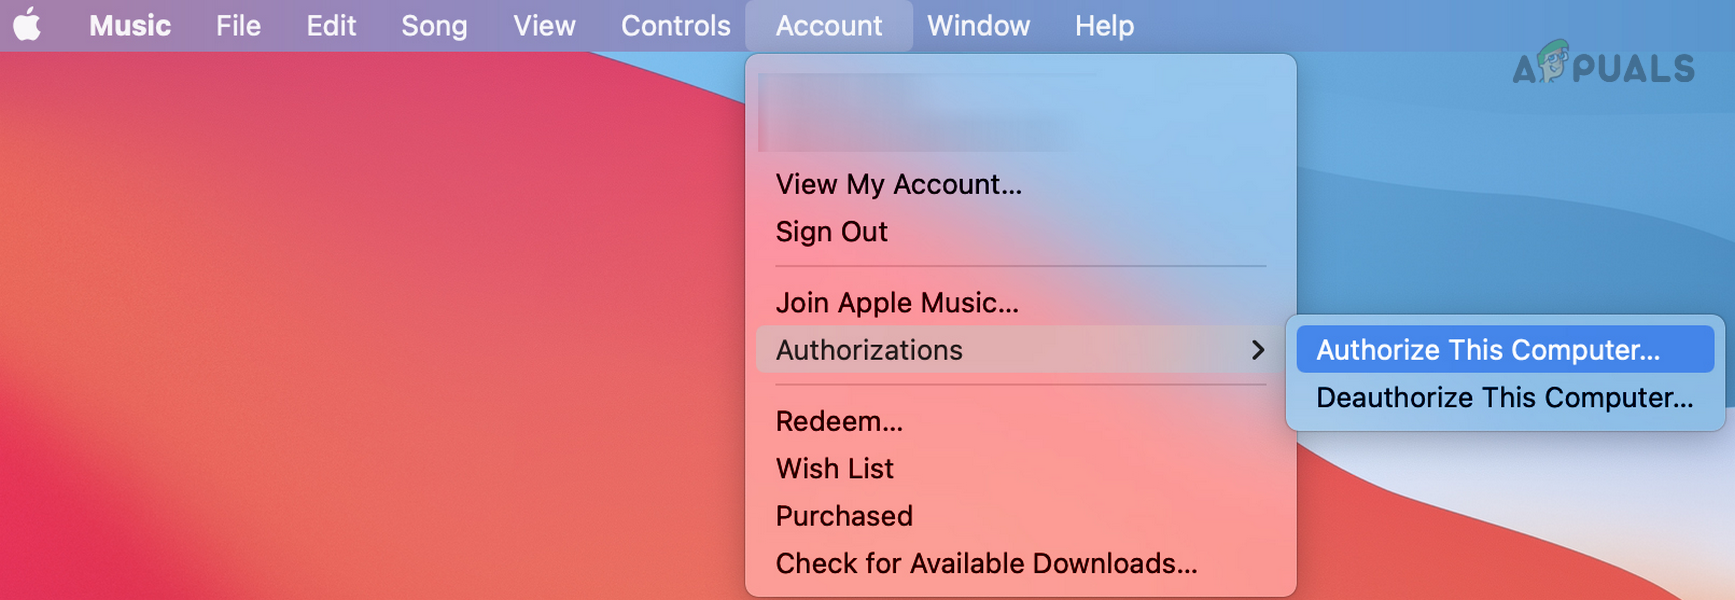
- Go to Account > Authorize This Computer and click on Authorize.
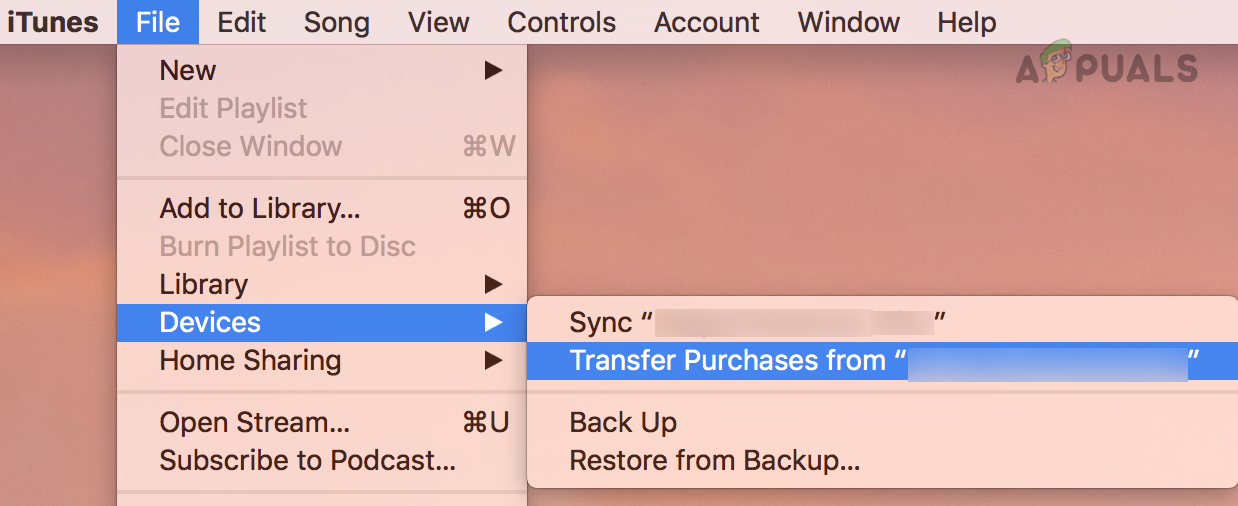
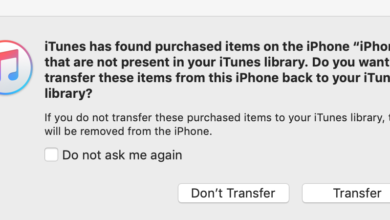
Authorize This Computer in iTunes - Connect the device to the PC and Navigate to File > Devices > Transfer Purchases from <your device>.
Transfer Purchases From iTunes - Follow the prompts to complete the process and check if syncing problem is solved.
- If the issue persists, check if changing the password of your Apple ID and re-logging into iTunes clears the issue.
8. Uninstall or Reconfigure Conflicting Apps
If another app on your system is locking a resource essential for initiating a sync session, issues may occur. Security apps like antivirus or firewall software can also cause conflicts. Uninstalling or reconfiguring these apps should resolve the problem.
- If you have a 3rd party security product, check if uninstalling it solves the problem.
- If you do not have a 3rd party security product, click Windows, type, and open Windows Security.
- Select Virus & Threat Protection and open Manage Settings.
- Under Exclusions, click on Add and browse to the installation directory of iTunes.
- Select iTunes and click OK.
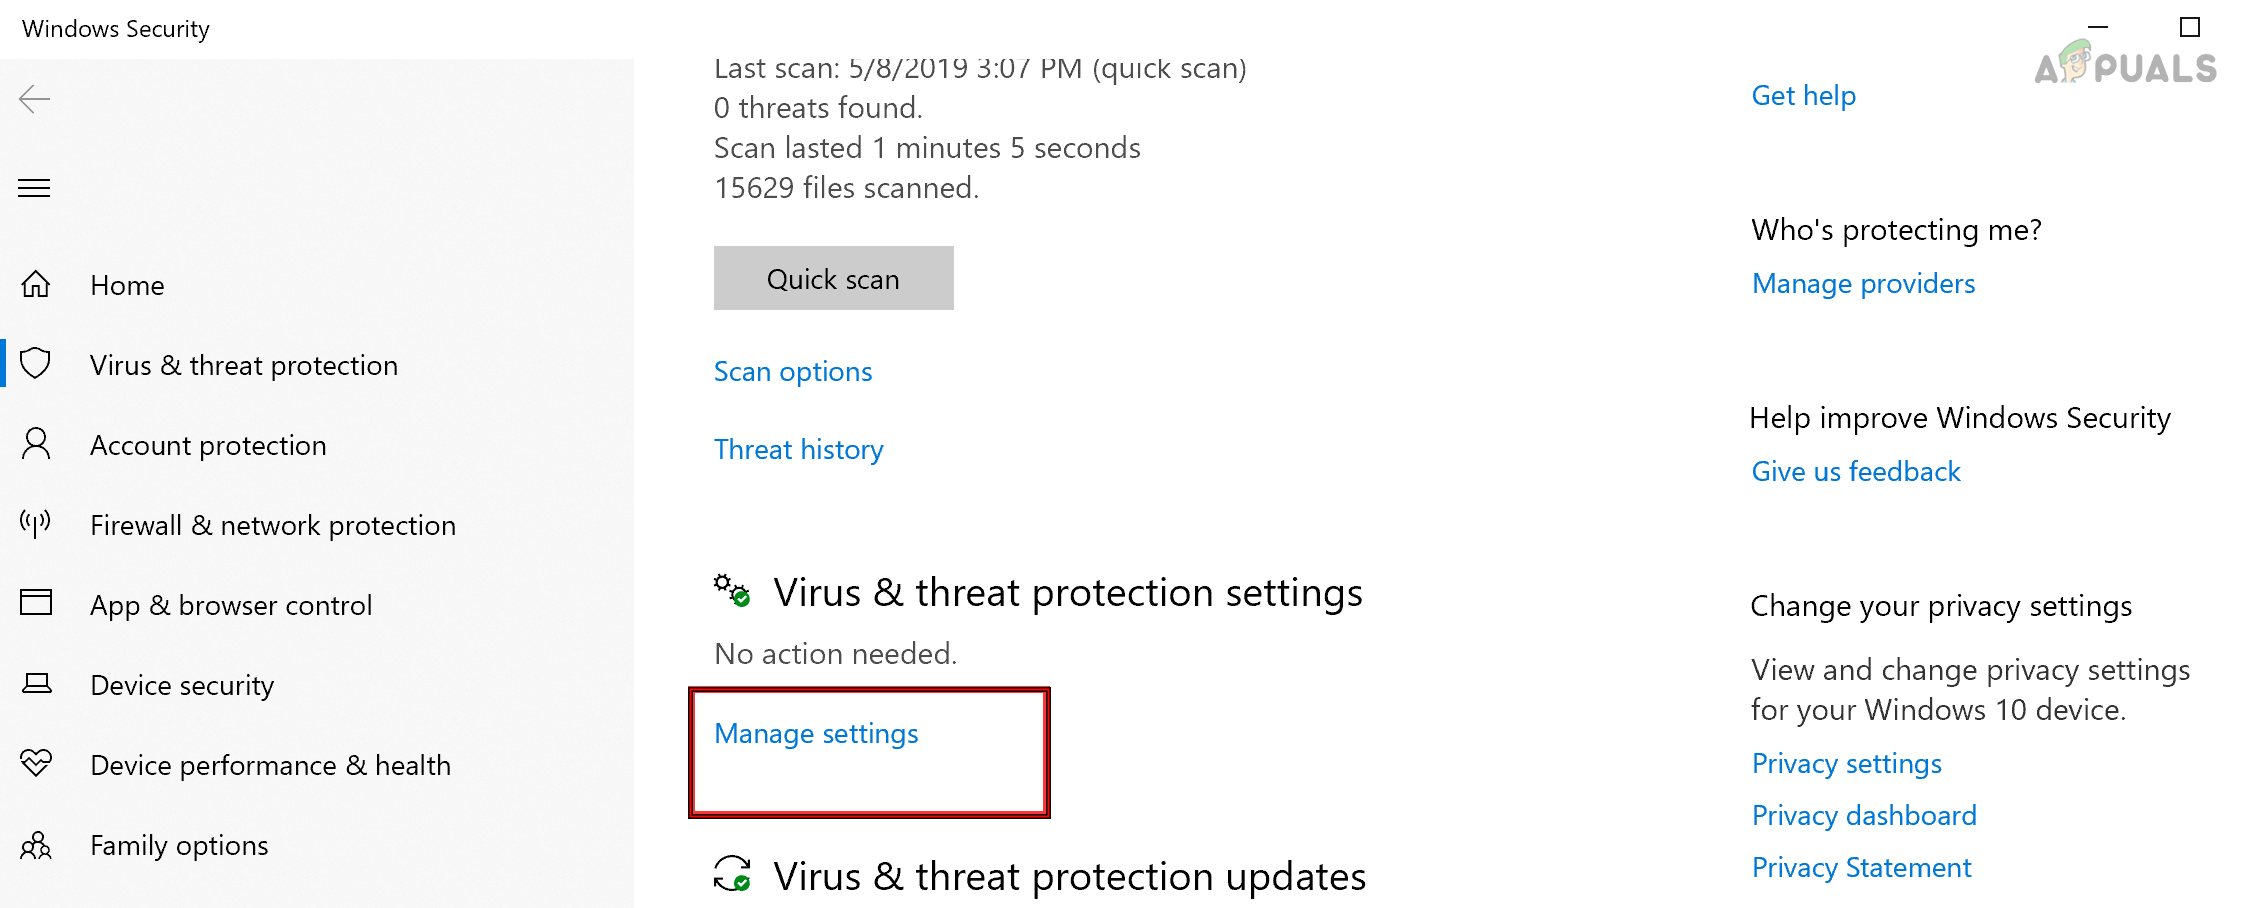
Open Manage Settings in Virus & Threat Protection of Windows Security Settings - Restart your system and check if the sync problem is solved.
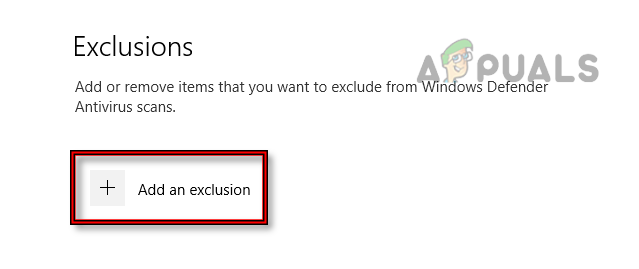
Add an Exclusion for iTunes in Windows Defender - If that does not work, check if your antivirus or firewall is not blocking any Apple processes such as Mobile Backup and Mobile Device Helper.
- If so, remove the block and then check if the problem is cleared.
If you are using iTunes in Wine on Linux, check if uninstalling SafeEyes resolves the issue. If you are using a virtualization app such as Parallels or VMWare, disconnect the phone from the system, disable those apps, and reconnect the phone with the system. Launch iTunes and check if the issue is resolved.
9. Delete Old Backups in iTunes and Reset Sync History
iTunes uses incremental backups, overwriting existing backups or attaching data to old backups. If the old backup in iTunes is invalid or inaccessible, it can disrupt the sync process. Deleting old backups in iTunes should fix the issue.
- Eject the phone in iTunes and disconnect the phone from the system.
- In iTunes, navigate to Edit > Preferences > Devices.
- Select the problematic device and delete all the old backups shown. If you want to play safe, move the old backup files to a safe location and then delete the backups.
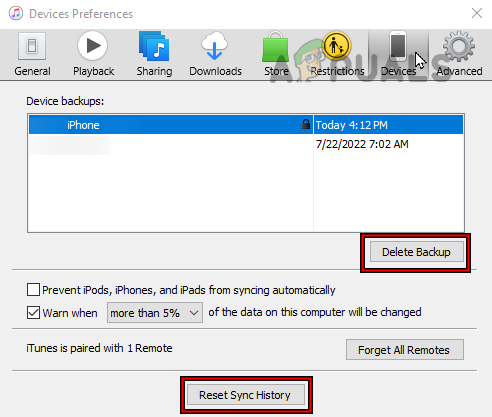
Delete Old Backup in the Devices Tab of iTunes - Go back to the Devices tab and click on Reset Sync History.
- Once done, exit iTunes and plug the iPhone into the system.
- Launch iTunes and check if it is syncing properly.
10. Reinstall iTunes
If iTunes is not properly installed due to a sudden power failure or failed update, relevant components won’t be able to access the connected device, causing issues. Reinstalling iTunes should resolve the problem.
Before uninstalling, ensure to back up the data in the iTunes directories to a safe location.
- Eject your Apple device from iTunes and disconnect the device.
- Exit iTunes and force close its processes in the system’s Task Manager.
- Right-click Windows and select Apps & Features.
- Locate iTunes and expand its Options.
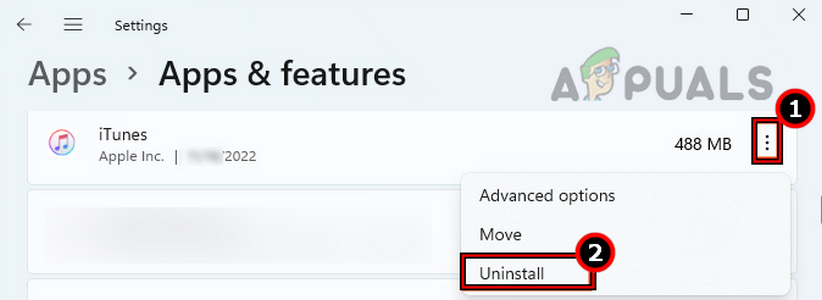
Uninstall iTunes on Windows - Click on Uninstall and follow the prompts on your screen to complete the process.
- Uninstall all the other Apple products on your system but in the following order:
Quick Times

Apple Software Update

Apple Mobile Device Support

Bonjour

Apple Application Support
- Once uninstalled, restart your system and make sure the following folders are deleted from your system:
C:\Program Files\Bonjour

C:\Program Files\Common Files\Apple\

C:\Program Files\iTunes\

C:\Program Files\iPod\

C:\Program Files\QuickTime\

C:\Windows\System32\QuickTime

C:\Windows\System32\QuickTimeVR

C:\Program Files (x86)\Bonjour

C:\Program Files (x86)\Common Files\Apple\

C:\Program Files (x86)\iTunes\

C:\Program Files (x86)\iPod\

C:\Program Files (x86)\QuickTime\

C:\Windows\SysWOW64\QuickTime

C:\Windows\SysWOW64\QuickTimeVR

%APPDATA%\

%userprofile%\Music\iTunes
- Once done, empty the recycle bin and restart your system.
- Download the latest version of iTunes from the Apple website and install it as an administrator.
- Once done, launch iTunes as an administrator, and if it asks for firewall exemptions, make sure to allow it.
- Check for iTunes updates and restart your system.
- Launch iTunes and wait for a minute.
- Exit iTunes and connect your Apple device to the system.
- Launch iTunes and check if it is syncing properly with the device.
11. Reset All the Settings of Your Mobile Device
If a setting on your mobile device is misconfigured or prevents communication with your system, the iTunes sync session may fail. Resetting all settings on your mobile device should fix the issue.
To reset all the settings on an iPad:
- Navigate to Settings > General > Reset.
- Tap on Reset All Settings and then confirm to reset the settings.
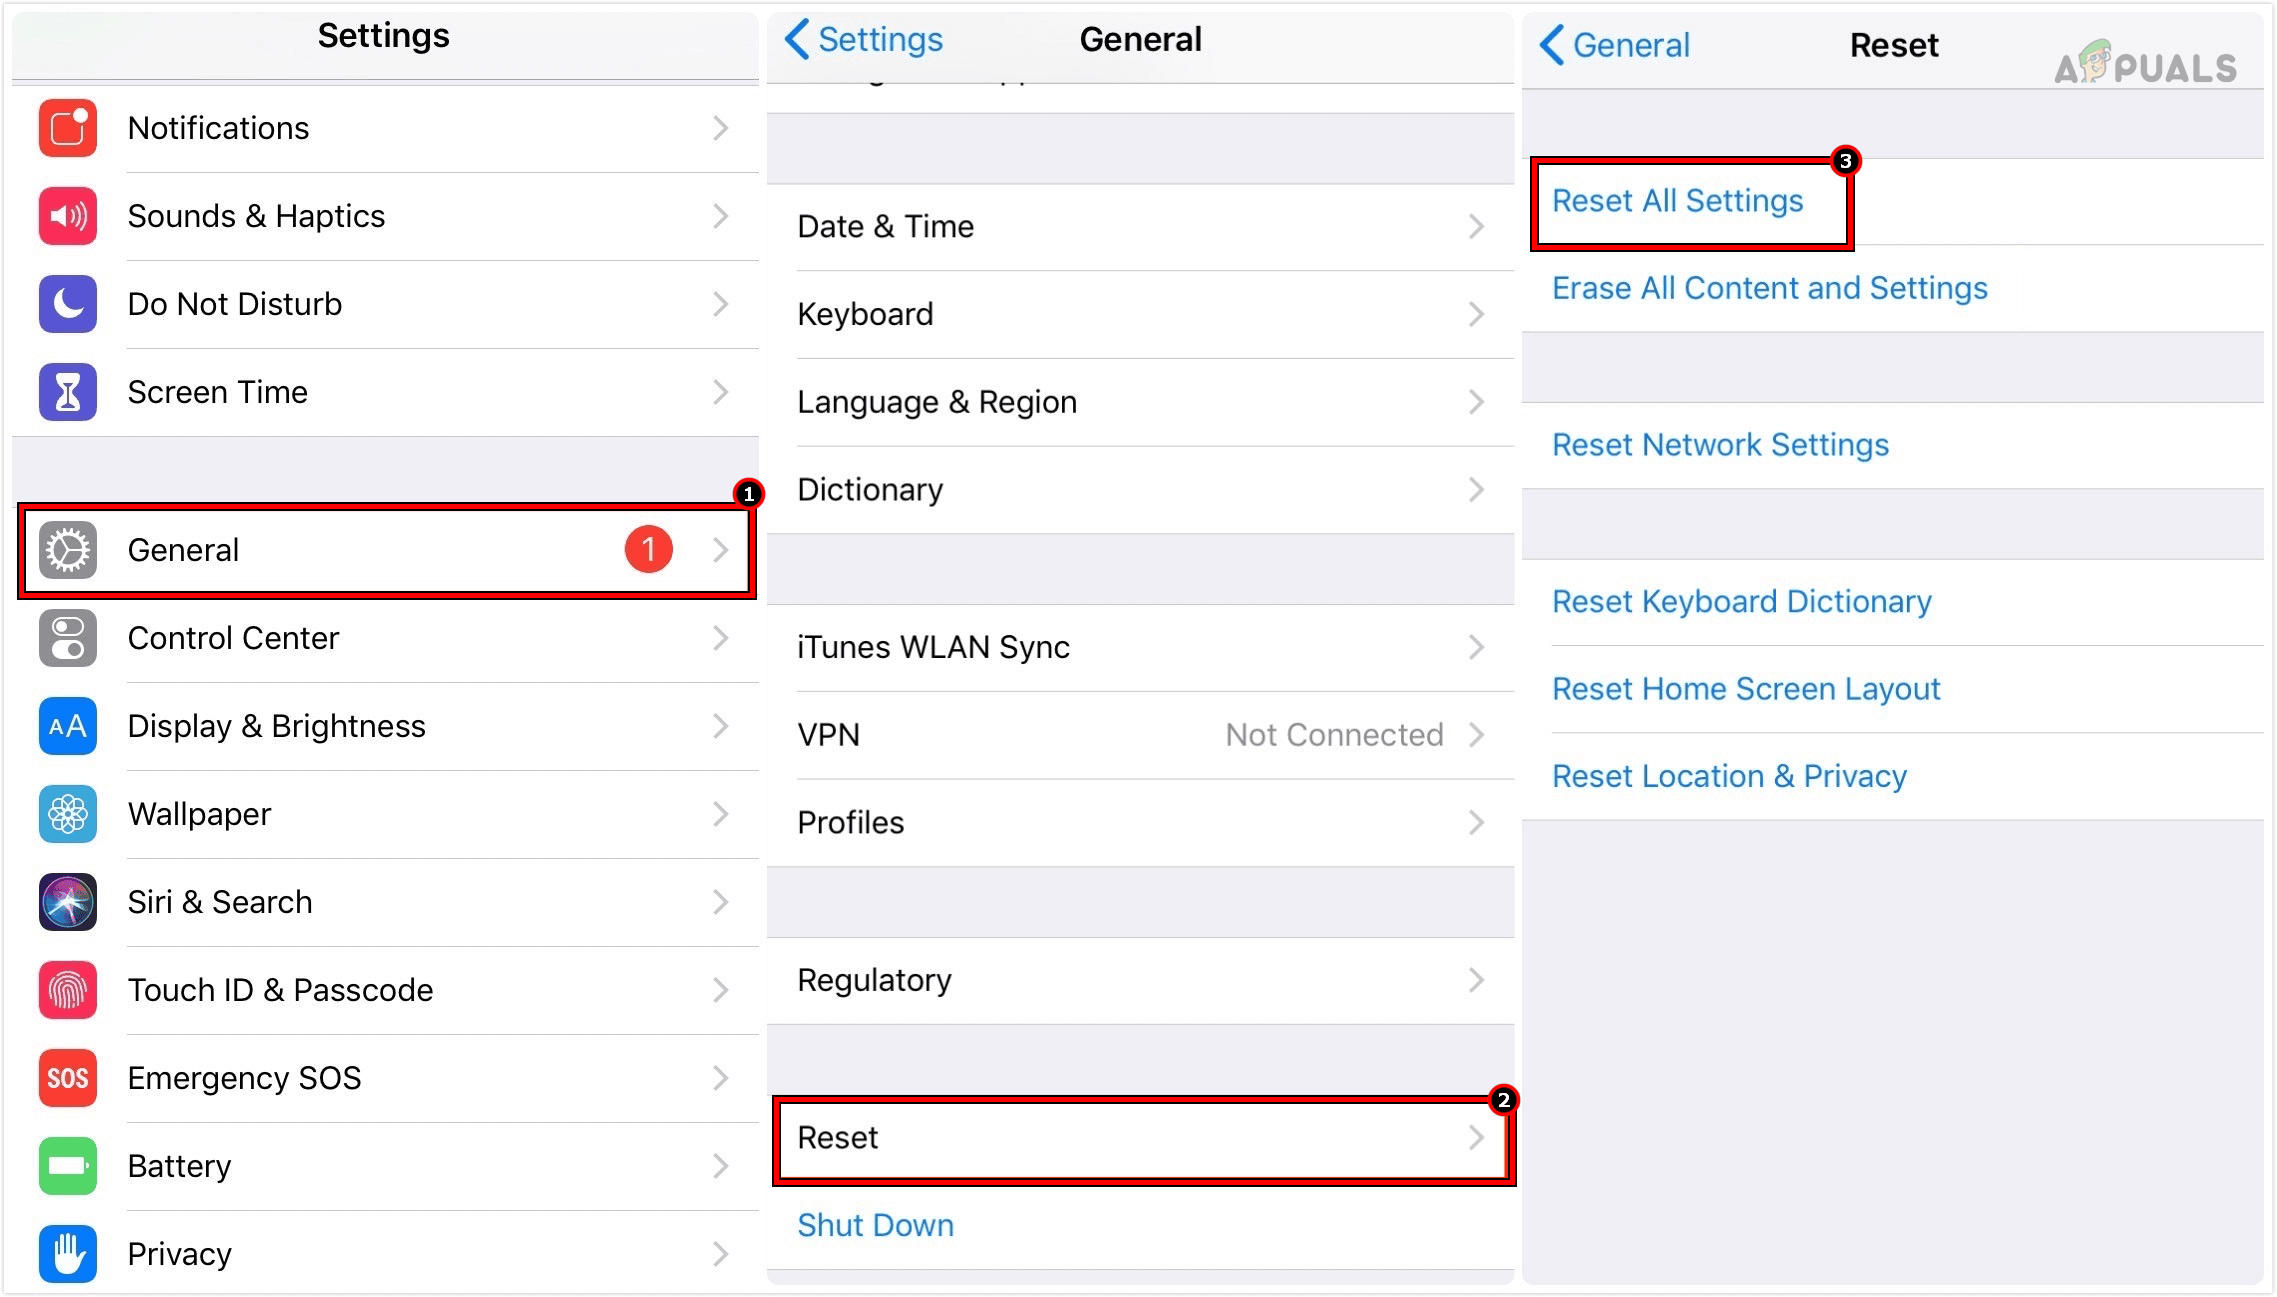
Reset All Settings of the iPhone - Once done, restart your iPad and check if the iTunes sync is operating correctly.
If none of the above worked, then you may reset your Apple device to the factory defaults and if the issue persists, then resetting your system to the factory defaults may resolve the issue. Otherwise, you may contact Apple Support. Till then you may use another method to sync data between the system or device (such as iMazing, AnyTrans, etc.).

I finally got it to work. I did:
1. Force close of all apps on iPhone XS
2. Deletion of backup on my MacOS 10.12.6 iTunes 12.8.2.3 (backup was shown with a lock)
3. Quit iTunes and reopened iTunes on my Mac while my iPhone was connected.
Each time I tried to do Back Up Now and it didn’t work until after #3 above. Could have been that was the issue or it could have been a cumulative effect.