How to Fix Issues Connecting to remote Hyper-V Server 2019
Successfully deployed Hyper-V infrastructure is managed by using Hyper-V Manager or Windows Admin Center. It can be done locally or remotely, but in many cases, remotely management is a more efficient way, especially if we have more servers. Starting from Windows 8, Microsoft has integrated Hyper-V Client in the Professional and Enterprise editions of the operating system (Windows 8, Windows 8.1 and Windows 10). It gives additional flexibility, because you as IT admin don’t need to do it from Windows Server, but from your Windows client machine.
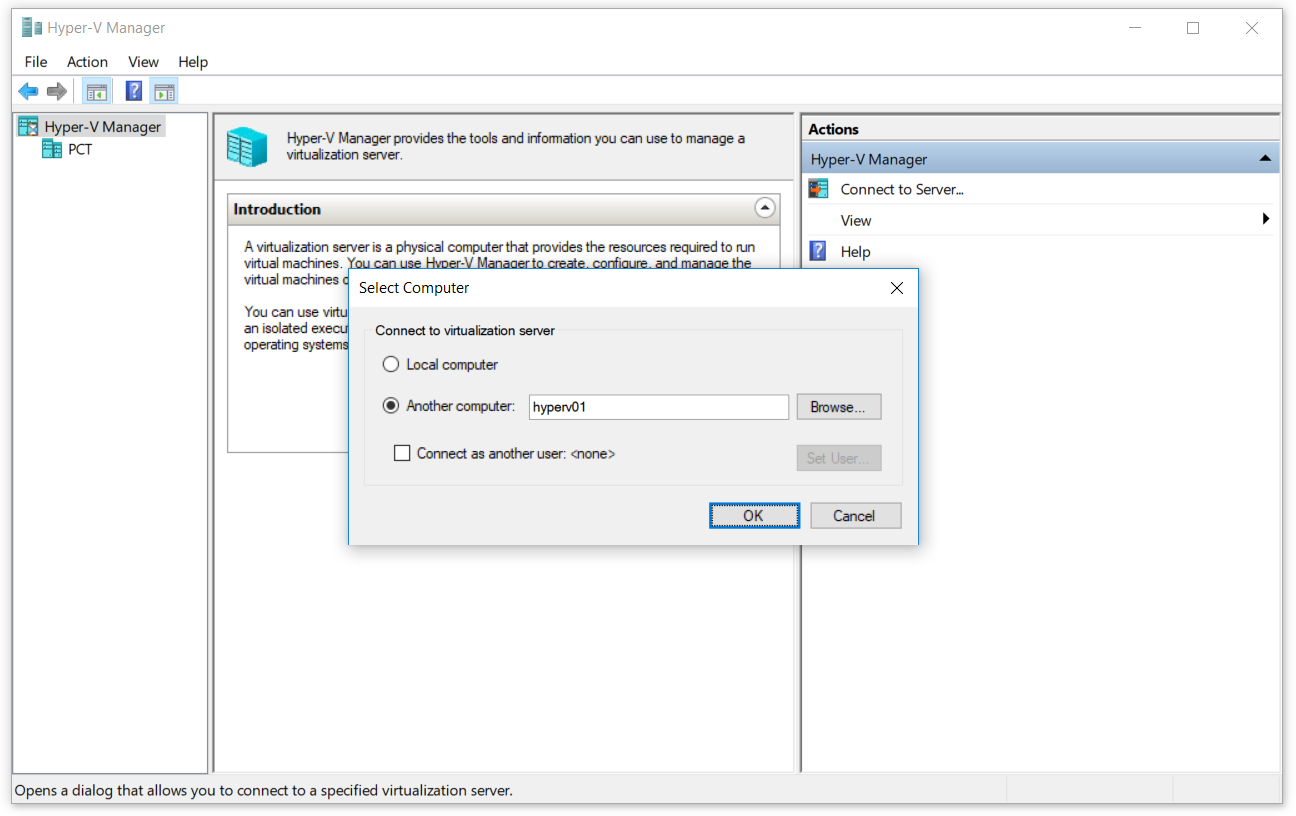
The procedure of connecting to remote Hyper-V server is straightforward. All we need is to open Hyper-V Manager and connect to remote virtualization server by clicking on Connect to Server… on the right side of the Hyper-V Manager console.
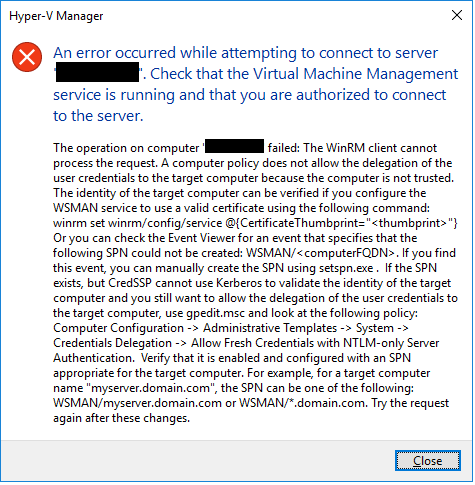
Some IT Admins are experiencing problems when connecting from Windows client to remote Hyper-V server. There are different reasons why this problem could happen, but in this article, we will talk about lacking trust between the source and the target machine. The error is known as: “An error occurred while attempting to connect to server “ServerName”. Check that the Virtual Machine Management service is running and that you are authorized to connect to the server. Connecting to remote server failed: The WinRM client cannot process the request. A computer policy does not allow the delegation of the user credentials to the target computer…” as shown on the screenshot below.
As the reason is quite obvious, in the next few steps we will walk you through the process of enabling trust between Windows client machine and remote Hyper-V Server.
Allow delegating fresh credentials with NTLM-only server authentification
Enabling trust on a Windows client machine can be done via GUI or a Powershell. In this article, we will do it by using the Local Group Policy Editor (GUI). The policy is called Allow delegating fresh credentials with NTLM-only server authentification. This policy setting applies to applications using the Cred SSP component (for example Remote Desktop Connection). Credential Security Support Provider protocol (CredSSP) is an authentication provider that processes authentication requests for other applications. If you enable this policy setting, you can specify the servers to which the user’s fresh credentials can be delegated (fresh credentials are those that you are prompted for when executing the application). If you do not configure (by default) this policy setting, after proper mutual authentication, a delegation of fresh credentials is permitted to Remote Desktop Session Host running on any machine (TERMSRV/*). If you disable this policy setting, a delegation of fresh credentials is not permitted to any machine. In our example, we will enable policy on a source Windows machine from which we are connecting to the remote Hyper-V server. So, let’s start.
- Right click on Start Menu and search for Group Policy Editor by typing gpedit
- Open Edit Group Policy
- Navigate to Computer Settings > Administrative Templates > System > Credentials Delegation
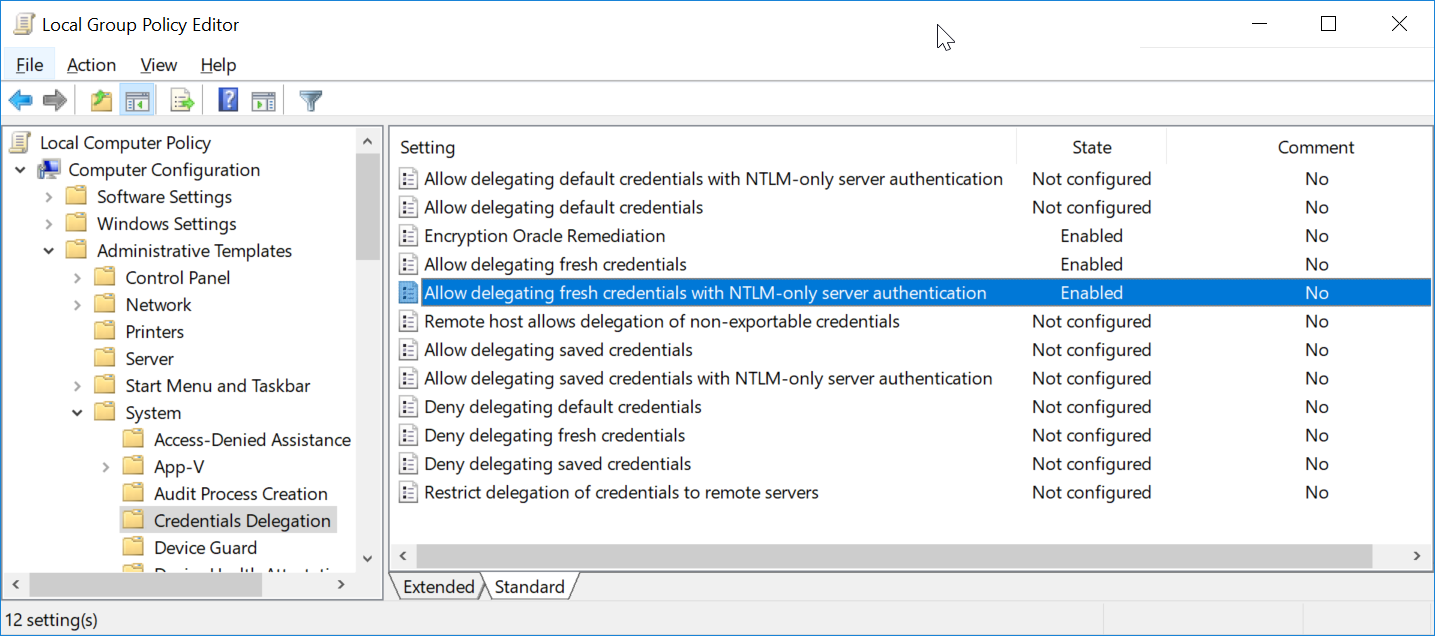
- Double click on Allow delegating fresh credentials with NTLM-only server authentication
- Activate policy by clicking on Enable
- Click Show… next to Add servers to the list
- Click on the field and type WSMAN/Hyper-V Server name. In our example server is called hyperv01, so we will type wsman/hyperv01
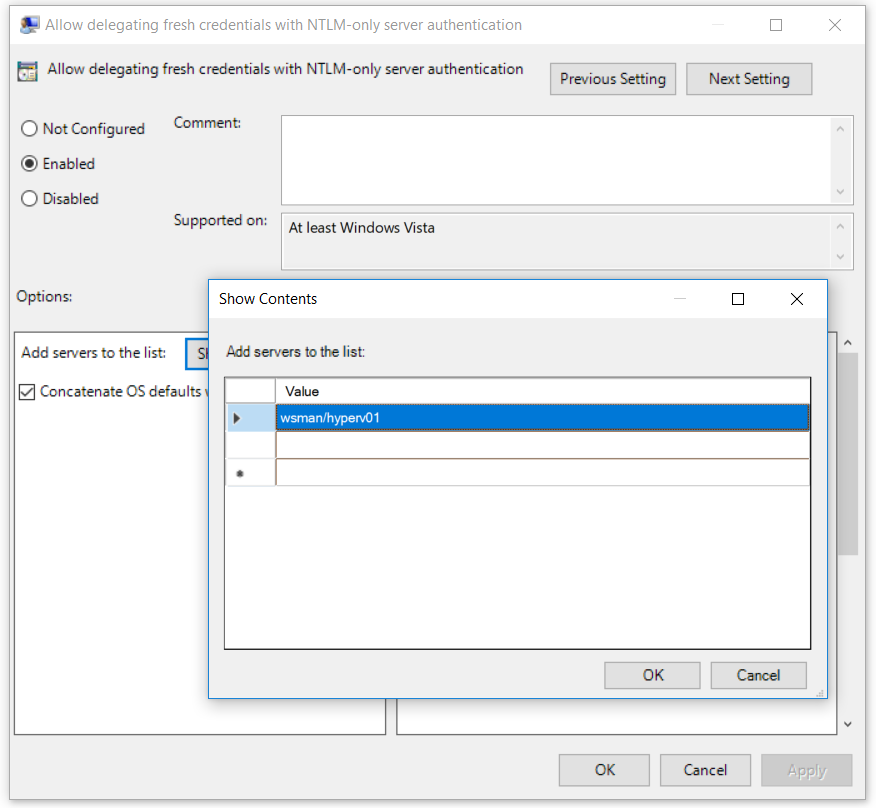
- Click OK to confirm
- Click Apply and then OK
By default, computer Group Policy is updated in the background every 90 minutes, with a random offset of 0 to 30 minutes. As we don’t want to wait for it, we will enforce an update by using CMD or a Powershell. Please follow the procedure below. Also, we can change a refresh interval for Group policy starting from 0 minutes to 31 days.
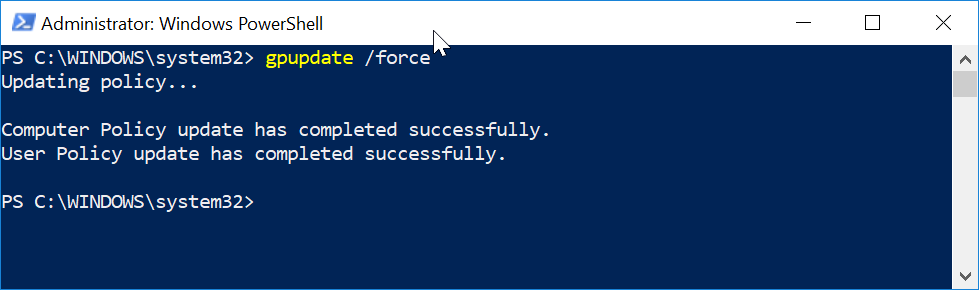
- Right click on Start Menu and open Windows PowerShell (Admin) or Command Prompt (Admin)
- Click Yes to Confirm opening as Administrator
- Type gpupdate /force and press The policy will be updated in a few seconds.
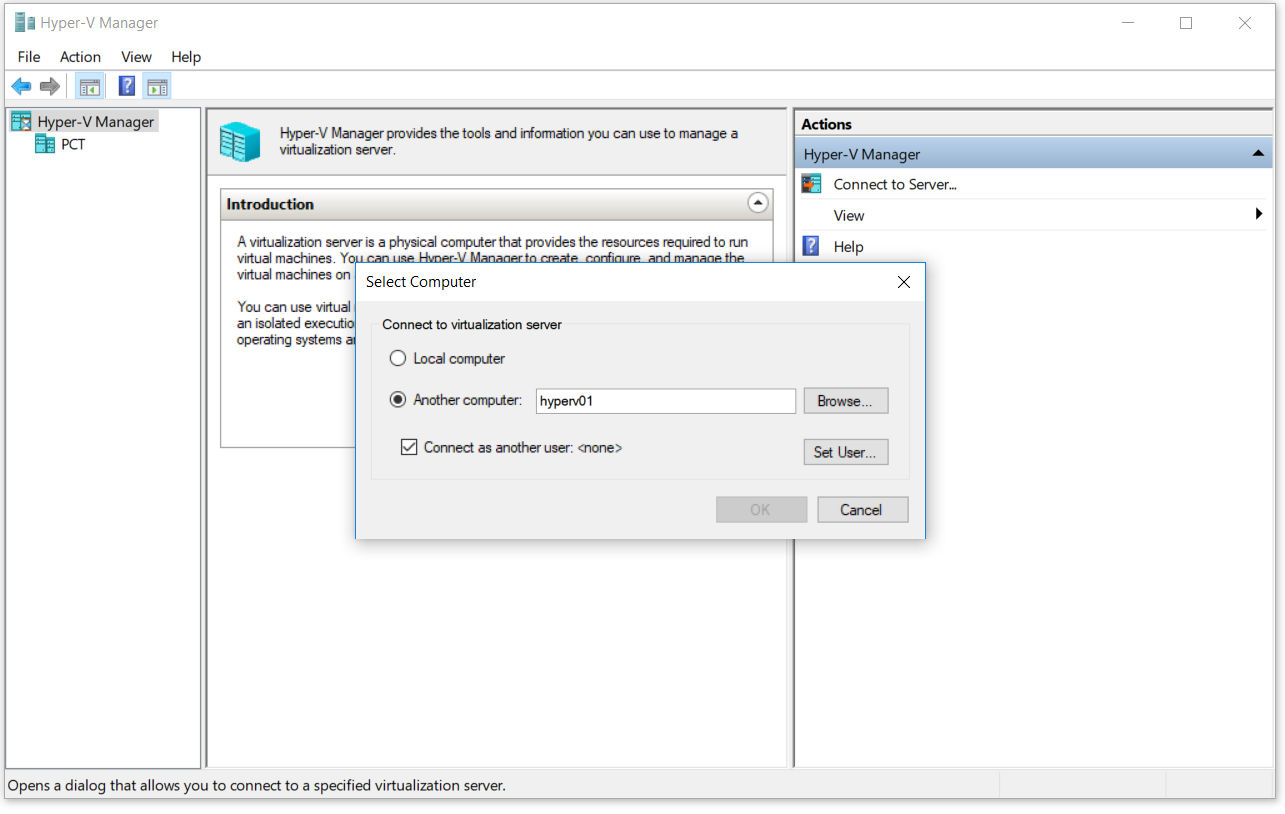
- Open Hyper-V Manager on Windows client machine
- Click on Connect to Server… on the right side of the Hyper-V Manager console
- Type Hyper-V 2019 server name under Another Computer, select Connect as another user. <none> and then click on Set User…. In our example, we are connecting to a remote Hyper-V server called hyperv01
- Type username and password. The username should be in a format <servername\user> or <domain\user>. In our example, we are using the server name hyperv01\Administrator.
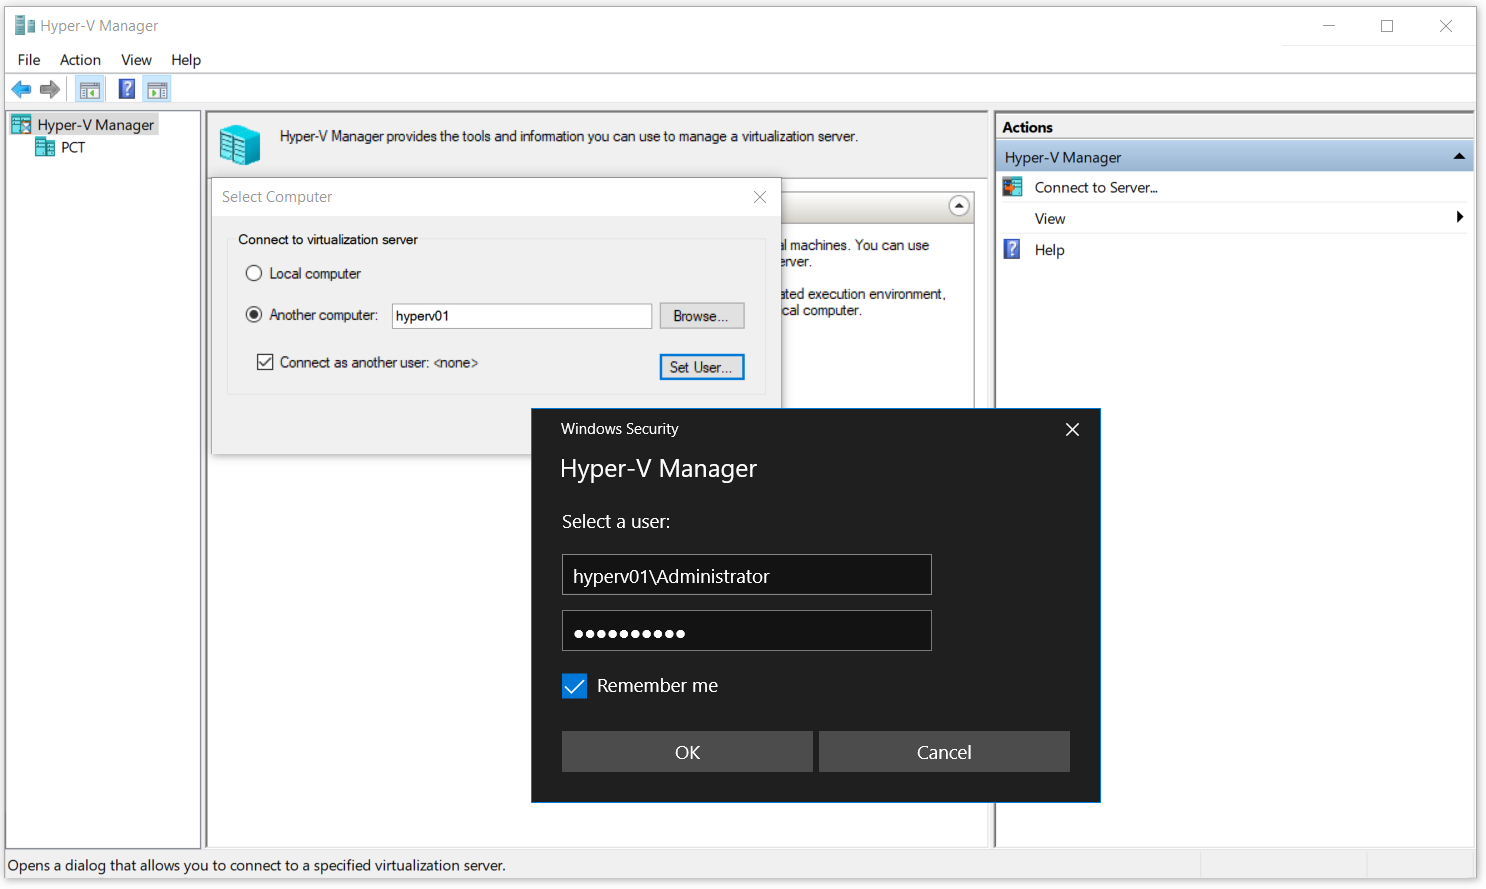
- Click OK and then OK again
- You are successfully connected to your remote Hyper-V server
- Enjoy playing with your virtual machines


