How to Fix ‘Failed to install Dependency’ Error in Kodi?
Kodi is a free and open-source media player software that is available across multiple platforms and has numerous add-ons available for it. It allows users to stream video, music, and podcasts. There is an option to add certain “add-ons” for the app that can increase its functionality. However, quite recently, there have been many complaints from users who have been unable to install addons and the “Failed to Install Dependency” error is shown.
What Causes the “Failed to Install Dependency” Error?
After receiving numerous reports from multiple users, we decided to investigate the issue and devised a solution to fix it completely. Also, we looked into the reason due to which it is triggered and listed it as follows.
- Missing Script: The error is sometimes caused when a script is missing from the application, this script might have been missed during installation or it might have gotten deleted afterward. All the files must be available while adding an “addon” or else this error might be triggered.
Now that you have a basic understanding of the nature of the problem, we will move on towards the solution. Make sure to implement it in the specific order in which they are presented to avoid conflicts.
Solution: Installing Script
The error is always caused when a certain script is missing from your installation of the Kodi application. Therefore, in this step, we will be figuring out the name of the missing script and installing it after downloading it from the internet. For that:
- Launch Kodi and try to install the add-on which you are facing the problem with.
- Go to the main home of the application.
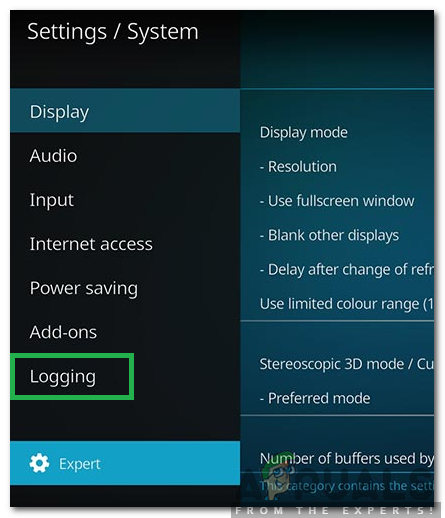
- Click on “Settings” and select “System Settings“.
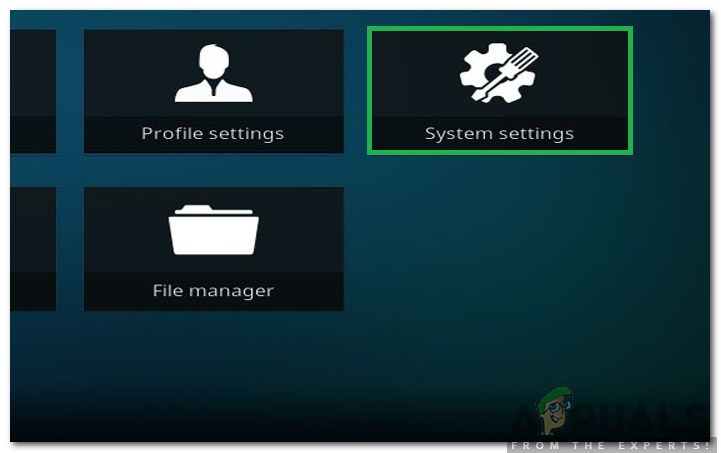
Selecting the “System Settings” option - Click on the “Logging” option.
Clicking on the “Logging” button - Select the “Show Event Log” option.

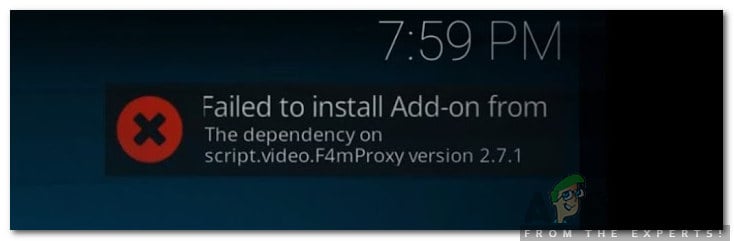
Clicking on the “Show Event Log” option - There will be shown the “Failed to install dependency” error in the main screen, look at the error closely and note the name of the script that it is displaying.
- In our case, the name is “script.video.f4mProxy version 2.7.1“.

The name of the missing script can be seen in the error log - Open your browser, type in “download script.video.f4mProxy version 2.7.1” and press “Enter“.
- Open the Kodi Addons site which should be in the results.
- Select the one from the list which best suits our need and click on “Download“.
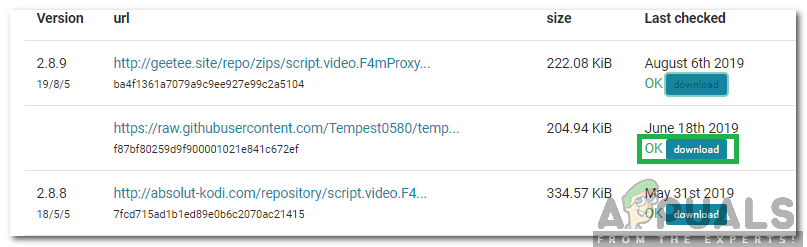
Clicking on the download button - Once the file has been downloaded, open Kodi and select the “Box” icon.
- Select the “Install From Zip” option and Guide the app to the location of our download.
- Now try to install the add-on and check to see if the issue persists.