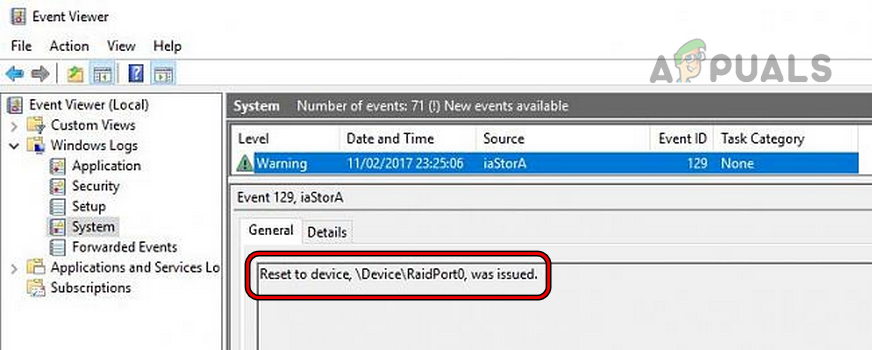
Fix: “Reset to device, DeviceRaidPort0, was Issued” in Event Viewer
The Reset to Device error is mainly caused by the drivers’ issues or as a result of a misconfiguration of the system’s power plan. The drivers’ issues range from missing to corrupt drivers. The issue usually arises when your PC starts freezing and the Event Viewer shows the error under discussion. Sometimes, the error also occurs with a BSOD or Event ID 129. In some instances, the issue is limited to a particular application or game. In some cases, the issue started to occur after a Windows update. Sometimes the error occurs with port0, port1, etc. as per the device’s port.
The reset to device issue could be caused by many diverse factors but the following can be easily marked as the main ones:
- Corrupt System Files: If the essential system files are corrupt, then that corruption could lead to the “reset to device” error as certain read/write operations on the drive will fail.
- Outdated PC’s Windows and System Drivers: You may encounter the DeviceRapidPort problem if the system’s Windows or system drivers are outdated as it can make OS or drivers incompatible with each other.
- Interference from the System’s Antivirus: The “reset to device” error might occur if the system’s antivirus is hindering the read/write operation to the disk.
- Outdated Firmware of the Disk Drive: If the firmware (not the driver) of your disk drive is outdated, then its incompatibility with the OS or storage driver may hinder the OS’s access to the disk device, thus causing the error at hand.
- Power Plan Settings of the PC: You may also encounter the issue at hand if the power plan settings of the PC are not optimal for the drive operation. Whether the system is in the power saving mode or if the power plan puts the drive under discussion to sleep (if not a system drive) to save the power and thus cause the issue.
1. Perform a Cold Restart of the System and Reseat the Disk Cables
A temporary glitch in the system’s modules or an improperly seated cable of the drive could cause the reset to devise issue. Here, performing a cold restart of the system and reseating the drive cables as well as other internal components (like RAMs) may solve the problem. Before proceeding, it is strongly recommended that you create a backup of the problematic drive as the error can be one of the first symptoms of a failing hard drive.
- Power off your system and remove its power cable from the power source. In the case of a laptop, remove its battery. Also, make sure to remove any connected devices from the system like a printer, etc.
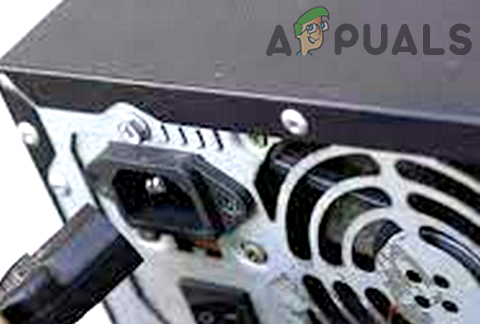
Unplug the Power Cable of the PC - Now press the power button of the system and wait for 30 seconds.
- Then release the PC’s power button and remove the cover of the system.
- Now reseat all the internal components of the PC and reinsert all the cables, especially, the cables of the problematic drive.
- Now put back the PC’s cover and wait for 10 minutes.
- Then power on the system and check if it is clear of the DeviceRapidPort issue.
- If that fails, check if using another SATA cable to connect the drive to the system resolves the issue.
If that did not work and the issue is occurring with an external drive with a cover or caddy, check if trying another cover/caddy or without any cover (if possible) clears the error. If the issue persists, check if increasing the system’s virtual memory solves the problem.
2. Change the System’s Power Mode to Balanced or High Performance
If your system is running in the Power Saving mode, then certain features of the system face degradation in the performance to save the system’s power and thus cause freezing. In such a case, changing the system’s power mode to Balanced or High Performance may solve the problem.
- Right-click Windows and open Settings.
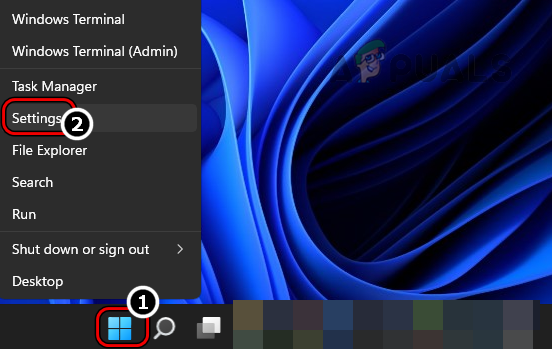
Open Windows Settings Through the Quick Access Menu - Now, in the left pane, head to the System tab, and in the right pane, open Power & Battery.
- Then change the dropdown of the Power Mode to Balanced and check if the issue is resolved.
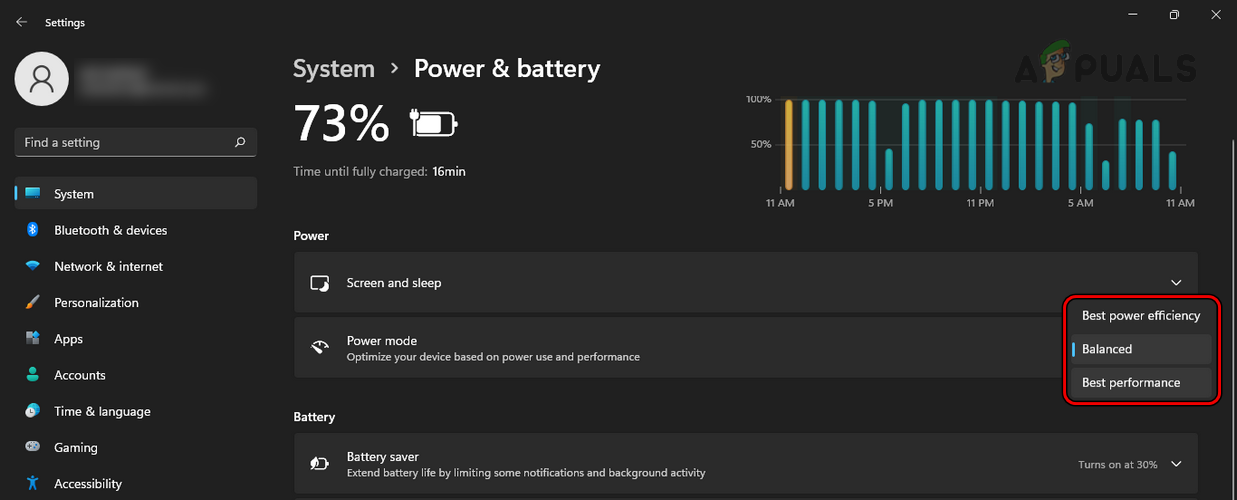
Change the System’s Power Mode to Balanced or High Performance - If not or the Power Mode is already set to Balanced, check if changing the Power Mode to High Performance solves the problem.
3. Run the Hardware and Devices Troubleshooter
You may also encounter the issue at hand if any of the hardware or device configurations are not optimal as per the OS requirements. Here, running the Windows built-in Hardware and Devices Troubleshooter may sort the configurations issues and thus may clear the DeviceRaidPort error.
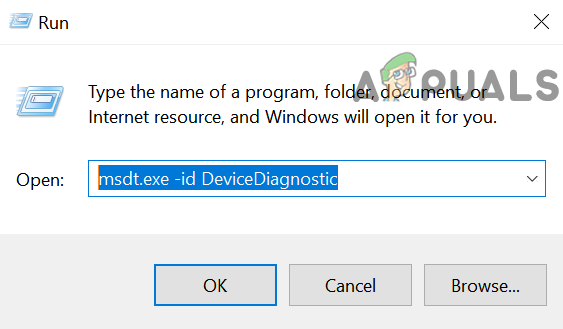
- Right-click Windows and open Run.
Open the Run Command Box from the Quick Access Menu - Now execute the following:
msdt.exe -id DeviceDiagnostic
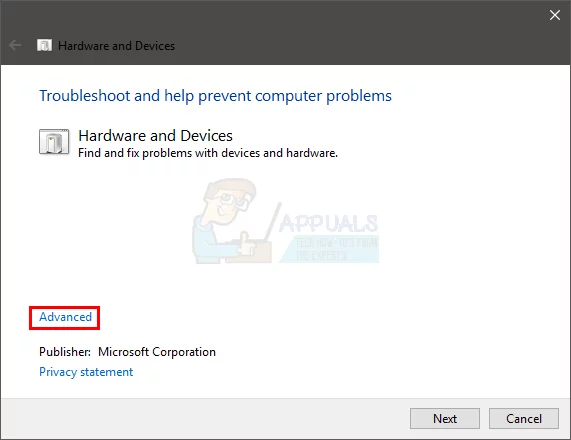
Launch the Hardware and Devices Troubleshooter Through the Run Command Box - Then click on Advanced and checkmark the option of Apply Repairs Automatically.
Open Advanced in the Hardware Troubleshooter - Now click on Next and follow the prompts on your screen to complete the process. Make sure to apply the automatic repairs by the troubleshooter.
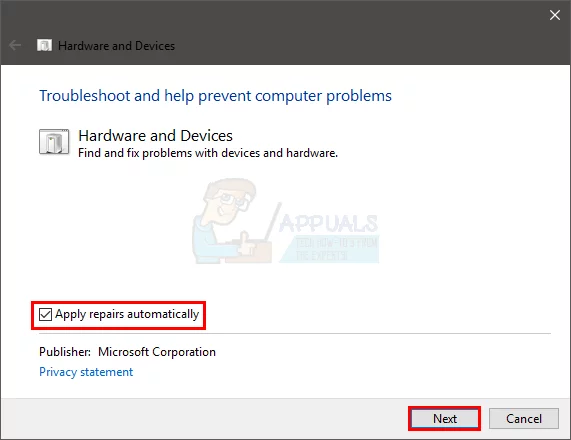
Select Apply Repairs Automatically in the Hardware Troubleshooter - Once done, check if the reset to device problem is cleared.
4. Perform the DISM and SFC Scans
Your system might freeze and crash with the “reset to device” issue if the essential system files are corrupt as the OS fails to execute the required operation on the disk. In this case, performing the DISM and SFC scans may clear the freezing issue. These scans may take time to finish, so, try when the system is free like overnight.
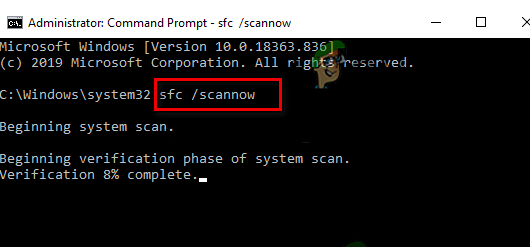
- Perform an SFC scan of the system and check if the freezing problem is solved.
Perform an SFC Scan - If not, check if performing the DISM scan clears the error but make sure to execute the following commands in the process:
Dism /Online /Cleanup-Image /ScanHealth

 Dism /Online /Cleanup-Image /RestoreHealth
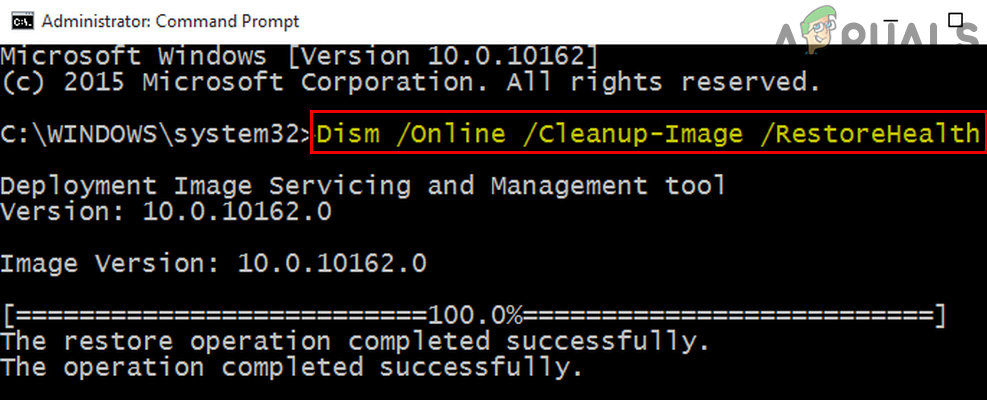
Use the DISM Command to RestoreHealth
5. Update the PC’s Windows to the Latest Build
If your PC’s OS is not updated to its latest build, then its incompatibility with the other OS modules (especially, the storage driver) can result in the Reset to Device issue. Here, updating the PC’s Windows to the latest build may clear the Device Raid Port issue.
- Click Windows and search for Check for Updates.
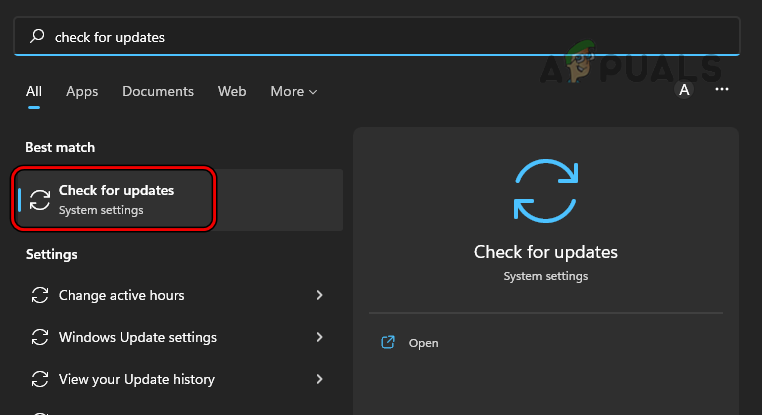
Open Check for Updates on Windows - Now, in the list of results, select Check for Updates (System Settings), and then in the right pane of the resulting window, click on the Check for Updates button.

Check for Windows Updates and Open Advanced Options - If some OS updates are available, download and install those updates.
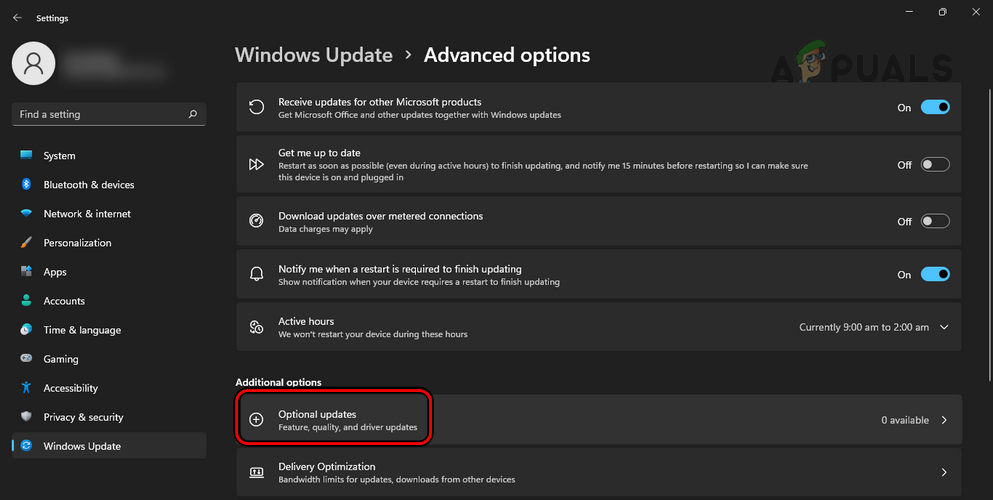
- Once installed, restart your PC, and upon restart, head to the Advanced Options for Windows Updates.
- Now open Optional Updates and download/install all the Optional Updates as well.
Open Optional Updates in the Windows Update - Once done, restart your PC and upon restart, check if the system is clear of the reset to a device problem.
If that did not work and the issue is caused by a particular application (like Office), then check if updating that application to its latest build resolves the issue.
6. Update the System Drivers to the Latest Builds and Install the Missing System Drivers
You may encounter “Reset to device, \Device\RaidPort0, was issued” if the system drivers are outdated as that can hinder the OS capability to perform a read/write operation to the problematic device. Also, if some essential system drivers are missing, then that could also result in the issue at hand. In this context, updating the system drivers to the latest builds and installing the missing system drivers may solve the problem.
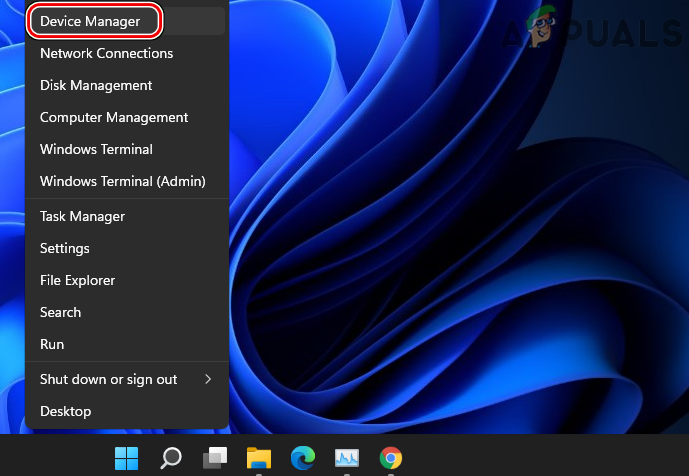
- Right-click Windows and select Device Manager.
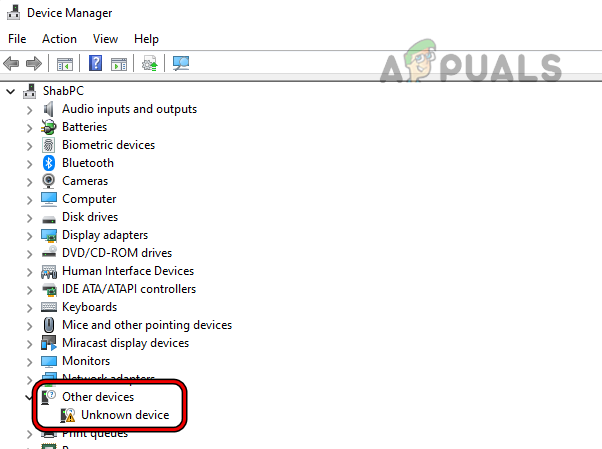
Open Device Manager Through the Quick Access Menu - Then check if some drivers are missing. If so, then install those missing drivers (like Intel Rapid Storage Technology Driver, Intel Chipset Device Software, Nvidia chipset driver, SATA driver, etc.) and afterward, check if the issue is resolved.
Install Missing System Drivers - If not, then open the Device Manager again.
- Now expand a tab like Storage Controllers and right-click on the storage controller.
- Then open Update Driver and select Search Automatically for Drivers.
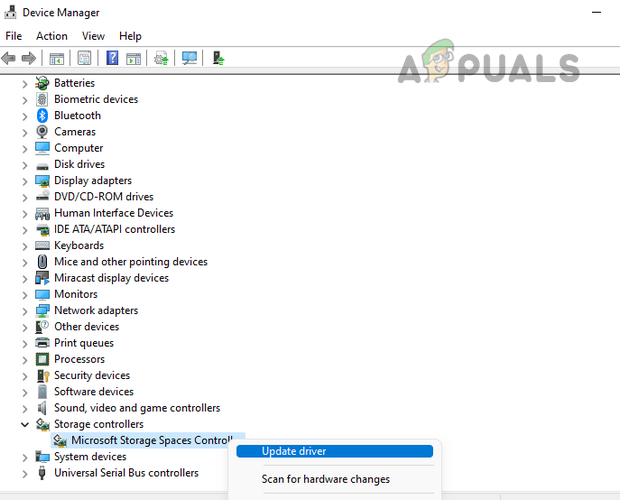
Update Storage Controller Driver Through the Device Manager - If a driver update is available, download and install the update.
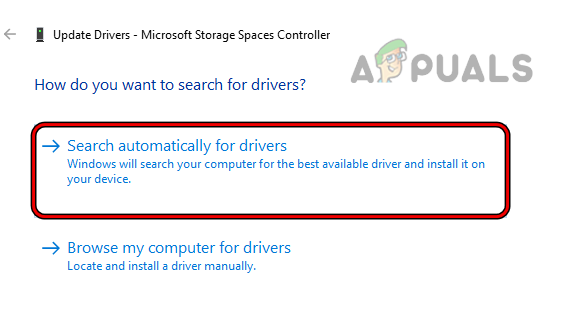
Search Automatically for Updated Driver of the Storage Controller - Now restart your PC and upon restart, repeat the same steps for all the drivers (a time-consuming but must-try effort) to update all the drivers. Do not forget to restart the system after updating each driver. Make sure to update RST, RAID, SATA, and USB 3.0 drivers if updating all the system drivers looks tough task.
- Once all the system drivers are updated, check if the Reset to Device issue is resolved.
- If that did not work, launch a web browser and head to the PC OEM website (like Dell).
- Now download all the drivers related to your system and install those drivers (one by one) to check if that resolves the issue.
- If the issue persists, then download the latest drivers from the specific hardware OEM (like Intel or Nvidia).
- Then install these drivers one by one and restart the system (after installing each driver).
- Once the drivers are updated, check if the Reset to Device problem is cleared.
- If not and the OEM has an update utility like Dell Support Assistant, check if updating the system drivers through the OEM utility clears the error.
7. Disable or Uninstall the PC’s Antivirus
If the PC’s antivirus is hindering the read/write operation to the problematic disk, then that could result in the error at hand. In this case, disabling or uninstalling the PC’s antivirus may clear the freezing issue due to reset to the device. For elucidation, we will discuss the process of disabling and uninstalling the ESET antivirus.
Warning:
Proceed at your own risk as disabling or uninstalling the system’s antivirus can be risky at times and may expose your system, network, data, etc., to threats.
- Expand the hidden icons of your system’s tray and right-click on ESET.
- Now select Pause Protection and if a UAC prompt is shown, click Yes.
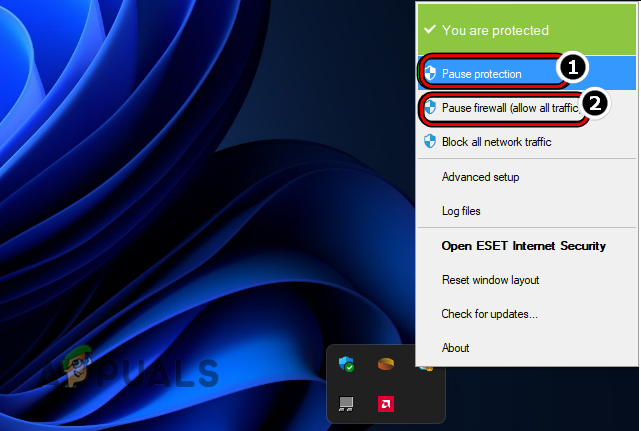
Pause ESET Protection and Firewall - Then select the time for which you want to disable ESET like 10 minutes.
- Again, right-click ESET in the system’s tray and select Pause Firewall.
- Now confirm to pause the ESET firewall and then check if the system’s freezing problem is cleared.
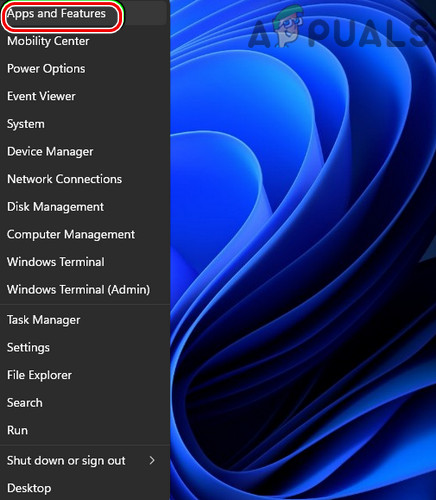
- If not, right-click Windows and open Apps & Features.
Open Apps & Features - Now locate ESET and expand its options.
- Then select Uninstall (or Modify) and in the dialogue box shown, click Remove.
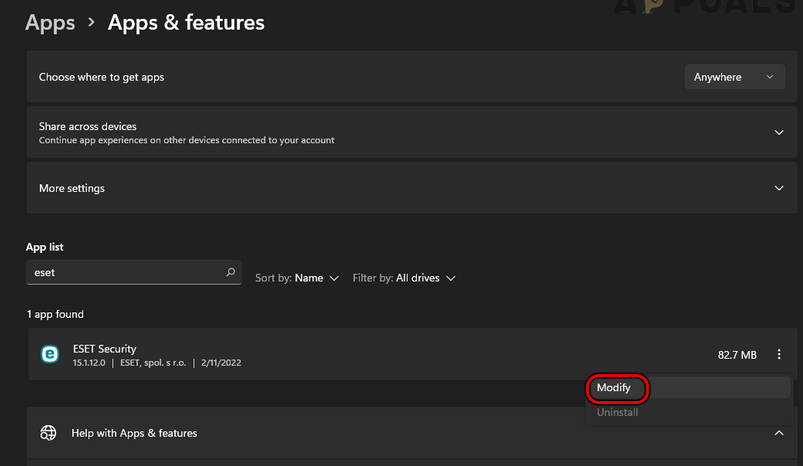
Uninstall ESET Security on Windows - Now follow the prompts on the screen to uninstall ESET and once done, restart your PC.
- Upon restart, check if the reset to device issue is cleared from the system.
If that did not work and the issue is occurring with a game that is not installed on the system drive, check if reinstalling the game on the system drive resolves the issue.
8. Reinstall the Storage and Other System Drivers
If the installation of storage and any other system drivers are corrupt, then that may cause the reset to devise issue at hand as the driver may fail to load the essential modules to perform read/write operations on the drive. In this context, reinstalling the storage or other system drivers may clear the problem. Before proceeding, make sure to download the system drivers from the OEM website.
- Right-click Windows and open Device Manager.
- Now expand IDE ATA/ATAPI Controllers and right-click on the controller.
- Then select Uninstall Device and in the dialogue box shown, click on Uninstall.
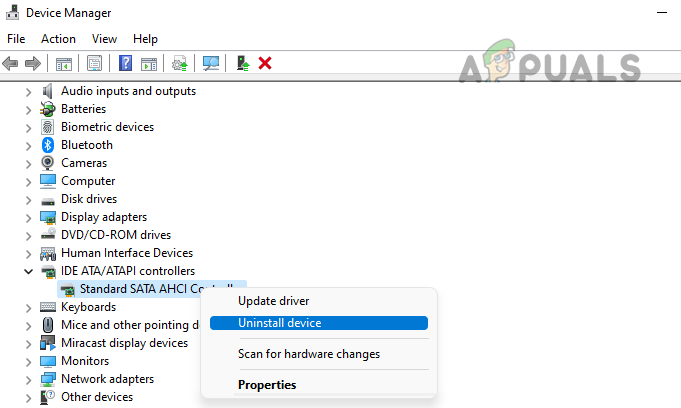
Uninstall IDE ATA ATAPI Controller Through the Device Manager - Once done, restart your system, and upon restart, install the latest IDE ATA/ATAPI driver.
- Then restart your PC and upon restart, check if the Reset to Device issue is resolved.
If that did not work, then check if reinstalling the following drivers (one by one) clears the error but make sure the driver is downloaded from the OEM website, not a generic Microsoft driver:
- iaStor drivers
- SATA/AHCI Controller Drivers
- Intel RST RAID Driver (if the system is using RAID)
- Intel SATA Driver
- Storage Driver
- WAN Driver
If none of the above drivers resolved the issue, then check if installing these drivers in a compatibility mode resolves the issue.
9. Change the PC’s SATA mode from AHCI to IDE
If any of the installed system applications or services is dependent on the IDE SATA mode but your PC uses AHCI, then that could result in the issue. In this scenario, changing the PC’s SATA mode from AHCI to IDE may clear the problem. The process might differ but the general guidelines are as under:
- Boot your PC into the BIOS and head to its Advanced tab.
- Now set the SATA Mode Selection to IDE and save the changes made.
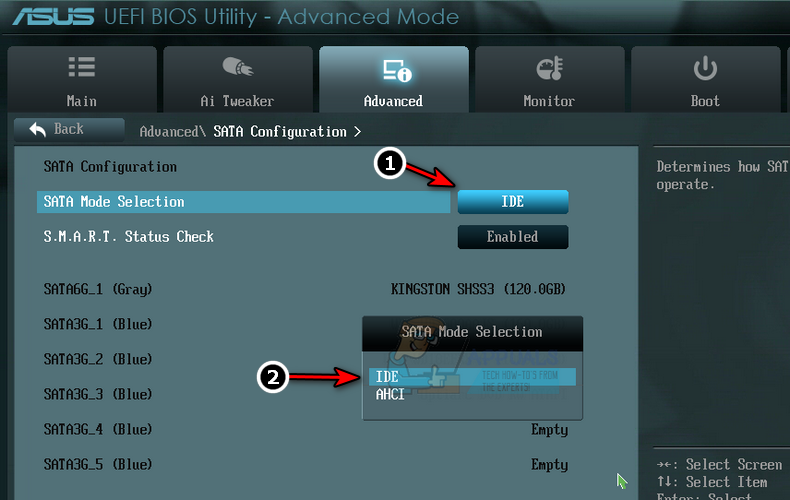
Change SATA Selection Mode in the System’s BIOS to IDE - Then restart your PC and boot it into Windows to check if the DeviceRapidPort problem is cleared.
If the SATA mode is already set to IDE at step 2, check if setting the SATA mode to AHCI clears the issue.
10. Perform a Clean Boot of the System and Uninstall the Conflicting Applications
If an application or utility is blocking the OS’s ability to read/write data to a particular drive, then that could result in the Reset to Device problem. In this scenario, performing a clean boot of your PC and uninstalling the conflicting applications may clear the device error at hand.
- Firstly, boot your PC in safe mode and check if the issue is resolved.
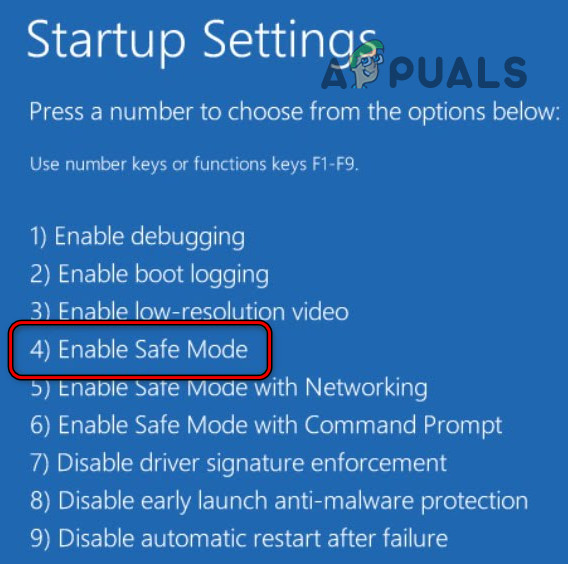
Boot Your System into Safe Mode - If so, then perform a clean boot of your PC and check if the system is working fine.
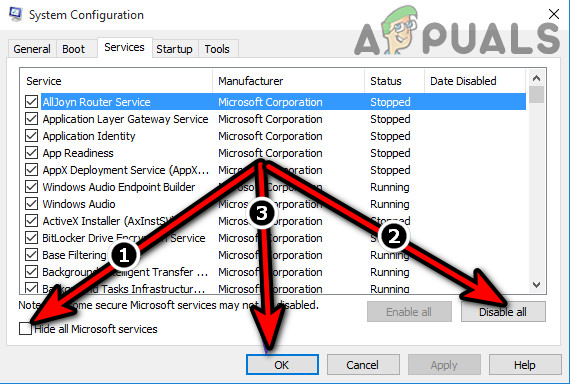
Clean Boot the Windows 10 PC - If so, then one by one enable all the processes/services disabled during the clean boot process and find the problematic one.
- Once found, you may disable the problematic application at the system startup or uninstall it (if not essential).
ExpressCache from Diskeeper and HP Insight Management WBEM Providers are known to cause the device issue at hand. If you have any of these applications or any other applications in a similar niche, then check if uninstalling those applications clears the error at hand.
11. Update Firmware of Your Drive
The system may show the “reset to device” problem if the firmware (not the driver) of the problematic drive is outdated as it can make the drive incompatible with the OS and cause the issue. In this context, updating the firmware of your drive may resolve the DeviceRaidPort issue. It is strongly recommended that you backup the data on the drive before proceeding. As the process will differ for different drives, we will discuss the process of updating an Intel SSD by using the Intel Memory and Storage Tool (GUI). If the SSD drives are in RAID, then it is recommended to use Intel Memory and Storage Tool (CLI).
Warning:
Advance with utmost care and at your own risk as a certain level of risk is involved when updating a drive’s firmware.
- Firstly, download Intel Memory and Storage Tool (GUI) and then install it as an administrator.
- Now launch the Intel MAS GUI as an administrator and when launched, head to the Firmware tab in the left pane of the application.
- Then, in the right pane, click on Firmware Update and wait till it is done.
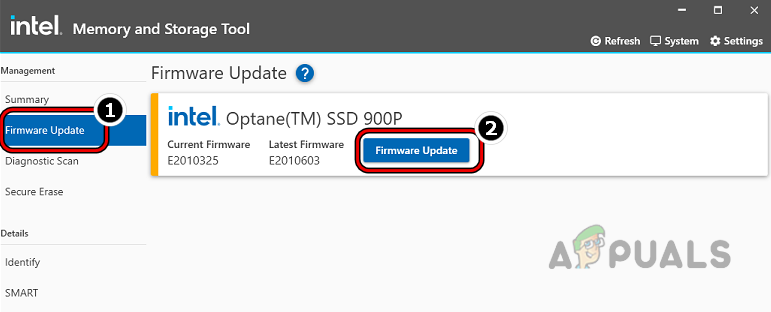
Update Firmware of an Intel SSD Through the Memory and Storage Tool GUI - Once done, check if the reset to device problem is solved.
12. Enable Hot-Plug for the Problematic Drive in the System’s BIOS
Hot-plugging makes a drive easily swappable and is essential for the execution of many AHCI-based operations. If the said feature is disabled for the problematic drive, then that could result in the error. In such a case, enabling the Hot-Plug for the problematic drive in the system’s BIOS may solve the problem.
- Boot your PC into the BIOS and head to its Advanced tab.
- Now open Hot Plug Handling Mode and set it to Enabled or Auto. Make sure all the drives are set to hot plug.

Set the Hot Plug Handling Mode to Auto in the System’s BIOS - Then save the changes made and boot your system into Windows to check if the reset to device issue is resolved.
If that did not work, check if reseating or replacing the CMOS battery clears the reset to device problem.
13. Resetting the System BIOS to the Factory Defaults
If any of the customizations done to your system’s BIOS conflict with the OS’s ability to properly perform a read/write operation on a particular drive, then that could result in the problem. In such a case, resetting the system BIOS to the factory defaults may solve the device issue at hand. The exact instructions might differ but the general guidelines are as discussed below.
Warning:
Advance at your own risk as editing the system’s BIOS is a skillful task and if anything goes wrong (like a sudden power failure), then you may brick your PC and cause everlasting damage to your data.
- Boot your PC into the BIOS and locate the Restore Settings option (usually, near the bottom).
- Now click on Restore Settings and afterward, confirm to restore the PC’s BIOS to its defaults.
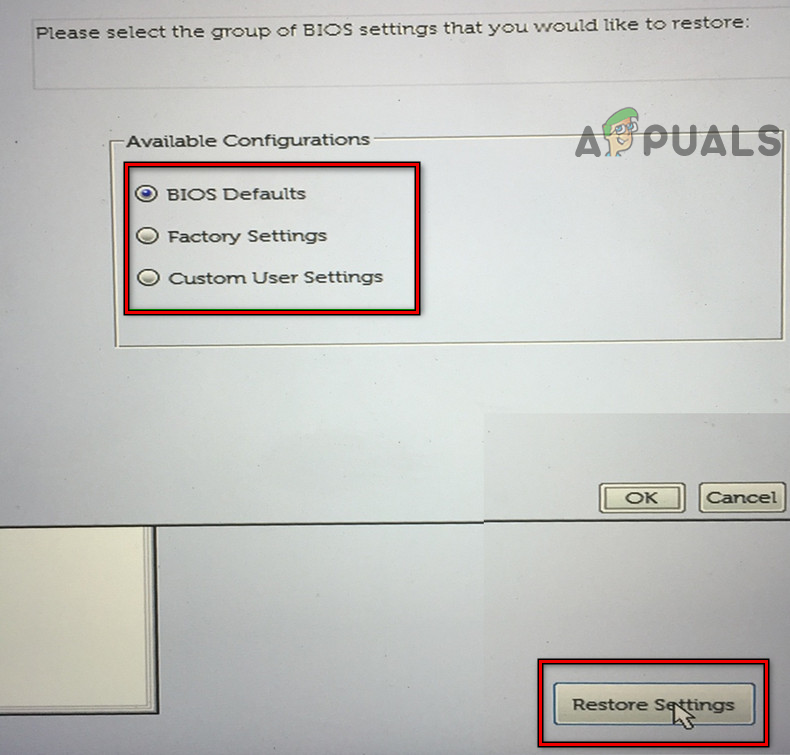
Reset BIOS to Defaults - Then boot your PC into Windows and check if it is clear of the reset to device error.
If that did not work and you are overclocking your PC, check if reverting the OC settings to the stock values resolves the issue.
14. Edit the System’s Registry
If none of the above worked for you, then editing the system’s registry to disable the hard disk’s low power mode may solve the problem. Before proceeding, make sure to back up the system’s registry.
Warning:
Advance at your own risk as editing the system’s registry is a skilled task and if not done properly, you may damage your system/OS and expose your data to threats. Also, when the LPM of the drive is disabled, it consumes more power and spins for a longer time, which may decrease the battery time and life span of the disk.
- Click Windows and type Registry Editor.
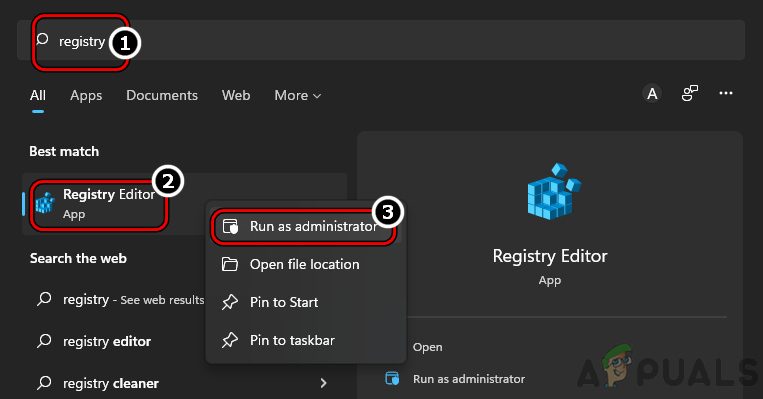
Open Registry Editor as Administrator - Now, in the list of results, right-click on Registry Editor, and in the sub-menu shown, select Run as Administrator. If a UAC prompt is shown, click Yes.
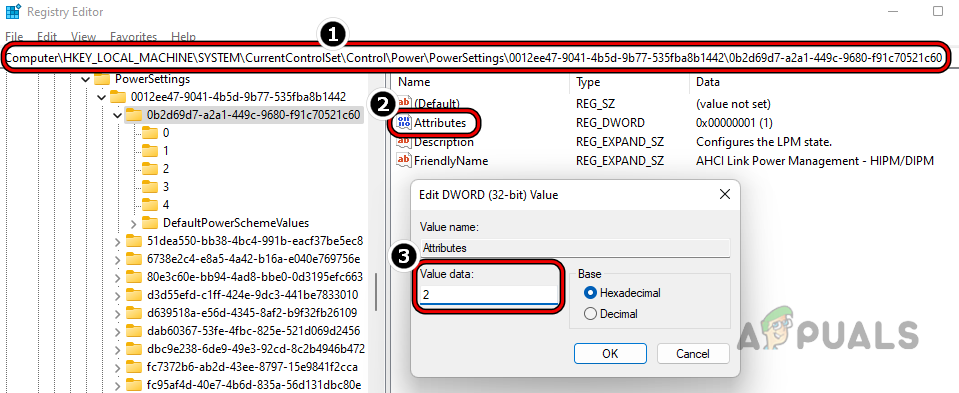
- Then navigate to the following path:
HKEY_LOCAL_MACHINE\SYSTEM\CurrentControlSet\Control\Power\PowerSettings\0012ee47-9041-4b5d-9b77-535fba8b1442\0b2d69d7-a2a1-449c-9680-f91c70521c60
- Now, in the right pane, double-click on Attributes and set its value to 2.
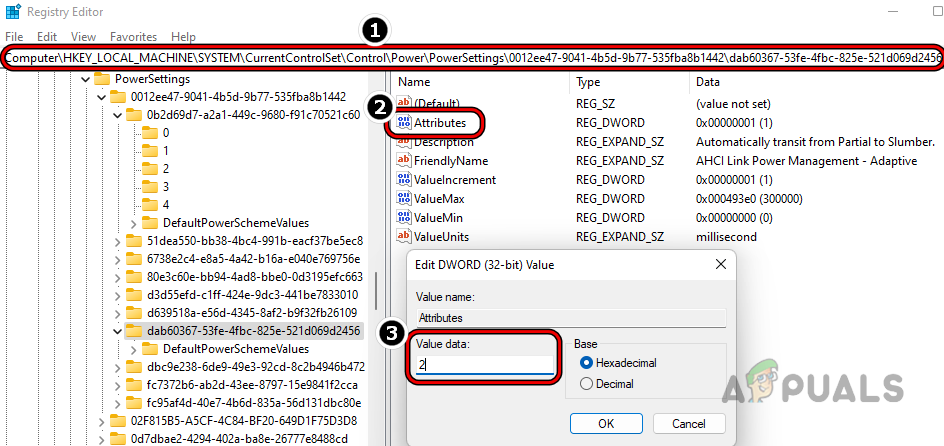
Set the Value to Attributes to 2 in the Power Settings Registry Key - Then navigate to the following path:
HKEY_LOCAL_MACHINE\SYSTEM\CurrentControlSet\Control\Power\PowerSettings\0012ee47-9041-4b5d-9b77-535fba8b1442\dab60367-53fe-4fbc-825e-521d069d2456
- Now, in the right pane, double-click on Attributes and set its value to 2.
Set the Value Data of Attributes to 2 in the System’s Registry - Then close the Registry Editor and restart your PC.
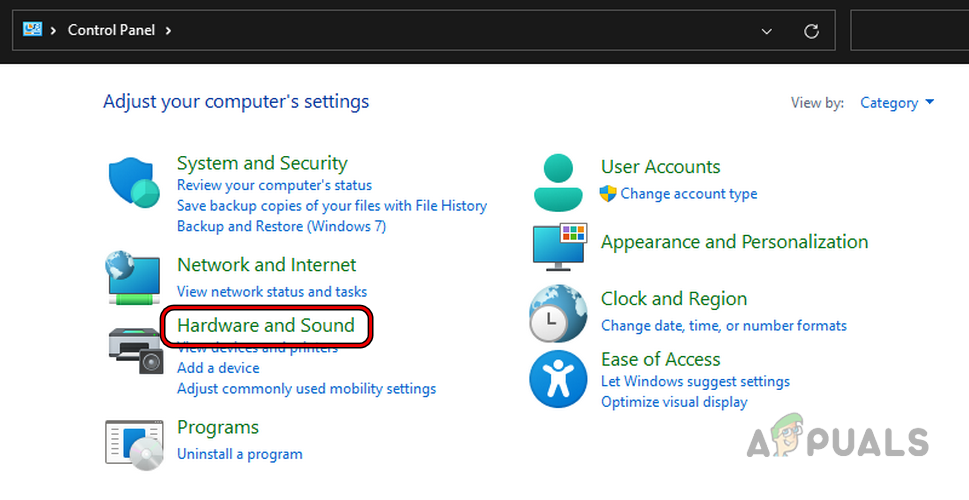
- Upon restart, click Windows, search and open Control Panel.
Open Control Panel - Now open Hardware and Sound.
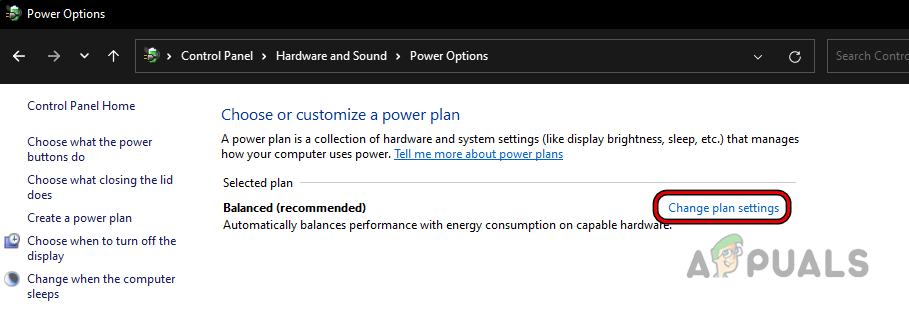
Open Hardware and Sound in the System’s Control Panel - Then select Power Options.

Open Power Options in the System’s Control Panel - Then click on Change Plan Settings
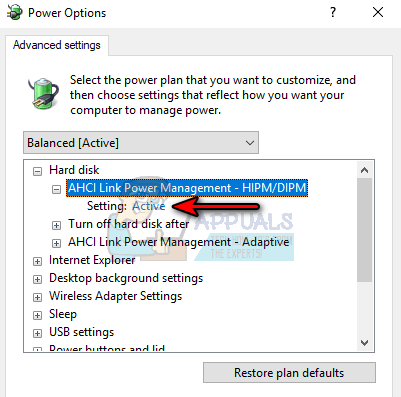
Open Change Plan Settings in the System’s Power Options - Now select Change Advanced Power Settings and expand the Hard Disk tab.

Open Change Advanced Power Settings in the Edit Plan Settings - Then double-click on AHCI Link Power Management – HIPM/DIPM and set its Setting dropdown to Active.
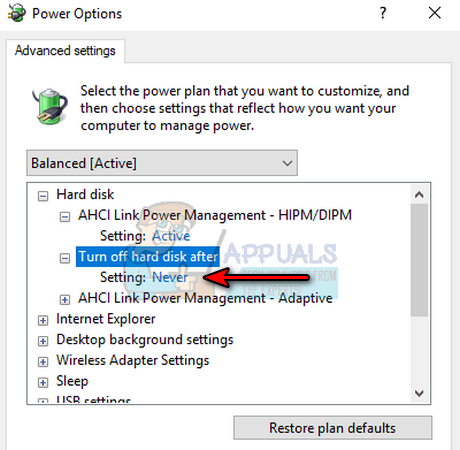
Set AHCI Link Power Management – HIPM/DIPM Setting to Active - Now expand Turn off Hard Disk After and change its Setting dropdown to Never.
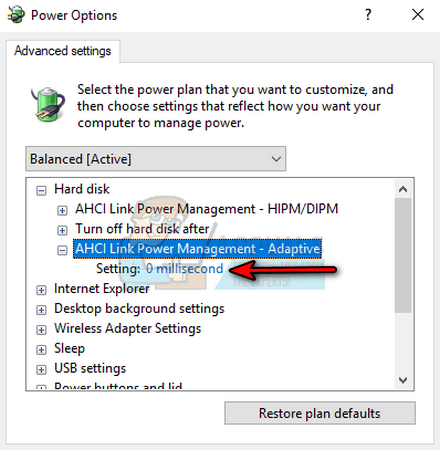
Set Turn Hard Disk After to Never - Then double-click on AHCI Link Power Management – Adaptive and set its Setting dropdown to 0 milliseconds.
Set AHCI Link Power Management – Adaptive to Zero Milliseconds - Now expand the PCI Express tab and its sub-tab of Link State Power Management.
- Then change its Setting dropdown to Off.

Set PCI Express Link State Power Management to off - Afterward, click on Apply/OK and close all the opened windows.
- Now restart your PC and upon restart, check if the reset to device freezing issue is resolved.
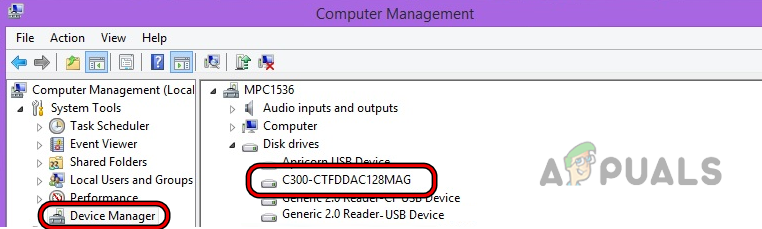
- If that did not work, right-click Windows and open Device Manager.
- Now expand the Disk Drives tab and note down/copy the exact name of the hard drive like C300-CTFDDAC128MAG.
Note the Problematic Hard Drive Name in the Disk Drive Tabs of the Device Manager - Then launch the Registry Editor as an administrator and steer to the following path:
Computer\HKEY_LOCAL_MACHINE\SYSTEM\CurrentControlSet\Services\storahci\Parameters\Device
- Now, in the right pane, double-click on NoLPM, and at the end of the list (without changing any other entry), add the name noted down/copied in step 21 with an asterisk sign at the end like the following (make sure to replace C300-CTFDDAC128MAG with your hard disk name):
C300-CTFDDAC128MAG*
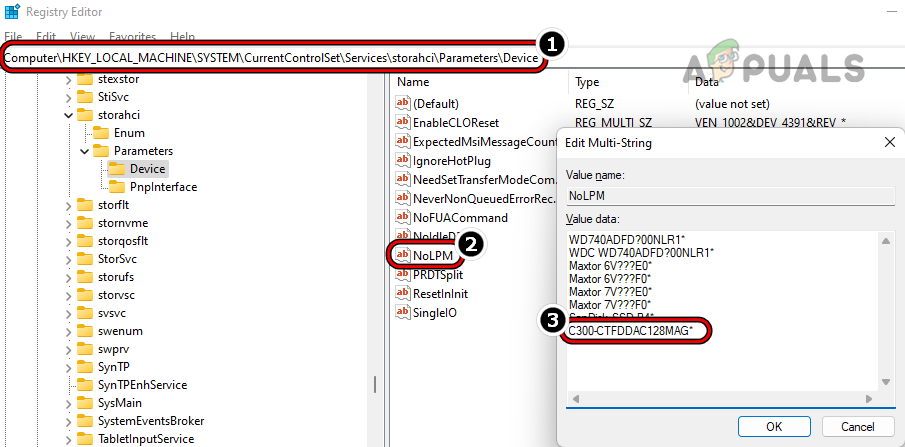
Add the Hard Disk Name in the NOLPM Device Registry Value - Then click OK and close the Registry Editor.
- Now restart your PC and upon restart, check if the reset to device problem is solved.
If the issue persists, check if increasing the TimeOut value of the disk clears the error. If that did not work, check if downgrading the PC’s Windows to an older version clears the error (if the issue started to occur after an OS update). If that fails, then you may reset the PC’s Windows to the defaults or perform a clean installation of the Windows to resolve the issue. If the issue continues to occur, then the issue might be hardware related as a failing hard drive, a faulty RAM stick, or a faulty power supply can also result in the issue at hand and you may try another power supply, RAM, or hard drive.