Fix: Modern Setup Host has stopped working
There are a lot of benefits which come with Window 10. If you are using Windows 7, Windows 8 and Windows 8.1 you can upgrade your Windows machine to Windows 10 without losing data, application, and settings. But, if you are using Windows XP and Windows Vista, you will not be able to upgrade your Windows machine to Windows 10. In that case, you will need to do a clean install. Before doing clean installation you will need to check does your motherboard support newer operating system and you should backup your data to USB flash disk, network storage or cloud storage. If you do not need your data, you can do the clean installation without backup.
You can upgrade your Windows machine to Windows 10 by using three methods. The first method includes upgrading your Windows by using bootable USB or DVD. These days vendors are manufacturing notebooks without DVD RW drives, so we are recommending you to use bootable USB. The second method includes upgrading your machine by using Windows Update and the third method includes upgrading your machine by using Media Creation Tool.
Few users started upgrade procedure and encouraged upgrade issues including error message Modern Setup Host has stopped working.
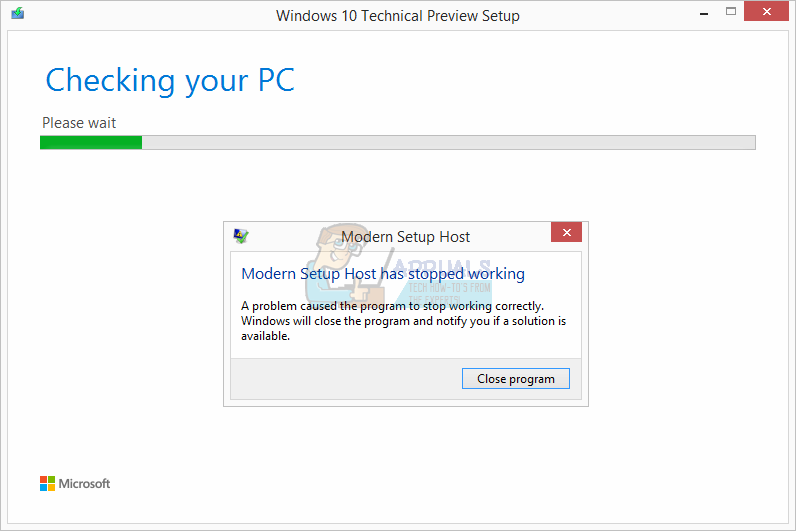
This issue occurs if you are trying to do upgrade Windows 7, Windows 8 and Windows 8.1 to Windows 10. There are different issues why this problem occurs including wrong system configuration, the problem with upgrade process and others.
We created few methods which will help you to solve this problem. So, let’s start.
Method 1: Check free Hard Drive space
One of the reasons why you can not upgrade your Windows machine is because you do not have enough free space on your system partition. Media Creation Toolkit requires 8 GB for downloading the update to your machine. We are recommending you to have much more than 8 GB because after the upgrade you will need additional free storage for your applications, data, and work. So, how much data do you need? We are recommending you minimum 15 GB + additional storage for your apps and data. You will need to check free hard disk space on your machine and delete unnecessary applications and data. Here are some tips:
- If you are using unnecessary data you can delete them from your system partitions
- You can backup your data to USB flash disk, external storage, network shared storage or cloud storage (OneDrive, Google Drive, and others). You can read instructions at https://appuals.com/how-to-backup-files-from-command-prompt/
Method 2: Prepare Windows machine for upgrade
In this method, we will need to do some system changes, including disabling services not related to Microsoft, disabling startup programs and changing regional Windows settings. We will describe the procedure for Windows 7, Windows 8 and Windows 8.1. By doing this method we will eliminate potential problems occurred because of conflict between different applications.
At first, we will disable services not related to Microsoft. This method is compatible with Windows 7, Windows 8 and Windows 8.1.
- Hold Windows logo and press R
- Type msconfig and press Enter to open System Configuration
- Choose Services
- At the bottom, left corner click Hide all Microsoft services
- At the bottom right corner click Disable all
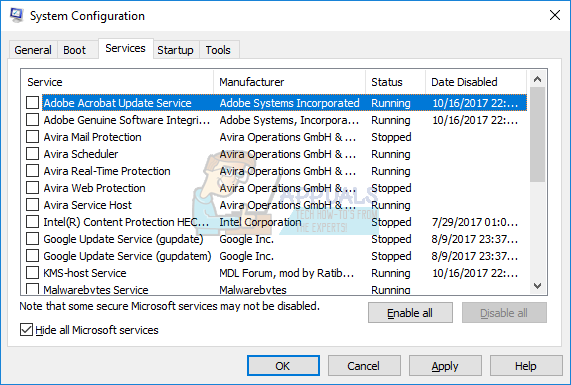
- Click Apply and then OK
In the second step, we will disable all startup programs.
If you are using Windows 7
- Hold Windows logo and press R
- Type msconfig and press Enter to open System Configuration
- Choose Startup tab
- At the bottom right corner click Disable all
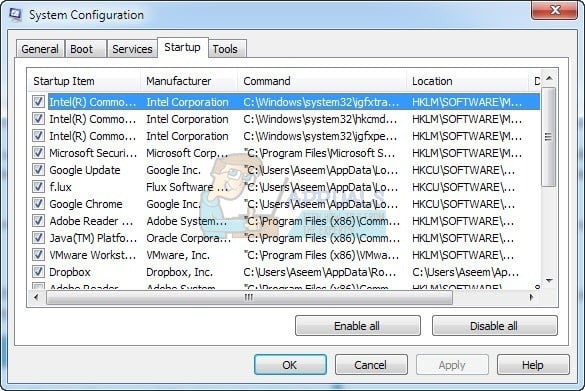
- Click Apply and then OK
- Restart your Windows machine
- Run Windows upgrade
If you are using Windows 8 and Windows 8.1
- Hold Windows logo and press R
- Type msconfig and press Enter to open System Configuration
- Choose Startup tab and then click Open Task Manager
- Choose Startup tab, again
- Disable all application for this time, by doing right click on application and choose
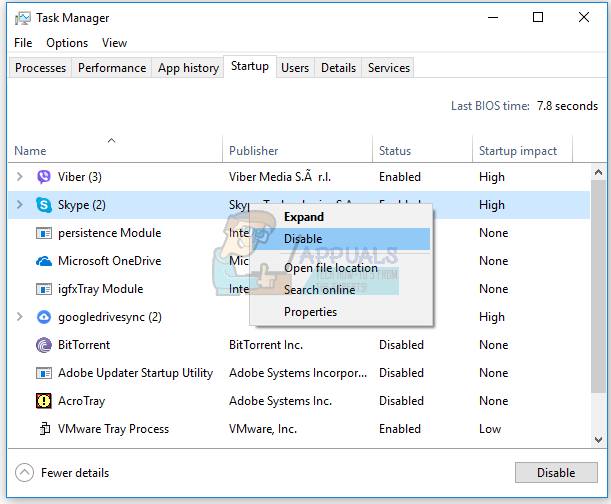
- Close Task Manager
- Restart your Windows machine
- Run Windows upgrade
The third step will include changing regional settings through Control Panel.
For Windows 7
- Hold Windows logo and press R
- Type control panel and press Enter to open Control Panel
- Choose View by Category
- Click Clock, Language, and Region
- Click Region and Language

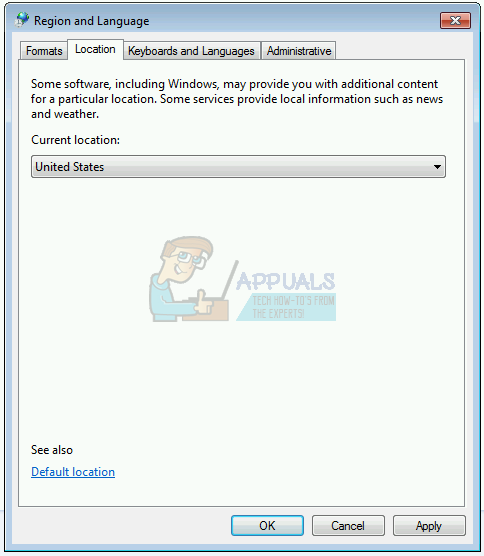
- Choose Location tab
- Under Current location choose the United States
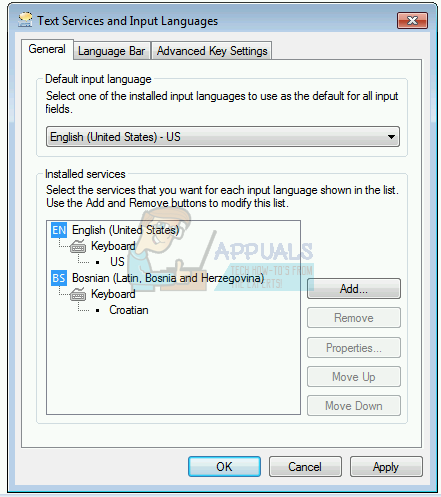
- Choose Keyboards and Languages
- Click Change keyboards…
- Choose General tab
- Under Default input language choose English (United States)
- Click Apply and then OK
- Close Control Panel
- Restart your Windows machine
- Run Windows upgrade
For Windows 8 and Windows 8.1
- Hold Windows logo and press R
- Type control panel and press Enter to open Control Panel
- Choose View by Category
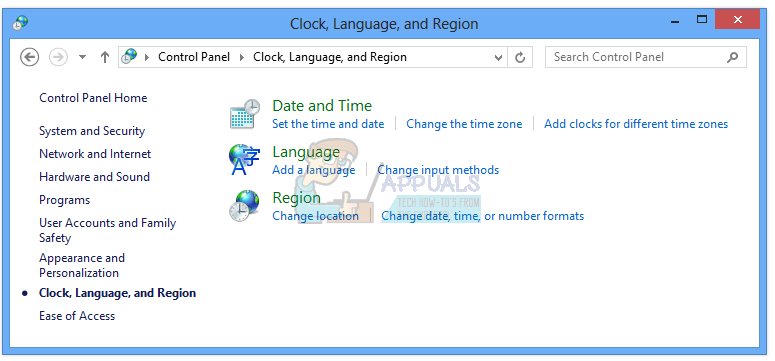
- Click Clock, Language, and Region
- Click Region
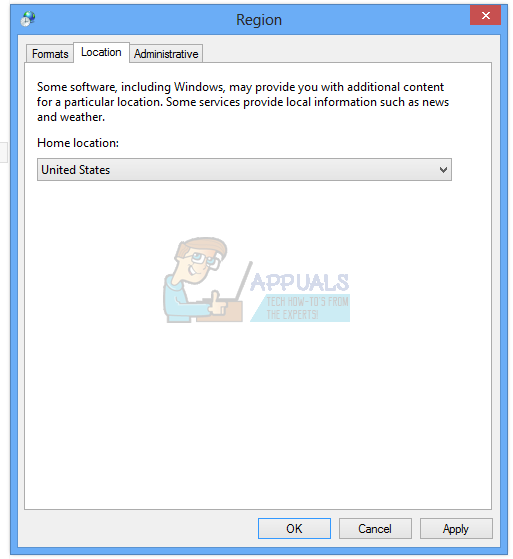
- Choose Location tab
- Under Home, location choose the United States
- Click Apply and then OK
- Under Clock, Language, and Region click Language to add another one language
- Click Add a language
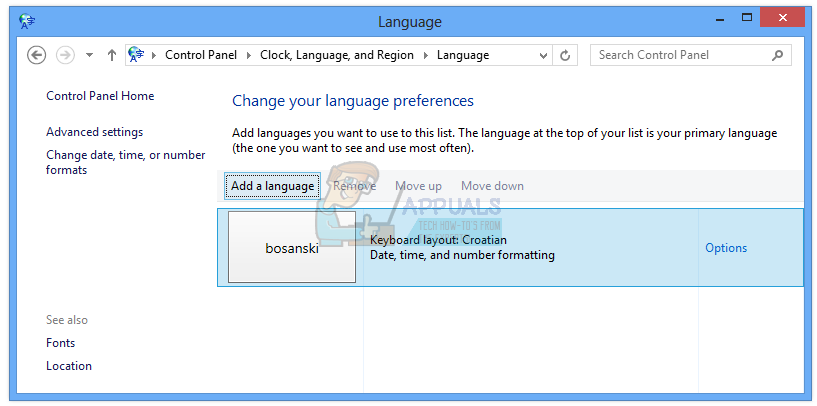
- Choose English and click Open

- Choose English (United States) and click Add

- Under languages select your previous language and choose Remove
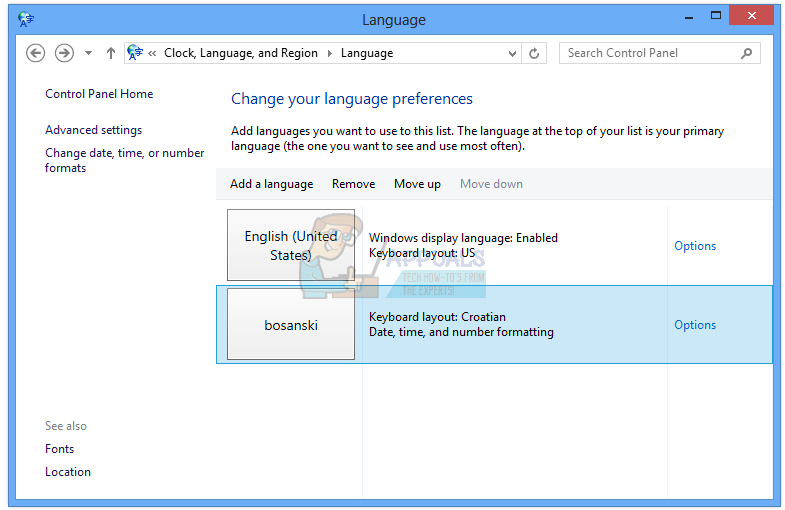
- Close Control Panel
- Restart your Windows machine
- Upgrade to Windows 10
- Enable services, startup programs and change regional settings
Method 3: Create bootable USB and upgrade your machine to Windows 10
In this method, you need to upgrade your Windows machine to Windows 10 by using bootable USB flash drive. At first, you will need to create https://appuals.com/how-to-create-windows-10-bootable-usb-using-rufus/ which is compatible with computers and notebooks. After that you will need to reconfigure your BIOS or UEFI, so your machine can boot from USB flash drive. How will you do it? Please check instructions on https://appuals.com/how-to-fix-boot-error-0xc000000f/, by following method 1. After that boot your Windows machine by using USB and run upgrade procedure.
Method 4: Run Disk Cleanup and delete $Windows.~WS folder
In this method, you will need to run Disk Cleanup and delete folder $Windows.~WS from your system partition. Disk Cleanup is utility integrated into Windows which helps you in removing the unnecessary files from your hard disk in order to boots the speed of your Windows machine.
Please check instructions on running Disk Cleanup at https://appuals.com/how-to-do-disk-cleanup-in-windows-8-and-10/ . The procedure is compatible with Windows 7, Windows 8 and Windows 8.1.
Next step will include deleting $Windows.~WS folder. When you upgrade your previous Windows to Windows 10 rather than clean install, you will see two hidden folders on your C Drive (any drive where you installed Windows). One of those hidden folders will be $Windows.~WS Please check instructions at $Windows.~WS folder from your hard disk.
Method 5: Resume upgrade by running setupprep.exe
This solution helped so many users, and it includes starting upgrade process and running setupprep.exe file which will resume the last operation instead of starting completely a new. The procedure is compatible with Windows 7, Windows 8 and Windows 8.1.
- Run Windows upgrade through Windows by using Media Creation Toolkit
- After you get error, close the Windows Update or Media Creation Tool
- Hold Windows logo and press R
- Type C:\$Windows.~WS\Sources\Windows\sources\setupprep.exe and press Enter to resume Windows upgrade
- Wait until Windows is finished upgrade
Method 6: Use DISM to repair Windows
For this method, we will need to use a tool named DISM (Deployment Image Servicing and Management). The DISM is command line tool which allows you to mount Windows image file (install.wim) and do image servicing including installing, uninstalling, configuring and Windows update. DISM is a part of Windows ADK (Windows Assessment and Deployment Kit) which you can download on this LINK. The procedure of repairing Windows image is the same for operating systems Windows 7 to Windows 8.1. Please check instructions at https://appuals.com/use-dism-repair-windows-10/
Method 7: Run System File Checker
System File Checker (SFC) is a command line utility integrated into Windows that checks for system file corruption. In case SFC found some issues with system file corruption, SFC will try to fix them. You must be an administrator running a console session in order to use the SFC utility. SFC includes additional commands as SCANNOW. SCANNOW scans integrity of all protected system files and repairs files with problems when possible. Please check instructions how to run SFC /Scannow.
Method 8: Install or upgrade graphics card driver
Few users solved their problem by reinstalling or installing the graphics card driver. Please check instructions at https://appuals.com/how-to-fix-display-adapter-or-gpu-showing-yellow-exclamation-mark/
Method 9: Move User folder to default location
Did you move your user profile to another location? If not, please read next method. If yes, you will need to move back your user profile to default location C:\Users\YourUserProfile. After that, you will need to run upgrade. Few users moved their user profile from system partition to another location and Windows upgrade was not able to continue the procedure.
Method 10: Clean install Window 10
If you do not want to play anymore with troubleshooting steps, you can to clean installation of your Windows 10. Before doing that, please check does your motherboard, brand name computer or notebook support Windows 10. Second, you will need to make a list of software you are using, so you can install later on your Windows 10. Third, you will need to backup your personal or business data to USB flash drive, external hard disk, network shared storage or cloud storage. Please check instructions https://appuals.com/how-to-clean-install-windows-10/.
If for some reason you still need to upgrade Win8.1 to W10 like i did and get this error, try an older compilation. 1903 worked for me. You can easily get them via Heidoc’s MS iso downloader.