How to Fix ‘CPU and Disk 100% Usage’ on Windows 11
So far, Windows 11 takes the crown as the fastest OS released by Microsoft to date. However, this is only true for mid to high-end PCs. On low-end PCs, early adopters are still reporting that they constantly see their CPU & Disk usage staying at 100% and slowing down their operating system to a halt.

Your CPU or Disk usage staying at 100% can have several different causes, but there are only a handful of culprits that are confirmed to cause this type of behavior on Windows 11. Here’s a list of scenarios that are known to cause unreasonably high Disk & CPU usage on the latest operating system released by Microsoft:
- Windows Search interference – The search function on Windows 11 that’s also tasked with indexing new files automatically is a prime suspect for this type of behavior, especially on low-end PCs. If you are willing to trade off file indexing for system stability, you can probably make the CPU and Disk usage go down considerably by disabling the Windows Search service via the Services screen.
- Insufficient RAM to accommodate Sysmain – If you installed Windows 11 on a computer with low RAM capabilities, chances are Sysmain will force your OS to leverage VRAM in order to pre-load the most-used apps. This will put unnecessary pressure on your HDD which will cause unusually high usage of your disk drive.
- Native Command Queuing freezes the HDD – It’s clear now that Windows 11 is quite inefficient in allowing traditional HDD drives to leverage native command queuing and will often cause unnecessary system freezes while the disk drive is stuck at 100% usage. To fix this, you’ll need to do a few registry modifications in order to disable native command queuing.
Now that we went over every potential cause that has the potential of keeping your CPU and Disk at 100% usage on Windows 11, let’s go over a couple of fixes that other Windows 11 users have successfully used to alleviate the problem:
Disable Windows Search
Just as with Windows 10, the number one culprit that likely produces these 100% disk usage issues is the search function. Apparently, the way the search function is designed to always index and keep track of new file entries will end up hogging all the system resources on low-end PCs – This affects both the CPU and traditional HDDs.
If the search function is indeed to blame for this particular issue and you’re actively using it, you’re not going to like the resolution.
As of now, the only reliable way of stopping file indexing (caused by Windows Search) from hogging all your system resources is to disable the function altogether.
This is done via the Services screen – You’ll need to start by stopping the status of the service prior to modifying the Startup type.
IMPORTANT: Doing this modification essentially means that you’re giving up on the search function on Windows 11. Your operating system will no longer spend time automatically indexing the files that are stored on your PC. This might fix your disk usage problems, but it will also prevent you from using Windows Search again.
If you understand what this modification will do to your operating system and you are ready to enforce this modification, follow the steps below:
- Start by pressing Windows key + R key to open up a Run prompt. At the dedicated prompt that just appeared, type ‘services.msc’ inside the text box and press Enter to open up the Services screen.
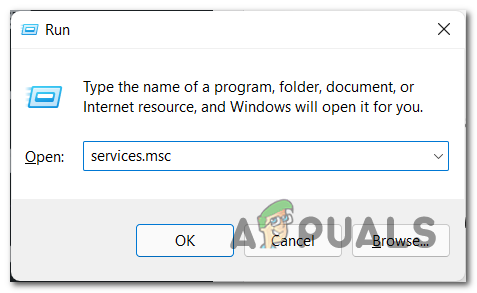
Opening the Services screen on Windows 11 - Once you’re inside the Services screen, move over to the right-hand side section of the page and scroll down through the list of services until you locate Windows Search.
- When you see it, right-click on it and click on Properties from the dedicated context menu.
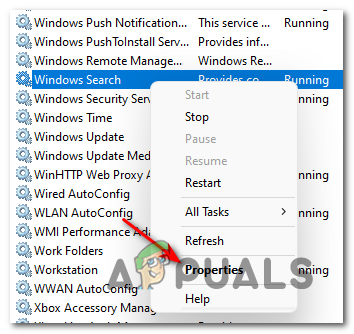
Accessing the Properties screen - Inside the Properties screen of Windows Search, start by accessing the General tab using the ribbon menu at the top.
- Next, check the Service status and see if it’s currently Running – If it’s set to Running, click on the Stop button below and wait until the service is stopped in its tracks.
- After the Windows Search service is finally stopped, change the Status type above from Automatic (Delayed Start) to Disabled.
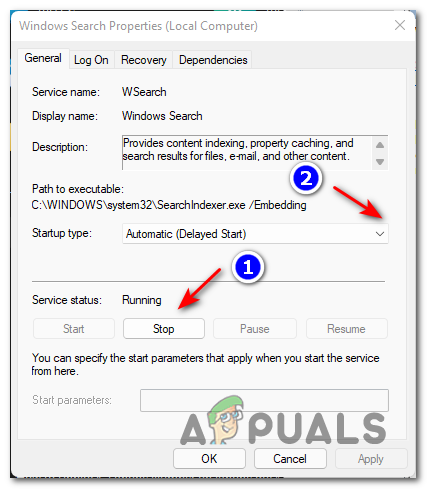
Modifying the Windows Search behavior on Windows 11 - Once the Windows Search service has been stopped, open Task Manager (Ctrl + Shift + Esc) and see if the Disk and CPU usage has gone down.
If the problem is still persisting, move down to the next potential fix below.
Disable Superfetch (Sysmain)
If you already tried disabling Windows Search or you aren’t ready to enforce this compromise, one additional likely culprit that might hogg all your system resources and keep your CPU and Disk usage at 100% is Superfetch (Sysmain).
Note: The purpose of this service is to increase the performance of your operating system by preloading apps you frequently use into RAM before you need to use them.
While this sounds great in theory and works beautifully on medium & high-end PCs, the same cannot be said for low-end configurations – If you are using a PC with limited RAM (with low frequencies), Sysmain will only make things worse because it will switch the burden from your RAM to VRAM (virtual memory hosted on your HDD or SSD).
This will most likely keep your Disk usage at 100% as your PC struggles to pre-load your most frequently used apps.
If you find yourself in this situation and you wish to alleviate the problem, the only tradeoff you can make is to prevent Sysmain from pre-loading your apps – This will serve the purpose of freeing up your system resources (especially your Disk Usage).
You can disable Sysmain via the Services screen. You’ll need to stop it first before modifying the Startup behavior.
Here’s how to do it:
- Open up a Run dialog box by pressing Windows key + R. Inside the newly appeared dialog box, type ‘services.msc’ and hit Enter to open up the Services screen.
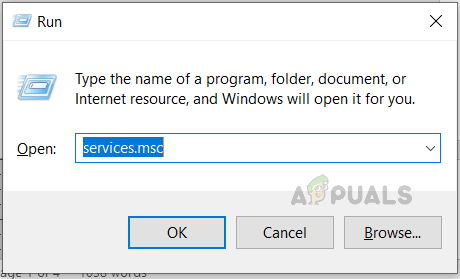
Opening the Services screen Note: If you are prompted by the User Account Control window, you’ll need to accept admin rights by clicking Yes.
- Inside the Services screen, use the menu on the right-hand side to find SysMain.
- When you find the correct service, right-click on it and click on Properties from the menu at hand.
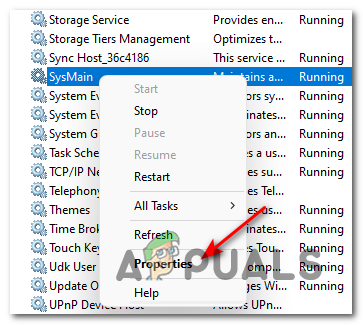
Accessing the Properties screen of Sysmain - In the SystMain Properties screen, select the General tab from the menu at the top, then Stop the service using the dedicated button under Service status.
- Next, change the Startup type to Disabled before clicking on Apply to enforce the changes and make them permanent.
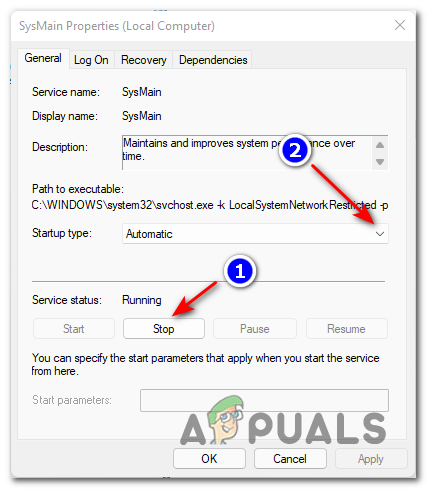
Disabling Sysmain - Once Sysmain has been effectively stopped, press Ctrl + Shift + Esc to open Task Manager and check if the Disk usage has gone down.
If the problem is still not yet fixed, follow the next method below for a different way of lowering your Disk usage on Windows 11.
Disable Native Command Queuing for your SATA AHCI Controller
If the first two methods were not effective in your case, let’s turn our attention to your SATA AHCI Controller driver and investigate either a built-in feature (Native Command Queuing) is not actually making your HDD perform worse than it should on Windows 11.
As it turns out, Windows 11 is quite inefficient at allowing HDDs to use native Command Queuing and this failure often results in the drive being stuck at 100%, rendering the PC in a prolonged frozen state.
Fortunately, you can fix this issue by doing some Registry Modifications to your SATA AHCI Controller driver so that Native Command Queuing is disabled – This will make your disk drive slightly slower, but it will likely solve any underlying disk usage problem on Windows 10.
Important: This method is only recommended for PC configurations using traditional HDDs. We haven’t been able to confirm this particular issue occurring with SSDs and Ultrafast SSDs.
Follow the instructions below to disable native command queuing for your SATA AHCI Controller in order to bring down the disk usage on your Windows 11 computer:
- Press Windows key + R to open up a Run dialog box. Next, type ‘devmgmt.msc’ inside the dialog box that’s currently on screen and hit Enter to open up Device Manager. If you see the User Account Control window, grant administrative access by clicking on the Yes box.
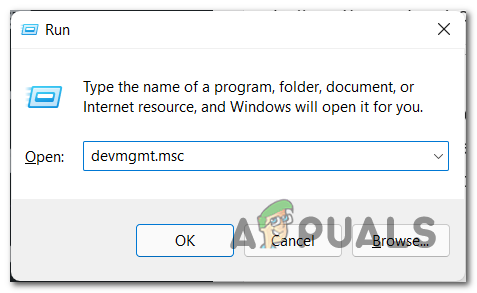
Opening Device Manager on Windows 11 - Once you’re inside Device Manager, scroll down through the list of devices and expand the drop-down menu associated with IDE ATA / ATAPI controllers.
- Next, right-click on your Standard SATA AHCI Controller driver and choose Properties from the context menu that just appeared.
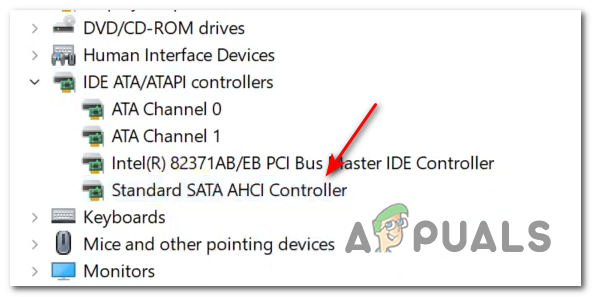
Accessing the Standard AHCI Controller driver properties Note: If you’re using a dedicated driver for your ATA / ATAPI controllers, the name of your controller might be different. For example, the name for Intel controller drivers is Intel(R) xxx Series Chipset Family SATA AHCI Controller.
- Once you’re inside the Properties screen, select the Details tab at the top, then change the drop-down menu of Property to Device Instance path.
- Next, right-click directly on the path under Value and hit Copy from the context menu.
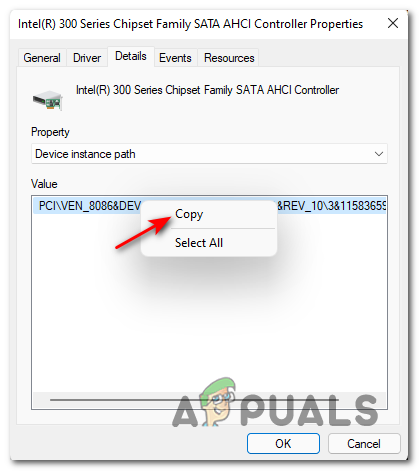
Copying the value to your clipboard - Now that you have the correct path safely copied onto your clipboard, press Windows key + R key to open up a dialog box. Next, type ‘regedit’ and hit Ctrl + Shift + Enter to open up the Registry Editor with admin access.
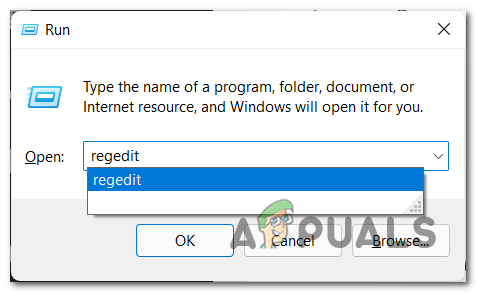
Opening the Registry Editor on Windows 11 - When you see the User Account Control prompt, click Yes to grant admin access.
- Once you’re inside the Registry Editor, use the navigation at the top to land in the following location:
Computer\HKEY_LOCAL_MACHINE\SYSTEM\ControlSet001\Enum\PCI
Note: You can either navigate to this location yourself or you can paste the location directly into the navigation bar to get there instantly.
- Once you’re inside the correct location, go to the navigation bar at the top, select the last part (PCI) and paste the path that you currently copied to your clipboard at step 5.
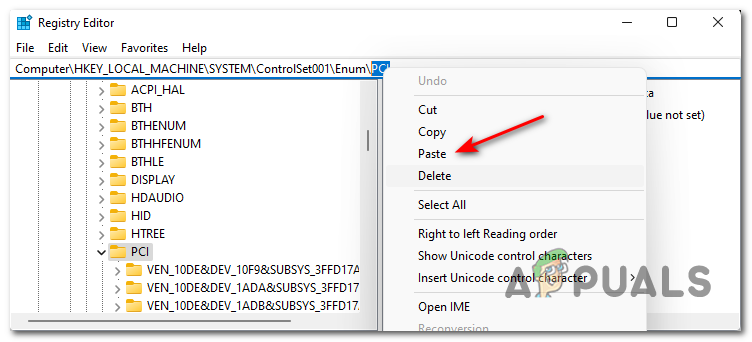
Navigating to the location of SATA AHCI Driver Registry keys - With the pat successfully pasted, hit Enter, then move back to the left-hand side many and expand the Device Parameters key.
- Next, expand the Interrupt Management key and select the MessageSignaledInterruptProperties key.
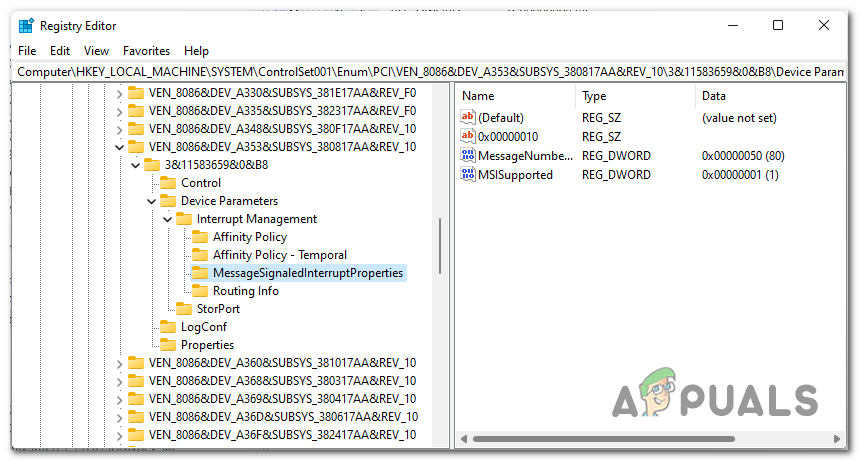
Navigating to the correct location via Registry Editor - Next, move over to the right-hand section of Registry Editor and double-click on MSISupported.
- Next, set the Base of MSISupported to Hexadecimal, then set the Value data to 0 to effectively disable native command queuing.
- Finally, close Registry Editor and restart your computer in order to allow the changes to take effect.
- After your computer boots back up, open up Task Manager (Ctrl + Shift + Esc) and see if the resource usage has gone down.


