How to Enable AHCI Mode in Windows 8/8.1/10
AHCI Mode is needed for SSD Drives. If SSD’s are installed with the disk controller type as IDE, then there may be BSOD Errors such as CRITICAL_PROCESS_DIED Error and the SSD may not perform to it’s fullest potential. Therefore, if you’ve upgraded your disk or just installed an SSD then the disk controller should be set as AHCI. In Windows 8 and 8.1;/10 this needs to manually activated from the Registry Settings and BIOS.
If in your BIOS, the Disk Controller Mode is set to IDE then it should be changed to AHCI bu before you do that there is a small registry tweak to allow AHCI to be recognized. Follow the steps below to modify this registry.
Before you go ahead and change it make sure you back your data up and the registry settings. This is a two step process, the first step involves changing the registry, the next step involves setting disk controller type to AHCI from BIOS.
Registry Edit for AHCI Recognition in Windows
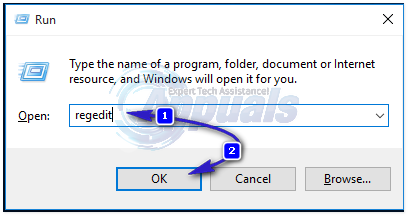
Hold the Windows Key and Press R. In the run dialog box, type regedit and click OK.
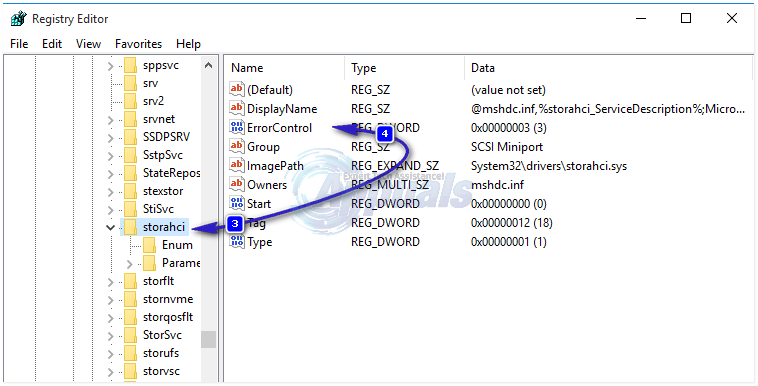
From the left pane in registry editor, go to HKEY_LOCAL_MACHINE > SYSTEM > CurrentControlSet > Services > storahci. With the storahci key highlighted, double click ErrorControl in the right pane and under Value data: change the value to 0.
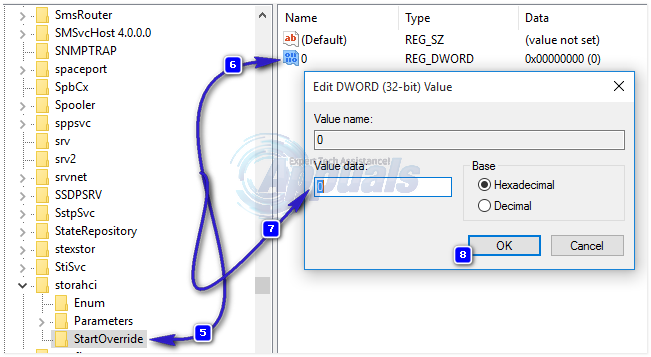
Now chose the subfolder under storahci in the left pane called “StartOverride“. In the right pane, double click the 0 entry to modify. Under Value data, change its value to 0.
Similarly, under Services, click on Msahci. In the right pane double click Start and change value below Value data to 0. And press OK.
Once done, reboot PC and boot to BIOS (follow steps given below)
How to BOOT into BIOS to change Boot Order
You must know how to boot and change boot order since this will be needed to perform the solutions below. Restart your computer. Enter your computer’s BIOS (or UEFI) settings as soon as it starts up. The key that you need to press to enter these settings depends on the manufacturer of your computer’s motherboard and can be anything from Esc, Delete or F2 to F8, F10 or F12, usually F2. This is displayed on the post screen, and the manual that was supplied with your system. A quick google search asking “how to enter bios” followed by model number will also list results. Navigate to the Boot.
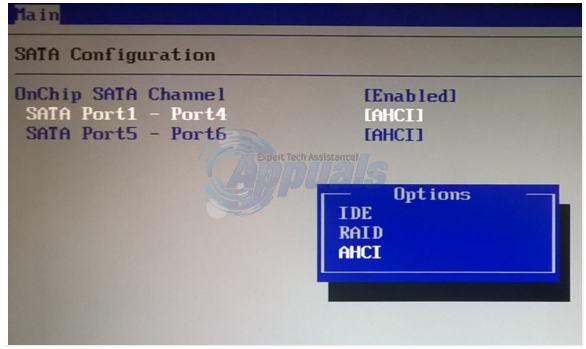
How to Enable AHCI Mode
To change it, power on your system on and go to your BIOS. Once in the BIOS setup, look for SATA Configuration which is usually in Main tab. Otherwise, navigate around until you find it. Once you do, change the mode for SATA to AHCI Mode. If there are more then one ports, then identify which port is the SSD Connected to by taking a look at the motherboard and then change it.