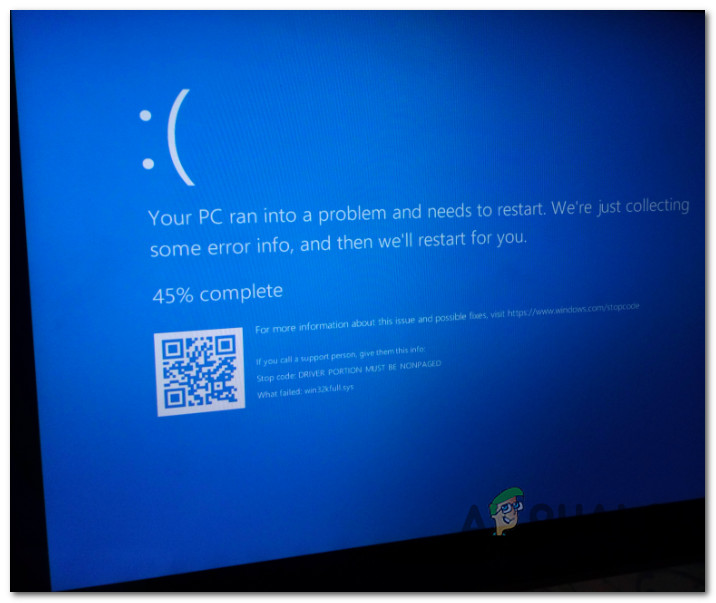
Fix: DRIVER_PORTION_MUST_BE_NONPAGED BSOD on Windows 10 / 11
Some Windows 10 and Windows 11 users are experiencing random BSOD (Blue Screen of Death) with the error code DRIVER_PORTION_MUST_BE_NONPAGED. This critical error appears during random intervals when the PC is either doing something or stays in idle mode. Typically, this type of BSOD is related to some kind of system file corruption or is caused by some type of driver issue affecting your HDD or SSD.
After investigating this particular issue thoroughly, we realized that there are actually several different underlying causes that might ultimately trigger this error code on a Windows 10 or Windows 11 computer. Here’s a list of scenarios that might end up causing this error code for you:
- Generic HDD-related issue – As it turns out, a lot of users dealing with infrequent BSODs with this particular error code have managed to fix them by running the Windows Hardware Troubleshooter and applying the recommended fix. Both Windows 10 and Windows 11 are equipped with a series of automated fixes that might be applied automatically if a recognizable scenario is identified.
- Outdated disk drivers – Another scenario that might cause this issue is a traditional HDD or an SSD that is using outdated drivers that are not fully compatible with your Windows version. If this scenario is applicable, you can fix the issue by accessing Device Manager and forcing the driver to update itself to the latest version.
- Missing Microsoft hotfix – As it turns out, Microsoft was already aware of this issue (at least on Windows 10) and has already released a series of hotfixes that made their way on the target computers via Windows Update. If you have pending updates on your Windows PC, install them first and see if the BSOD crash is resolved.
- System File corruption – There are documented scenarios where this problem actually occurred due to some kind of system file corruption that ended up causing this critical system crash. Two ways of addressing these potential issues without clean installing or repair installing is to perform an SFC or a DISM scan.
- HDD Sectors going bad – If you’re still using a traditional HDD, the reason why you’re experiencing this BSOD is a scenario in which some of the storage sectors used to store system files are beginning to fail. In this case, you can prologue the life of your HDD by deploying a Check Disk Scan to replace failing sectors with unused equivalents.
- 3rd party interference – As it turns out, you can expect to deal with this issue in scenarios where some time of service, process, or startup item belonging to an installed application (or a recently uninstalled one) is actually triggering this critical system crash. You can test out if this theory is true by booting your PC in clean boot mode and seeing if the crash is still occurring. If it doesn’t, you’ll need to systematically uninstall every 3rd party component until you discover the culprit responsible.
- Insufficient Paging file – As it turns out, another plausible scenario that might cause your system to crash with the DRIVER_PORTION_MUST_BE_NONPAGED error is when the available Windows Paging File is not big enough or it’s not able to expand itself quick enough to avoid the system critical crash. In this case, the only available repair strategy is to expand the available paging file manually.
Now that we went over every potential scenario that might cause the DRIVER_PORTION_MUST_BE_NONPAGED error, let’s go over a series of verified fixes that other affected users have successfully used to get to the bottom of this issue.
1. Run the Windows Hardware Troubleshooter
It turns out that running the Windows Hardware Troubleshooter and applying the suggested patch has helped a lot of people who experience sporadic BSODs with this specific error code. Both Windows 10 and Windows 11 come with a number of automated solutions that could be performed instantly if a recognizable case is found.
The only thing you need to do is launch the Windows Hardware Troubleshooter and follow the instructions if you’re fortunate enough to experience this issue as a result of a driver inconsistency brought on by a partial incompatibility (which occurs frequently on both Windows 10 and Windows 10).
This is most likely the root of the DRIVER_PORTION_MUST_BE_NONPAGED BSOD problem if you recently connected a new peripheral or external drive.
The simplest method to fix the issue in this situation (and a few others) is to run the Hardware and Devices troubleshooter and carry out the suggested repair.
Note: If a frequent situation is identified, a number of automated fixers in this tool may be automatically applied.
Follow the steps below to launch the hardware and device troubleshooter:
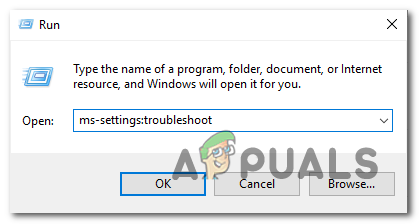
- To open the Run dialog box, press the Windows key + R.
- Next, enter “ms-settings:troubleshoot” in the text field and press Enter to start the Hardware and Device Troubleshooter.
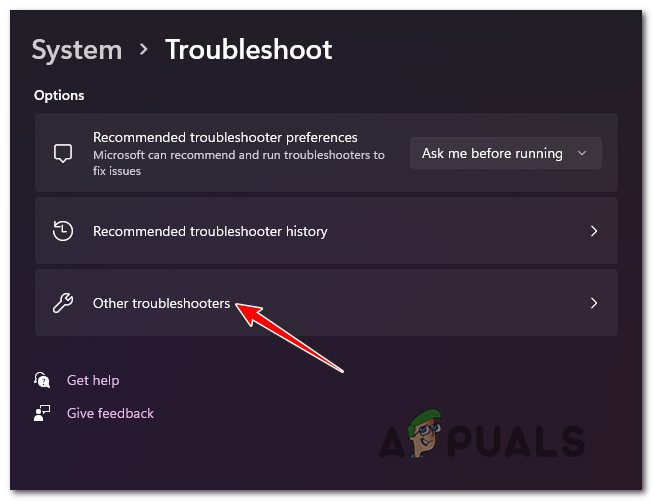
Accessing the troubleshoot menu - After entering the Troubleshooting tab, choose Other troubleshooters from the menu on the right-hand side.
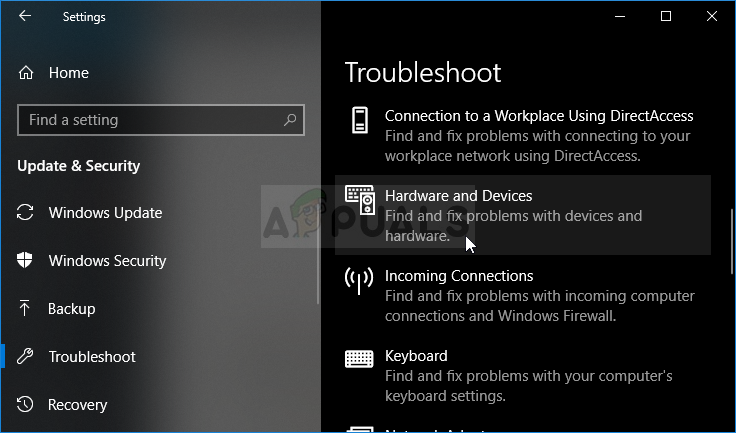
Access the Other Troubleshooters - After viewing the whole list of other troubleshooters, scroll down to Find and fix more problems, expand the Hardware and Devices section, and then select Run the troubleshooter.
Access the Hardware & Devices Troubleshooter - Be patient and wait until the Hardware and Devices troubleshooter‘s initial scan is finished.
- Click Enable to instruct Windows to always check for updated driver signatures when new hardware is attached if the software discovers the same problem as what we anticipate.
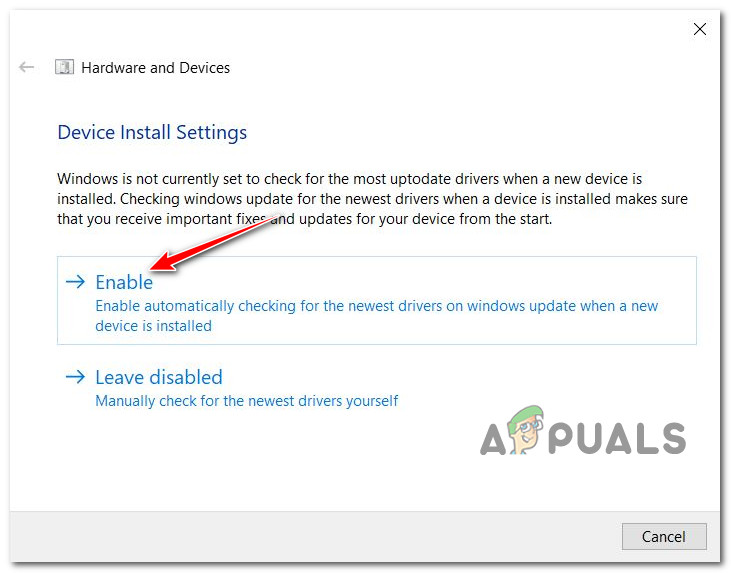
Enable the Hardware & Device menu - Restart your computer, then use it normally to see if the major crash caused by DRIVER_PORTION_MUST_BE_NONPAGED has been resolved.
If the same kind of issue is still occurring, move down to the next potential fix below.
2. Update your disk drives
A standard HDD or SSD that is running out-of-date drivers that are insufficiently compatible with your Windows version is another circumstance that could lead to this problem. If this situation applies, you can resolve the problem by going to Device Manager and ordering the driver to automatically download the most recent version.
If you are using a more recent SSD or HDD model, see if there is an updated driver available. Note the SSD or HDD model number by going to Device Manager. Check the internet to see if there is a fresh firmware update that you may apply as soon as you get that.
Prior to replacing the firmware on your storage disk, take care to back up your data. If the firmware is upgraded, all the data on your disk will be erased.
Many users reporting this type of error have stated that they were eventually able to resolve it after utilizing the procedures below to identify their hard drive model number and using it to locate a newer driver version.
Note: Though there is an extremely slim chance you’ll find a newer version, you can also attempt changing the SSD or HDD firmware through Device Manager.
Follow these steps to update the storage device firmware to the most recent version:
- Press the Windows key + R to open the Run dialog box.
- Then, enter “devmgmt.msc” into the text box and press Ctrl + Shift + Enter to start Device Manager.

Open Device Manager - In the User Account Control, choose Yes to grant admin access.
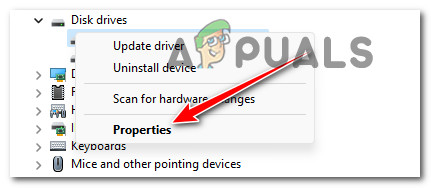
- Expand the Disk Drives drop-down box after opening Device Manager.
- Next, pick Properties from the context menu by right-clicking the SSD or HDD disk in the Disk Drives section.
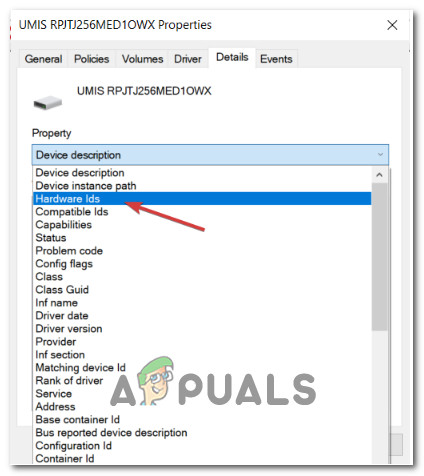
Accessing the properties screen - When you are on the Properties screen, click the Details tab at the top.
- On the Details tab, choose Hardware IDs from the Property menu.
Accessing the Hardware ID - The upper portion of the drive has both the model number of the drive you are now using and the firmware version shown beneath its name.
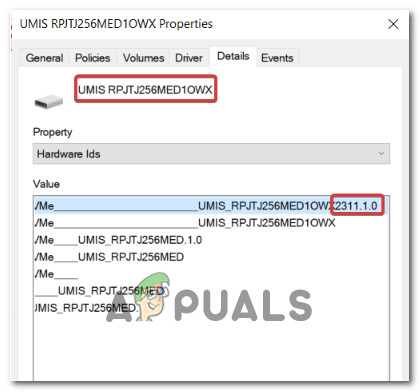
Taking note of the model - Search online (or on the website of the maker of your PC or your SSD or HDD) to see if there is a new firmware version available for your SSD or HDD.
- If the updated version is available, download it and then install it by following the on-screen instructions.
After updating the firmware on your storage device, restart your computer to see if the issue has been fixed.
3. Update Windows to the latest version
It turns out that Microsoft was already aware of this problem (at least with Windows 10) and has already issued a number of hotfixes available through Windows Update to the affected computers. Install any pending updates on your Windows computer first, then check to see if the BSOD problem has been fixed.
Microsoft recently released a hotfix for this problem on Windows 11 in response to an instance when a defective Windows update caused the DRIVER_PORTION_MUST_BE_NONPAGED error to appear. Before you can install the patch that fixes this issue, you must update every pending Windows Update.
Make sure you have the most recent Windows infrastructure updates installed if you have a high-end PC. You should take this action if you frequently experience this issue when using your PC for resource-intensive tasks.
Note: Updating Windows 11 or Windows 11 PC might enable you to utilize your computer steadily without experiencing these annoying BSODs.
For thorough directions on how to do this on Windows 10 or Windows 11, continue reading:
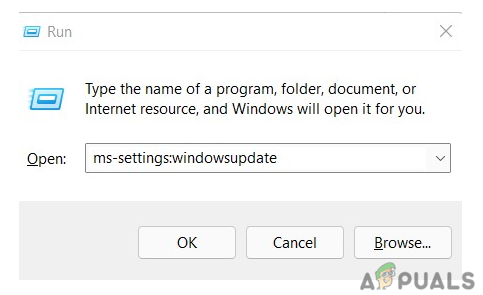
- One way to launch Windows Update is using the Run dialog box. Press the Windows key and R on your keyboard to do this. As a result, the Run dialog box will show up.
- After that, enter “ms-settings:windowsupdate” into the text box. This will take you to the Windows Update area of the Settings app.
Open Windows Update Note: If you haven’t changed the UAC settings, you can receive a prompt asking for your permission to continue. Clicking Yes indicates that you are in agreement with this.
- Select Check for Updates from the menu on the right after accessing the Windows Update pane.
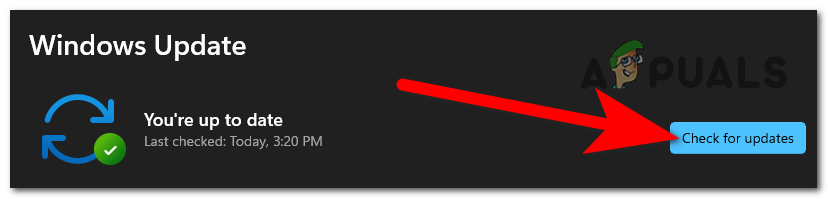
Check for Updates - Select Install Now to start a local installation after the update has finished downloading.
- Check to see if the problem has been fixed by restarting your computer.
Continue to the procedure below if you’re still seeing the DRIVER_PORTION_MUST_BE_NONPAGED error.
4. Run SFC and DISM Scans
Some people claim that system file corruption, a Windows function that uses a lot of resources, can cause this problem.
By using SFC (System File Checker) and DISM (Deployment Image Servicing and Management) to locate the damaged files at the heart of the issue and replace them with functional versions, the issue can be fixed.
Despite the fact that these two utilities have a lot of characteristics, they take different approaches to getting rid of corruption. If you want to try this method, start by starting an SFC scan because DISM requires a Windows Update add-on while SFC uses a locally stored archive to download clean files.
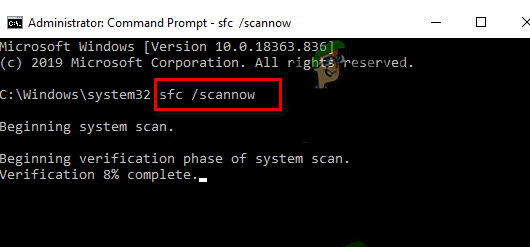
When the initial SFC scan is finished, restart your computer and perform a DISM scan.
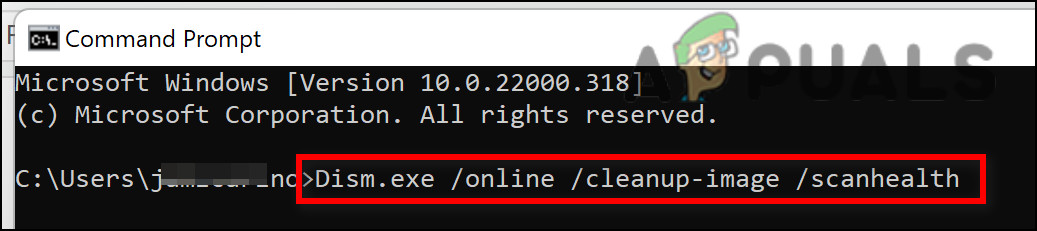
Note: Prior to beginning the DISM process, confirm that your Internet connection is steady.
Replace corrupted files by adhering to the on-screen directions if any of these tools are successful in locating and fixing an underlying corrupt issue.
Once the DISM scan has successfully concluded, restart your computer to see if the problem has been fixed.
If you’re still dealing with the same DRIVER_PORTION_MUST_BE_NONPAGED error, move down to the next method below.
5. Deploy CHKDSK Scan
The scenario in which parts of the storage sectors used to hold system files are starting to fail is what would cause this BSOD if you’re still using a conventional HDD. In this situation, you can extend the life of your HDD by running a Check Disk Scan to swap out bad sectors for good ones.
To rule out this scenario, try running a CHKDSK scan from an elevated CMD prompt.
Fortunately, Windows’ built-in CHKDSK tool can check for errors and corruptions as well as correct any logical mistakes and damaged data that may have been left behind by a forceful deletion attempt.
To grant CHKDSK the permissions it requires to repair damaged files, open it in an elevated CMD window.
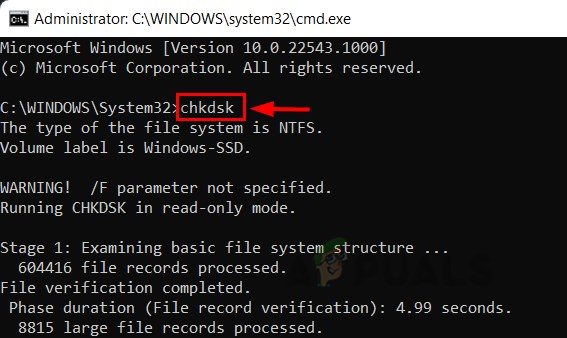
Note: The instructions ought to function regardless of the Windows version you’re using.
Once the CHKDSK scan is complete, restart your PC and see if the DRIVER_PORTION_MUST_BE_NONPAGED is now fixed.
If the same error is still occurring, try the next method below.
6. Clean Boot your Windows
It turns out that situations, when a service, process, or startup item from an installed application (or a recently uninstalled one) is truly causing this major system crash, are what you may anticipate to deal with. By starting your computer in clean boot mode and checking to see if the BSOD crash still occurs, you can determine whether this idea is correct.
If it doesn’t, you’ll have to carefully remove each component from third parties until you find the offending element.
If this situation applies, you should be able to resolve the problem by performing a clean boot to look for software conflicts and identify the problematic service or process. For many of the impacted consumers, the effectiveness of this action was proven.
Remember that by reaching a clean boot state, your computer will start up without any third-party services, programs, or startup items that could be responsible for the emergence of this problem.
The actions to take in order to get this clean boot state are as follows:
- Hold down the Windows key and R key to open the Run dialog box.
- Next, enter “msconfig” in the text field and press Enter to open the System Configuration window.
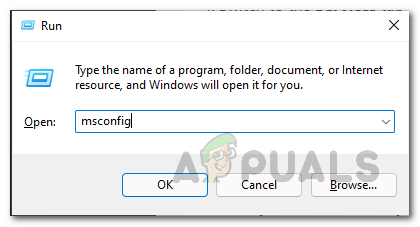
Open the msconfig utility Note: When the User Account Control (UAC) prompts you to grant admin access, select Yes.
- From the System Configuration menu’s ribbon bar, select the Services tab. Then, check the box next to Hide all Microsoft services.
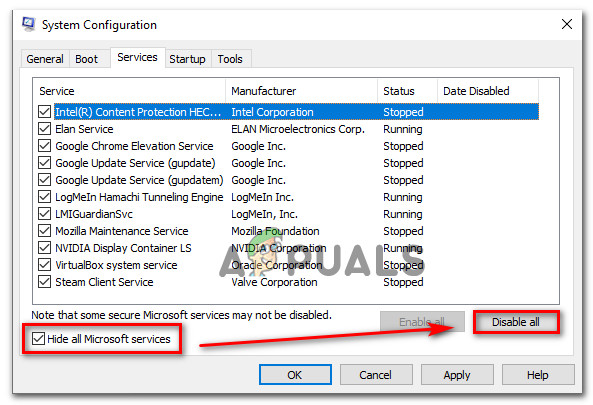
Hide all Microsoft Services Note: By doing this action, you will avoid mistakenly deactivating any Microsoft services that your operating system depends on.
- After you have taken care of all necessary services, pick Open Task Manager from the drop-down box on the Startup tab.
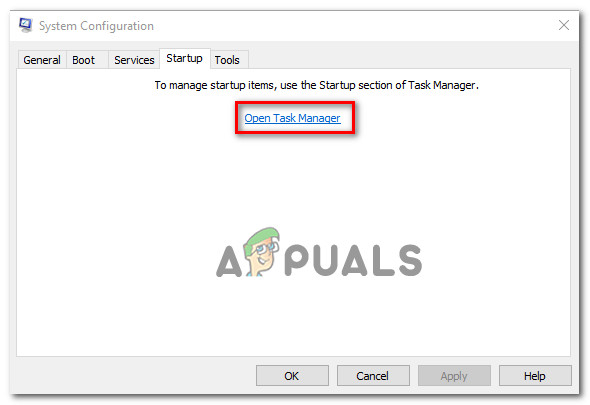
Open Task Manager - The operation that was just performed will lead you directly to the Startup tab of Task Manager.
- After you’ve entered, start choosing each third-party startup service individually and clicking the Disabble option at the bottom of the screen to stop them from starting when the system restarts.
Disable Startup programs Note: Continue doing this until there are no more startup services left to launch at system startup.
- You are prepared to polish the boot if you have read this far. All you need to do at this point is restart your computer to benefit from this status.
- Only the services that your operating system need will be started when you restart your machine. When the procedure is finished, see if the BSOD is still occurring.
- Reverse engineer the previous steps to verify that your next computer startup is regular and that third-party services, processes, and startup items are permitted to run, regardless of the outcome.
After achieving a clean boot state, try the next option if the issue is still not resolved.
7. Increase the Windows Paging File
Your Windows most likely ran out of RAM memory when you noticed that your applications started to slow down, freeze, and eventually become completely unresponsive.
This won’t be an issue if you have a lot of RAM to work with (16 GB or more), but if you only have 4 GB and you’re trying to finish resource-intensive tasks like video editing, rendering, gaming, or using RAM intensive apps like Maya or Unity, it’s likely that Windows 11 will freeze frequently or even give you the DRIVER_PORTION_MUST_BE_NONPAGED blue screen of death error.
Additionally, some of these freezes may progress to a Black Screen of Death (BSOD), which would force your PC to restart. This is because of how Windows 11 handles memory management.
You can solve the issue by increasing the virtual memory (vRAM) instead, if this case applies and you upgrade your system with more RAM.
Important: Note that increasing VRAM will increase the free space set aside for RAM overflow, preventing instances in which your app freezes due to a lack of memory.
To learn how to increase the VRAM on Windows 11 or Windows 11, follow the methods listed below:
- To open the Settings menu in Windows 11, press Windows key + I.
- From the Settings menu, type “performance” into the settings box in the top-left corner of the screen.
- From the context menu that just opened, select Adjust Appearance and Performance of Windows when the results are displayed.
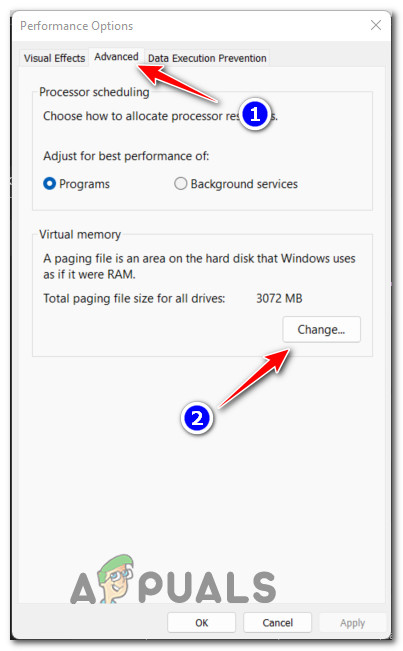
Adjust the performance and appearance - Using the ribbon menu at the top of the Performance Options menu, select the Advanced tab.
- After that, press the Change button (under Virtual Memory).
Change the virtual memory - Next, start by contrasting the Recommended paging file size value with the Currently allocated presently in the Virtual Memory pane.
- Select the C (or your OS drive) from the Paging file size for each drive, uncheck the box next to Automatically manage paging file size for all drivers, then choose Custom size as an alternative if the value of Currently allocated is less than the Recommended value.
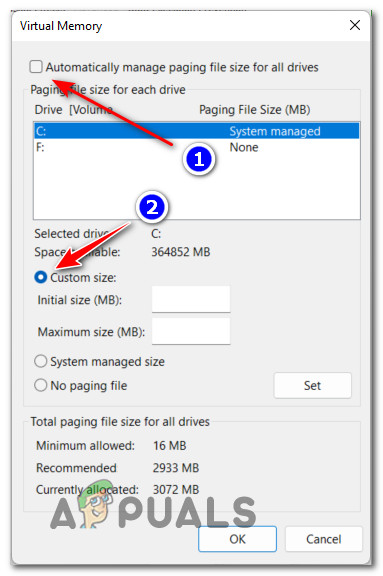
Custom paging file Note: Skip the subsequent steps below and go straight to the next technique if the Currently allocated amount is higher than the Recommended value.
- After that, add a bigger number to the Maximum Size Box and enter the Recommended value in the Initial Size box.
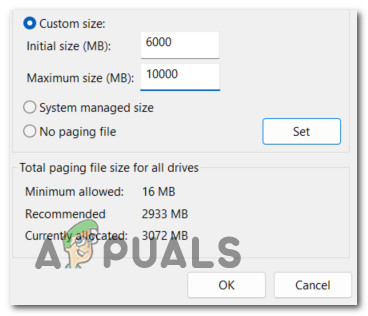
Modify the custom paging file Note: If your storage capacity permits it, feel free to quadruple the recommended value.
- To see if the sporadic freezes and crashes have stopped, restart your computer after clicking Ok to save the modifications.
If you previously tried this solution and it didn’t work for you or if it wasn’t appropriate in your situation, scroll down to the next possible solution below.
8. Perform a clean install or repair install
There is only one course of action left if none of the aforementioned techniques have succeeded: go nuclear and replace all of the harmed system file dependencies with their healthy equivalents.
If you have system file corruption, your only choices are to perform a clean install or a repair install (in-place upgrade).
Our recommendation is to repair install (in-place upgrade) if you have the option or if you’re stuck in this situation. The only files that will change during a repair installation (in-place upgrade) are the system files (while keeping your personal files, user preferences apps & games).
If a repair install is not an option for you or you’re specifically looking for the nuclear option, a clean install may be the best choice if specific kernel processes are impacted, but it has the disadvantage of wiping any personal data stored on the OS drive. However, you should be aware that if you select this option, all of your personal data will be lost.


