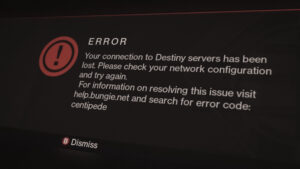
How to Fix Destiny 2 Error Code Monkey?
Some Destiny 2 players are frequently encountering the ‘monkey’ error code when they attempt to connect to the main server in order to play online. This error code is reported to occur on last-gen consoles (Xbox One, PS4), next-gen consoles (PS5, Xbox Series S), and on PC.
After investigating this particular issue, it turns out that there are several different scenarios that might be triggering this particular error code:
- Underlying server issue – As it turns out, you can also expect to encounter this issue in situations where Bungie is dealing with an underlying server issue that is affecting the connection to the game servers. In this case, there is nothing you can do to fix the issue other than waiting for the involved developers to fix the issue on their end.
- TCP / IP Inconsistency – If your ISP assigns dynamic IPs, you are prone to game crashes facilitated by a TCP or IP inconsistency. Most of these occurrences can be fixed by either restarting or resetting your network connection.
- Bad DNS Range – Depending on your ISP, you can also see this issue if you’re stuck with a bad DNS range that the game server rejects. In this case, you can fix the issue by changing the current DNS range to a more stable equivalent. But keep in mind that depending on your platform of choice, the exact steps of doing so will be different.
Now that you are familiar with every scenario that might spawn this error, here’s a list of verified methods that other affected users have successfully used to fix the issue:
Method 1: Checking the Server Status
Before you move on to any of the fixes below that will allow you to fix the issue locally, you should take some time to ensure that the ‘monkey’ error is not occurring due to a server issue that is entirely beyond your control.
Since this error code is often associated with server issues, you should start by using services like DownDetector and OutageReport to see if other users in your area are currently reporting the same kind of issues.
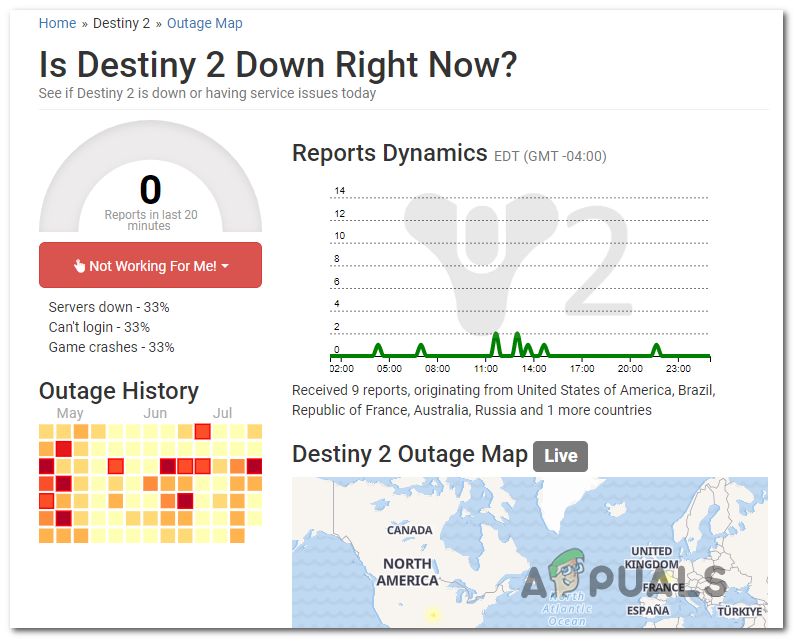
In case you find a lot of recent user reports saying that they see the same error code as you, there’s probably little else you can do to fix the issue other than wait for Bungie to fix their problems.
If you discover evidence of a server issue, you should also check out the Status Page of Destiny 2 to see if if it’s currently reporting an underlying issue.
Note: If you want to be extra thorough, you should also check out Bungie’s support account on Twitter to see if they have made an official post about this issue. Keep in mind that the ‘monkey’ error code has been a recurring instance these past few years.
On the other hand, if the investigations just didn’t reveal an underlying server issue, move down to the next method to attempt and fix the issue locally.
Method 2: Restarting or Resetting the Server
Once you’ve confirmed that you’re not actually dealing with a server issue, you should start troubleshooting against the most common culprit that might produce this error locally – a network inconsistency.
If this scenario is applicable, your first attempt at fixing the issue is to simply restart your router in order to allow it to re-assign network TCP / IP data to the device where you’re playing the game.
According to some affected users, this operation will end up fixing those cases where a low-end router is unable to allocate enough network resources to sustain a connection with the game server – While doing this, it’s also recommended to disconnect non-relevant devices from taking up precious Internet bandwidth.
In order to perform a simple router reboot, just press the power button once (typically located on the back of the router) and physically unplug the power cable from the power outlet, then wait for a full minute. This last step is important because it gives the power capacitors enough time to drain themselves.
Once the period ends, turn on your router again and see if the problem is now fixed.
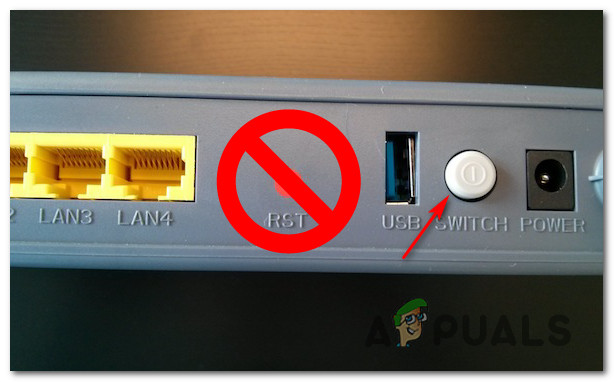
If you still end up seeing the same ‘monkey’ error code in Destiny 2, the next thing you should do is a router reset.
But before you go forward with this operation, be advised that this procedure will reset any custom credentials, settings, and other adjustments that you made to your current settings.
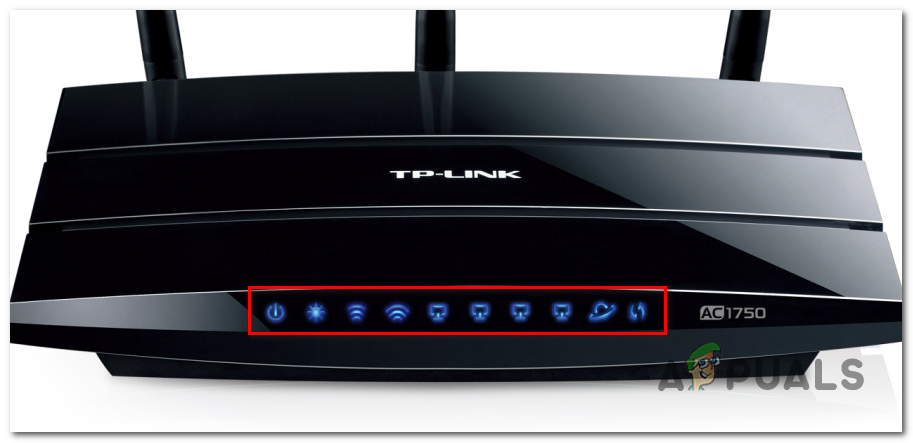
If you are prepared to lose the custom router settings for forwarded ports, blocked/whitelisted devices, and custom settings, you can use a sharp object (small screwdriver, toothpick, needle, etc. ) to hold on the reset button for about 10 seconds or until you see every front LED flashing at the same time.
Once the reset procedure is complete, re-establish the internet access and re-insert the user credentials if necessary (if your ISP is using PPPoE).
In case the problem is still not resolved, move down to the next potential fix below.
Method 3: Migrating to Google DNS
If none of the methods above have worked for you, there’s a very big chance that you’re dealing with some kind of DNS (Domain Name System) inconsistency. This occurs with certain ISP provides that are likely to assign a bar ISP range that inhibits the connectivity with a lot of game mega servers.
One cure-all fix for this type of issue is to migrate to the Google DNS provided by Google – This range is consistently more stable than a lot of default DNS ranges supplied by default by some ISPs.
But since this game has launched on a lot of platforms, the steps of migrating to the Google DNS range will be different from platform to platform.
To accommodate PC users and last-gen / next-gen Destiny 2 players, we’ve put together a guide that will show you how to migrate to Google DNS from the default range:
A. Changing the Google DNS on PC
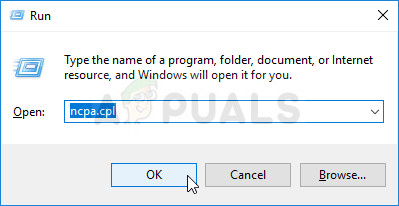
- Start by pressing Windows key + R to open up a Run dialog box. Next, type ‘ncpa.cpl’ and press Enter to open up the Network Connections window.
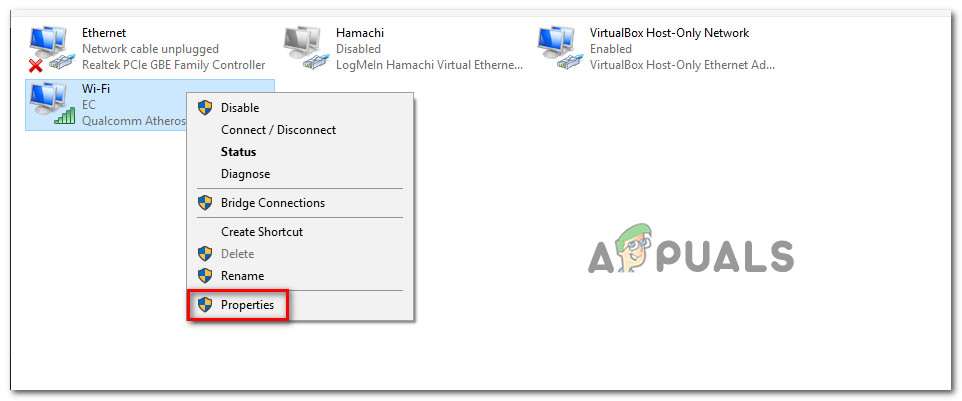
Accessing the Network Connections window - Once you’re inside the Network Connections window, right-click on Wi-Fi (Wireless Network Connection) or Ethernet (Local Area Connection) depending on if you’re using a wired or wireless connection. Next, click on Properties from the new context menu that appeared.
Accessing the Properties screen of your Network - When you’re prompted by the UAC (User Account Control) prompt, click Yes to grant admin access.
- From the Properties screen that just appeared, access the Networking tab, then navigate to the section entitled This connection uses the following items section.
- Once inside, check the box associate with Internet Protocol Version 4 (TCP / IPv4) then click on the Properties button.
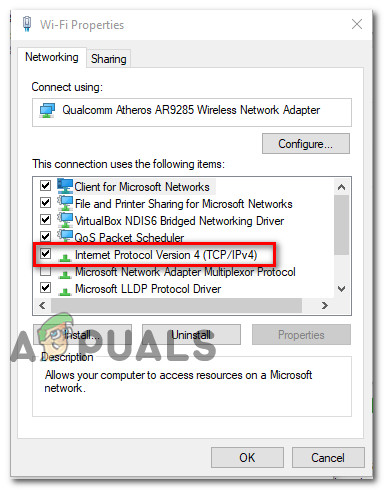
Accessing the Internet protocol 4 settings - Inside the next screen, go ahead and replace Preferred DNS server and Alternate DNS server with the following values:
8.8.8.8
8.8.4.4
- If you’re also heavily reliant on the TCP/IPv6 protocol, return to the initial menu and do the same thing for the Internet Protocol Version 6 – Change the Preferred DNS server and Alternate DNS server to the following value:
2001:4860:4860::8888
2001:4860:4860::8844
- Once the changes have been made, reboot your PC, then open Destiny 2 and see if you still end up seeing the ‘monkey’ error code.
B. Changing the Google DNS on PS5
- From the main dashboard of your PS5 console, use your thumbstick to access the Settings menu in the top-right section of the screen.
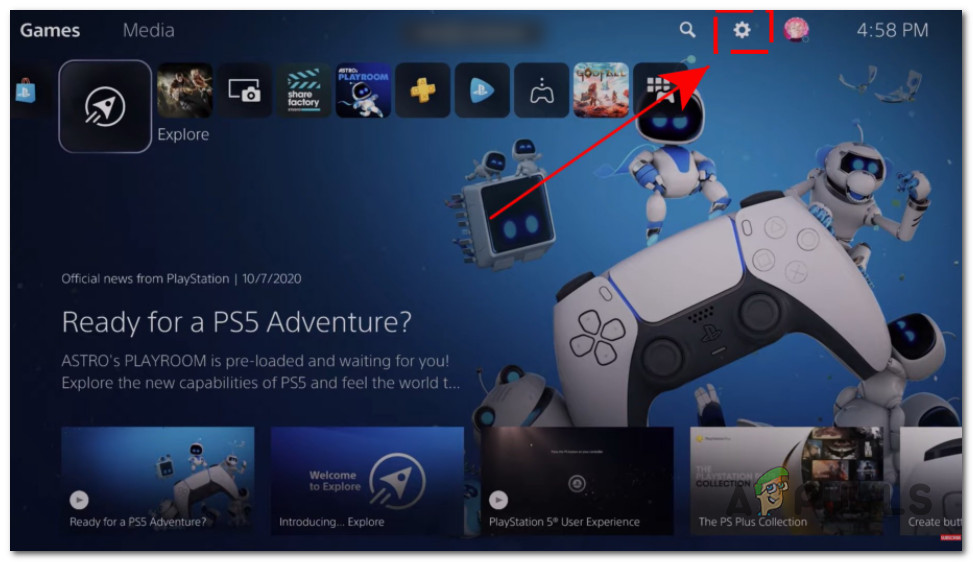
Accessing the Settings menu - Once you’re inside the Settings menu of your PS5, click on Network, then access the Settings menu.
- Inside the Settings menu of your network, access the Set up Internet Connection tab, then scroll down to the bottom of the screen and choose Set up Manually.
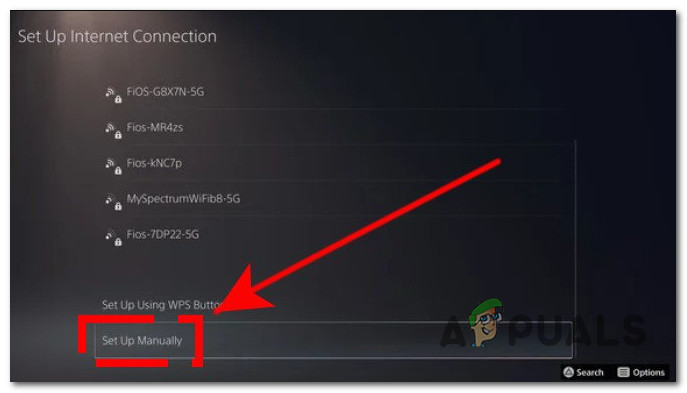
Setting up the DNS manually Ps5 - Depending on the type of connection that you’re using, select Wi-Fi or LAN cable before choosing DNS.
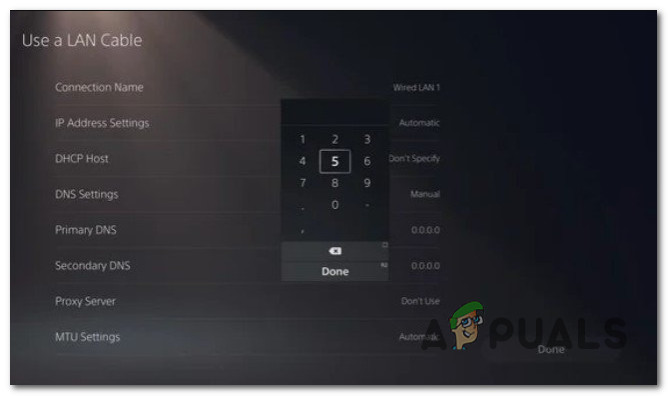
- Next, change the Primary DNS and Secondary DNS to the following values:
Primary DNS: 8.8.8.8
Secondary DNS: 8.8.4.4
Note: If you want to use IPV6, use these values instead:
Primary DNS: 208.67.222.222
Secondary DNS: 208.67.220.220
Changing to the Google DNS on PS5 - Save the changes, then restart your console and see if the Destiny 2 error code is now fixed.
C. Changing the Google DNS on Xbox One X / Xbox Series X
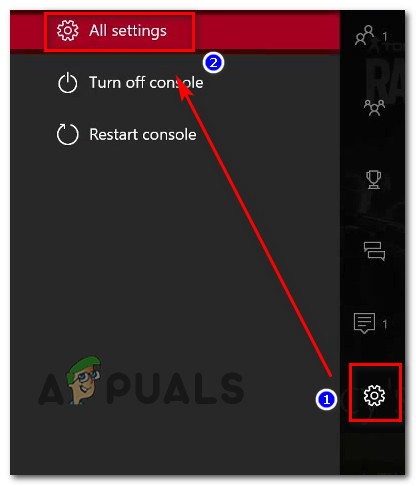
- At the initial dashboard menu of your Xbox console, press the Xbox button (on your controller) to open up the guide menu. Once you’re inside, access the All Settings menu.
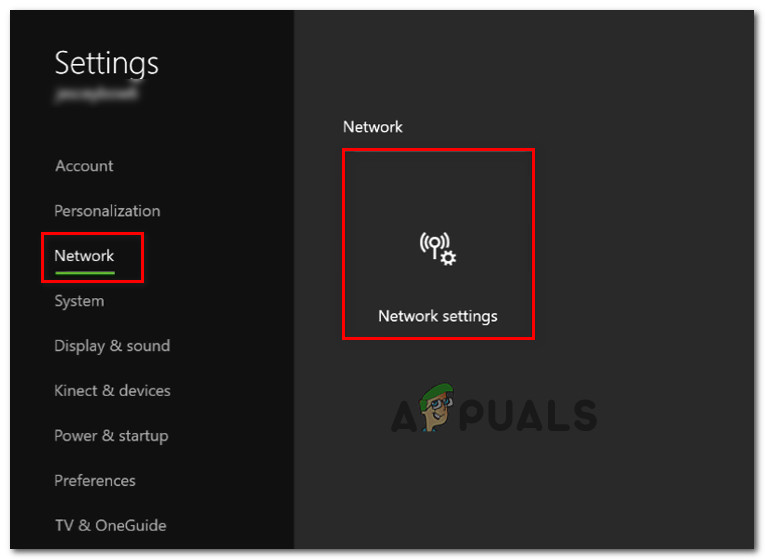
Accessing the All Settings menu - Inside the Settings menu, access the Network tab using the menu on the right-hand side, then access the Network Settings sub-menu.
Accessing the Network Settings sub-menu - Inside the Network menu of your Xbox One console, choose Advanced Settings from the section on the left.
- From the Advanced Settings menu, choose DNS settings, then choose Manual at the next prompt.
Changing the DNS settings on Xbox One / Xbox Series S - At the next prompt, change the default DNS values to the following:
Primary DNS: 8.8.8.8
Secondary DNS: 8.8.4.4
Note: If you want to use IPV6, use these values instead:
Primary DNS: 208.67.222.222
Secondary DNS: 208.67.220.220
- Save the changes, then launch the game again and see if the error code is now resolved.
D. Changing the Google DNS on PS4
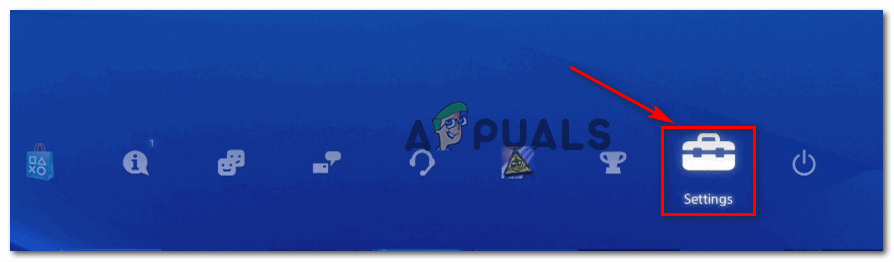
- On your PS4 console, access the main dashboard, then use the thumbstick to access the vertical menu at the top and select the Settings icon, then press X to access the menu.
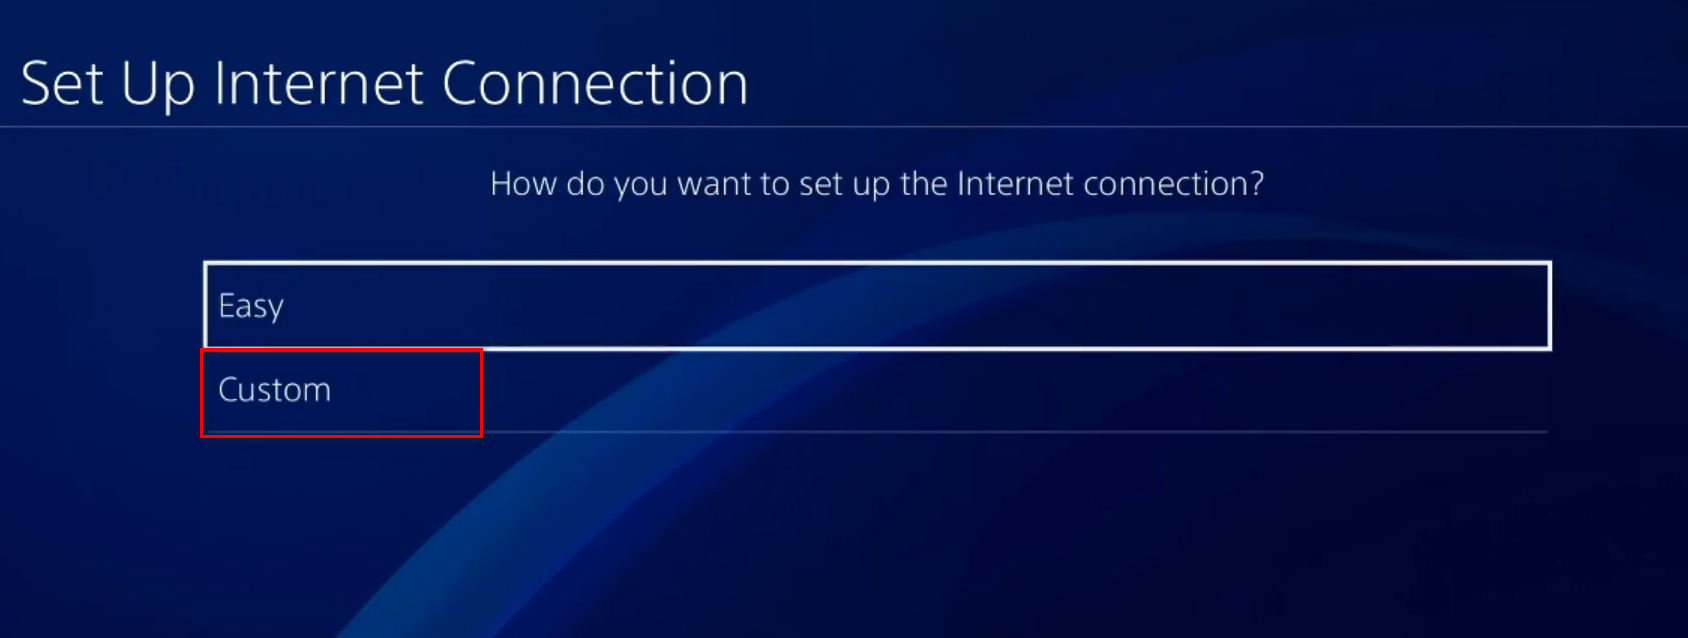
Accessing the Settings menu on Ps4 - Inside the Settings menu, navigate to Settings > Network and then choose Set Up Internet Connection from the list of available options. Next, choose Custom, so you have the option to establish a custom DNS range.
Accessing the Custom internet connection on PS4 - When asked if you want to configure your IP Automatically or Manually, choose Automatic.
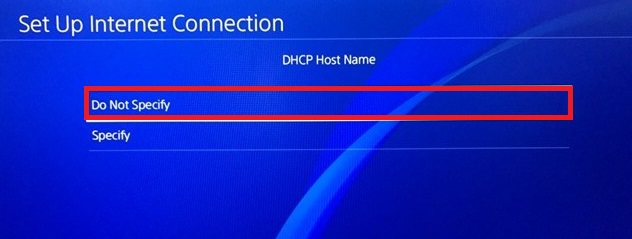
- At the DHCP Host Name prompt, choose No Not Specify.
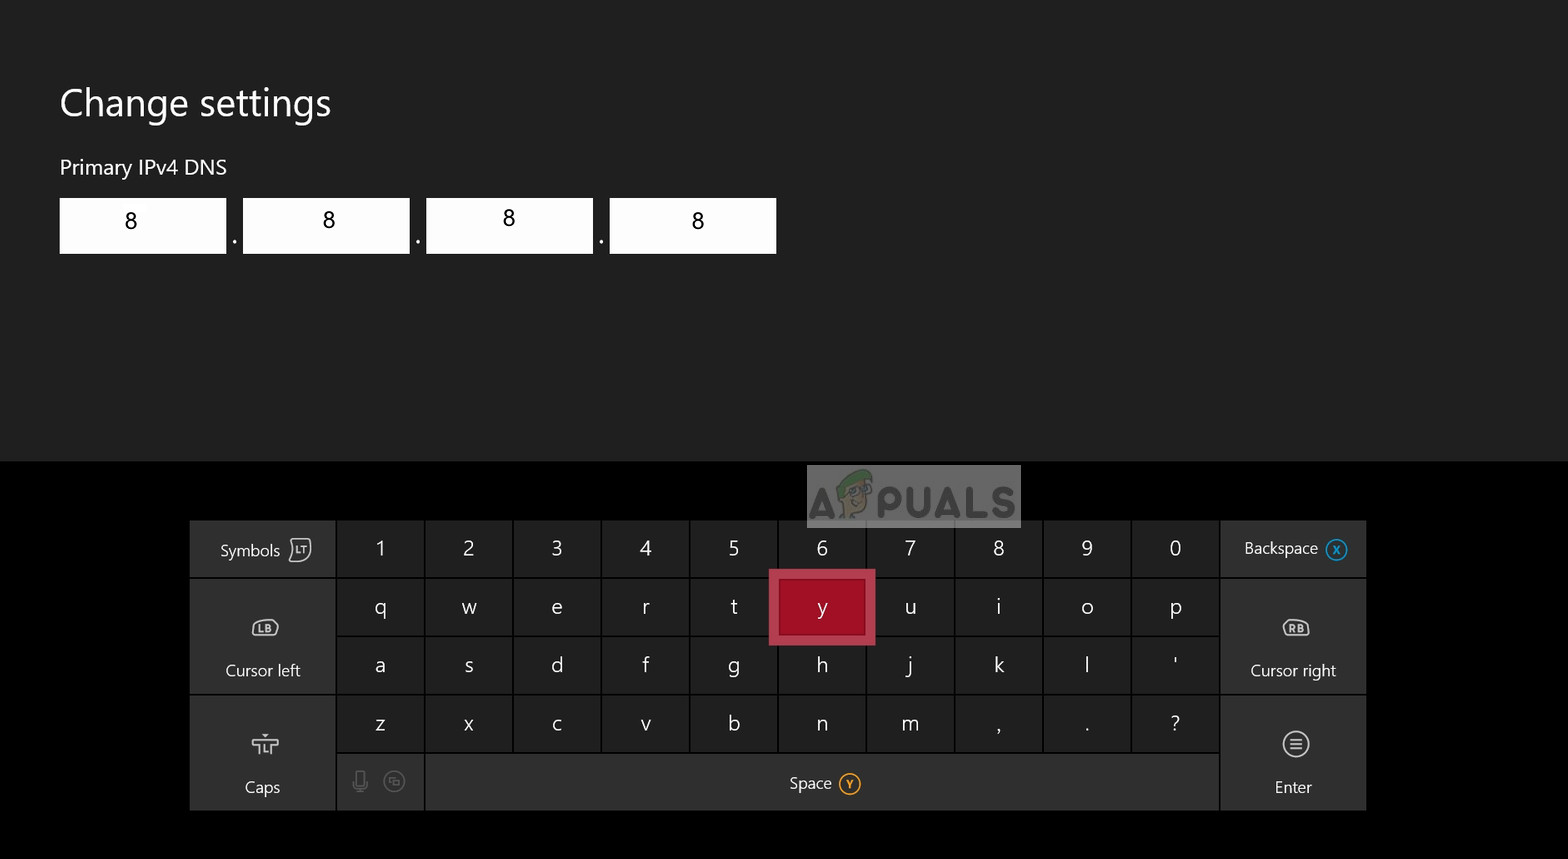
Not specifying the DHCP hostname on Ps4 - Once you arrive at the DNS Settings stage, choose Manual, then set the Primary DNS to 8.8.8.8 and the Secondary DNS to 8.8.4.4.
Primary DNS - 208.67.222.222
Secondary DNS - 208.67.220.220
Note: If you prefer to use IPv6, you need to use the following values instead:
- Next, save the changes, then restart your PS4 console and launch Destiny 2 to see if the problem is now fixed.


