DIY: Build Your Own WiFi Range Extender at Home
A very common problem that is faced by people in offices and homes is the weak strength of internet signals if the router is placed at some distance. As everything in the modern world is getting smart, it needs an internet connection to operate. We can take a Smart Home as an example. In some areas of home or offices, the internet strength gets weaker. In these areas, we need a device that can help us to boost the weak internet signal. This device is known as a WiFi booster or extender. the main task of this extender device is too receive a weak Wifi signal, amplify it and transmitted a strong wifi signal. By using his gadget, the wifi range of the router can be extended and can be accessed from every corner of the house or workplace.
How To Make A Wifi Booster using ESP8266?
There are many Wifi extender gadgets available in the market which are very efficient but there cost is very high. We can make our own extender at home which will be equally efficient but very low in price. An ESP8266 also known as Node MCU can be used for this purpose. ESP is an opensource firmware that is used to do IoT projects. Let us move forward and start gathering more information about how we can make this extender.
Step 1: Gathering The Components
To start working on any project, an excellent task to do is to make sure that everything you are going to need to complete the project, is present or not. For this purpose, we should make a list of complete components and buy them fro the market in case we don’t have it. A complete list of all the components is given below that are easily available in the market.
- No products found.
- Breadboard
- No products found.
- No products found.
- No products found.
- Plastic Box
Step 2: Download The Files
To make a Wifi Extender using a Node MCU, we will need some firmware files and a software tool. To download these files, click here.
After downloading the files, if you are using Windows OS, open the folder named “flash_download_tools_v3.4.1”. In this folder, you will find an exe file with the same name. Double click on that file.
Step 3: Download and Install The Software
Now, a driver will be needed which will help to get the USB adapter to communicate with the computer. The name of this driver is CH340. If you are using Windows OS, open the subfolder named “CH341SER_win” and if you are using MAC, open the subfolder named “CH34x_Install_mac”. Extract the files from that subfolder and install the driver.
Step 4: Flash The Firmware on The Microcontroller
Now as we have downloaded and installed the necessary files and software to configure our extender, follow the steps below to configure the microcontroller.
- Connect your Node MCU board to your laptop and open the control panel. in the control panel, click on Hardware and Sound. Now click on Devices and Printers. Here, find the port to which your microcontroller board is connected. In my case it is COM14 but it is different on different computers.
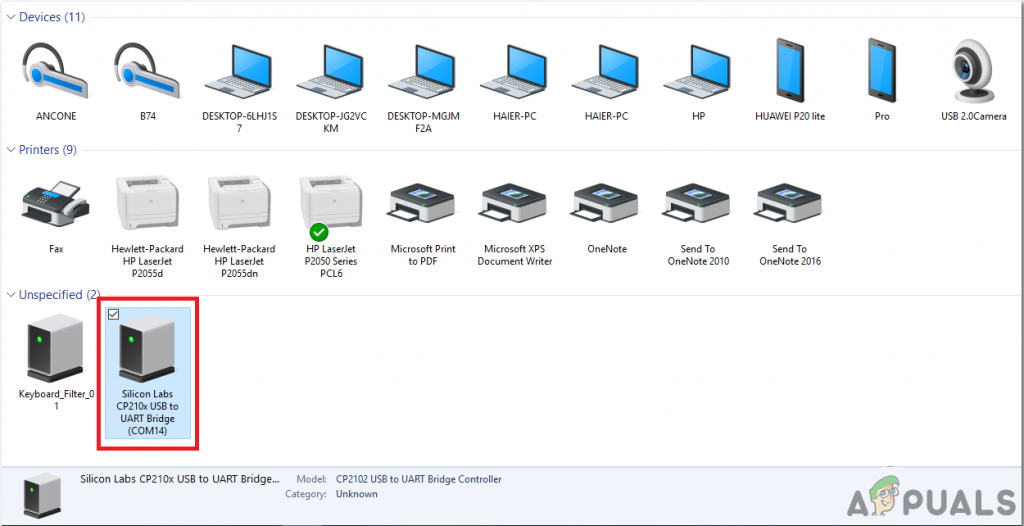
Finding Port - Open the ESP8266 Download Tool.
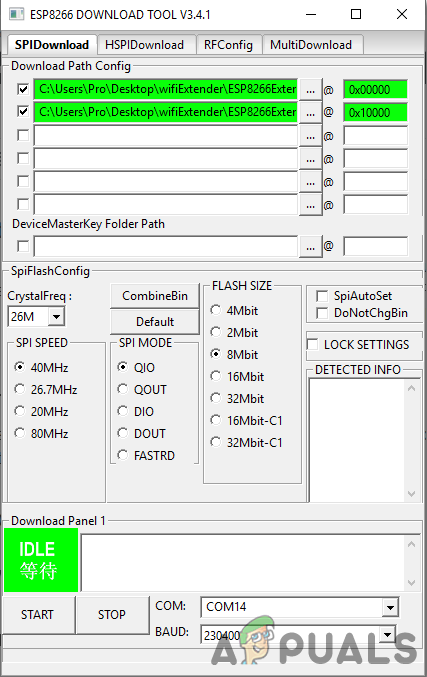
- Under the heading of Download Path Config, we need to add the path to two firmware files. First, add the path of 0x00000 file from the firmware folder and then add the path of 0x10000 file from the same folder. In the end, don’t forget to check the box of these two files.
- Now in front of both of the files that you have added, fill the box with their names. Write 0x00000 and 0x10000 in both the boxes respectively.
- Now make sure that the SPI speed is 4 MHz.
- Mark QIO as the SPI mode.
- Mark 8 Mbit as the Flash Size.
- In the COM, write the name of the port that you have already observed before in the control panel. In my case it was COM14.
- Set the baud rate as 230400.
- When all this is done, press the start button to upload the firmware on the development board.
You can refer to the image below to confirm the setting that you have made in your firmware.
Step 5: Configure Your Development Board
Now as the firmware is installed in the development board, let us configure with our Wifi to make it an extender gadget. Follow the steps below to configure it:
- Connect the board to your laptop.
- Open any web browser and open the configuration page http://192.168.4.1/.
- Under the STA setting, Fill the box of SSID with the name of your local internet connection.
- Input the password of your local router.
- After filling these both boxes, click on the connect button to save the settings. After connecting successfully, the page will refresh.
- Now under the AP settings, set the name and password of your extender.
- Make sure that the security mechanism is WPA2.
- the subnet of this extender can be changed. If you want to change it, type another one of your choices in the respective field.
- Click the set button to save the changes.
Now our Wifi extender device is ready to use. You just need to make a box to enclose this circuit just to make sure that it is not damaged by any accident.
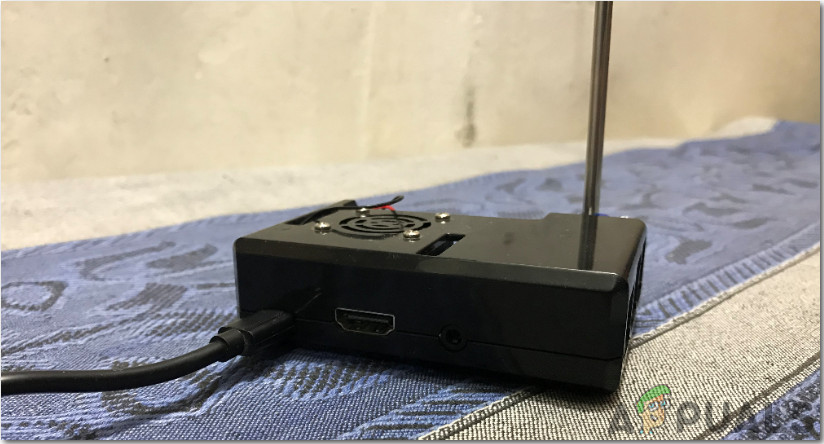
Step 6: Casing of Microcontroller
As everything is now ready, take the box in which you want to keep the microcontroller. Make two holes in the box. One hole will be used to pass the power cable and the other hole should be wide enough so that the antenna can fit in it. Solder a connecting wire with the antenna and connect it with the ESP. You can use some sort of adhesive to make sure that everything is fixed in its place.
Step 7: Test Your Extender
Place this extender circuit in any area of your home where the Wifi signals are weak. Power on the circuit. Now On your laptop, look for the name in the list of available WiFi, that you have set before. Connect to it by providing the password that you have set before. enjoy a stronger signal strength of the WiFi signal now. You can use this gadget to provide an internet connection to your home automation systems.


