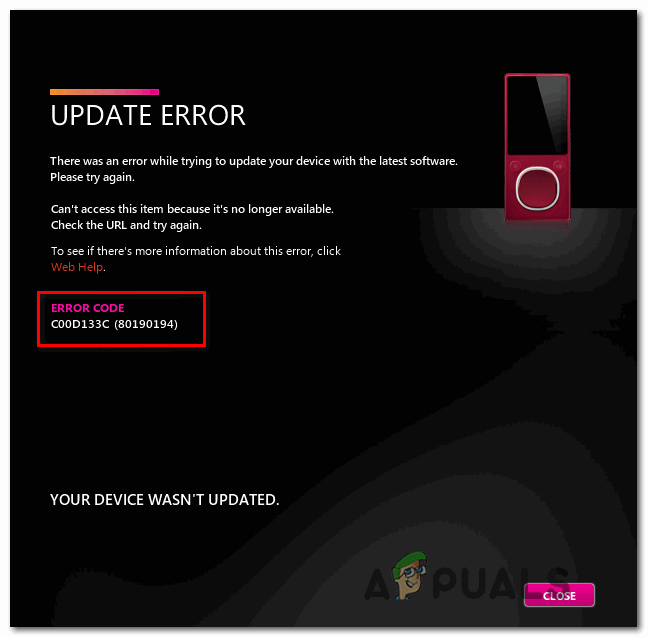
How to Fix Zune Error Code C00D133C (80190194)
The Error Code C00D133C (80190194) is encountered on Windows when users attempt to update a Zune device to the latest software version. Zune products were discontinued in 2012, but some users are still actively using them. This problem is confirmed to occur on Windows 7, Windows 8.1, and Windows 10.
Keep in mind that Zune’s products were discontinued since 2012, so problems are to be expected. If you have the Zune software installed for a long time, you should start this troubleshooting guide by uninstalling the current build and then reinstalling the Zune software from the official channels.
If this didn’t work, chances are you’re seeing the Error Code C00D133C due to a firmware issue. In other words, the firmware update cannot be installed because the Zune servers were shut down. In this case, you will need to set up your own virtual web server with Abyss (or another equivalent) and do a couple of other adjustments trick the Zune Sofware into believing that the web servers are still functioning so the firmware update can take place.
Reinstalling Zune software
In case you’ve tried to connect your Zune device multiple times and the end result is the same, it’s likely that you’re dealing with some type of corruption that ends up affecting the Zune suite installation. Several affected users seeing the Error Code C00D133C (80190194) have confirmed that they managed to resolve this problem by uninstalling the current Zune software version and then reinstalling the latest version by using the official channels.
If this scenario is applicable, follow the instructions below to reinstall the Zune software and see if this ends up resolving you Error Code C00D133C:
- First things first, physically unplug the Zune device from your PC.
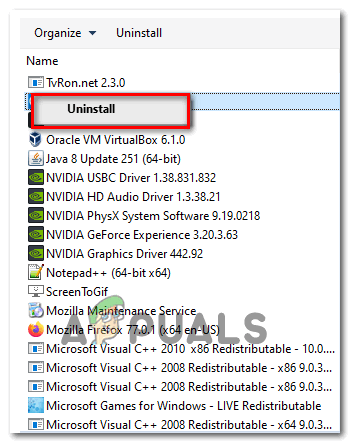
- Press Windows key + R to open p a Run dialog box. Next, type ‘appwiz.cpl’ and press Enter to open up the Programs and Features menu.

Type appwiz.cpl and Press Enter to Open Installed Programs List - Once you’re inside the Programs and Features menu, scroll down through the list of installed applications and locate Zune Software.
- When you see it, right-click on it and choose Uninstall from the newly appeared context menu, then follow the on-screen instructions to complete the uninstallation.
Uninstalling the Zune Software - Once the uninstallation is complete, restart your computer and wait for the next startup to complete.
- After the next startup is complete, download the latest version of Zune, click Yes at the UAC (User Account Control), then follow the on-screen instructions to complete the installation.
Note: Chances are the setup will need to download additional software – if this happens, click Download and wait for the process to complete. - After the installation is complete, connect your Zune device once again and see if the problem is now fixed.
Update Zune firmware
If switching to the latest version didn’t work, there’s a big chance that you’re seeing the C00D133C due to a firmware issue. Keep in mind that Microsoft Zune servers are discontinued, so there is no longer an automated way to update your Zune firmware. So instead, you will have to do it manually.
If this scenario is applicable, you will be able to get this issue resolved by downloading & extracting the latest Zune firmware version manually and then manually flashing the current firmware of your Zune device to a custom made one.
In case this scenario looks like it could be applicable, follow the instructions below:
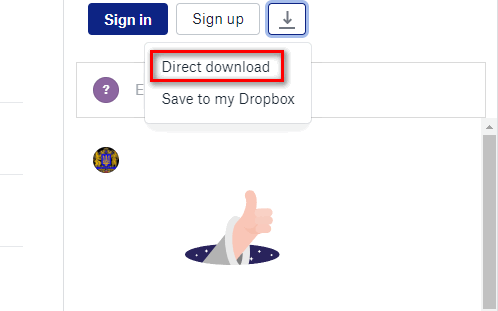
- Visit this dropbox link containing the latest Zune Firmware and download the ZuneFirmware.zip archive. Once you’re inside, click the download icon, then click on Direct Download and wait for the operation to complete.
Downloading the latest Zune firmware - Once the download is complete, use a tool like 7zip, WinZip, or WinRar to extract the contents of ZuneFirmware.zip.
- Next, look in your tray bar menu and close off everything that is published by Microsoft (like Skype, Oneplus, OneNote, Office, etc.). Leaving programs like this open might interfere with the operation we’re about to perform.
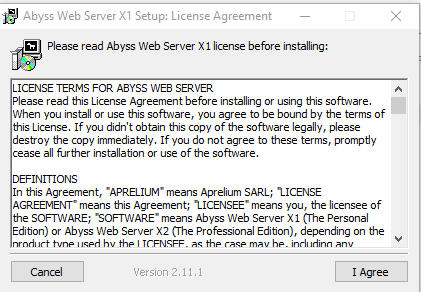
- Next, navigate to the folder you’ve just extracted, double-click on Part 1 – Abyss Web Server, double-click on setup.exe, click Yes at the UAC prompt and follow the on-screen prompts to install the Abyss Webserver tool. The installation is pretty straightforward so you should not have any issues completing it.
Installing the Abyss Web Server software - Once the installation is completed, you should see a tray-bar icon popping up, telling you that the software has been successfully installed. Leave the tool opened, then open up your default browser, type the following address inside the navigation bar and press Enter:
127.0.0.1
- If you end up seeing a page whose signature says Powered by Abyss Web Server X1, you’re in the right place.
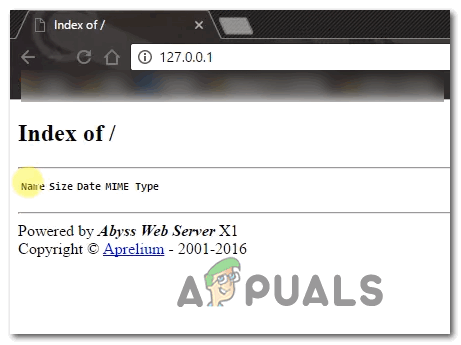
Accessing the Abyss web page Note: If you’re not seeing this page, restart your computer in order to allow the Abyss software to take over at the next computer startup.
- Next, return to the folder you previously extracted at step 2, double-click on Part 2 – Zune Firmware Files.
- Once you’re inside, press Ctrl + A to select everything, then right-click on a selected item and choose Copy to make a selection.
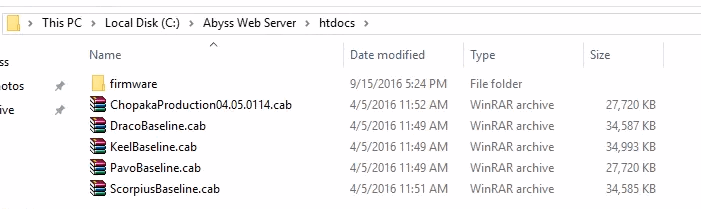
- Next, navigate to the following location and paste the files you previously copied at step 8 inside:
Local Disk (C:) > Abyss Web Server > htdocs
Note: The location of the Abyss Web Server will be different if you installed in a custom location.
Pasting the correct Zune Firmware in the Abyss server - If you want to confirm that the operation was completed successfully, return to your browser, access 127.0.0.1 and see if the files you just uploaded show up. If they do, everything is in order!
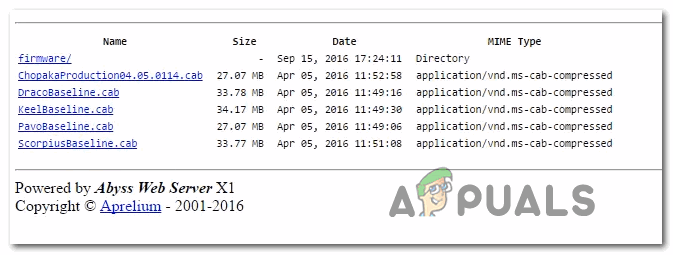
Verifying the files - After you’ve finished with this, go back to the Zune Firmware folder, double-click on Zune Firmware and copy the hosts file.
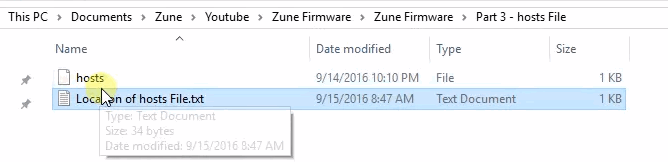
Cutting the hosts file - Next, press Windows key + R to open up a Run dialog box. Inside the text box, paste ‘%SystemRoot%\System32\drivers\etc\‘ and hit Enter to automatically navigate to the location of the hosts.text file.
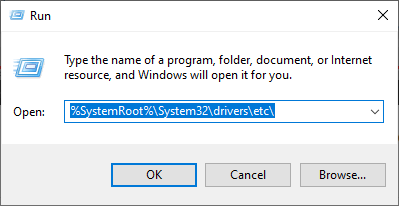
Accessing the System32 drivers’ folder Note: This location will be the same regardless of your computer configuration or Windows version.
- Once you’re inside the correct folder, right-click on an empty space and paste the hosts file that you previously copied at step 11. When asked either you want to replace the file, click on Replace the file in the destination, grant admin access and wait for the process to complete.
- Next, open up the Zune application once again. This time, you will not be prompted by the same Error Code C00D133C.
- Instead, you will be prompted by a different screen prompting you to update. Do so by clicking Accept, then wait for the process to complete and enjoy using your Zune device.

Installing the new firmware version in Zune


