How to Fix ‘Your PIN is No Longer Available’ on Windows 11
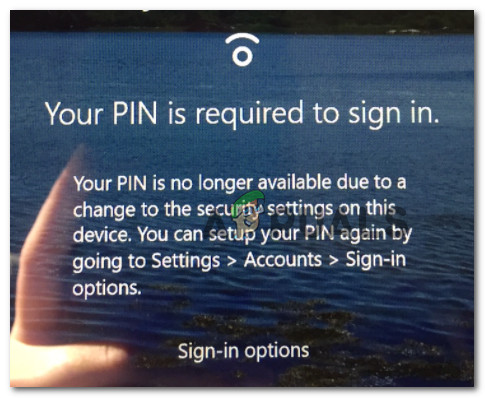
Some Windows 11 are reporting that after installing an update, they are no longer able to get past the login screen. Upon inserting the correct PIN, they end up seeing an error message saying that ‘Your PIN is no longer available due to a change to the security settings on this device‘.
We’ve investigated this issue thoroughly and we’ve discovered that there are several underlying scenarios that might be responsible for the ‘Your PIN is no longer available’ error on Windows 11. Here’s a list of possible culprits:
- OS won’t recognize your current pin – As it turns out, there are documented scenarios where a new security update released for insider builds of Windows 11 might end up invalidating your previously established PIN. In this case, you can attempt to complete the sign-in process using the password instead before establishing a new pin.
- Bad Windows 11 Security update – If you started experiencing this issue immediately after you restarted your Windows 11 PC in order to complete the installation of a new update, chances are there’s some kind of conflict that ended up invalidating your sign-in options. If this scenario is applicable, you can try booting in Safe Mode and rolling back the latest Windows update.
- Conflicting PIN data stored in the NGC Folder – Another reason why you might expect to see this error is conflicting data currently stored inside the NGC folder. This type of issue will typically occur for users that have just finished upgrading to Windows 11 from an older Windows version. To fix it, you’ll need to boot in Safe Mode and delete the NGC folder in order to eliminate the conflicting data.
- Boot-related issue – As it turns out, the reason why you’re experiencing this issue might have nothing to do with your PIN. It’s also possible to experience this issue due to corrupted boot-related data that prevents your PC from completing the sign-in process. In this case, you should go for a Startup Repair procedure.
- System file corruption – Under certain circumstances, you can expect to deal with this issue due to an underlying system file corruption that affects your Windows 11 ability to boot. The best way of troubleshooting the issue away, in this case, is to perform a PC reset with the option to keep Personal files.
Now that you are aware of every potential reason why you might suddenly be unable to sign in with your previously established PIN, here’s a list of methods that other Windows 11 have successfully used to fix the ‘Your PIN is no longer available‘ error:
1. Sign in with the password instead and change the current PIN (if applicable)
If you are suddenly unable to use your PIN to complete the sign-in process, the first thing you should try is to use the fallback alternative of logging in – using the Microsoft account / local account password instead of the PIN.
Note: This method might not work if you’re using a local account.
If you have a password to fall back on and you successfully manage to complete the sign-in process on Windows 11, you can then go inside the Sign-in Options menu (under Accounts) and establish a new PIN.
In case this scenario is applicable, follow the instructions below to sign in with the password and change the current PIN in order to fix the ‘Your PIN is No Longer Available’ error:
- Once you get to the screen that shows the error, click on Sign-in Options to make all the log-in options visible.
- Next, every option has become visible, click on the password icon if available.
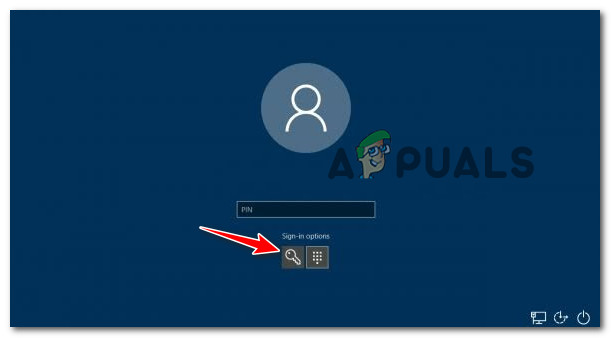
Sign in with the Password instead of PIN Note: If the password icon is not available, this method won’t work in your case. In this case, skip the remaining steps and move directly to Method 2 below.
- After you click on the password icon, you’ll notice that the text of the box above changes from ‘PIN’ to ‘Password. When this happens, insert the password related to your Microsoft account (or local account).
- Once you manage to sign in to your account using the password, press Windows key + I to open up the Settings menu of Windows 11.
- Once you’re inside the Settings screen, click on Accounts from the vertical menu on the left, then move over to the right-hand section and click on Sign-in Options.
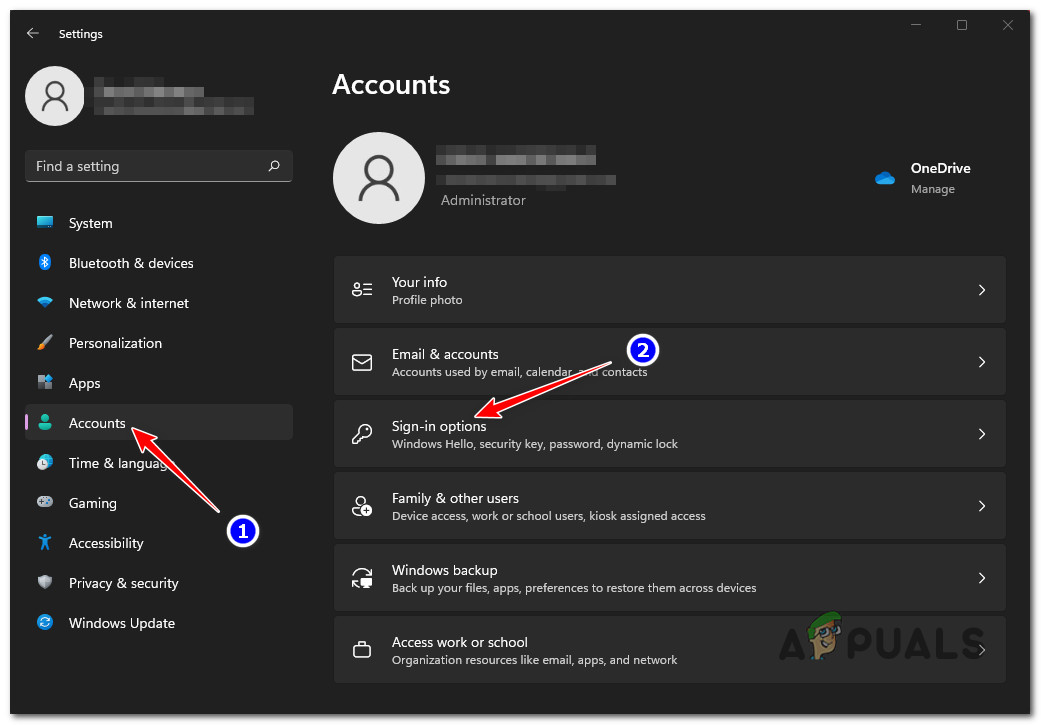
Accessing the Sign-in Options menu Note: If the vertical menu on the left is not visible by default, click on the action icon (top-left section of the Settings window).
- Once you’re inside the Sign-in options menu, click on PIN (Windows Hello).

Accessing the Windows Hello setup screen - From the context menu that just expanded, click on the Add PIN button.
- Next, add the PIN that you wish to use from now on, then click Ok to save the changes.
- Reboot your Windows 11 PC and see if you are able to sign in with your newly established PIN at the next log-in screen.
If you didn’t have an account password to fall back to, move down to the next potential fix below.
2. Rollback the latest update from Advanced Options (if applicable)
If you noticed that the issue started to appear immediately after you completed the installation of a pending security update, you are most likely dealing with a conflict that has rendered your current sign-in options obsolete.
In case this scenario is applicable, one way to fix the issue is to force your PC to boot inside the Advanced Options menu and roll back the latest Windows update that was recently installed.
Note: You should only follow this guide if you started getting the ‘Your PIN is no longer available’ error immediately after a new Windows Update was installed.
Follow the instructions below to learn how to access the Advanced Options and roll back the latest Windows Update that was recently installed in order to fix the issue:
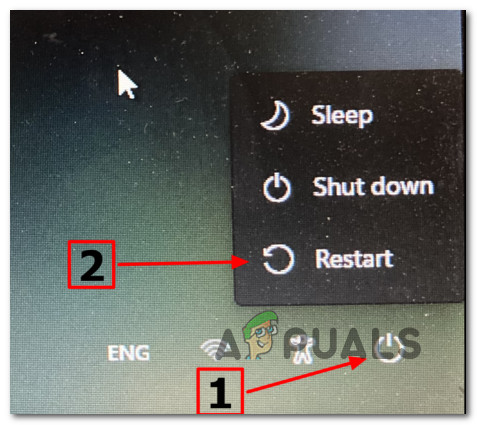
- Once you get to the sign-up screen that shows the ‘Your PIN is no longer available’ error, press the power icon, then press and hold on the Shift key while clicking on Restart.
Force Windows 11 to boot inside the Recovery menu Note: This will force your Windows 11 computer to boot directly into the Recovery Menu.
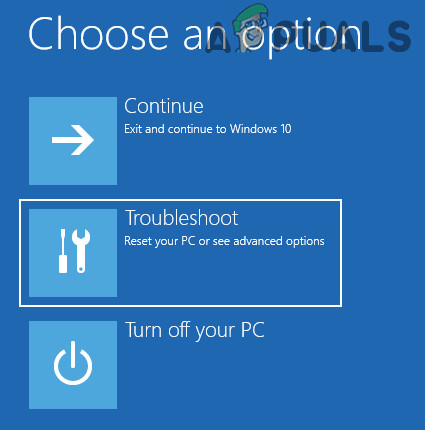
- Once you’re computer restarts and boots into the Recovery menu, click on Troubleshoot when you’re presented with the first screen.
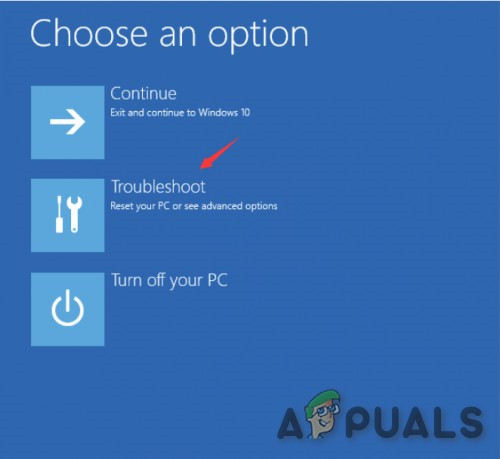
Accessing the Troubleshoot tab - Next, you should see the Advanced Options menu. Once inside, click on Uninstall Updates from the list of available options.
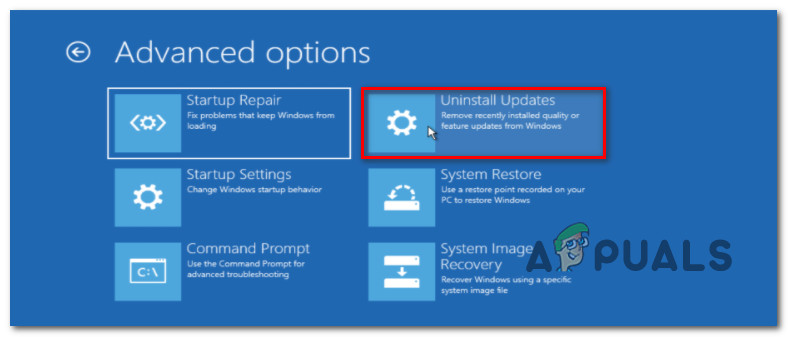
Uninstall Updates from the Windows Recovery menu - Next, follow the on-screen prompts to complete the uninstallation of the latest Windows Update that was installed on your Windows 11 PC.
- After the update is successfully uninstalled, exit the Advanced Options menu and allow your PC to boot normally.
If you’re still experiencing the same ‘Your PIN is no longer available’ error even after you installed the latest available update, move down to the next potential fix below.
3. Boot in Safe Mode and Delete NGC folder
If none of the methods above have proven to be effective in your case, you should start considering the fact that you might be dealing with some type of conflicting data that is currently being stored inside the NGC folder.
Note: THe NGC folder is responsible for storing information related to the sign-in options currently set up on your PC – this includes PIN, password and retina, and any other type of sign-in method.
If the reason why you’re seeing the ‘Your PIN is no longer available’ error is an inconsistency rooted inside the NGC folder, then booting in Safe Mode (without networking) and deleting the NGC folder should allow you to resolve the issue.
For step by step instructions on how to do this, follow the instructions below:
- At the signup screen that triggers the error, click on the power icon, then press and hold on the Shift key while clicking on Restart.
Force Windows 11 to boot inside the Recovery menu Note: This will force your Windows 11 computer to restart directly inside the Recovery menu.
- After your PC boots into the Recovery menu, click on Troubleshoot on the first screen to open up the Advanced Options menu.
Accessing the Troubleshoot tab - Inside the Advanced Options menu, click on Startup Settings from the list of available options.
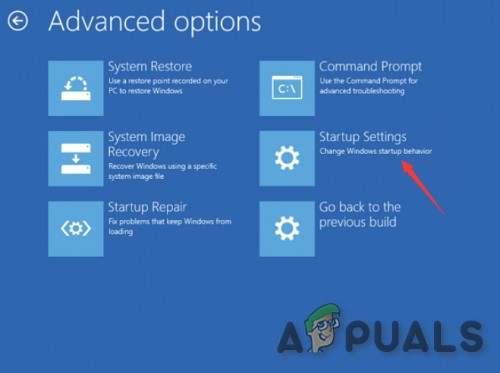
Open up the Startup Settings menu - Once you click on this option and confirm your choice, your PC will restart again directly into the Startup Settings menu.
- Inside the Startup Settings menu, press the F4 key or Num 4 key to force your PC to boot in Safe mode.
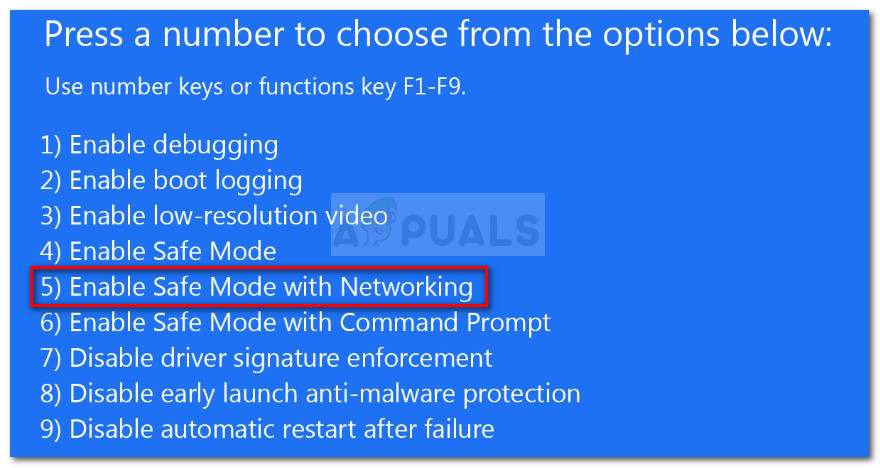
Boot Windows 11 in Safe Mode - At the confirmation prompt, hit Yes, then wait until your Windows 11 PC boots in Safe Mode.
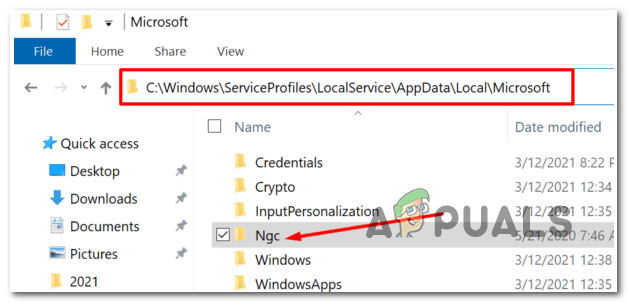
- Once the boot sequence is complete, open File Explorer and navigate to the following location:
C:\Windows\ServiceProfiles\LocalService\AppData\Local\Microsoft
- Inside the correct location, simply right-click on the NGC folder and choose Delete from the context menu.
Deleting the NGC folder - Once the NGC folder is deleted, reboot your PC normally and you should be able to sign in directly without the need to insert a PIN.
Note: After this, you can set a new PIN as the NGC folder will be regenerated.
In case this method was not effective in your case and you’re still unable to bypass the initial login screen when booting normally, try the next potential fix below.
4. Perform a Startup Repair procedure
As it turns out, you can also expect to see this issue due to some type of boot-related issue that prevents your PC from validating a previously established PIN. The ‘Your PIN is no longer available’ error can occur due to corrupted boot data that interferes with the startup sequence.
If this scenario is applicable, you should be able to fix the issue by initiating a startup repair procedure.
Note: Startup Repair is a Windows recovery tool that will fix the majority of common system problems that will prevent your Windows installation from starting. This tool (much like every other automated troubleshooter present on Windows) comes with a series of automated repair strategies that can be applied if a viable scenario is found.
But keep in mind that since you’re likely not able to boot up normally, you will need to trigger a Startup Repair procedure from the Recovery Menu.
Here’s what you need to do:
- Start your computer up wait until you get to the login screen that is showing the error. Next, click on the power icon, then press and hold on to the Shift key while clicking on Restart.
Force Windows 11 to boot inside the Recovery menu Note: This will force your PC to restart directly into the recovery window.
- Once your Windows 11 PC boots back up inside the Recovery menu, click on Troubleshoot from the context menu that just appeared.
Accessing the Troubleshoot menu - Once you’re inside the Troubleshoot tab, click on Startup Repair from the list of available options.
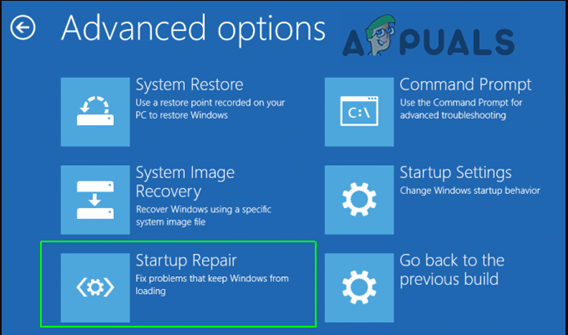
Open up the Startup Repair utility - Once you’re inside the Startup Repair screen, follow the on-screen instructions to initiate and complete a Startup Repair operation.
- After the operation is complete, restart your PC one final time to allow it to boot normally and see if you are now able to sign in using your previously established PIN.
In case you’re still seeing the same ‘Pin is no longer available’ error, move down to the next potential fix below.
5. Reset PC and keep Personal Files
If none of the methods above have proven to be effective in your case, one last resort solution that has helped a lot of users finally fix this error is to perform a Windows 11 Reset with the option to keep your personal files.
Note: Keep in mind that this procedure is different than a repair install procedure. This procedure will reset your Windows to the default state erasing any previously established PINs. However, aside from personal files (documents, personal media, etc.), everything else (including games and applications) will be erased.
If you have no options left and you understand the consequences of going for this method, follow the instructions below to reset your Windows 11 PC with the option to keep your personal files:
- Once you get to the error screen, click on the power icon, then press and hold on the Shift key while clicking on Restart to force your PC to restart your Windows 11 PC directly into the recovery mode.
Force Windows 11 to boot inside the Recovery menu - Wait until your PC boots directly into the Recovery menu, then click on Troubleshoot from the list of available options.
Accessing the Troubleshoot tab - Inside the Troubleshoot menu, click on Reset this PC from the list of available options.
- Next, from the Reset this PC screen, click on Keep My Files.
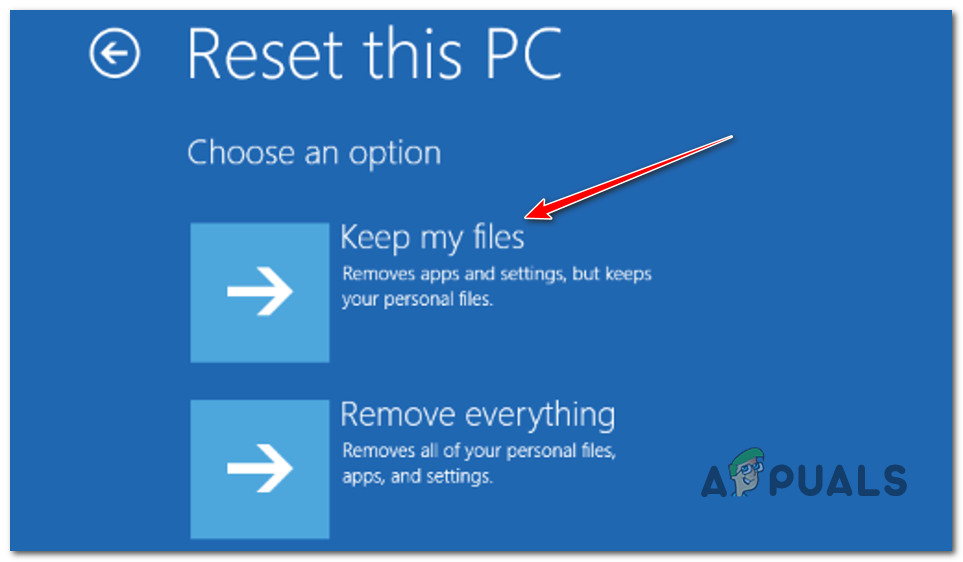
Deploying a Reset with the option to keep personal files - Follow the remaining prompts to initiate the reset procedure, then wait until the operation is complete – at the end of it, your PC will restart normally and you will be prompted to set up a new PIN the next time you boot up.


thankyou!!! you helped me solve my problem