Google Chrome: Your Clock is Ahead/Behind
The ‘Your clock is ahead / behind’ is an error that appears when Google Chrome users attempt to visit one or multiple websites. Most affected users are reporting that the issue seems to be exclusive to Google Chrome – the same website opens up just fine on different websites.
In most cases, this error will occur due to an outdated system time & date. This can be resolved easily by modifying the values from the Date & Time values. However, it’s also possible that the issue is being facilitated by a faulty CMOS battery that is no longer able to remember the correct date & time in between restarts.
However, your Chrome’s cache can also create this issue in the event that it ends up storing date & time webserver information. If this scenario is applicable you can fix the issue by deleting Chrome’s cache and cookies.
But it turns out that the issue can also be beyond your control. An expired SSL certificate might also trigger the ‘Your clock is ahead / behind’. In this case, you can avoid the error by establishing a command-line argument or by contacting the web administrator and asking them to fix the issue.
How to Fix the ‘Your clock is Ahead/behind’ error?
1. Adjust the time & date
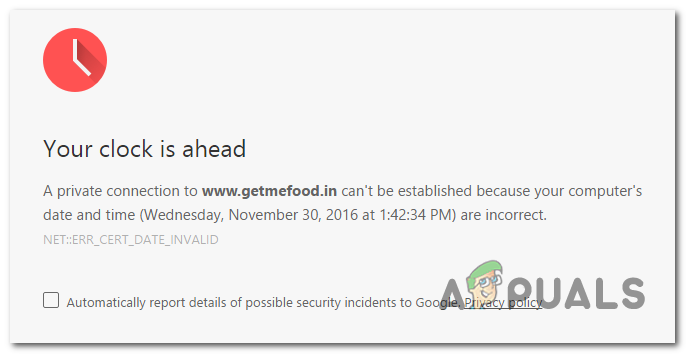
In most documented instances, the ‘Your clock is ahead / behind’ error will be eventually thrown due to an underlying NET::ERR_CERT_DATE_INVALID error. This typically occurs in an instance where the computer or the mobile device date & time is inaccurate.
Keep in mind that the majority of browsers will throw warnings if your date is off since it can mess up with security certificates. But so far, Chrome is the only one that will outright prevent you from accessing a webpage unless your date and time are correct.
If this scenario is applicable, here’s a quick guide on changing the date & time to the correct values in order to fix the ‘Your clock is ahead / behind’ error:
- Ensure that your computer is connected to the Internet.
- Open up a Run dialog box by pressing Windows key + R. Next, type ‘timedate.cpl’ and press Enter to open up the Date & time panel.
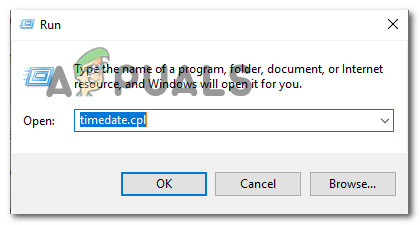
Accessing the Time & Date panel via a Run box - Once you’re inside the Date & Time window, go fo the Internet Time tab and click on Change settings.
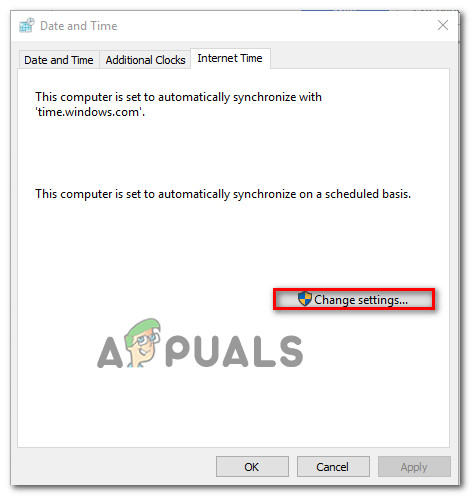
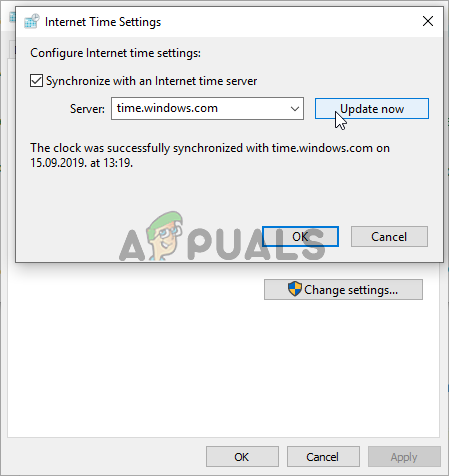
Changing the settings of Date & Time - Once you’re inside the Internet Time settings, start by checking the box associated with Synchronize with an Internet time server. After you do this, set the Server to time.windows.com and click on Update Now.
Internet Time Settings - After this setting is enforced, move over to the Date & Time tab and click on Change time zone and make sure you’re using the correct one. After you do this, click on Change date and time to ensure that the date is set properly.
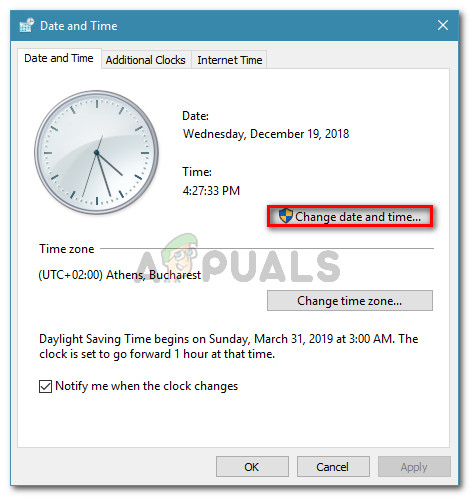
Setting the correct date and time - Make the adjustments and click Apply to save the modifications.
- Restart your computer and see if the issue is resolved at the next system startup.
In case you see the same issue persisting or the time & date resets again at the next system startup, move down to the next method below.
2. Cleaning / Replacing CMOS battery
If the method above has worked only temporarily (you started encountering the same ‘Your clock is ahead / behind’ error at the next startup), chances are you’re encountering this issue due to the CMOS (Complementary Metal-Oxide Semiconductor) battery.
The purpose of this motherboard component is to remember data between restarts. It’s responsible for remembering the time, the date and a few other system settings. If you’re dealing with a faulty battery, your computer will start from scratch after every system startup.
In case, your date & time reset after every system startup, follow the instructions below for instructions on cleaning or replacing the CMOS battery:
- Start by turning off your computer and unplugging it from a power source.
- After you do this, remove the side cover and equip yourself with a static wrist band in case you have one at the ready.
Note: This step is important since it grounds you to the frame of the computer and events out electrical energy. As long as you have one equipped, there is no risk of producing damage to your PC’s components due to static electricity. - After you manage to open the case, take a look at your motherboard and identify your CMOS battery. When you see it, use your fingernail or a non-conductive screwdriver to remove it from its slot.
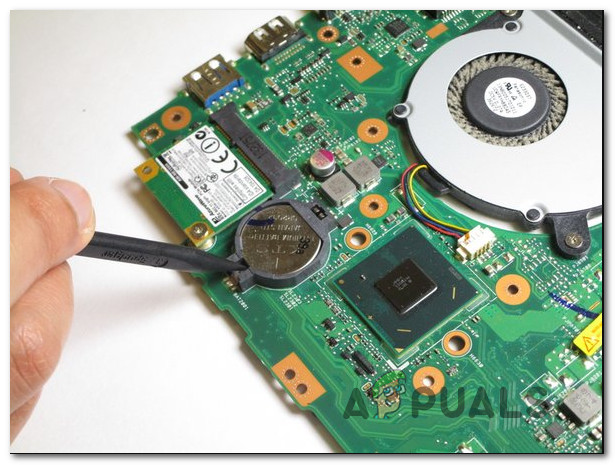
Removing the CMOS battery - After you remove it, clean it thoroughly with rubbing alcohol and ensure that there is no lint or dust inside the CMOS slot.
Note: If you have a spare CMOS battery, it’s recommended that you replace the current one. - Insert the old or new battery back into the CMOS slot, then put the side cover back and plug your computer back to a power source and start it up.
- Power it up and wait for the machine to start. After the next startup procedure is complete, follow Method 1 to change the time to the correct values again, then restart your computer to see if the change is permanent.
3. Deleting Chrome’s Cache and Cookies
As it turns out, this issue can also occur due to a temporary file stored by your browser. It’s possible that you’re encountering this issue because of a cookie or a web cache that is currently storing date & time info that is now outdated. In this case, Chrome will not bother to check for new values, which might trigger the ‘Your clock is ahead / behind’ error.
To force your browser check for the current webserver time, follow the guide below to force Chrome to retrieve the correct date & time values:
- Open your Google Chrome browser and click on the action button (three-dot icon) in the top-right corner of the screen.
- Once you’re inside the Settings menu, scroll down all the way to the bottom of the screen and click on Advanced to bring up the hidden options.
- After you manage to land inside the advanced options menu, scroll down to the Privacy and Security tab and proceed by clicking on Clear browsing data.
- Inside the Clear browsing data menu, start by clicking on the Basic tab, then make sure that the boxes associated with Cookies and other site data and Cached images and files are enabled.
- Finally, set the Time range to All time and then hit the Clear data button to start the process of deleting your Chrome’s cookies and cache.
- Wait patiently until the process is complete, then restart your computer and see if the problem is resolved at the next system startup.
In case the same ‘Your clock is ahead / behind’ error is still occurring, move down to the next method below.
4. Adding a Command-line Argument to Chrome launcher
If you’re certain that the error is being caused by a certain SSL error, you can avoid this error message entirely by modifying the launching sequence of Chrome so that it starts with the –ignore-certificate-errors as a command-line argument
While this workaround will allow you to visit SSL-revoked websites without encountering the ‘Your clock is ahead / behind’ error, it can also leave your system vulnerable to certain security risks.
Keep in mind that this procedure will ignore any other SSL errors, making you clueless when surfing online.
If you understand the consequences and you still plan on going forward with this procedure, here’s what you need to do:
- Close Google-Chrome, then right-click on the launching executable/shortcut. Then, from the newly-appeared context menu, choose Properties.
- Once you’re inside the Google Chrome Properties screen, select the Shortcut tab from the horizontal menu at the top.
- Inside the Shortcut tab, add the following command at the very end of the Target text box:
--ignore-certificate-errors
- Click on Apply to save the changes, then launch Chrome. If the procedure was done correctly, you will no longer encounter the same ‘Your clock is ahead / behind’ error.
Note: If you ever want to get rid of this workaround, reverse engineer the steps below and simply delete the command you previously added to the Target command. - Click Continue at the Access Denied prompt to grant administrative privileges.
In case the same issue is still occurring, move down to the next potential fix below.
5. Contact the Web administrator
If none of the methods above have allowed you to fix the issue and you are only encountering the issue with a particular website, it’s very likely that the issue is occurring due to an expired security certificate.
In case this particular scenario is applicable, the issue is beyond your control (unless you are the administrator). If you have admin login, renew the SSL (Secure Socket Layer) certificate to get the issue resolved.
But if you don’t have admin access, your only hope of getting the issue resolved is to contact the website admin and ask him to renew the SSL certificate.
Typically, you can contact the webmaster via the Contact us link, or by finding contact information using Whois search. To do this, visit this link (here), paste the domain you want to investigate and hit search.