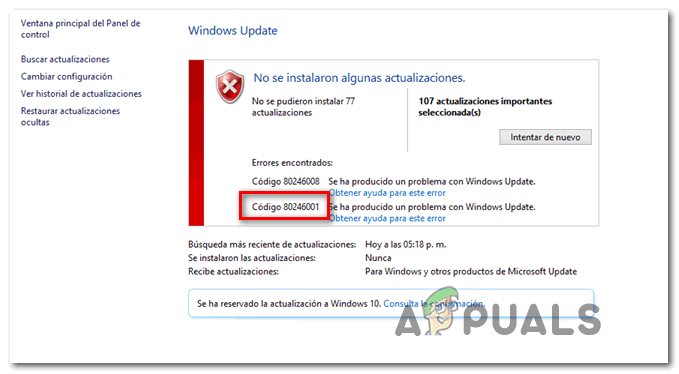
How to Fix Windows Update Error 80246001
The error code 80246001 is typically encountered when Windows 7 users attempt to install one or more pending updates conventionally. In most cases, this problem is reported to occur with Important and Cumulative updates.
As it turns out, there are several different causes that might end up facilitating the apparition of this error code:
- Generic Windows Update issue – If you’re seeing this issue on Windows 7, you should start by making sure that the built-in Windows Update troubleshooter is not capable of fixing the issue automatically. Some affected users have successfully used it to fix this particular error code.
- Broken WU component – In case you’re dealing with a broken WU component or you are specifically preventing new Updates from being installed, you can circumvent this error by utilizing the Windows Update Catalog to install the update that’s triggering the error code.
- Interfering malware – As it turns out, you might also encounter this problem after some type of malware successfully infiltrated the Windows Update component of IE. In this case, you should deploy a scan with Microsoft Safety Scanner and see if the operation manages to find and fix infected instances.
- Improper Management Engine Interface driver – If you’re seeing this error code while attempting to install a Windows Update aimed at updating the Management Engine Interface driver from intel, you should be able to avoid the error code by downloading & installing the latest MEI driver manually from Intel’s download page.
- System File Corruption – Under certain circumstances, it’s possible that you’re dealing with some type of system file corruption that cannot be resolved conventionally. In this case, you should run back-to-back DISM and SFC scans and see if they manage to fix the system file corruption.
- The corrupted file inside SoftwareDistribution or Catroot2 – A lot of Windows 7 users have confirmed that in their case, the problem was being facilitated by a glitch originating from the SoftawreDistribution or Catroot2 folder. In this case, you will be able to fix the problem by resetting every WU component and renaming the two folders used for update storing.
Method 1: Running the Windows Update Troubleshooter
If you’re encountering this problem on Windows 7, you should start this troubleshooting guide by seeing if one of the built-in troubleshooters is not capable of fixing the issue automatically.
Some users that we’re also seeing the 80246001 error have confirmed that they managed to fix the problem by running the Windows Update Troubleshooter and applying the recommended repair strategy. This operation will automatically scan for an inconsistency associated with the updating component and apply an automated fix if a recognizable scenario is identified.
Here’s a quick guide on running the Windows Update troubleshooter on Windows 7:
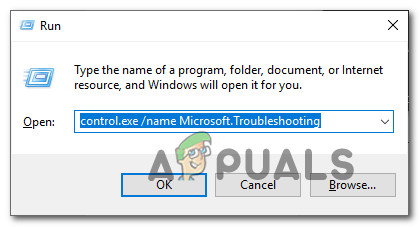
- Open up a Run dialog box by pressing Windows key + R. Next, type ‘control.exe /name Microsoft.Troubleshooting’ inside the text box and press Enter to open up the Troubleshooting tab of the Settings app.
Opening the Troubleshooting tab on every Windows version - Once you’re inside the Troubleshooting tab, scroll all the way down to Windows Update, extend the context menu and click on Run the Troubleshooter.
- Wait until the initial scan is complete, then click on Apply this fix if a viable repair strategy is identified.

Apply this fix - After the recommended repair strategy is successfully identified, restart your computer and wait for the next startup to complete.
- Once the next startup is complete, attempt to install the pending update once again and see if the problem is now fixed.
In case you’re still seeing the same 80246001 error code, move down to the next potential fix below.
Method 2: Installing the Pending Update Manually (Workaround)
In case the first method didn’t allow you identify any underlying issues with the Windows Update component and you don’t really have the time to dig in and investigate every potential culprit, one quick fix that will likely allow you to circumvent the 80246001 error is to use the Windows Update Catalog to find the update/s that are failing and install them manually.
This operation was confirmed to work by a lot of affected users – This process might be a little tedious (especially if you’re dealing with multiple updates that are all failing with the same error), but it’s worth it if you want to avoid relying on the built-in Windows Update component.
If you decide to go through with this fix, follow the step by step instructions below:
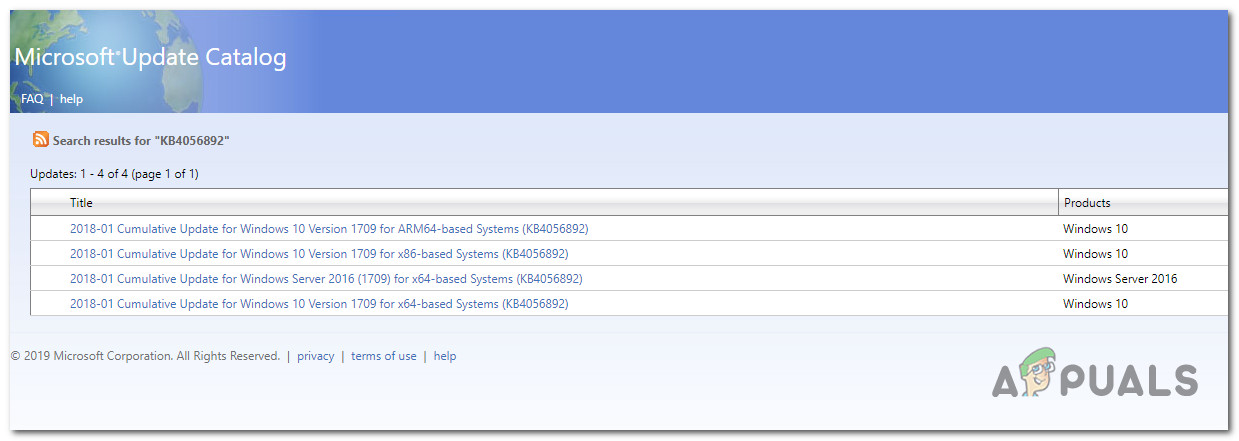
- Start by opening your browser and access the root address of the Microsoft Update Catalog.
- Once you are inside, use the search function in the top-left corner of the screen to search for the update/s that is/are failing with the 80246001 error.

Searching for the update that you want to install manually - Once the results are successfully generated, go ahead and look for the appropriate update while keeping in mind your current OS architecture and the Windows version that you’re using.
Choosing the right Windows Update - Once you manage to locate the correct update, go ahead and click on the Download button associated with the correct driver.
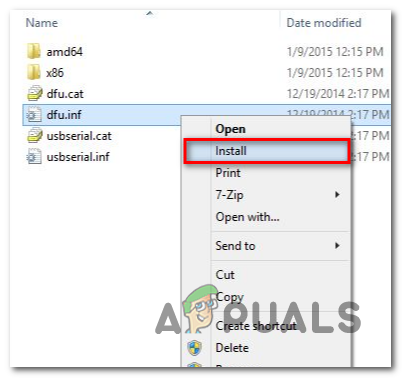
- After the operation is complete, open File Explorer and navigate manually to the location where the driver was downloaded. When you get there, right-click on the .inf file and choose Install from the newly appeared context menu.
Installing the Inf driver - Once the installation is complete, repeat steps 3 to 5 with every Windows Update that was previously failing when you attempted to install it conventionally.
In case the same problem is still occurring when you try to install the updates via the Windows Update catalog, move down to the next potential fix below.
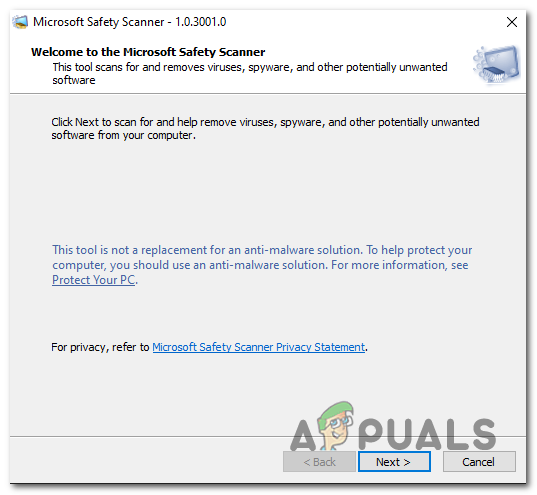
Method 3: Running the Microsoft Safety Scanner
Some affected users that were seeing this error on Windows 7 have reported that in their case, the problem was actually being caused by malware that successfully infiltrated the Windows Update component as well as Internet Explorer.
If this scenario is applicable, you should be able to fix the problem by running Microsoft’s native virus-removal tool (Microsoft Safety Scanner). This might not be the best at finding lingering malware, but it’s very efficient in getting rid of malware that infiltrates Windows components.
Here’s a quick guide on running the Microsoft Safety Scanner:
Note: This utility needs to run in Safe Mode for maximum efficiency.
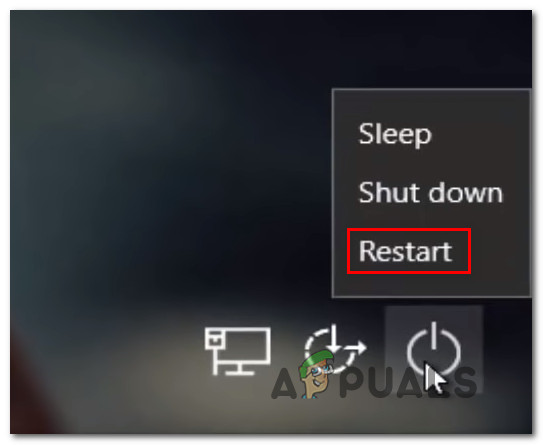
- Power on your computer (or restart if it’s already on) and wait until you get the next login screen. When you get to this screen, click on the power icon (bottom right corner).
- Once you get to the power contact menu, press and hold the Shift key while clicking on Restart to force your computer to restart directly into the Recovery menu.
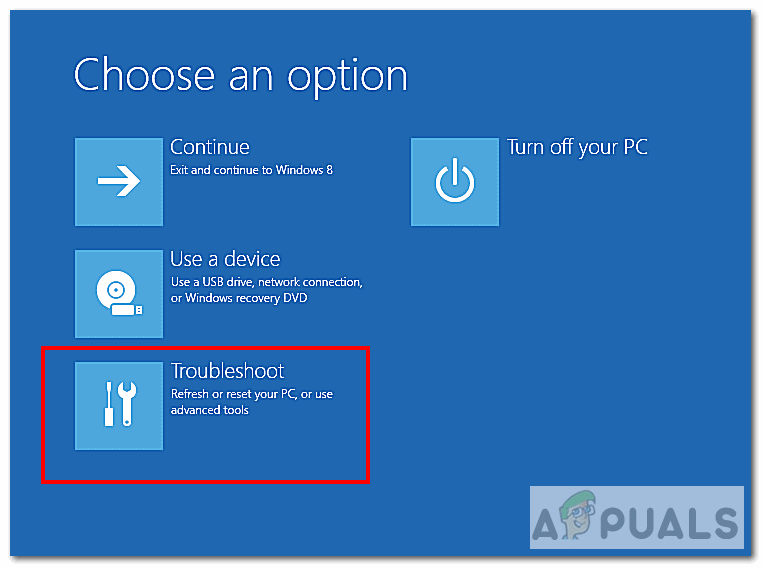
Forcing the PC to restart in Safe Mode - After you do this, your computer will restart directly into the Recovery menu. Once you’re inside, select Troubleshoot from the list of available options.
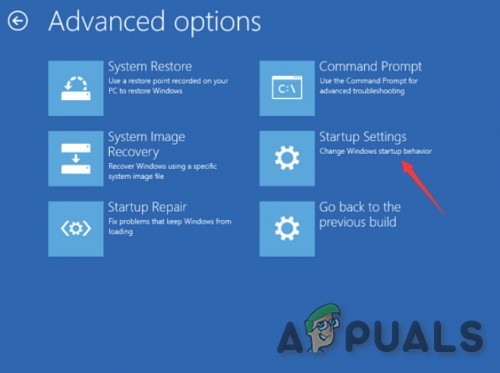
Troubleshoot - Once you’re inside the next menu (Advanced Options), click on Startup Settings.
Startup Settings in Advanced Options - At the next menu, press F5 to boot your computer in Safe Mode with Networking.

Starting your computer in Safe Mode with Networking Note: This is important since your computer will need to have INternet access in order to download files needed by the Windows Safety Scanner.
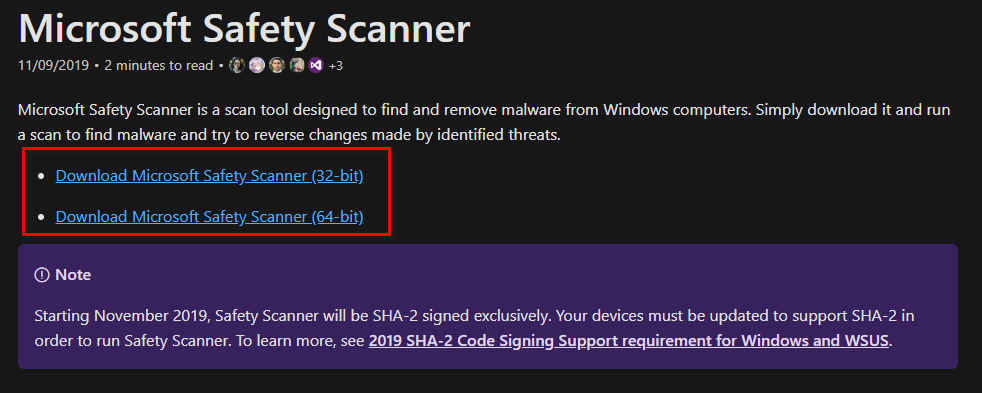
- Once your computer is successfully booted in Safe Mode with Networking, visit this Microsoft download page and download the latest version of Microsoft Safety scanner (choose the correct version according to your Windows bit version).
Downloading Windows Safety Scanner - After the download is complete, double-click on the MSERT.exe file and click Yes at the User Account Control prompt to grant admin access.
- Follow the on-screen instructions to initiate the scan with the Microsoft Safety scanner, then wait patiently until the operation is complete.
Completing the Microsoft Safety Scan - After the operation is complete, restart your computer and boot it in normal mode to complete the operation. Once it boots back up, repeat the action that was previously causing the 80246001 error and see if the problem is now fixed.
In case the same problem is still occurring, move down to the next potential fix below.
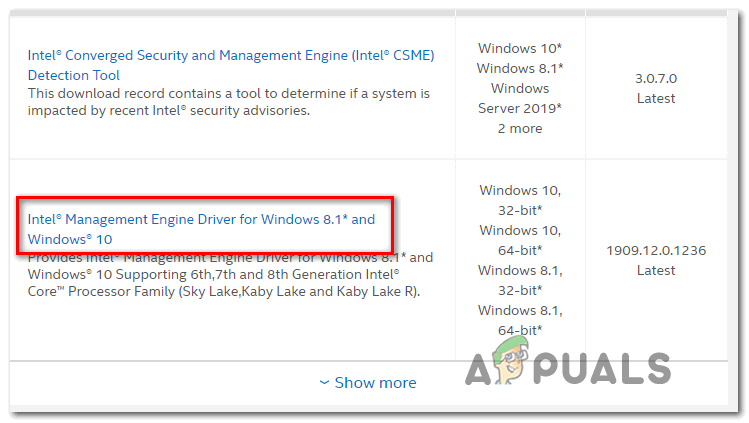
Method 4: Installing the Management Engine Interface from Intel (if applicable)
As it turns out, you might see this error while attempting to update the Management Engine Interface driver (from Intel) via Windows Update. This can produce various errors including the 80246001 error code as a lot of affected users have confirmed.
In the event that Windows Update cannot handle the updating of this driver, you can download and install it manually directly from Intel’s download page. This workaround was successfully followed by a lot of users that were facing this problem with the Management Engine Interface driver.
If this scenario is applicable, follow the instructions below to download and install Intel’s Management Engine Interface driver through the native channel:
- Open your default browser, access Intel’s Download Center for the Management Engine Interface, and click on Inter Management Engine Driver for Windows 8.1 and Windows 10.
Downloading the latest version of the Intel Management Driver - Once you get to the next page, click on the Download button, then wait for the driver to be successfully downloaded.

Downloading the Management Engine Driver - After the download is complete extract the contents of the archive with a utility like WinZip, WinRar, or 7Zip.
- Next, double-click on MEISetup.exe, provide admin rights, then follow the on-screen instructions to complete the installation, then restart your computer.
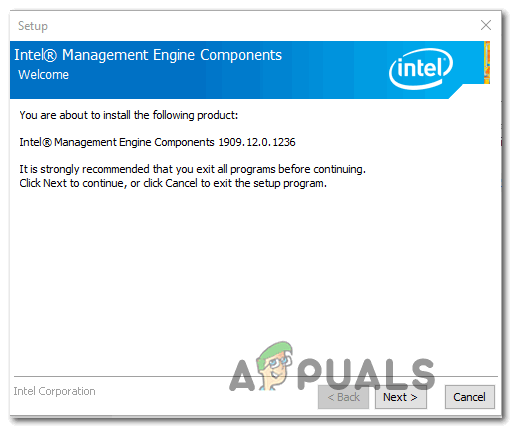
Installing the Intel Management Engine - See if the installation completes without the dreadful 80246001 error code.
In case the same problem is still occurring, move down to the next potential fix below.
Method 5: Performing SFC and DISM Scans
If none of the potential fixes above have worked for you, it’s likely that you’re dealing with some time system file corruption that cannot be resolved conventionally. It’s likely that some type of Windows-related corrupted ended up affecting the Windows Update component, rendering it incapable of downloading and installing new updates.
In this case, you should attempt to fix the problem by using a couple of built-in utilities (System File Checker and Deployment Image Servicing and Management( to resolve the corruption issue.
If you want to try this fix, our recommendation is to start with a simple SFC scan since this operation is completely local and can run perfectly without an Internet connection. This will automatically compare your current OS files against a healthy list of equivalents and swap out any corrupted file from a locally stored archive.
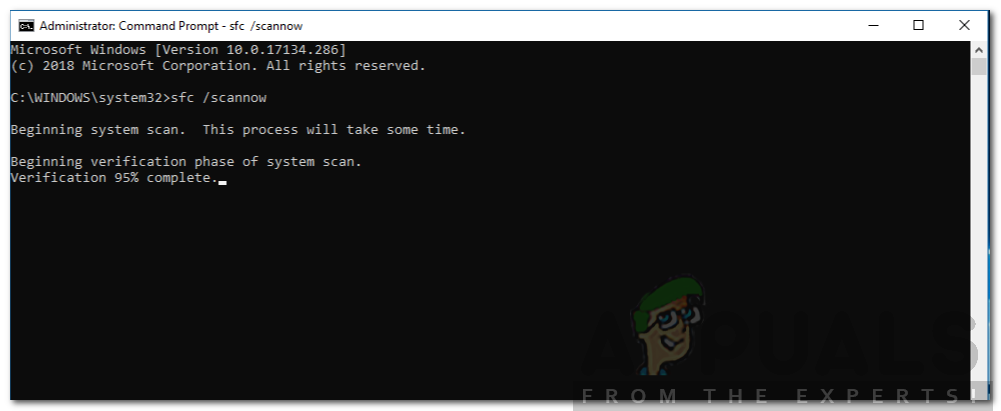
Important: Once you’re starting out this procedure, do not interrupt it until the operation is finished. Closing the CMD prompt forcibly might contribute to the creation of additional logical errors that will spawn additional issues.
After the operation is complete, restart your computer and wait for the next startup to complete. Once your computer boots back up, go ahead and initiate a DISM scan.
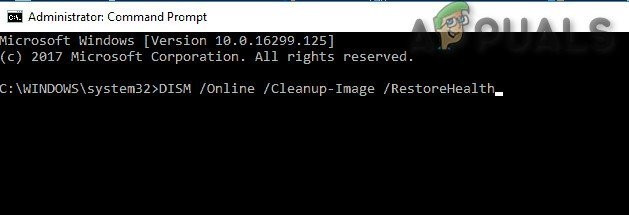
Note: Keep in mind that DISM is a more modern tool that relies on a subcomponent of Windows Update to download healthy files that are needed when repairing system file corruption. That’s why it is important to ensure that your Internet connection is stable before initiating this type of scan.
Once the operation is complete, restart and see if the 80246001 error code is still appearing when attempting to install updates via the Windows Update component.
In case the problem is still occurring, move down to the next potential fix below.
Method 6: Resetting every WU Component
If none of the potential fixes presented above have worked for you, it’s possible that you’re dealing with some kind of corruption that’s affecting the Windows Component or with a glitch that’s currently inhibiting your ability to install new Windows Updates.
If this scenario is applicable, you should be able to fix the problem by resetting every component and dependency involved in the process. Several affected users have confirmed that they were able to fix the problem by resetting the Windows Update manually via an elevated Command Prompt.
Here’s a quick guide on how to do this:
- Press Windows key + R to open up a Run dialog box. Next, type ‘cmd’ inside the text box and press Ctrl + Shift + Enter to open up an elevated Command Prompt.
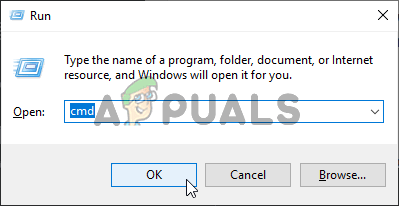
Running Command Prompt Note: When you’re prompted by the User Account Control (UAC), click Yes to grant administrative privileges.
- Once you’re inside the elevated Command Prompt, type the following commands in order and press Enter after each one to stop Windows Update and every related sub-service:
net stop wuauserv
net stop cryptSvc
net stop bits
net stop msiserver
Note: Once you have successfully run these commands, you would have successfully stopped the Windows Update service, the MSI Installer, the Cryptographic service and the BITS services.
- Once every relevant service are disabled, run the following commands in the same CMD window and press Enter after each one to rename the SoftwareDistribution and Catroot2 folders:
ren C:\Windows\SoftwareDistribution SoftwareDistribution.old
ren C:\Windows\System32\catroot2 Catroot2.old
Note: These two folders are protected so you can’t delete them conventionally even with administrative privileges. Because of this, you will need to rename them in order to force your OS to disregard them and force Windows to create new equivalents that will take their place.
- After you manage to rename the two folders, type these final commands and press Enter after each one to re-enable the services that you previously disabled:
net start wuauserv
net start cryptSvc
net start bits
net start msiserver
- Next, open Windows Update again and attempt to install the pending Windows updates that were previously failing with the 80246001 error.


