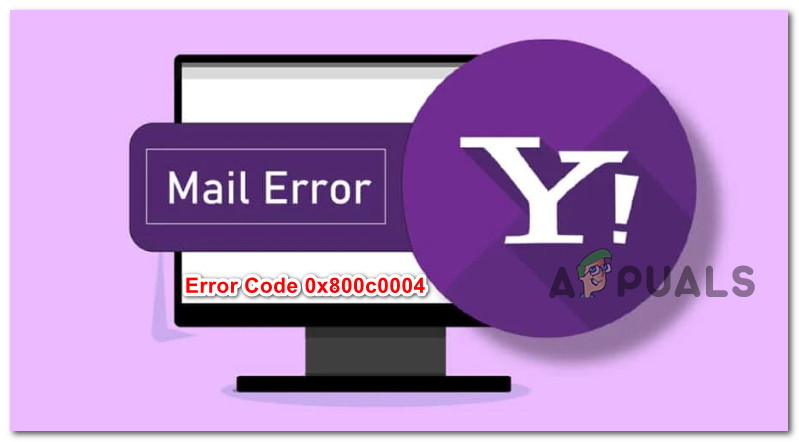
Fix: Yahoo Error Code 0x800c0004 in Windows 11 Mail App
Some Windows 11 users report that when they attempt to re-add their Yahoo mail account to the Windows 11 Mail app, they end up seeing the Error Code 0x800c0004. This seems to be an issue that is exclusive to Windows 11.
Depending on your specifics, the reason you are experiencing this problem can have several underlying causes. Here’s a list of scenarios that you should investigate:
- UWP Inconsistency – This issue might occur due to corruption affecting the entire fleet of UWP apps. This is very likely if you get the same error with other email providers than Yahoo. Numerous impacted users claim that using the Windows Store Apps troubleshooter and implementing the suggested repair would solve this issue.
- The same Yahoo account is already connected – As it turns out, you might expect to deal with the same 0x800c0004 error in a situation where the account giving the error when you attempt to add it is already connected to the Windows 11 Mail app. To fix this issue, take the time to remove the Yahoo account completely.
- Hotfix for the Windows 11 App is not installed – Microsoft has already made a patch available to address this issue. Other customers experiencing the same issue reported that it was repaired once they manually updated the UWP app.
- Bad Credentials – As it turns out, you can also expect to deal with this issue in a scenario where the actual password you’re using when connecting your Yahoo mail to the Windows Mail app is incorrect. To fix this issue, sign in to your Yahoo mail from any browser and generate a password for another app and use that to finalize the connection.
- The corruption that affects the 11 Mail app – Another scenario you should consider is when the auto-syncing feature fails, and the primary Windows 11 Mail program becomes damaged. Typically, this happens following an unanticipated system disruption that occurred while the system was upgrading the email program. Try resetting or repairing the app to resolve it, and then reinstall it if necessary.
- System file corruption – When a system dependency that the Windows Mail program depends on becomes corrupt, you may occasionally have to deal with this problem. Before pursuing more complex repair or clean install processes in this situation, running an SFC and DISM scan is recommended.
- 2FA is not enabled – As it turns out, since Yahoo has upgraded its security protocols, connecting a Yahoo account to a 3rd party email aggregator like the Windows Mail app is impossible if 2FA is not enabled. If 2FA is disabled in your case, you can fix the problem by enabling this component and connecting it with the Windows Mail apps.
Now that you are familiar with the most common reasons why you might end up experiencing this issue on your PC, let’s go over a series of verified fixes that other users who were also experiencing the error code 0x800c0004 when attempting to add a Yahoo email account to the Windows Mail app on Windows 11.
1. Run the Store Apps Troubleshooter
Most native Windows 11 applications also struggle with the same issue, which is the root of this problem. According to many users affected by this issue, the problem may be resolved by utilizing the Windows Store Apps troubleshooter and applying the suggested repair.
Note: Keep in mind that the same list of requirements applies to the primary store component and any native apps running on the Universal Windows Platform (UWP).
You may predict that a shared Windows Mail app dependency is affected following a faulty update or due to any other form of file corruption. In situations like these, using the Windows Apps Troubleshooter and allowing its automated repair component to take care of the issue is the most effective course of action that can be taken.
The Windows Apps Troubleshooter is a repair tool with many automatic repair choices that may be used if a scenario known to be problematic is detected.
If you haven’t already, run the Windows App Troubleshooter; then, once you’ve done so, follow the steps below to execute the proposed fix to repair any shared dependencies you may have:
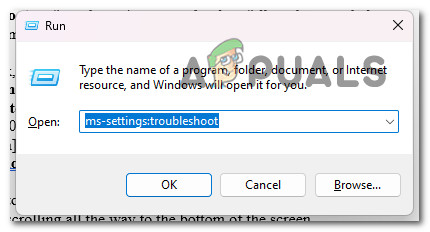
- The Windows key + R simultaneously to launch the Run dialog box.
- By typing “ms-settings:troubleshoot” into the text box and pressing Enter, the Settings menu’s Troubleshooting tab will be shown.
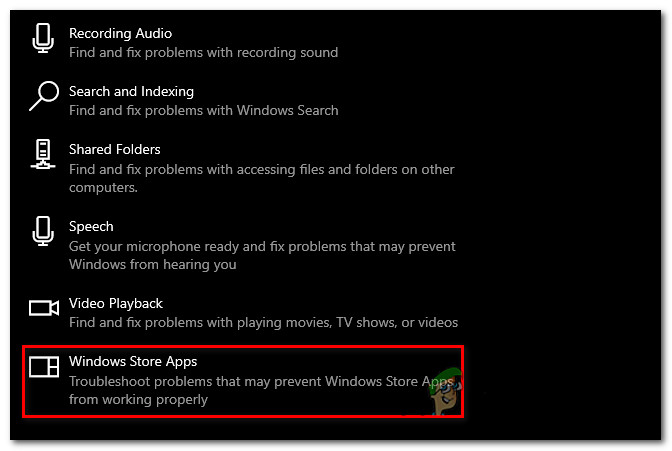
Access the Troubleshoot tab - At the bottom of the right-hand pane of the Troubleshoot window, look for the Other troubleshooters option.
- After scrolling to the bottom of the page, choose the Run option next to Windows Store Apps in the dedicated Other Troubleshooters menu.
Run the Store apps troubleshooter - Wait until the preliminary scan is finished to determine if a feasible fix has been found after starting the Windows Store App troubleshooter.
- Click “Apply this Fix” if a fix is presented to you, then select it.

Apply this fix Note: Depending on the type of repair described, you might need to follow a series of manual instructions to complete the work.
- After the remedy has been successfully performed, restart your Windows PC to see if the problem has been resolved.
If the problem is still not fixed, move to the next method below.
2. Remove the Yahoo account
It has come to our attention that you should be prepared to cope with the identical 0x800c0004 problem in a scenario in which the account giving you the error when you try to add it is already linked to the Windows 11 Mail app. To solve this problem, you must delete your Yahoo account before trying to add it again.
Several affected users have confirmed that they managed to get this issue resolved by accessing the Manage Accounts tab (inside the Settings menu of the Mail app) and removing the Yahoo account:
Here’s who to do this:
- Press the Windows key to open up the Start menu.
- Next, type ‘mail’ in the search function up top, then click on Windows Mail from the results list.
- Once you’re inside the Windows Mail app, click on the Settings icon.

Access the Settings app - From the next method, click on Manage accounts and click on your currently connected Yahoo account from the list of connected emails.
- Click on Remove this account from this device from the next menu, then wait until the operation is complete.
- Go ahead and attempt to add the same Yahoo account that you just removed to the Mail app.
If the problem is still not fixed, move to the next method below.
3. Generate an email password from Yahoo
As it turns out, you can also anticipate having to deal with this problem if the password you’re using to try to connect your Yahoo mail to the Windows Mail program is incorrect.
Note: After the latest protocol update that Yahoo pushed, you need to generate a different password to connect your mailbox to a 3rd party email client like Windows Mail.
To resolve this problem, go into your Yahoo mail account using any browser, create a password for a different app, and use that password to complete the connection.
Here’s what you need to do:
- Open a web browser that you are comfortable with. (Google Chrome, Firefox, or any other that you regularly use)
- Use your ID and password to log into Yahoo Mail. Use your default credentials and complete the verification if needed.
- Click on your name icon in the top-right corner, then select Account details.
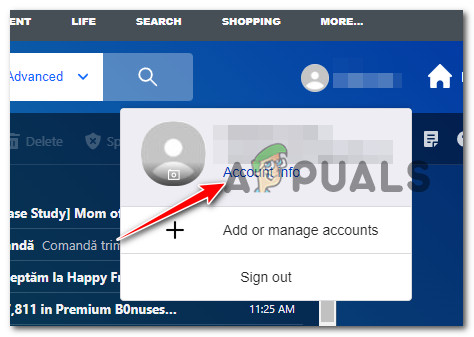
Access the Account Info - You must choose Account security in the next area (from the left-hand menu).
- You’ll now have a new tab; scroll down to the Other ways to sign in section and click on Generate app password (under App Password).
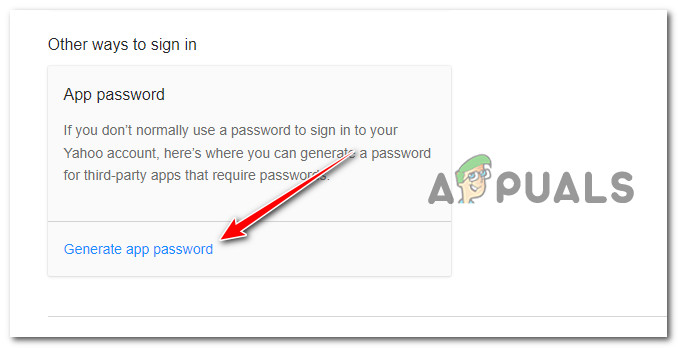
Generate the app password Note: This will help you generate a password for any type of 3rd party app that uses Yahoo’s mailing protocol, including the Windows Mail app.
- Once inside the next screen, type Windows Mail in the App name box, then click on Generate password.
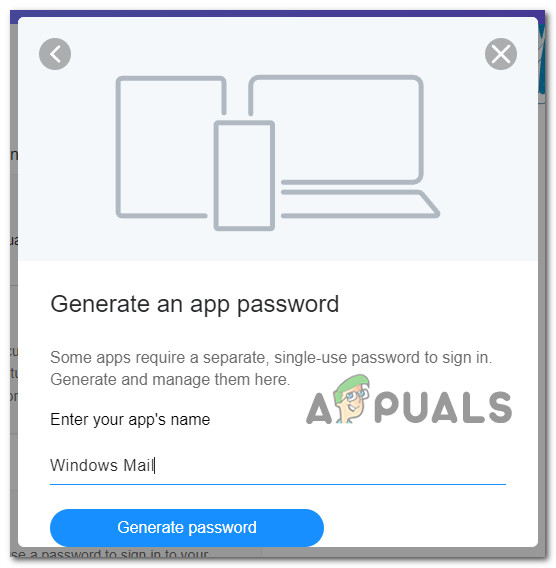
Generate Yahoo Password - Next, Yahoo Mail will now generate a 16-character password. Copy the code exactly as it is.
- Reopen Windows Mail now and get past the initial connection screen.
- Next, go to Settings, then click on Manage accounts.
- From the next screen, click on +Add account.
- Keep in mind that you shouldn’t select Yahoo this time. Instead, choose Other account (POP, IMAP).
- Enter the Yahoo email address you use.
Note: Make sure it’s the same address you used in step 2. - Enter the 16-character password you just copied from Yahoo when prompted for a password.
- Select Save after entering your name.
- See if you can complete the connection without experiencing the same 0x800c0004.
If the problem is still not fixed, move to the next method below.
4. Update the Mail App
Another common source of this issue is an outdated Windows 11 Mail program version that won’t update itself. When they manually updated the UWP app, other users who had the same problem said it was resolved.
Note: When you have pending Windows updates waiting to be installed on your computer, this procedure is often proven successful. Before using the steps below to upgrade the Windows 11 mail app via the Microsoft Store, it is advised that you take the time to apply all pending Windows updates (security, cumulative, and feature updates).
Here’s what you need to do to update the Mail app:
- By selecting the icon in the taskbar or entering “store” into the Start menu, you may access the Microsoft Store.
- From the menu that displays in the upper right corner of the screen, choose Downloads and Updates.
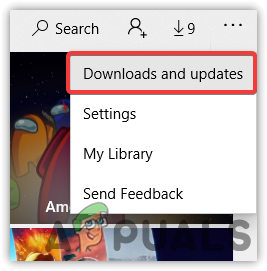
Access the Download and Updates screen - Under Downloads and Updates, choose Mail and Calendar, then watch for the upgrade to be finished. Depending on the number of updates available, you may also need to choose to Get Updates and wait for all your installed applications to be updated.
- After the download is complete, click the Get button to begin the installation if it doesn’t begin immediately.
- Restart your computer when the Windows Mail program has been updated, then close the Microsoft Store.
- After the next startup, see if the issue has been resolved and if you can connect your Yahoo email box to the Windows Mail app.
If the same problem persists, move down to the next method below.
5. Repair or reset the Windows 11 Mail App
If none of the above-mentioned fixes has worked for you, you may be dealing with corrupted cached data, which prevents the Mail app from correctly assimilating new accounts.
You will need to fix or reset the Calendar and Mail apps because they all reside on the same panel. Fortunately, as many worried users have confirmed, you may be able to resolve this issue by restarting the Windows 11 mail app through the appropriate channels.
If you’re experiencing this issue with Windows 11 and haven’t already tried repairing and resetting the Windows Email program, the procedures outlined below may be of assistance:
- The Run dialog box will appear by pressing the Windows key + R.
- The Apps & Features page of the Settings app will open on Windows 11 once you type “ms-settings:appsfeatures” in the text box and press Enter.
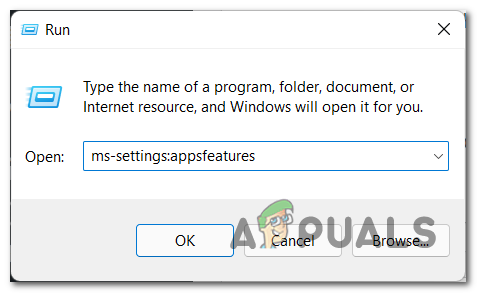
Access the Apps & Features menu Note: If the UAC (User Account Control) box displays, click Yes to enable admin access.
- Use the search field to search for “mail” in the top right corner of the Apps & Features panel.
- Choose Mail & Calendar from the search results, and then click the Advanced settings hyperlink on the context menu that is just displayed.
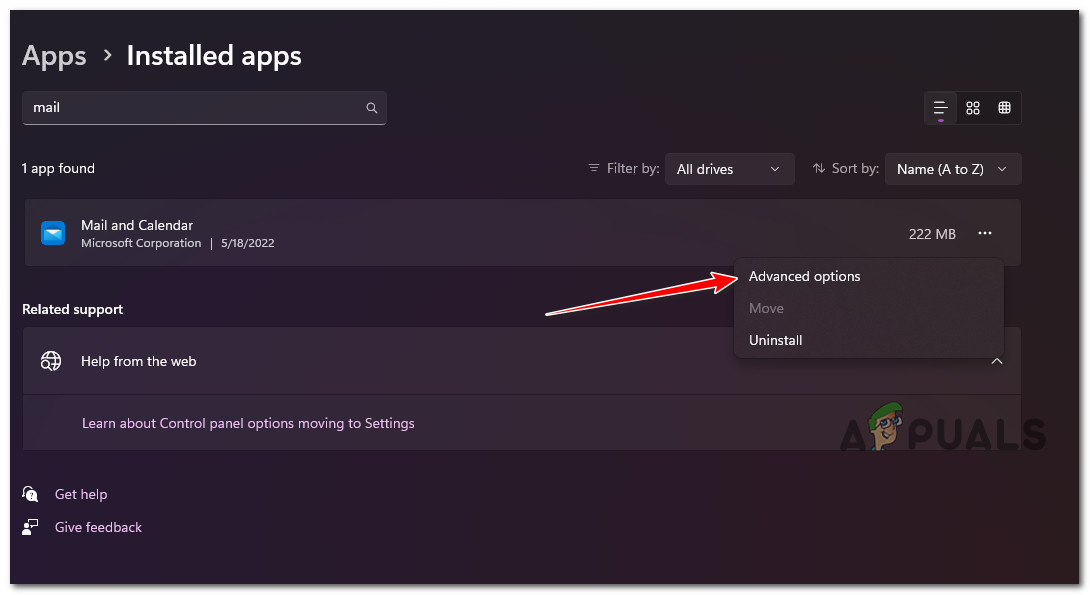
Access the Advanced Options menu - Go to the Reset tab and click the Repair option after opening the Advanced Options menus of the Mail and Calendar programs.
- At the confirmation box, choose Repair once more, and then hold off on restarting your computer until the procedure is complete.
- After the repair process is finished, click the Reset button below and then click it again to confirm.

Reset the Windows Mail app
7. Sync the Windows 11 mail app once again to see if the problem has been fixed after completing both tasks successfully.
If the same problem is still occurring, move to the next potential fix below.
6. Reinstall the Mail & Calendar app
If the procedure described above did not produce the desired results, you should try reinstalling the entire Mail and Calendar component by accessing the Installed Apps tab of the Settings menu. This should be done only if the reset and repair procedure described above did not produce the desired results.
This procedure has been tested and shown to function for many users, and the Windows 11 Home and Windows 11 PRO editions are the only ones on which we are seeing this issue.
Before downloading the component from the Microsoft Store, you will first need to use the Apps menu to remove the Mail & Calendar Universal Windows Platform app completely, then restart your device and reinstall the component.
For detailed, step-by-step guidance on how to achieve this, please follow the guidelines that are listed below:
- By pressing the Windows key + R you’ll force the Run dialog box to appear.
- Next, you can make the Apps & Features page of the Settings app appear on Windows 11 by typing “ms-settings:appsfeatures” in the text box and press Enter.

Open up the Apps & Features screen Note: If the UAC (User Account Control) box displays, click Yes to enable admin access.
- Use the search field to search for “mail” in the top right corner of the Apps & Features panel.
- Choose Mail & Calendar from the search results, and then click the Advanced settings hyperlink on the context menu that is just displayed.
- Go to the Uninstall tab and click the Uninstall button after opening the Advanced Options menus of the Mail and Calendar programs.
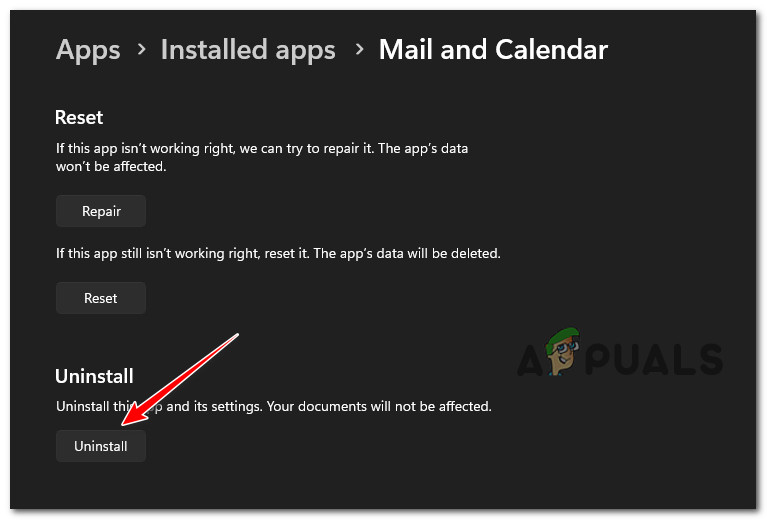
Uninstall the mail & calendar app - Click Uninstall once more at the confirmation box and wait until the uninstallation is finished.
- After removing the Mail & Calendar program, restart your computer and wait until the subsequent startup is finished.
- Open the Microsoft Store when your computer has restarted and type “calendar and mail” into the search bar.
- Select the Mail and Calendar app from the results list, then select the corresponding Get button.
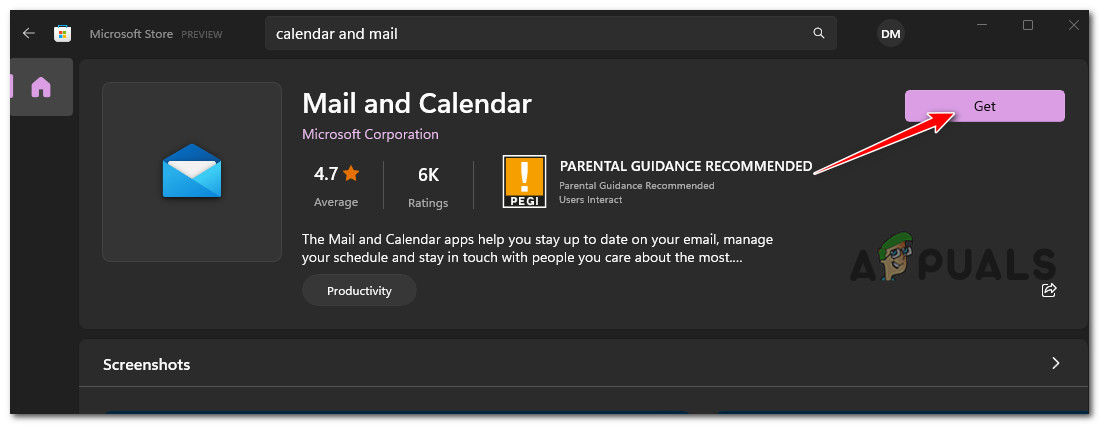
Open the Get button - Complete the installation by following the on-screen directions, signing in, connecting with your account, and checking to see whether the synchronization issue has been fixed.
If the same issue is still occurring, move to the next method below.
7. Enable 2FA for your Yahoo mail
It has come to our attention that because Yahoo has changed its security procedures, it is now not feasible to link a Yahoo account to a third-party email aggregator such as the Windows Mail program if two-factor authentication is not activated.
If two-factor authentication (2FA) is turned off for your account, the issue can be remedied by turning on this component and integrating it with the Windows Mail applications.
Here’s what you need to do:
- Open a web browser such as (Google Chrome, Firefox, or any other that you regularly use)
- Use your ID and password to log into Yahoo Mail. Use your default credentials and complete the verification if needed.
- Click on your name icon in the top-right corner, then select Account details.
Access the Account Info - You must choose Account security in the next area (from the left-hand menu).
- From the next screen, scroll down to the ” This is how you sign in now ” and click on the Turn on 2SV hyperlink (under 2-Step verification).
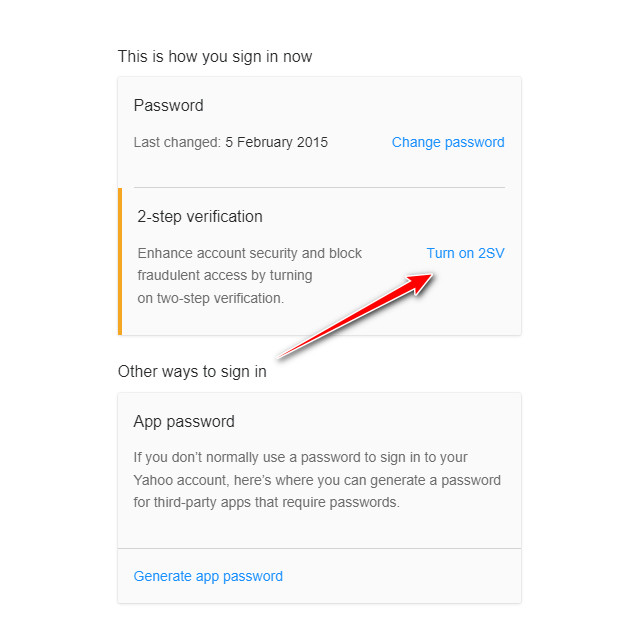
Enable 2-step verification - Follow the next instructions to set up 2-step verification by using a phone number, an authenticator app, or a security key.
- After you configure the 2-step verification procedure and you manage to turn it on, attempt to connect your Yahoo account to the Windows Mail app and see if the problem is now fixed.
If the same 0x800c0004 error still occurs, move down to the next method below.
8. Deploy DISM & SFC scans
If you have tried every workaround described above and are still receiving the same issue when you try to link your Yahoo account to the native mail software that comes with Windows 11, you should at least think that you are dealing with a problem related to file corruption in the system.
In this particular scenario, you need to make an effort to repair the corrupted files causing the mail program to malfunction and give you the 0x800c0004 error number.
SFC, which stands for System File Checker, and DISM, which stands for Deployment Image Servicing and Management should be run in rapid succession to replace corrupted system files with healthy equivalents and failed storage sectors with unused equivalents.
Here’s what you need to do:
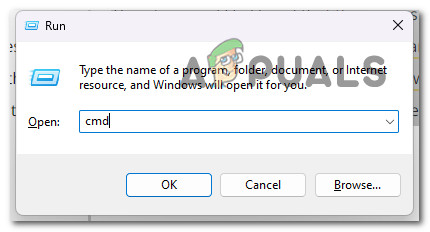
- To open the Run dialog box, press the Windows key + letter R.
- Once the dialog box is visible, the next step is to start an administrative Command Prompt by typing “cmd” and pressing Control key + the Shift key + the Enter key simultaneously.
Open the CMD window - In response to the prompt from the User Account Control, choose Yes to enable administrative access.
- At the elevated CMD prompt, type the following command and click Enter to begin an SFC scan:
sfc /scannow
Note: System File Checker is a purely local tool that does not call for an active internet connection. For it to function properly, it uses a locally cached archive of backup system files to replace any corrupted files with their undamaged equivalents.
5. After the SFC scan is finished (regardless of the findings), do a DISM scan from the same elevated CMD window:DISM /Online /Cleanup-Image /RestoreHealth is the command you need to use.
Note: It is essential that you take into consideration the fact that DISM is a more recent technology that calls for a reliable connection to the internet. This is vital because DISM will utilize a sub-component of WU to get healthy replacements for the problematic files that need to be replaced, and finding these alternatives is necessary.
6. Successfully, give your computer one last restart and check to see whether it has finally resolved the issue.
If you’re still experiencing the same issue, move to the final potential fix below.
9. Perform a repair install
If you’ve made it this far, your problem is probably the consequence of system file corruption, which is impossible to resolve using conventional methods.
In this circumstance, the suggested course of action to resolve the issue without completing a complete OS reinstall is refreshing every Windows component (including boot data).
There are two possibilities:
- Repair Install – This more time-consuming procedure is also known as in-place repair. The advantage is that you may preserve your personal files—including music, movies, software, and even certain user preferences—without creating a backup in advance, even if you must provide an installation medium.
- Clean installation – In Windows 11, you may launch it directly from the menu without needing an installation DVD. You will lose your personal data if you don’t back it up before beginning this process.