How to Fix “What Failed: IntcOED.sys” Error on Windows 11
Some Windows 11 users are reporting that after Windows 11 installed a cumulative update or after installing a pending driver, they constantly get Blue Screen crashes with the ‘What Failed: IntcOED.sys‘ error code.

After investigating this particular issue, it turns out that this error can actually be rooted in multiple potential causes. Here’s a list of scenarios that might end up causing the ‘What Failed: IntcOED.sys‘ error on Windows 11:
- Driver-related inconsistency – Oftentimes, the root cause that’s causing this crash is already fixed by the automated fixes available through the Windows Audio troubleshooter. So, the best way to start troubleshooting this problem is to run the Audio troubleshooter and follow its recommended fix.
- Corrupted Smart Sound Technology driver – Having issues with audio or audio recording can be a huge pain, and it’s often caused by corrupted driver files. In this case, the best way to deal with the issue is to uninstall the current Smart Sound Technology OED driver and let your OS automatically migrate to a generic equivalent.
- An available hotfix is not installed – If you’re experiencing this issue after installing a feature update and you have pending Windows updates, you should know that Microsoft has released a hotfix to resolve the problem. You can check for and install the hotfix through Windows Update. Additionally, you can simply uninstall the feature update that was just installed in order to allow Windows to install the non-buggy version.
- System File corruption – If you’re seeing the “System File Inconsistency” error, it’s likely due to a problem with your system files. You can fix this by running SFC and DISM scans to repair any corrupted OS data. In more serious cases, you might need to do a system restore or even go for a repair install or reinstall the OS.
- Outdated BIOS / UEFI driver – If your BIOS or UEFI firmware is outdated, it could be the reason behind this particular problem. Updating to the latest version should take care of the issue.
- Conflict with OED driver – If you’re seeing problems with the OED driver on your Surface Book Perf base device, it’s likely due to a conflict between system processes. You can resolve the issue by forcing your system to roll back the current OED driver.
Now that we went over every scenario that might be responsible for the ‘What Failed: IntcOED.sys‘ error, let’s go over a series of fixes that other affected Windows 11 users have successfully used to get to the bottom of this issue.
Run the Sound Troubleshooter
If you’re experiencing this issue on your Windows 11 installation, the first thing you should do is see if Microsoft has already pushed out an automated fix for the problem. As it turns out, they are aware of the issue and have released a couple of fixes already.
As it turns out, this problem is often related to a legacy sound driver that was improperly ported from Windows 11.
To take advantage of the automated fixes that Windows provides, you’ll need to run the Audio troubleshooter and apply the recommended fix. This particular fix has been confirmed by many users as being effective – especially those that upgraded from Windows 10 to Windows 11, as opposed to clean-installing the latest operating system.
Here’s how you can run the Audio Troubleshooter and apply the recommended fix:
1. Start by opening the Settings app from your Start menu. You can do this by pressing the Windows key + I on your keyboard.
2. Once the Settings app is open, click System from the vertical menu on the left, then click on the “Troubleshoot” option from the right-hand section.
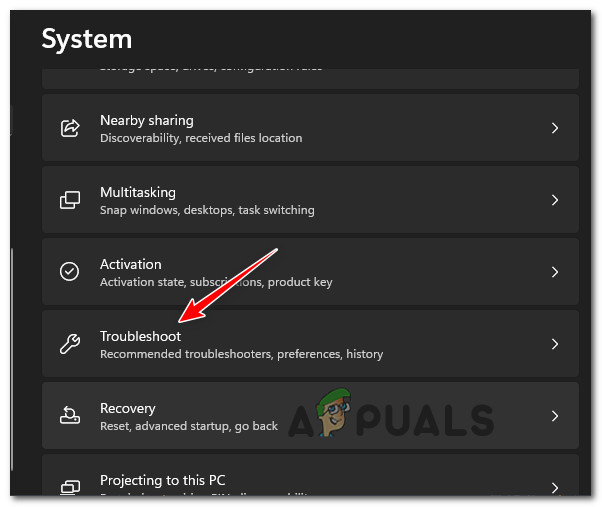
4. In the Troubleshoot window, scroll down and click on the “Playing Audio” option.
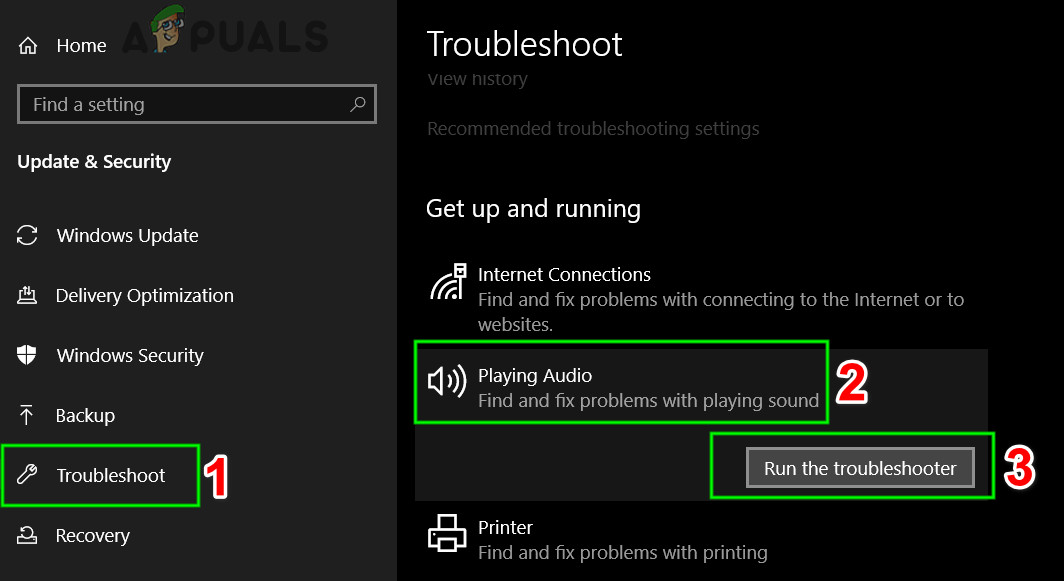
5. Click on the “Run the troubleshooter” button and wait for Windows to scan your computer for audio problems.
6. If any problems are found, follow the on-screen instructions to fix them.

7. Restart your computer and see if the issue is resolved.
If you’re still getting the ‘What Failed: IntcOED.sys‘ at random intervals, move down to the next method below.
Uninstall the Intel Smart Sound Technology driver
If the method above didn’t work and the ‘What Failed: IntcOED.sys‘ error is related Smart Sound Technology OED service, one of the most effective things you can do is to uninstall the driver that’s currently governing it. This might seem counter-intuitive, but it will force your operating system to migrate to a generic equivalent, which should resolve the issue entirely and prevent your system from crashing in the system.
Note: The only time you’ll run into problems is if you’re actively using the Intel dedicated Sound Technology driver for advanced audio editing tasks, in which case you’ll need to find an alternative solution. But for everyone else, this should take care of the problem.
If you lose audio or recording capabilities on your Windows computer, don’t worry – this is only a temporary interruption while your computer migrates from the dedicated driver to the generic equivalent. You can fix this issue by following the instructions below to migrate over to a generic equivalent using Device Manager:
- Press Windows key + R to open up a Run dialog box.
- Type ‘devmgmt.msc’ inside the text box and press Ctrl + Shift + Enter to open up Device Manager with admin access.

Open Device Manager - Scroll down through the different device categories and expand the drop-down menu associated with Sound, video, and game controllers.
- Find the Smart Sound Technology OED service and right-click on it.
- From the next context menu that just appeared, choose Uninstall device.

Uninstall the Smart Sound Technology driver - At the confirmation prompt, click Yes and wait for the uninstallation to finish.
- Restart your computer and see if the random crashes associated with the ‘What Failed: IntcOED.sys‘ error stop occurring.
If the problem is still persisting, try the next method below.
Uninstall the recent feature update
As it turns out, you might start receiving the ‘What Failed: IntcOED.sys’ error in situations where your system recently installed a Windows 11 feature update that ends up conflicting with the IntcOED.sys dependency.
Several users that dealt with this issue themselves have reported that they managed to fix this problem by uninstalling the latest feature update and restarting their computer.
Note: Since Microsoft already released a hotfix for this issue, the next time WU will install this feature update, you will no longer experience this problem.
Follow the instructions below to manually uninstall the Windows feature update that was recently installed:
Note: As an extra step we also included some instructions that will allow you to hide the update and prevent it from installing in the future.
- To open the Programs and Features screen, first press the Windows key + R to open a Run dialog box. Then, inside the text box, type ‘appwiz.cpl’ and press Enter.

Open up the Programs and Features menu - After you’re inside the Programs and Features menu, use the vertical menu on the left to click on View installed updates.
- Once you’re in the Installed Update screen, find the update that was installed the last and right-click on it.
- From the context menu, choose Uninstall.

Uninstall the latest Windows 11 feature update - At the confirmation prompt, click Yes to begin uninstalling the update. Wait until the process is complete.
- Now that the update is uninstalled, don’t restart your computer just yet. Instead, visit the official download page of the Microsoft Show or Hide troubleshooter.
Note: The download should start automatically. - After the download is finished, open up the .diagcab file and click on Advanced at the first prompt. Then, check the box next to Apply Repairs Automatically before clicking on Next.

Apply the repairs automatically - The utility will scan your system to figure out which pending updates are not installed. Once the next screen appears, click Hide Updates from the list of options.
- On the following screen, check the box next to the update that you’re targeting and click Next to hide it – this will stop Windows Update from installing the update again in future attempts.
- Reboot your PC one final time and see if you can use your computer without constantly getting the ‘What Failed: IntcOED.sys’ error.
If the problem is still not fixed, move down to the next method below.
Install every security update
Soon after the ‘What Failed: IntcOED.sys’ error started occurring on Windows 11 due to the problematic Windows 11 feature update, Microsoft released a fix that supposedly addressed the issue.
If you are affected too and none of the methods above have helped, you can follow the instructions below to install the hotfix and resolve the constant crashes pointing towards the IntcOED.sys process.
Note: Microsoft releases these hotfixes in segments, so it‘s possible that you haven‘t yet received the hotfix while others have. If no new update is available yet, check back regularly or move down to the next potential fix below.
If you have pending updates that are currently waiting to get installed on your PC, follow the instructions below to get them installed and apply the hotfix:
- To open the Windows Update tab on Windows 11, first press the Windows key + R to open a Run dialog box. Then, type ‘ms-settings:windowsupdate‘ in the text box and press Enter.

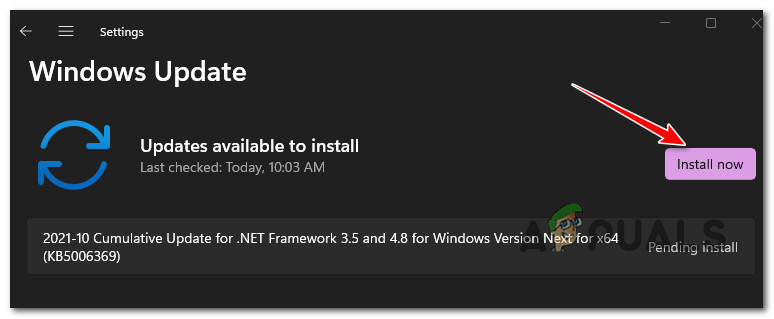
Accessing the Windows Update screen - Within the Windows Update screen, locate the right–hand section and click on Check for Updates to see if the hotfix is available.

Check for Updates - If a new update appears, click Install Now and wait until the hotfix has been installed on your device.
Install the pending hotfix - Once installation is complete, reboot your computer and repeat the action that was previously causing the IntcOED.sys process to see if the problem is now resolved.
If the issue is still not fixed yet, move down to the next potential fix below.
Deploy SFC and DISM Scans
If the issue with the ‘What Failed: IntcOED.sys‘ error persists, you may need to troubleshoot a potential system file corruption.
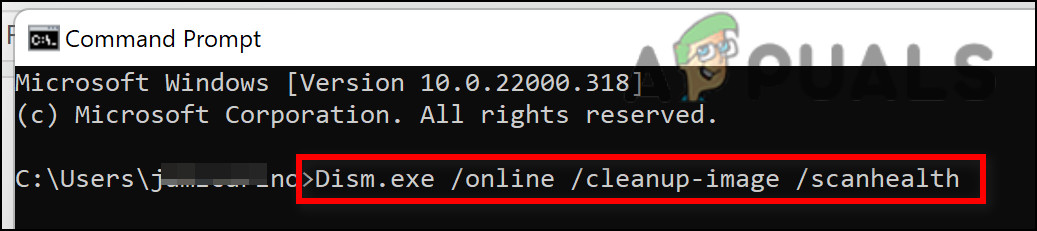
The best way to do this is to use two built–in utilities, SFC and DISM. These utilities can fix common corruption instances that may be causing the error.
To start, run a System File Checker scan. This does not require a stable internet connection.

Note that SFC is a local tool that uses a cached copy of healthy system files to replace corrupted ones. It is important not to interrupt the scan until it is complete, as this could create additional logical errors.
If you are running this on a traditional hard drive rather than an SSD, it may take a couple of hours to complete. So arm yourself with patience.
Additionally, SFC has a tendency to freeze temporarily – if this happens, do not close the window, and wait for the real–time tracking to return.
Once the SFC scan is complete, reboot your computer and see if the IntcOED.sys error is still, occurring. If you are still seeing the same ‘What Failed: IntcOED.sys’ error, you can run a DISM scan next.
Info: DISM uses a component of Windows Update to replace corrupted files with healthy copies downloaded from the internet. Before starting the scan, make sure your internet connection is stable.
Once you have run both SFC and DISM scans, reboot your computer and repeat the action that was previously causing the same critical system crash. If you are still seeing the same error, try another potential fix below.
Installing the pending BIOS update
If you find yourself encountering the ‘What Failed: IntcOED.sys‘ error, it is likely because you have an outdated BIOS version that is causing your system to be unstable under heavy loads.
Several users who have experienced the same problem have found that updating their BIOS version to the latest one available has fixed the issue.
However, this process will differ depending on your motherboard manufacturer. Most manufacturers have developed their own flashing utilities to make the process easier.
You can find the official documentation for this procedure easily by doing a web search for ”*Your motherboard model* + BIOS Update.”

Keep in mind that if you do not follow the steps correctly or skip any, you run the risk of bricking your motherboard. Unless you have experience with updating BIOS firmware, we recommend that you take your PC to a certified technician.
If this method does not work or is not applicable, and you have already updated your BIOS version but are still seeing the same ‘What Failed: IntcOED.sys’ error, try the next potential fix below.
Rollback the Audio Controller (Surface Book users)
If you are using a Surface Book Perf base device, chances are you’re seeing this problem due to a problem having to do with a conflict between some system processes and the OED driver.
In case this scenario is applicable to your particular use case, you should be able to resolve the issue by forcing your system to roll back the current OED driver. Several users dealing with the same problem have confirmed that once they’ve done this, the What Failed: IntcOED.sys error stopped occurring and they could utilize their PC normally.
Follow the instructions below to roll back your current OED driver and fix the What Failed: IntcOED.sys error:
- Start by opening Device Manager by pressing Windows key + R.
- From the text prompt that appeared, type ‘devmgmt.msc’ and press Enter to open Device Manager.

Open Device Manager - Once you’re inside Device Manager, expand the System Devices Group and double-click on the Audio controller driver.
- From the Properties tab of the Audio Controller driver, go to the Driver tab, click on the Roll Back driver.
- At the confirmation prompt, click Yes and allow your system to perform the rollback procedure.
- Reboot your PC and see if the What Failed: IntcOED.sys error is fixed once the next startup is complete.
In case this method was not applicable in your particular scenario or it didn’t fix your problem, move down to the next method below.
Use a System Restore point
If the methods above have not worked to fix the issue, it is likely that there is an underlying file corruption causing the ‘What Failed: IntcOED.sys’ error.
Since the issue cannot be resolved in a conventional manner, you can try using System Restore to restore the entire Windows installation.
Note: System Restore is a utility that can fix critical errors by reverting the machine to a previous point in time when the problem did not occur.
But in order to get this to work, you need to have a restored snapshot from a time before the issue began. Windows should automatically save these snapshots regularly.
Before you go ahead with this method, keep in mind that a system restore will revert all software and firmware to the state it was in when the snapshot was created.
Important: This means that all games, applications, user preferences, and anything else related to your Windows installation will be reversed.
If you decide to use System Restore, here are step–by–step instructions:
- To begin, press Windows key + R to open a Run dialog box.
- In the box, type ‘rstrui’ and press Enter to launch the System Restore wizard.
Opening the System Restore utility - On the first screen of System Restore, click Next to continue.

Opening the System restore - On the next screen, check the box next to Show more restore points.
- After doing this, select a restore point that is prior to when the issue began appearing, then click Next.
- To initiate the restoring process, click Finish. This will restart your computer and, upon startup, load the older state that you selected. [caption id=”attachment_96448“ align=”aligncenter“ width=”588“] Starting the System Restore process[/caption]
- After the reboot sequence is complete, check to see if the BSOD 0x000000c2 error is still occurring. If it is, proceed to the next method below.
Repair install WIndows 11
If you’re still encountering the ‘What Failed: IntcOED.sys’ error, it’s clear that you’re dealing with a severe corruption issue.
In this case, the only way of taking care of the problem is to reset all Windows components to ensure that you remove any instance of corrupted system files.
Most users choose the radical solution – a clean install that does the job but also removes any personal data including applications, games, media, and documents.
If you want to go for a less destructive route that will allow you to refresh your Windows components without affecting any of your personal files, you should go for a repair install. This procedure will allow you to keep all your personal data.
Follow this guide for step-by-step instructions on completing a repair install procedure.


