Fix: Webcam Keeps Turning Off and On Again
Your webcam may keep turning off and on due to a virus/malware infection. Moreover, outdated/corrupt Windows and system drivers may also cause the error under discussion. The issue arises when the webcam of the user keeps turning off and on again every few seconds.
Before moving on, check if the camera works fine with another computer. Moreover, check if the webcam is not set as the default ‘video in’ for your streaming application. Furthermore, make sure your camera is directly connected to the system (without any hub/extension cable). If you are trying to use an action camera (like Insta360_One_R), then make sure to change the USB mode to webcam in the camera menu. Last but not least, check if booting your system with the bare minimums sorts out the problem.
Solution 1: Perform a Malware/Virus Scan
Your webcam may keep turning on or off if your system is infected with malware/viruses. In this case, performing a thorough malware/antivirus scan of your system may solve the problem. Also, keep in mind, if at any stage, you fail to perform the scan, then boot your system into the safe mode and then scan the system.
- Firstly, disconnect your system from the internet and perform a Disk Cleanup of your system. Make sure to remove (at least) Temporary Files, Offline Webpages, and Temporary Internet Files.
- Then perform a malware scan by using Malwarebytes and AdwCleaner.

Malwarebytes AdwCleaner - Now scan with the Junkware Removal Tool (JRT) and then with Emsisoft Emergency Kit. You can also try the online scanners by Kaspersky and ESET.
- After clearing out your system from the malware/viruses, check if the Camera issue is resolved. If there are some detections, it will be better to contact an IT person to clear out any remnants of the malware/viruses.
Solution 2: Update Windows, Drivers, and BIOS of Your System to the Latest Build
The webcam issue may arise if any of the essential system entities (like Windows, Drivers, or BIOS) are outdated, as it can create incompatibility between the OS modules. In this context, updating the BIOS, Windows, and drivers of your PC to the latest build may solve the problem.
- Update the Windows, Drivers, and BIOS of your PC to the latest build. Make sure that all the optional updates are also installed. If you are using an OEM update application (like Dell Support Assistant), use that application to update the drivers.
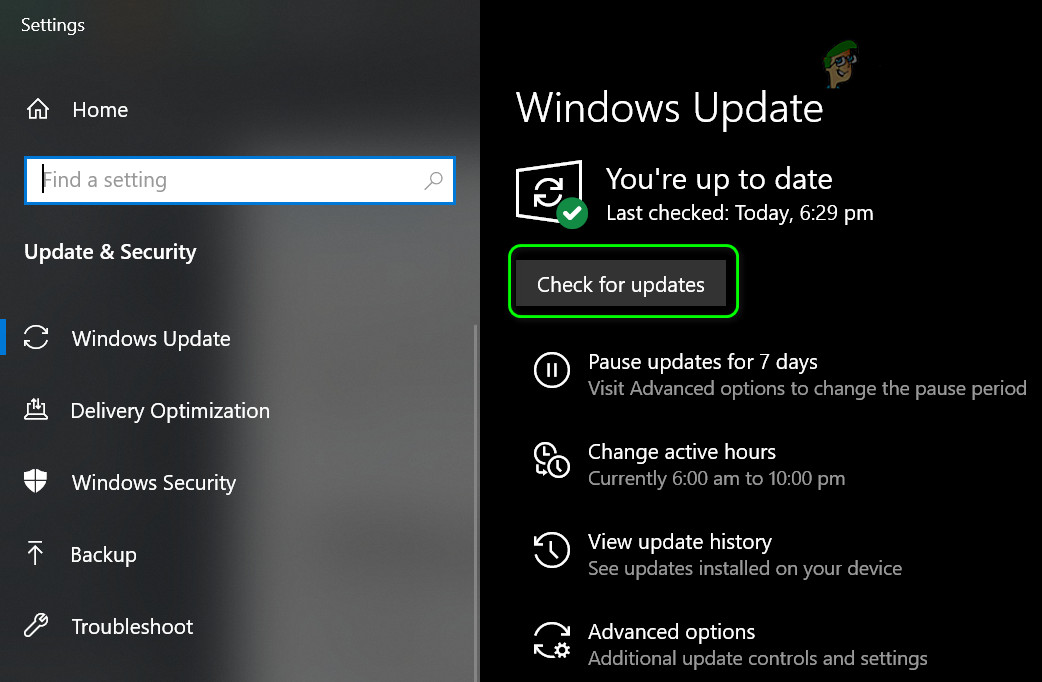
Check for Windows Updates - After updating the modules, check if the webcam issue is resolved.
Solution 3: Rename the RsProviders Folder
The webcam may keep turning off and on if the essential folder (i.e., RsProviders) for the operation of the Camera app is corrupt. In this case, renaming the RsProviders folder may solve the problem. But keep in mind this folder may not be available to all the users.
- Right-click on the Start menu button (to open the Quick Access menu) and choose Run.
- Now, in the Run command box, execute the following:
\Program Files\Realtek
- Then right-click on the RsProviders folder and rename it (e.g., RsProviders_backup). If you fail to rename the folder, make sure to force close the Realtek process in the Task Manager and retry.
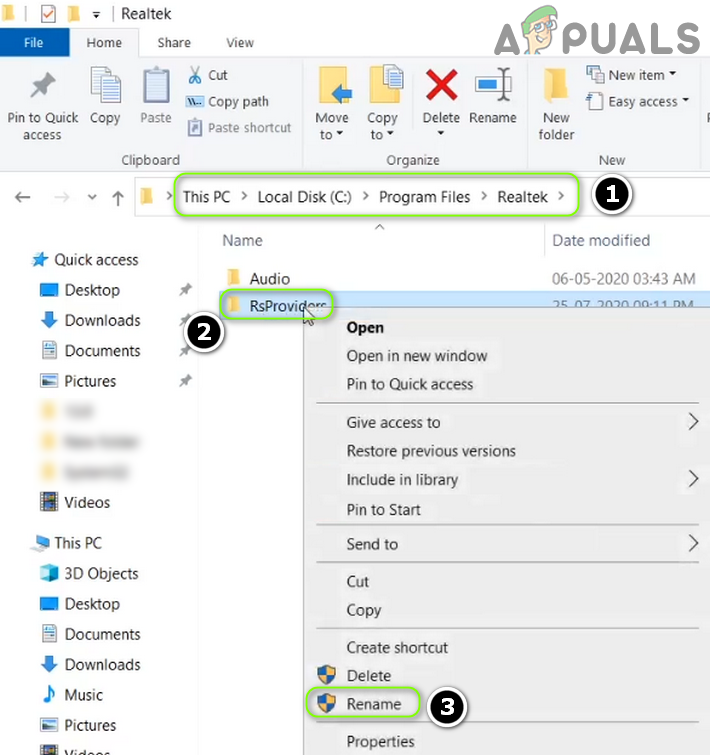
Rename the RsProviders Folder - After renaming the folder, reboot your PC and check if the webcam is operating normally.
- If that did not do the trick, make sure that the above-mentioned folder is renamed and then copy the same folder from another trusted/working computer (try to avoid acquiring the folder from a non-trusted source).
- After replacing the folder, reboot your PC and check if the webcam problem is solved.
Solution 4: Disable Power Saving for the Camera’s USB Port
The webcam may keep turning off and on if your system is configured to power off the Camera’s USB port. In this scenario, disabling the powering saving for the USB port may solve the problem.
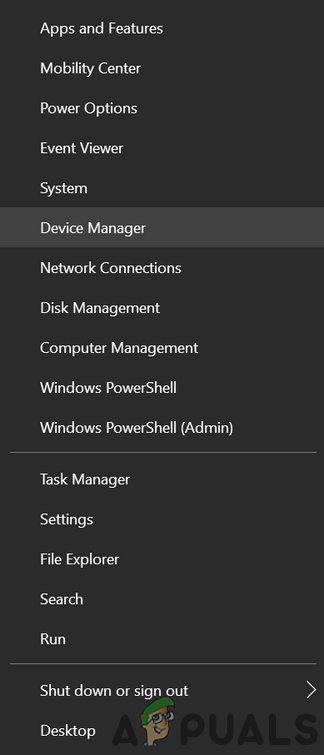
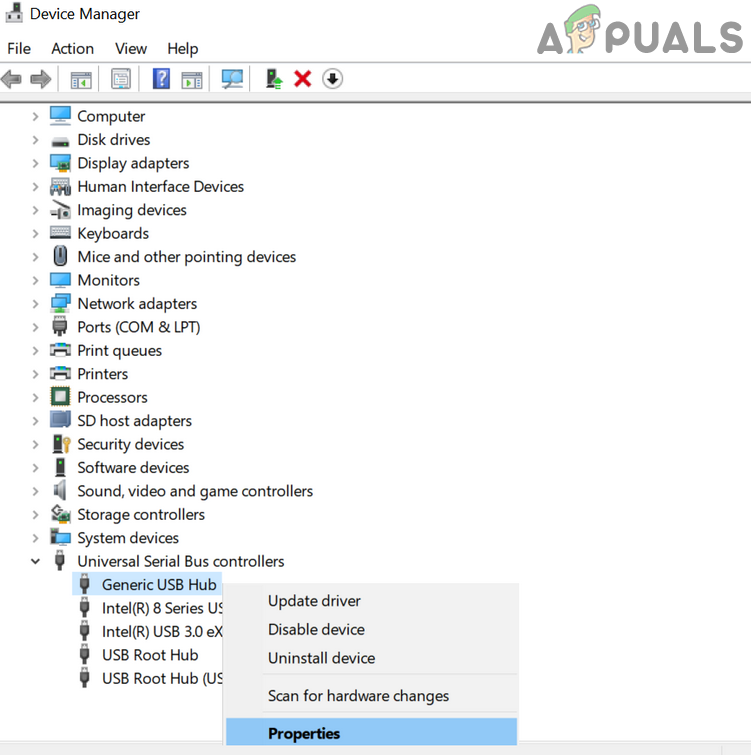
- Launch the Quick Access menu (by simultaneously pressing the Windows + X keys) and choose the Device Manager.
Open Device Manager - Now expand Universal Serial Bus Controllers and find the USB port (where the camera is attached). You may need to disable the ports one by one to find out the camera port.
- Once the camera port is found, right-click on it and choose Properties.
Open Properties of the USB Hub - Now, in the Power Management tab, uncheck Allow the Computer to Turn Off This Device to Save Power.
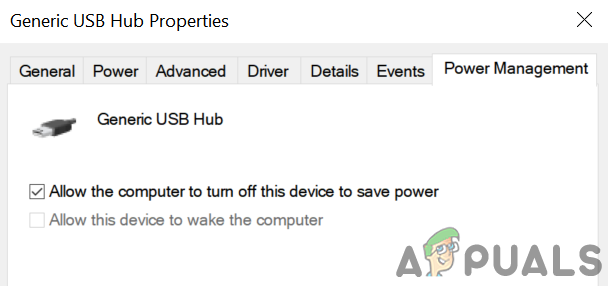
Uncheck the Option of Allow the Computer to Turn off This Device to Save Power - Then apply your changes and reboot your PC to check if the webcam is operating fine.
Solution 5: Update / Reinstall the Windows 10 Camera App
You may encounter the issue at hand if the installation of the Windows 10 Camera app is outdated/corrupt. In this scenario, updating, resetting, or reinstalling the Windows 10 Camera app may solve the problem. But before proceeding, make sure to remove any other camera app (like the Realtek Camera app).
Update the Camera App
- Hit the Windows key and type: Camera app. Then, right-click on the result of the Camera app and choose Share.
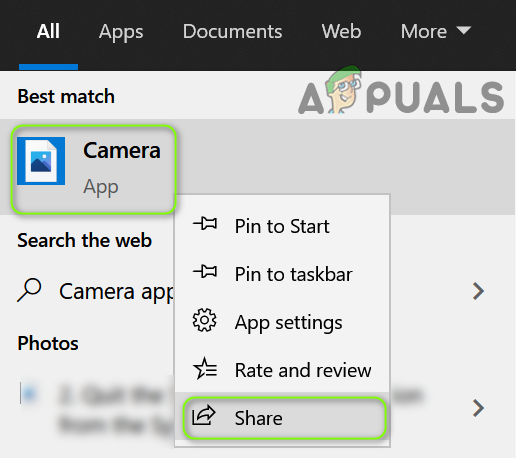
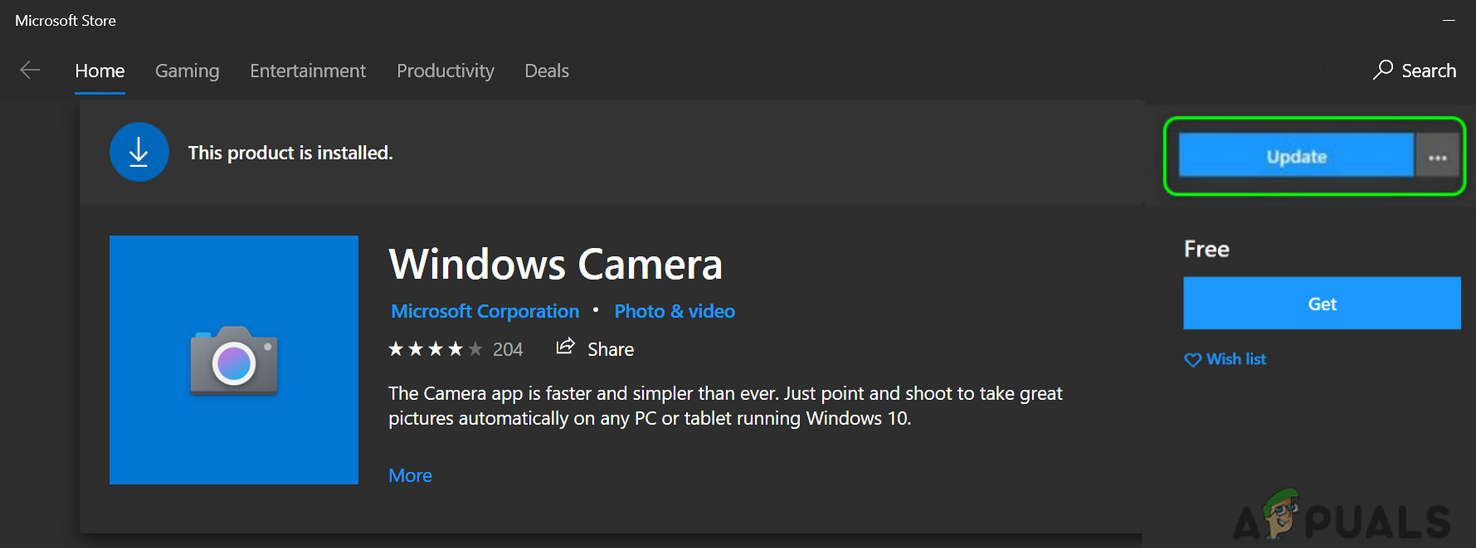
Share the Camera App - Now the Camera app page of Microsoft Store will be shown (skip the Share screen, if shown) and check if an update of the Camera app is available.
- If so, then update the Camera app and reboot your PC to check if the webcam issue is resolved.
Update the Windows Camera App
Reset the Camera App to the Defaults
- Press the Windows key and type: Camera app. Then, right-click on the Camera app and select App Settings.
- Then, scroll a bit and click on the Terminate button.
- Now click on the Reset button and then confirm to Reset the Camera app.
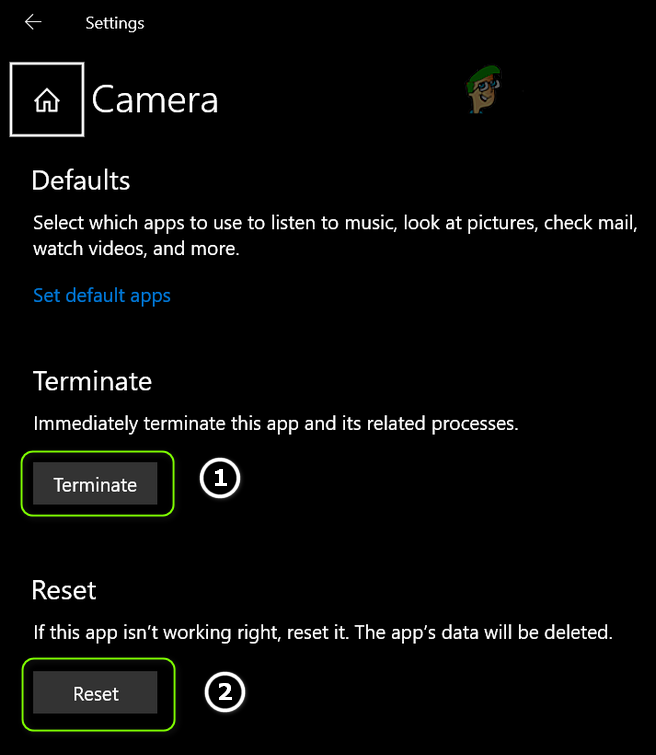
Terminate and Reset the Camera App - Then reboot your PC and check if the Camera app issue is resolved.
Reinstall the Camera App
- Right-click on the Start menu button and in the Quick Access menu, choose Windows PowerShell (Admin).
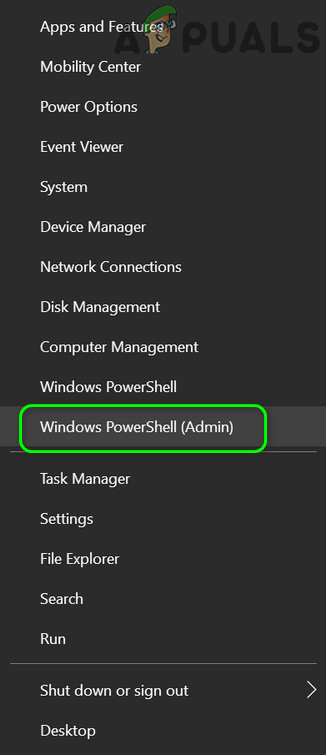
Open Windows PowerShell Admin - Now execute the following command to remove the Camera app (as the camera app cannot be uninstalled in the normal way):
Get-AppxPackage Microsoft.WindowsCamera | Remove-AppxPackage
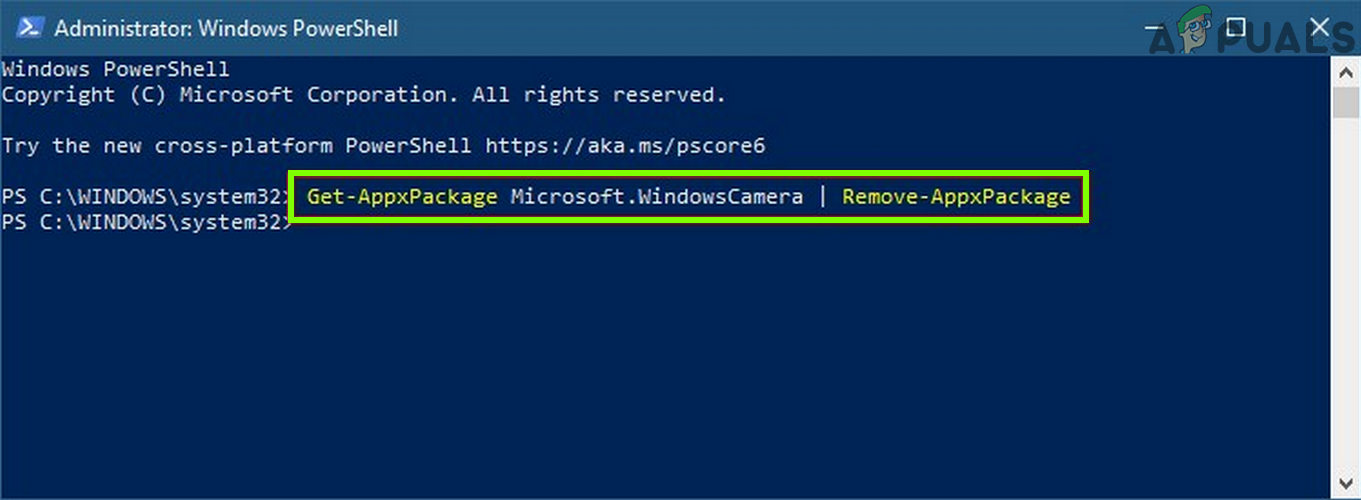
Uninstall the Windows Camera App - Once the Camera app is removed, reboot your PC and then reinstall the Camera app from the Microsoft Store or you may execute the following in the Windows PowerShell (Admin):
Get-AppxPackage -allusers Microsoft.WindowsCamera | Foreach {Add-AppxPackage -DisableDevelopmentMode -Register “$($_.InstallLocation)\AppXManifest.xml”} - After reinstalling the Camera app, reboot your PC and then check if the webcam is functioning normally.
Solution 6: Reinstall the Camera Driver
The Camera may keep turning off and on if the installation of its driver is corrupt. In this case, reinstalling the Camera driver may solve the problem.
- Firstly, make sure to download the latest version of the camera driver from the OEM website.
- Now, right-click on the Windows button (to launch the Power User menu) and choose Device Manager.
- Then, expand Camera/Webcams (or Imaging Devices) and right-click on your Camera.
- Now, in the menu shown, choose Uninstall and in the resulting window, checkmark the option of Delete the Driver Software for This Device.
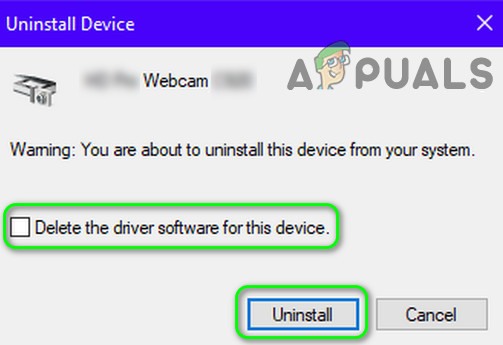
Uninstall Camera Driver - Then click on the Uninstall button and let the camera driver uninstallation complete.
- Now open the View menu of the Device Manager and choose Show Hidden Devices.
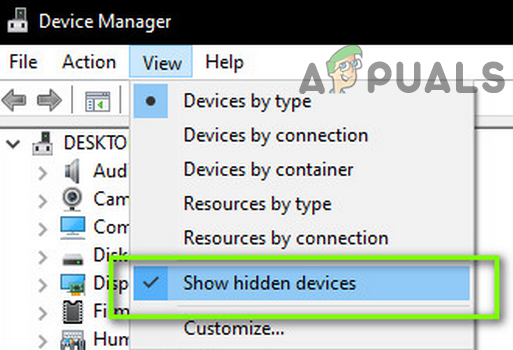
Show Hidden Devices in Device Manager - Then make sure to remove all the rogue devices (especially, audio, video, and camera devices). Also, check if another Camera is shown in the Device Manager, if so, remove it as well.
- Now reboot your PC and check if the Camera issue is resolved (Windows may try to install the default driver).
- If the default driver is not installed or the issue is still there, install the camera driver (downloaded at step 1) and then check if the webcam issue is resolved.
If the issue persists, then check if your OEM provides a Camera app (like the Realtek Camera app), if so, then install the OEM Camera app and check if that resolves the webcam problem.
If that did not do the trick, check if replacing the Realtek Audio (Device Manager>> Sound, Video, and Game Controllers) with the default Microsoft driver (High Definition Audio Device) resolves the webcam issue.
Solution 7: Disable the Access to the Camera
The webcam may show the behavior under discussion if any of the system’s processes/applications are accessing it. In this case, disabling the Camera access in the privacy settings of your system may solve the webcam problem.
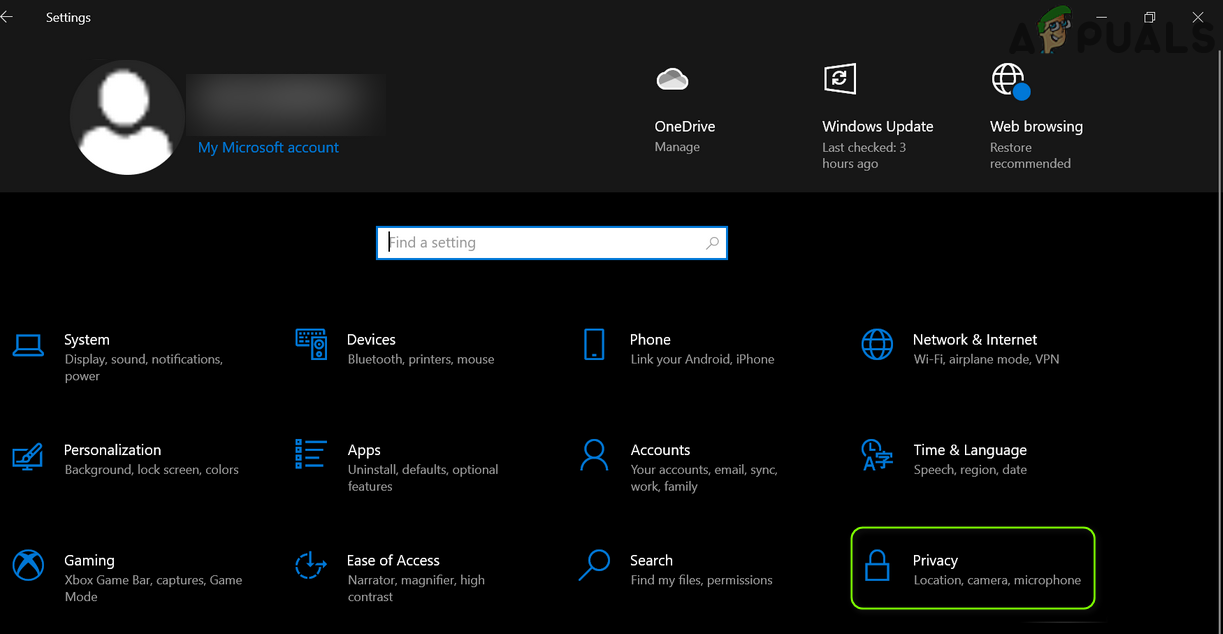
- Click on the Windows button and open Settings.
- Now open Privacy and in the left pane, steer to the Camera tab.
Open Privacy in the Windows Settings - Then, under Camera Access for This Device, click on the Change button and toggle off the switch to disable it.
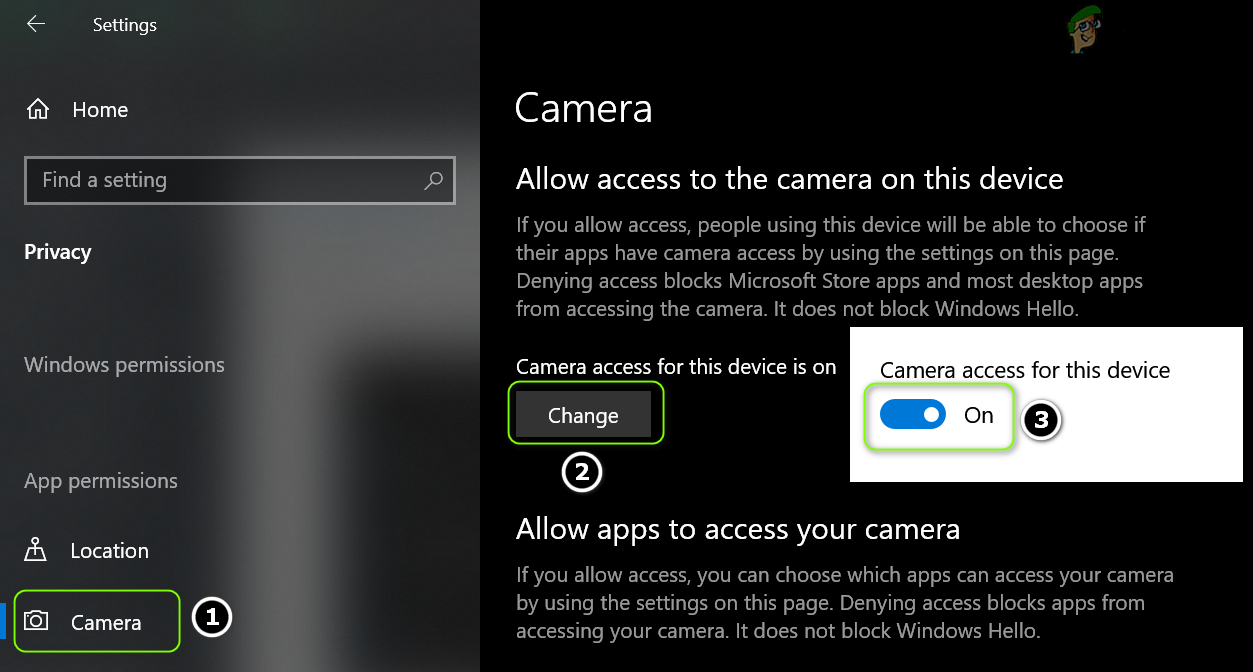
Disable Access to the Camera on This Device - Now, under Allow Apps to Access Your Camera, toggle its switch to the off position to disable it.
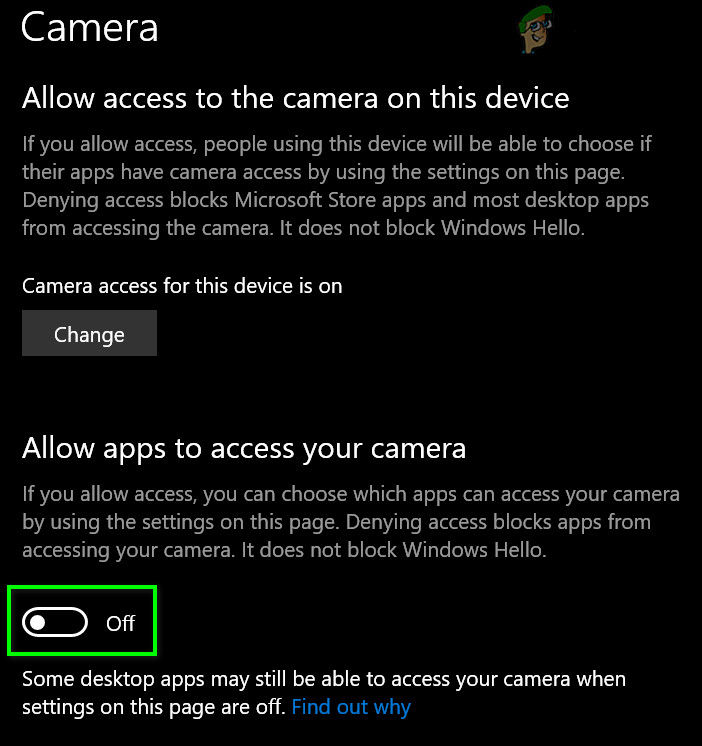
Disable Allow apps to access your camera - Then, under Allow Desktop Apps to Access Your Camera, toggle its switch to the off position to disable it.
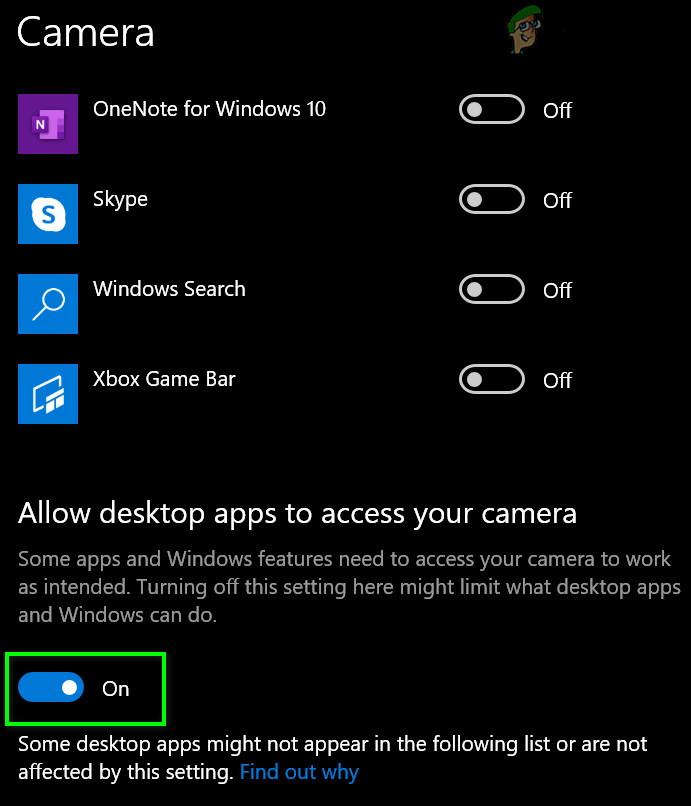
Disable Allow desktop apps to access your camera setting - Now reboot your PC & check if the webcam issue is resolved.
If your OEM uses a utility (like Lenovo Vantage Application) to manage the devices & their access, then check if disabling the access to the Camera in the utility settings sorts out the webcam issue. If that did not do the trick, then you may disable the Camera either in the Task Manager or in the system’s BIOS. When you want to use the camera, you may have to enable it. Also, it is a better security measure to cover your camera (either with a camera cover or duct tape).
Solution 8: Edit the System’s Registry
If the issue persists, then you may edit some registry keys to sort out the webcam problem. But keep in mind these keys may not exist for all users. Also, make sure to back up the system’s registry.
Warning: Advance with extreme care & at your own risk as editing the registry of your system is a skillful task and if anything goes wrong, you may cause everlasting damage to your system/data.
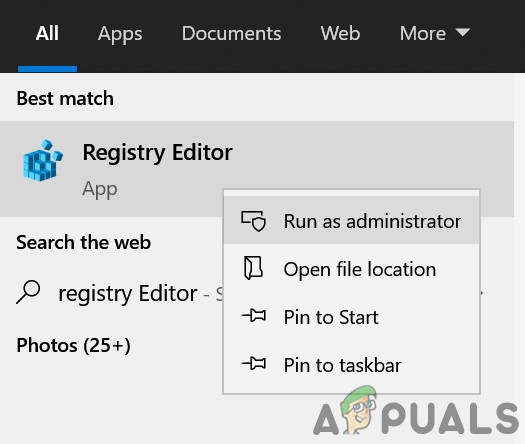
- Press the Windows key and type (in the Windows search): Registry Editor. Now, right-click on the result of the Registry Editor and choose Run as Administrator.
Open Registry Editor as Administrator - Now navigate to the following path:
HKEY_LOCAL_MACHINE\SOFTWARE\Microsoft\Windows Media Foundation\Platform
- Now, in the left pane, right-click on Platform and select New > Dword (32-bit) Value.
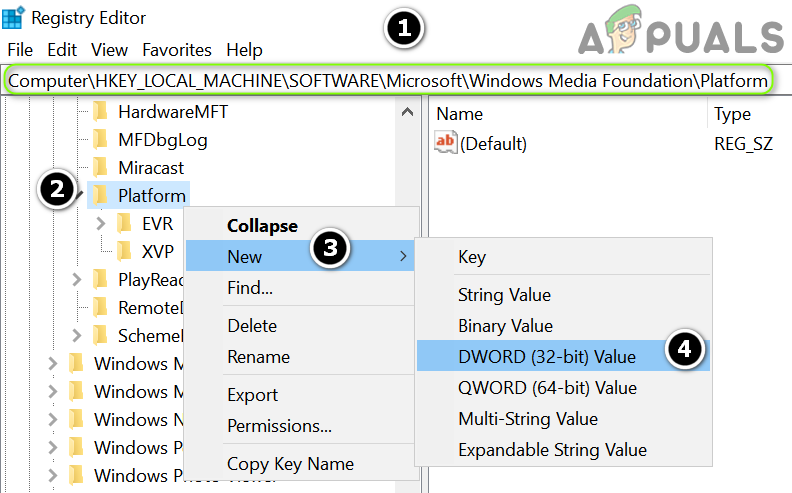
Create a New DWORD (32-bit) Value in the Platform Key - Then rename it as EnableFrameServerMode and set its value to 0.
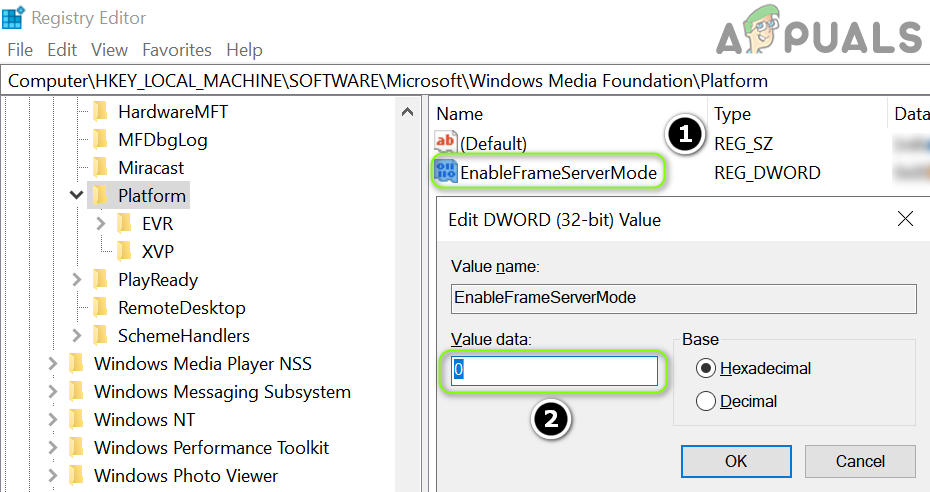
Set the Value of EnableFrameServerMode to 0 - Now repeat the same to the following path and exit the Editor:
HKEY_LOCAL_MACHINE\SOFTWARE\WOW6432Node\Microsoft\Windows Media Foundation\Platform
- Then reboot your PC and check if the webcam issue is resolved.
Solution 9: Disable/Remove the Conflicting Applications
You may encounter the webcam issue at hand if any of the system’s applications are hindering the operation of the camera. In this case, disabling/removing the conflicting applications may solve the webcam problem.
- First, to find out the problematic application, you may clean boot your computer (you can also use the Process Explorer) and then check if the issue is resolved.
- If so, then you may enable the processes/applications (disabled during the clean boot process) one by one till you find the one creating the issue. Following applications are reported by the users to create the issue:
- WaveMaxx Audio/WavesSysSvc/Waves Audio
- Skype
- Cortana
- Nvidia Shadowplay
- Desktop App Viewer
- VirtualBox
Once the problematic application is found, you can try any of the solutions mentioned below.
- End the application process in the Task Manager.
- Disable the Camera-related options in that application (for example, disabling Waves NX in the WaveMaxx Audio).
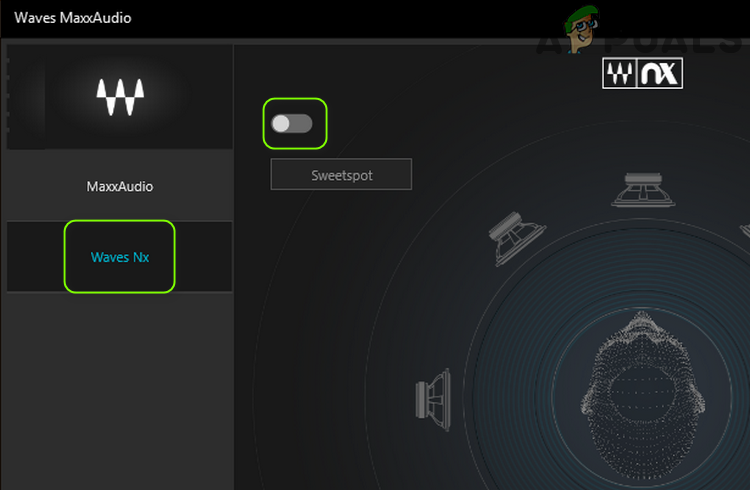
Disable Waves NX - Stop the application at the system’s startup.
- Uninstall the application (for example, MaxxAudio Pro).
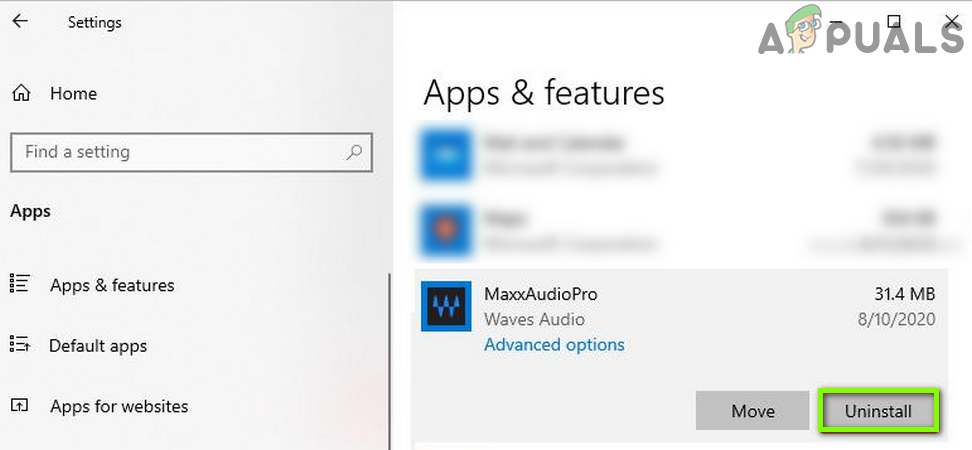
Uninstall MaxxAudio Pro
If the issue persists, then get your system/camera checked for a hardware issue.


This fixed it for me32 bit
Windows Registry Editor Version 5.00[HKEY_LOCAL_MACHINESOFTWAREMicrosoftWindows Media FoundationPlatform]
“EnableFrameServerMode”=dword:0000000064 bit
Windows Registry Editor Version 5.00[HKEY_LOCAL_MACHINESOFTWAREMicrosoftWindows Media FoundationPlatform]
“EnableFrameServerMode”=dword:00000000[HKEY_LOCAL_MachineSOFTWAREWOW6432NodeMicrosoftWindows Media FoundationPlatform]
“EnableFrameServerMode”=dword:00000000