Fix: Volume Keeps Automatically Resetting on Windows
Windows Volume keeps automatically resetting itself issue is typically caused due to incorrect sound settings within the system, and outdated or faulty audio drivers that are causing the volume function to act up.
![]()
Below, we have listed the troubleshooting methods that worked for other effective users who were facing the same problem.
We suggest that you take a look at the troubleshooting methods first to identify the cause of the problem in your case. Once you pinpoint the issue, you can proceed with the relevant troubleshooting method. Let’s get right into it!
1. Change Sound Settings
If the volume keeps resetting on Windows, then the first thing you need to do is modify the sound settings. If the issue is being caused due to incorrect settings, this should fix the problem.
Here is what you need to do:
- Right-click on the sound icon on the taskbar and choose Sound settings.
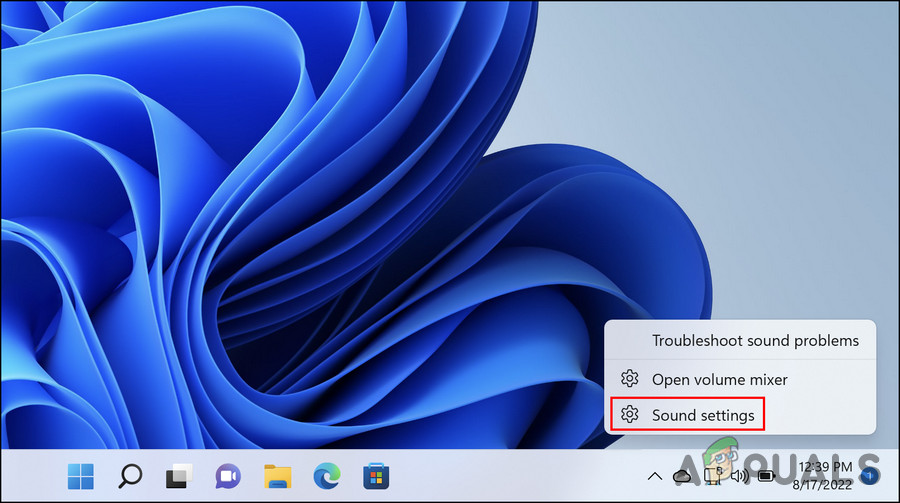
Launch the Sound settings of Windows - In the following window, navigate to the Advanced section and click on the More sound settings option.
- Now, head over to the Playback tab in the Sound dialog.
- Right-click on your sound device and choose Properties from the context menu.
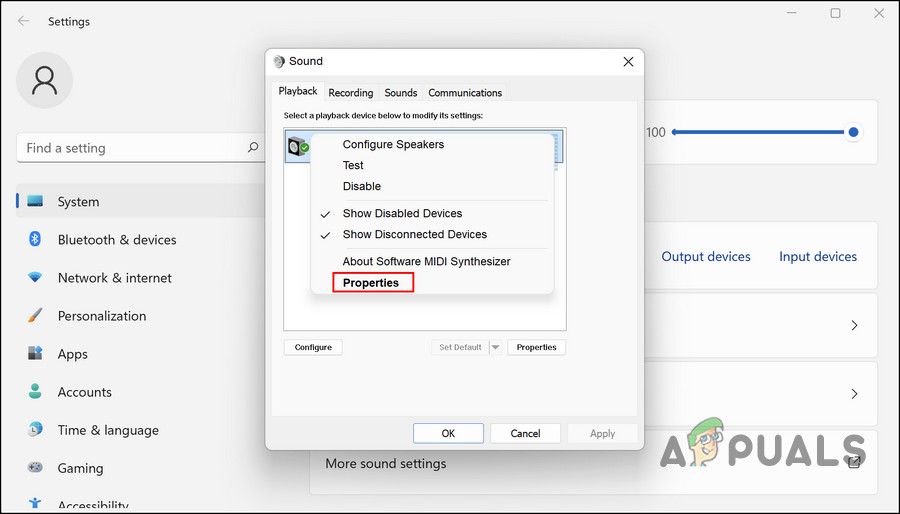
Access the properties of your sound device - Navigate to the Enhancements tab and checkmark the box with Disable all enhancements.
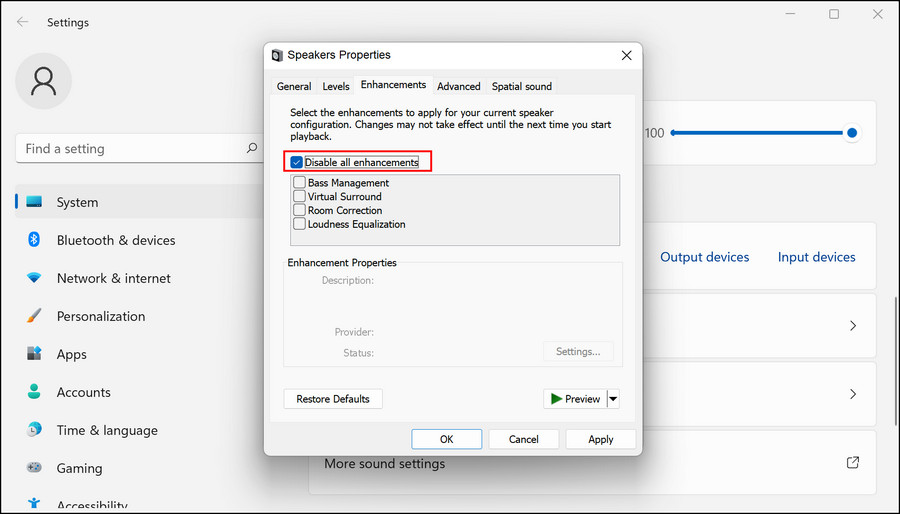
Disable sound enhancements on Windows - Once done, head over to the Communications tab in the Sound dialog.
- Choose Do nothing from the options available.
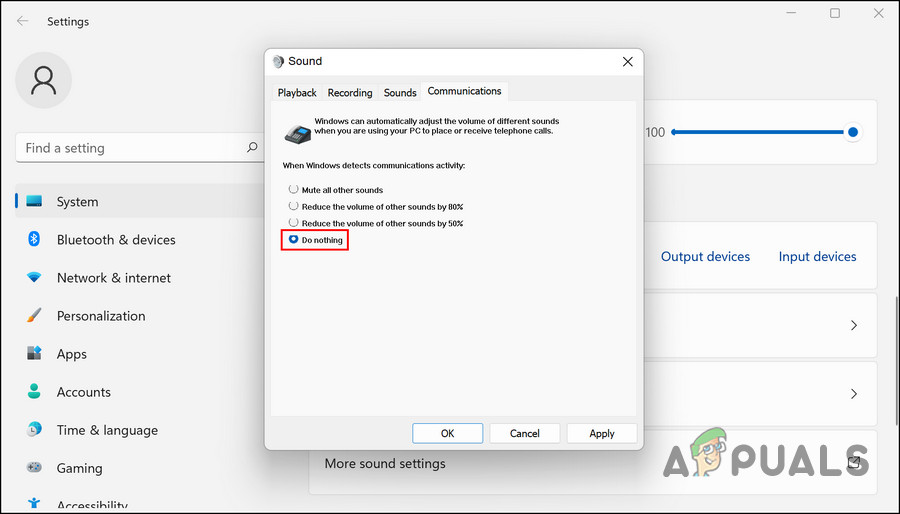
Choose the Do nothing option - Click Apply > OK to save the changes.
Hopefully, the issue will be resolved after following the steps we listed above.
In case the issue is occurring while using an application, then follow these steps as well:
- Right-click on the speaker icon on your taskbar and choose Open volume mixer.
- Head over to the Apps section, and click on the Reset button for Reset sound devices and volumes for all apps to the recommended defaults.
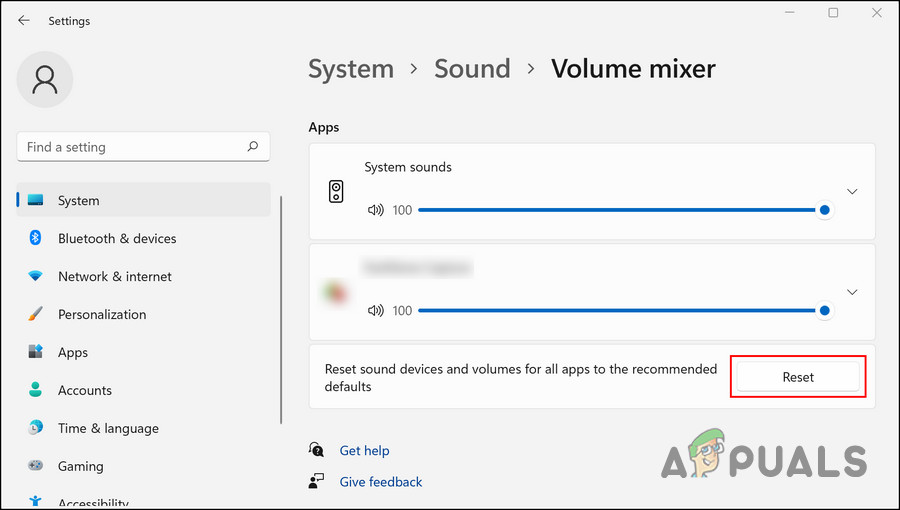
Reset the Sound settings - Then, type Control Panel in the Windows search and click Open.
- Choose Large icons in the View by category.
- Navigate to Sound > Recording tab.
- Now, right-click on your microphone and choose Enable.
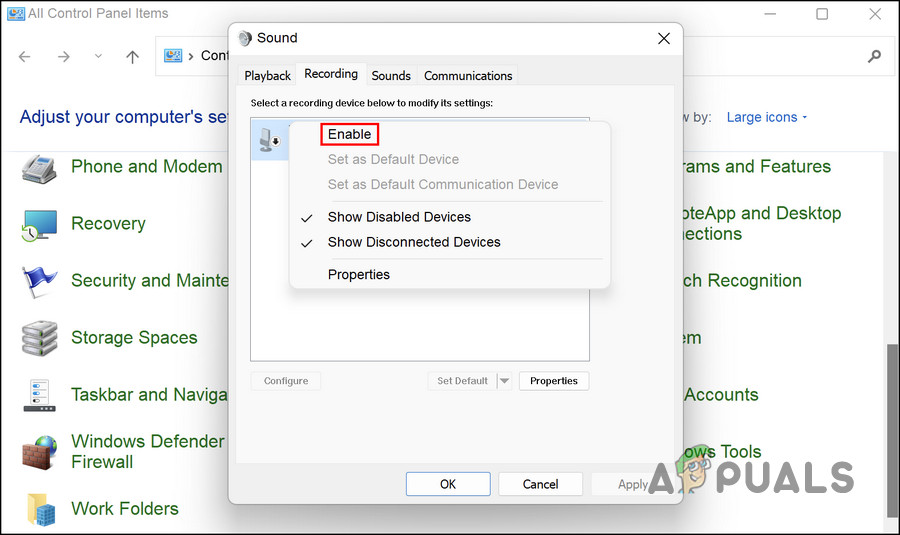
Enable the sound device - Right-click on this device again and choose Set as Default Device.
- Next, right-click on your microphone again and choose Properties.
- Head over to the Levels tab and adjust the volume slider to your own preferences.
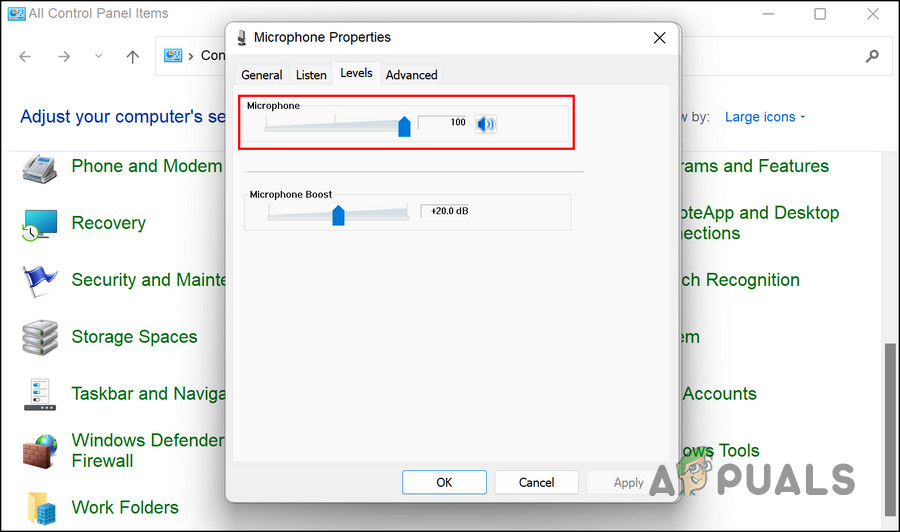
Adjust the volume slider of the microphone - Click OK to save the changes.
- Then, go to the Advanced tab and uncheck the box for Allow application to take exclusive control of this device.
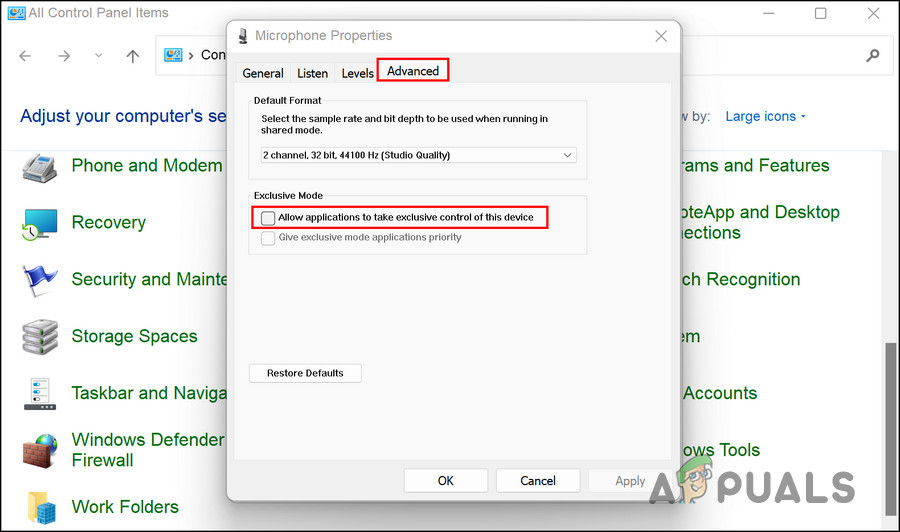
Allow apps to manage the sound settings
2. Update or Reinstall the Audio Drivers
Another reason why you might be facing the volume issue is because of outdated or corrupt audio drivers. If you do not know already, drivers are responsible for linking the hardware devices to the system, so that you can use them properly.
If the drivers are not functioning properly, you will run into issues like the one at hand frequently. The first thing you need to do if you suspect an issue with the drivers is to update them. If that does not work, you can proceed with uninstalling the driver and then reinstalling it from scratch.
Here is how you can do that:
- Type Device Manager in the search area of taskbar and click Open.
- In the following window, expand the Audio inputs and outputs section and right-click on the adapter.
- Choose Update driver from the context menu.
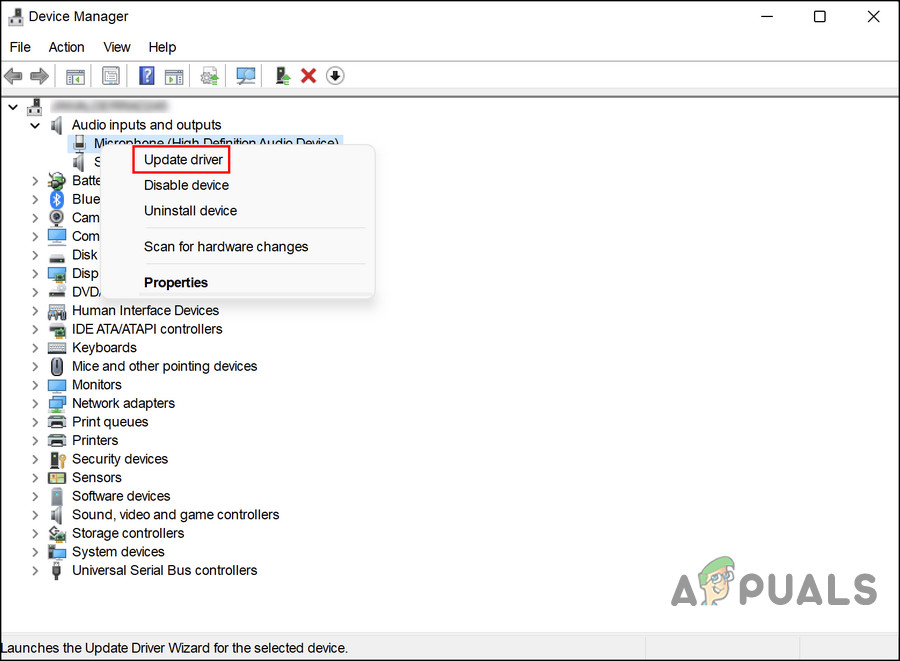
Update the audio driver - Click on Search automatically for drivers and once the system picks a driver, follow the on-screen instructions to proceed.
Once the driver update is installed, check if the issue is resolved. If not, you can proceed with reinstalling the driver. Follow the instructions below to proceed:
- In the same Device Manager window, right-click on your audio driver again.
- Choose Uninstall device from the context menu and follow on-screen instructions to proceed.
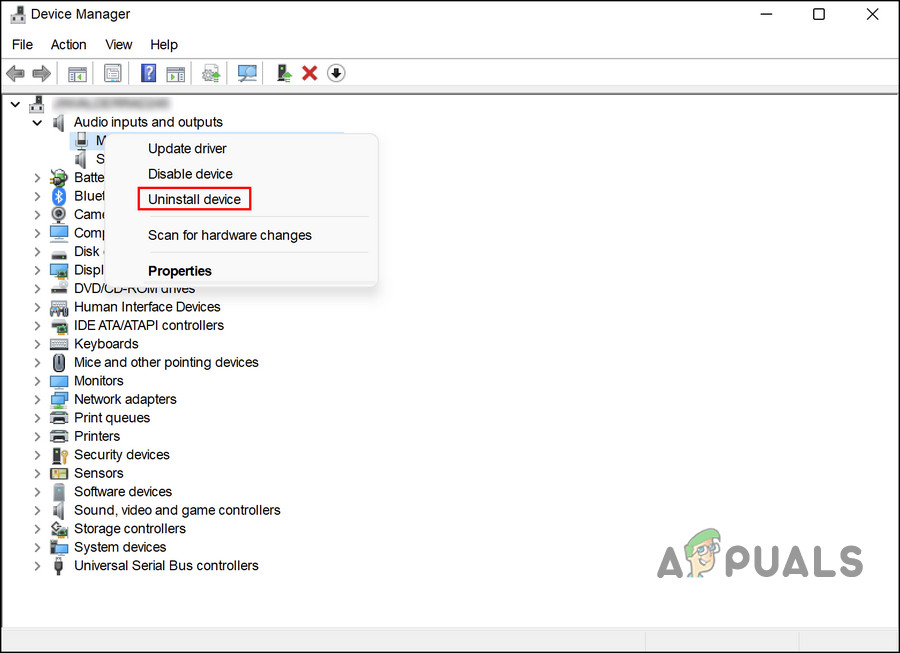
Uninstall the audio driver
After the driver is uninstalled, head over to the manufacturer’s official website and install the latest audio driver from there. In case the issue was caused by a problematic driver, this should fix the problem.
3. Switch to Another User Account
In some cases, the users were also facing the volume problem due to an issue within the user account. You can determine if your user account is the culprit by switching to a different user account and using the volume feature there.
If the error does not appear there, then it is safe to say that your user account is the culprit. In this case, you can proceed with running a virus scan using your antivirus software or simply use the built-in troubleshooting utilities within Windows.
In this method, we will be using the sound troubleshooter that is built into Windows by Microsoft. Here is what you need to do:
- Press Win + I together to open the Settings app.
- In the Settings window, choose System from the left pane.
- Choose Troubleshoot from the list of options available.
- Now, look for the Playing Audio troubleshooter and click on the Run button associated with it.
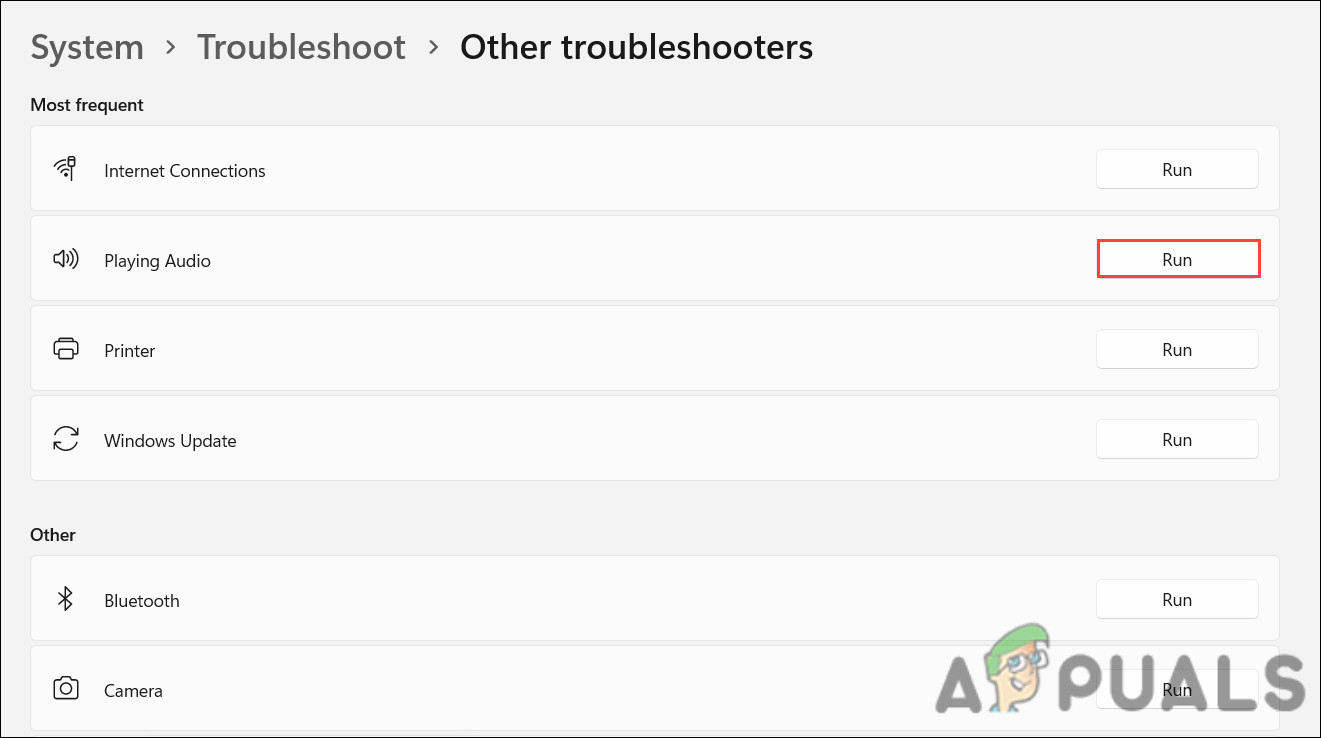
- The troubleshooter will now begin its initial scan, and then ask you which devices you wish to troubleshoot. Choose the faulty device and press Next.
- Follow the on-screen instructions to proceed.
- If the troubleshooter identifies any problems, it will notify you. In that case, click on Apply this fix to proceed with the solution recommended by the troubleshooter.
Once the troubleshooter completes the process, you should not face any issues with the system volume again.


