How to Fix Windows Update Error 0x8024d001
When attempting to update Windows, users might encounter the error 0x8024d001. This error suggests a problem with the Windows Update service or its components. It most frequently occurs when the INF file contains invalid information or is corrupted. An INF file is a text-based setup file that includes the necessary instructions to install driver packages, updates, or configurations required to make devices operational in Windows.
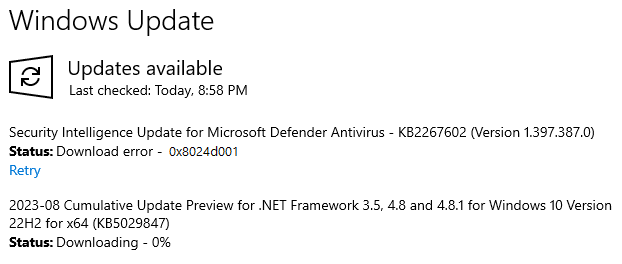
Other factors contributing to this error may include a corrupted Software Distribution folder, misconfigured Windows Update components, and corrupted system files. This guide details several solutions to help you resolve this error.
1. Windows Troubleshooter
The Windows Troubleshooter is an integrated utility tool within the Windows operating system designed to identify and suggest fixes for various issues.
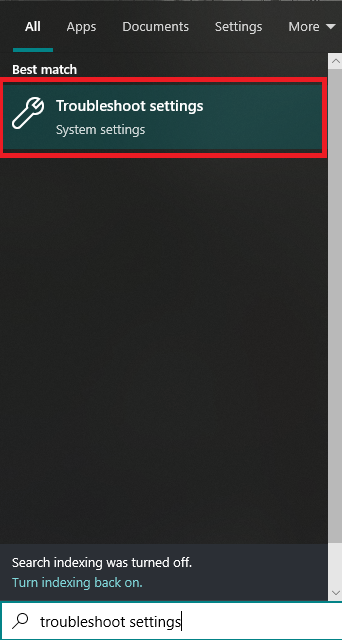
- Click on the Start Button, then type Troubleshoot Settings in the search box and click on it.
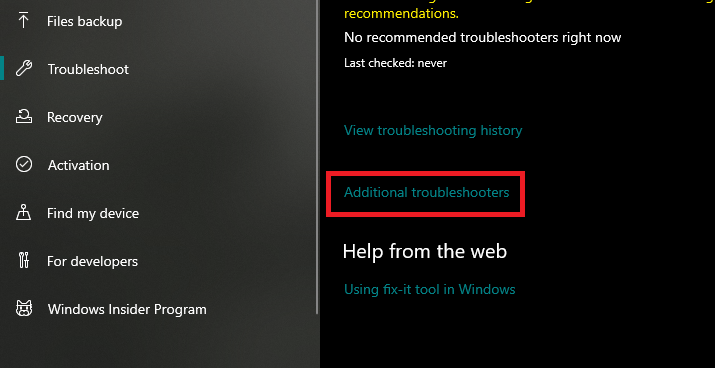
- In the Troubleshoot section of the settings window, click on Additional Troubleshooters.
- Next, click on the Run the Troubleshooter button within the Windows Update menu.

- The Windows Update Troubleshooter will automatically attempt to diagnose the issue and provide potential fixes. Follow the on-screen instructions to apply a fix.
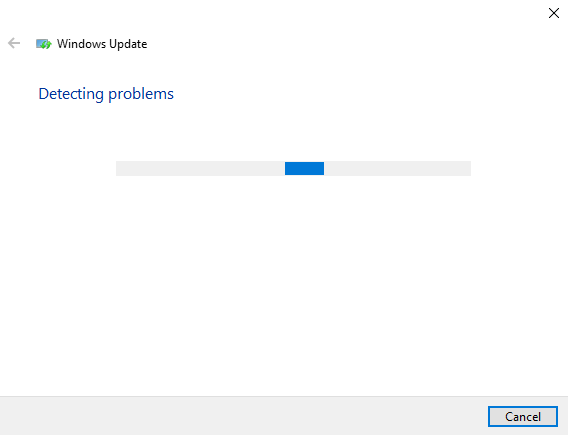
- After applying the recommended fixes, check if the issue has been resolved.
2. Delete Software Distribution Folder
The Software Distribution Folder stores files necessary for installing updates. Sometimes, these files may become corrupted. Deleting the contents of this folder will prompt the Windows Update agent to download and install fresh copies of the updates.
- Restart your computer.
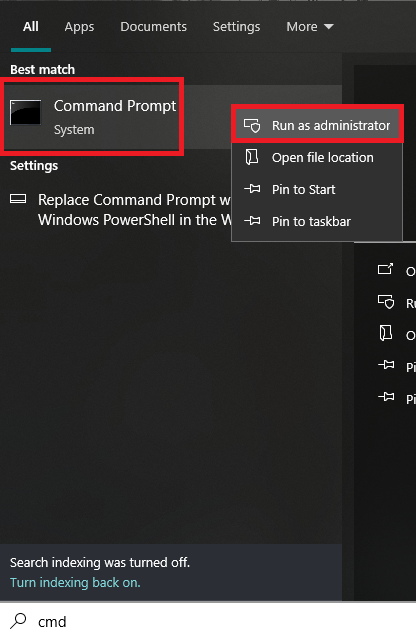
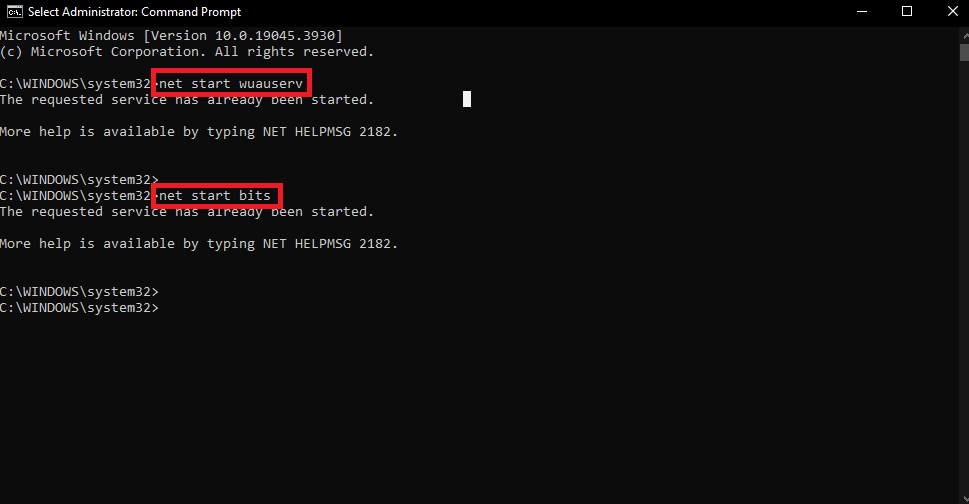
- Click on the Start Button, type Command Prompt in the search box, then right-click on Command Prompt and select Run as Administrator.
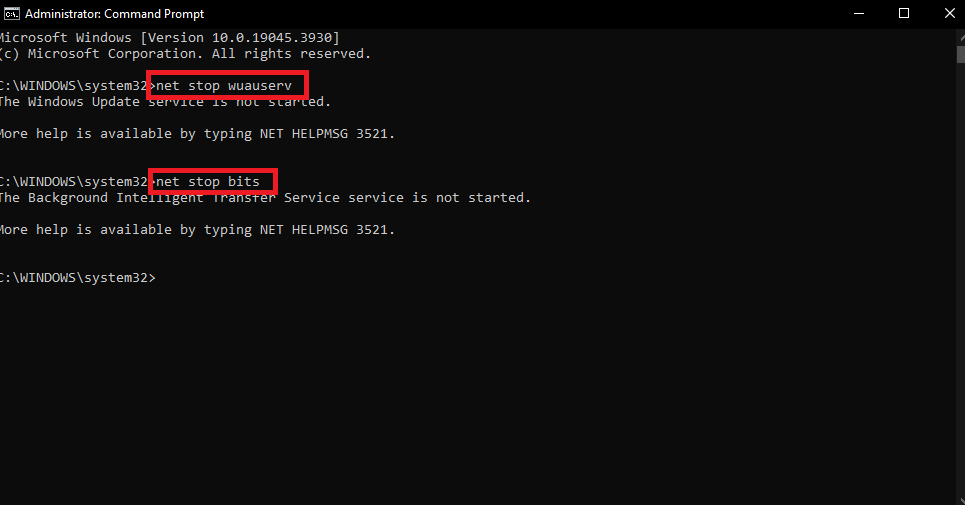
- Type and execute the following commands one by one in the Command Prompt window:
net stop wuauserv
net stop bits
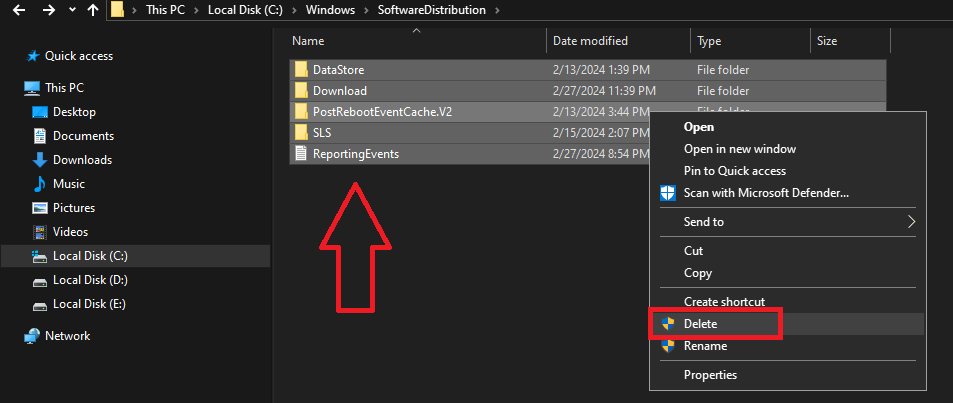
- Press Windows+E on your keyboard to open Windows Explorer.
- Navigate to the Software Distribution Folder at:
C:\Windows\SoftwareDistribution
- Select all files in the folder by pressing Ctrl+A, right-click, and then choose Delete.
- Restart the Update Services that you stopped earlier using the following commands in the Command Prompt:
net start wuauserv
net start bits
- Check to see if the error has been resolved.
3. Run SFC and DISM Command
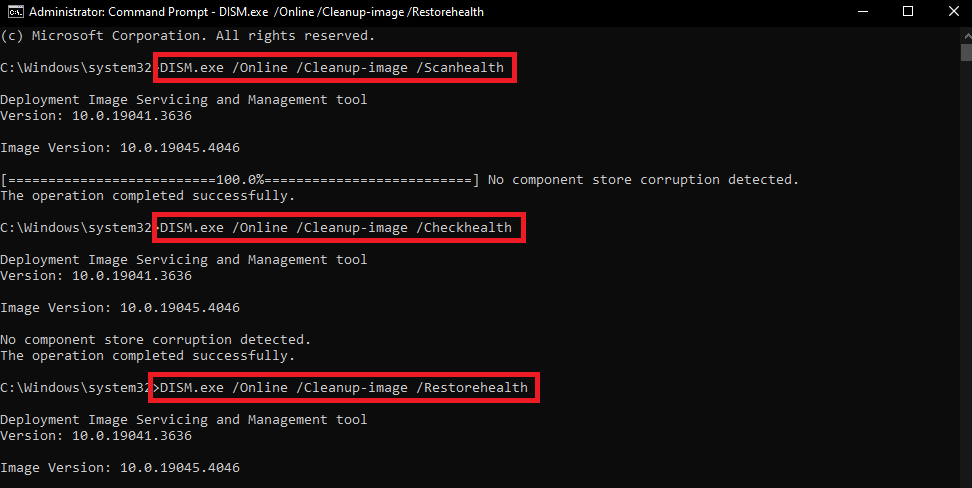
Corrupted or damaged system files can lead to the error 0x8024d001, as they impair the stability and functionality of the operating system. The System File Checker (SFC) and Deployment Image Servicing and Management (DISM) are two tools that can be used to repair corrupted files. If SFC is unsuccessful, DISM should be run as a subsequent step.
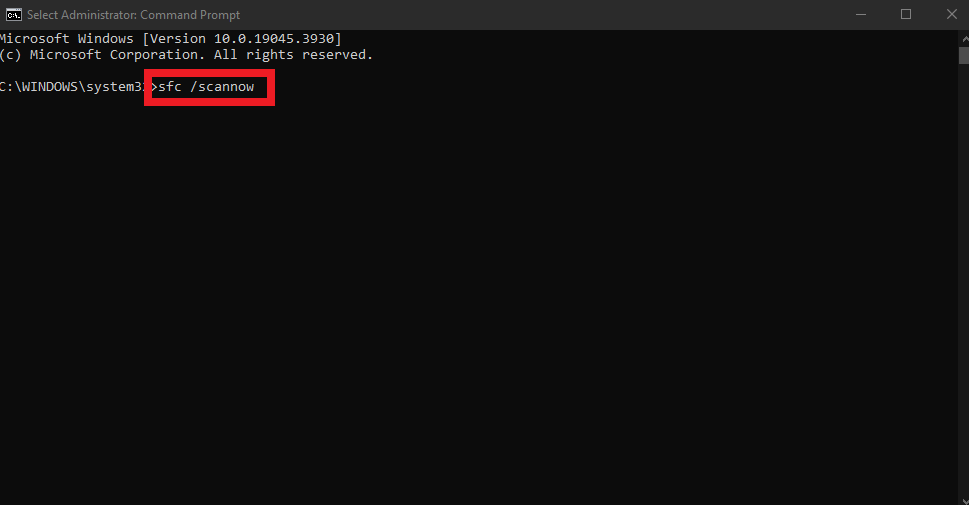
- Click on the Start Button, type Command Prompt in the search box, right-click on Command Prompt, and select Run as Administrator.
- Execute the following command to start the System File Checker:
sfc /scannow
- If SFC does not fix the corrupted files and reports an error, proceed with DISM by entering these commands sequentially in the Command Prompt:
DISM.exe /Online /Cleanup-image /Scanhealth
DISM.exe /Online /Cleanup-image /Checkhealth
DISM.exe /Online /Cleanup-image /Restorehealth
4. Resetting Windows Update Components
Resetting the Windows Update components can return the services to their default configuration, which may resolve various issues with updates.
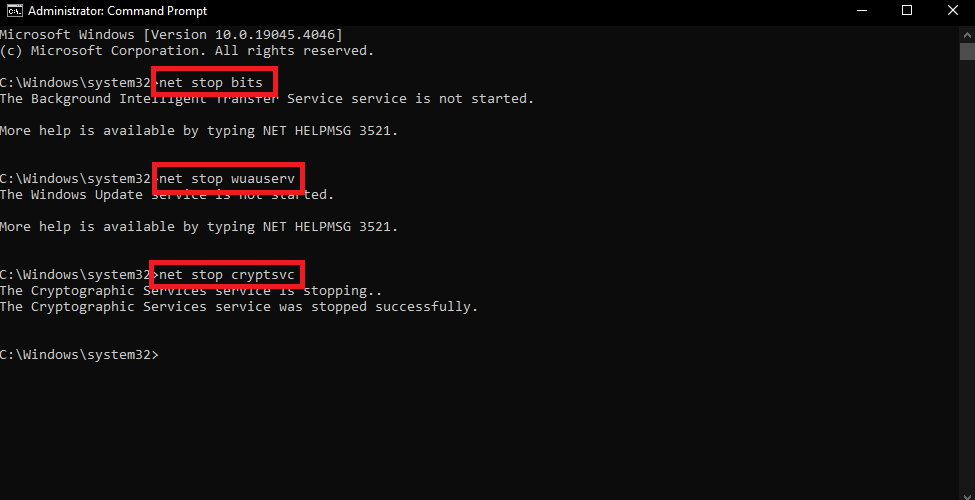
- Click on the Start Button, type Command Prompt in the search box, right-click on Command Prompt, and select Run as Administrator.
- Stop the Windows Update services by typing and executing the commands below one at a time:
net stop bits
net stop wuauserv
net stop cryptsvc
- Delete qmgr*.dat files associated with BITS by entering this command:
Del "%ALLUSERSPROFILE%\Application Data\Microsoft\Network\Downloader\qmgr*.dat"
- Rename the update cache folders with these commands:
Ren %Systemroot%\SoftwareDistribution\DataStore DataStore.bak
Ren %Systemroot%\SoftwareDistribution\Download Download.bak
Ren %Systemroot%\System32\catroot2 catroot2.bak
- Reset the Windows Update Service and BITS to their default state using these commands:
sc.exe sdset bits D:(A;CI;CCDCLCSWRPWPDTLOCRSDRCWDWO;;;SY)(A;;CCDCLCSWRPWPDTLOCRSDRCWDWO;;;BA)(A;;CCLCSWLOCRRC;;;IU)(A;;CCLCSWLOCRRC;;;SU)
sc.exe sdset wuauserv D:(A;;CCLCSWRPLORC;;;AU)(A;;CCDCLCSWRPWPDTLOCRSDRCWDWO;;;BA)(A;;CCDCLCSWRPWPDTLOCRSDRCWDWO;;;SY)
- Change the directory to System32 using the following command:
cd /d %windir%\system32
- Register the BITS and Windows Update files by executing each of these commands individually in Command Prompt:
regsvr32.exe atl.dll

regsvr32.exe urlmon.dll

regsvr32.exe mshtml.dll

regsvr32.exe shdocvw.dll

regsvr32.exe browseui.dll

regsvr32.exe jscript.dll

regsvr32.exe vbscript.dll

regsvr32.exe scrrun.dll

regsvr32.exe msxml.dll

regsvr32.exe msxml3.dll

regsvr32.exe msxml6.dll

regsvr32.exe actxprxy.dll

regsvr32.exe softpub.dll

regsvr32.exe wintrust.dll

regsvr32.exe dssenh.dll

regsvr32.exe rsaenh.dll

regsvr32.exe gpkcsp.dll

regsvr32.exe sccbase.dll

regsvr32.exe slbcsp.dll

regsvr32.exe cryptdlg.dll

regsvr32.exe oleaut32.dll

regsvr32.exe ole32.dll

regsvr32.exe shell32.dll

regsvr32.exe initpki.dll

regsvr32.exe wuapi.dll

regsvr32.exe wuaueng.dll

regsvr32.exe wuaueng1.dll

regsvr32.exe wucltui.dll

regsvr32.exe wups.dll

regsvr32.exe wups2.dll

regsvr32.exe wuweb.dll

regsvr32.exe qmgr.dll

regsvr32.exe qmgrprxy.dll

regsvr32.exe wucltux.dll

regsvr32.exe muweb.dll

regsvr32.exe wuwebv.dll
- Reset Winsock Catalog with this command:
netsh winsock reset
- Restart the Windows Update Component services with these commands:
net start bits
net start wuauserv
net start cryptsvc
- Restart your PC and check if the error has been resolved.
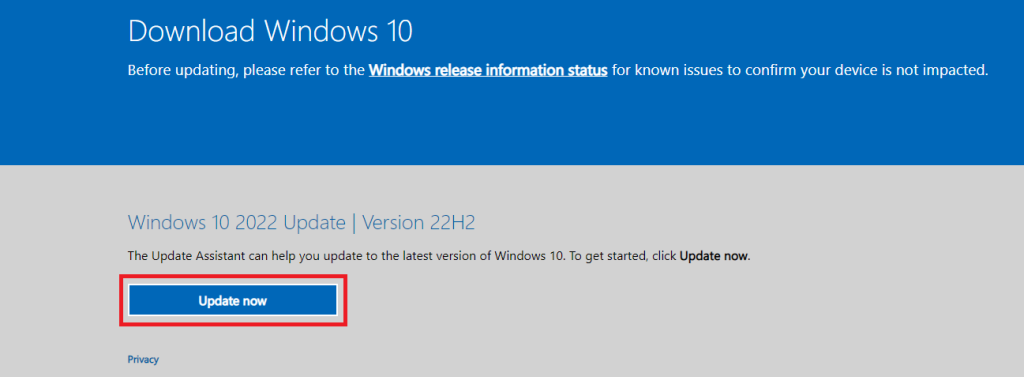
5. Windows Update Assistant
The Windows Update Assistant is a Microsoft-developed utility tool for updating Windows to the latest version.
- Download the Windows Update Assistant from this Microsoft webpage by clicking on the Update Now button.
- Run the Windows Update Assistant executable file and follow the on-screen instructions to update Windows to the latest version.
6. Install Update Manually
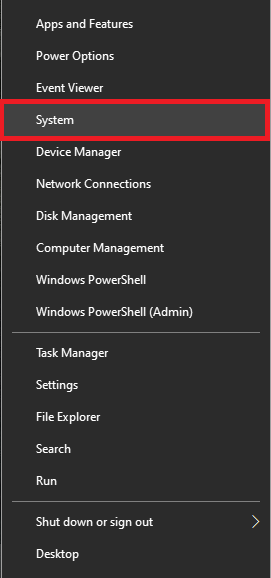
If Windows Update is still failing to download and install a specific update, you can install the update manually. Begin by identifying your device’s system type:
- Right-click on the Start Button and select System.
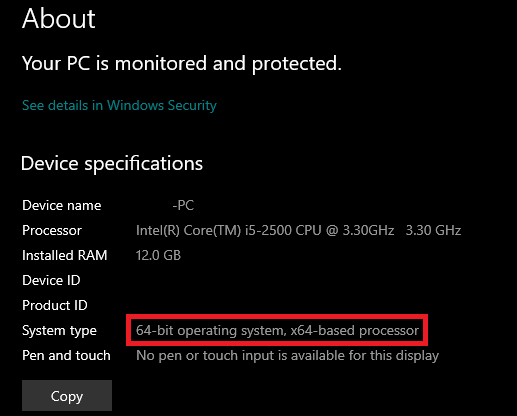
- Under Device Specifications, look for System Type. (Your system type may vary based on your device’s architecture.)
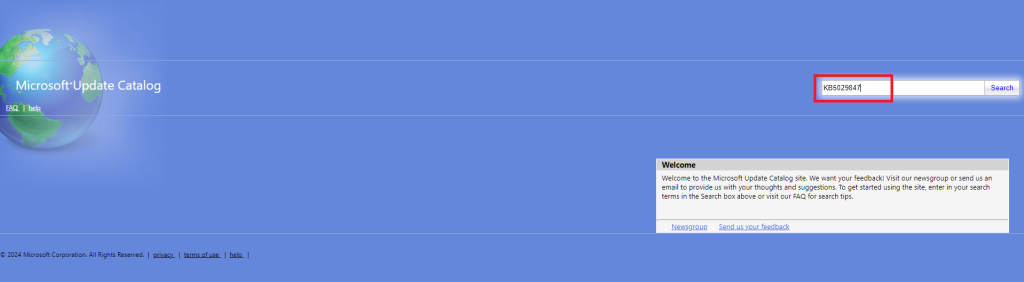
- Go to the Microsoft Update Catalog webpage, enter the KB number of the problematic update in the search box, and press Enter.
- Download the version of the update that corresponds to your system type.
- Execute the downloaded update package, and it will install the update automatically.