Fix: Touchscreen not Working Windows 10
Windows 10 is a huge leap from 8.1 as the whole operating system got revamped. There were changes in ease of access, usability, effectiveness, more features and quicker operations. Microsoft is constantly rolling our updates to fix bug fixes and provide additional security definitions.
Even with the constant updates targeted at fixing bugs, some people reported that their touchscreen refused to respond or work. This issue is caused by a number of reasons. This problem usually occurs when users upgrade from a previous version of Windows to Windows 10. When we install a new OS, all the drivers are installed again from scratch. In this case, it is possible that your drivers are not installed correctly.
Solution 1: Re-enabling Touchscreen
We can try refreshing your touch screen by disabling and enabling it using the device manager. All the connected devices to your machine are listed in the device manager. We will be navigating to Human Interface Devices and disable the touchscreen before re-enabling it again.
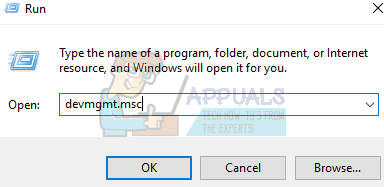
- Press Windows + R to bring up your computer’s Run application. Type “devmgmt.msc” in the dialogue box. This will launch your computer’s device manager.
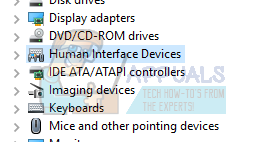
- Once the device manager is opened up, search through the devices until you find “Human Interface Devices”. Click it to release the drop down menu.
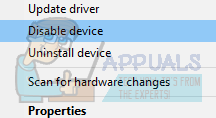
- From additional options, select “HID-complaint touch screen”. Right click it and select Disable. Windows will give a warning that disabling it might make it stop working. Press Okay.
- Now right click on the option again and select Enable this time. It will try starting your touchscreen again.
Solution 2: Restart your device
It may seem patronizing to suggest this, but with new features such as advanced sleep and wake functionality etc. your device might be shut down more than you think. Sometimes, a restart is all that is required to get your touch screen working again. Before we move on to more technical and tedious methods, check if a restart fixes the problem for you.
Solution 3: Install the latest Windows updates
Windows roll out important updates targeting the bug fixes in the operating system. One of the bugs is our case; the touch screen doesn’t work. If you are holding back and not installing the Windows update, we strongly recommend that you do. Windows 10 is the latest Windows operating system and new operating systems take a lot of time to get perfect in every regard.
There are a lot of issues still pending with the OS and Microsoft rolls out frequent updates to target these issues.
- Press Windows + S button to launch your start menu’s search bar. In the dialogue box type “Windows update”. Click the first search result which comes forward.

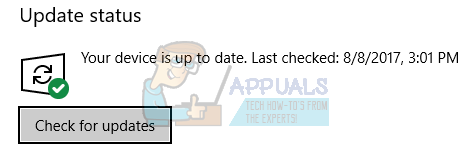
- Once in the update settings, click on the button which says “Check for updates”. Now Windows will automatically check for updates available and install them. It may even prompt you for a restart.
- After updating, check if your issue got fixed.
Solution 4: Configuring the touch display
After upgrading to Windows 10, it is possible that your touch display isn’t configured properly. There are two primary interaction systems for your computer. One is your keyboard and mouse, and other one is the touchscreen. The touchscreen just jumped into PC’s very recently so the primary form of input is still considered the keyboard and the mouse.
We can try configuring your touch screen from the settings and check if the problem gets resolved.
- Press Windows + S to launch your start menu’s search bar. In the dialogue box type “Tablet PC settings”. Open the first result.
- Navigate to the Display tab in the Settings and click Setup.
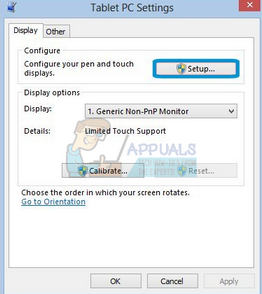
- Now a little window will pop up asking you which input do you want to select. Select the option of Touch input and proceed with the setup.
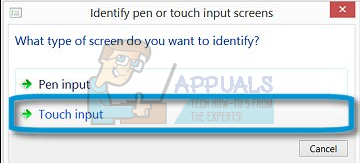
- Follow the instructions on the screen and navigate through all the steps.
- After all the steps are completed, tap the screen to see if it responds.
Solution 5: Changing Power Management Settings
Windows 10 comes pre-packed with different settings to help you conserve energy and battery. Although many people flag this feature as an upgrade over the previous OS, this may cause some problems.
Windows is configured to power off devices not in use for a specific period of time. These devices include your touchscreen, your speakers etc. Since the operating system is not fully free of problems and bugs, it can force the devices to be shut down until you perform a computer reset. These problems also include when the touchscreen stops working when you close the lid of your computer and it goes into the sleep mode.
We can try changing the power management settings of your touchscreen and see if does the trick.
- Press Windows + R to bring up your computer’s device manager. Type “devmgmt.msc” in the dialogue box. This will launch your computer’s device manager.
- Once the device manager is opened up, search through the devices until you find “Human Interface Devices”. Click it to release the drop down menu.
- From additional options, select “HID-complaint touch screen”. Right click it and select Properties.
- Once in the Properties, select the tab of Power Management.
![]()
- Uncheck the box which says “Allow the computer to turn off this device to save power”. Save changes and exit.

- Restart your computer and check if the problem got solved.
Solution 6: Disabling USB Selective Suspend
Many users reported that disabling USB selective suspend feature also fixed their problem immediately. The USB selective suspend feature allows the hub driver to suspend an individual port without affecting other ports on the hub. It is enabled by default in portable computers to help conserve power and help maintain a long battery life.
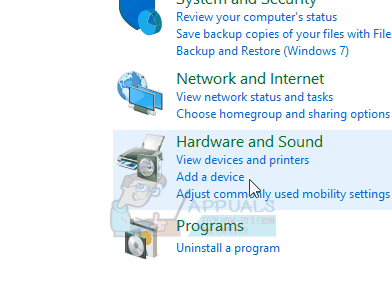
- Press Windows + R to launch your computer’s Run application. Type “control panel” in the dialogue box and hit Enter.
- Select “Hardware and Sound” from the list of categories.
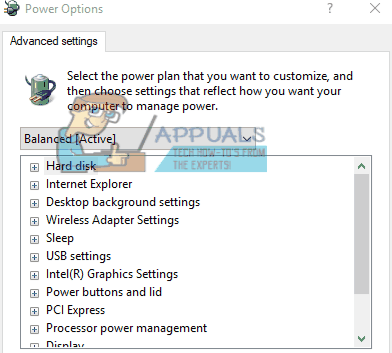
- Now click on “Power Options”. A new window will come forward consisting of all the power plans your computer has. Select the one you are using and click on “Change plan settings”.
- Now to navigate to the advanced settings, click “Change advanced power settings”.
- Search for USB settings from the list of options and click on it to expand. You will another title named “USB selective suspend settings”. Click it again to expand and select Disabled in both cases (On battery and Plugged in). Save changes and exit.
- Now perform a cold reset. Turn off your computer, take out the battery (if it is a laptop) or unplug the power cable. After waiting for 10 minutes turn your computer back on and check if the touchscreen got fixed.
No. 6 did it. I hadn’t used my touch screen for at least a year. I must have missed this article.