How to Fix a Computer Turning Off By Itself
The computer automatically powering off is quite a common issue these days. Your PC will automatically turn off without any warning. The turn off can happen at any time but mostly there is something that triggers it. Sometimes your computer might turn off automatically after playing a specific game or after a certain task. That is usually the case but not always true. Sometimes you pc might start turning off randomly as well.
There are two things that can cause these type of issues. The first one is a faulty power supply. Since your power supply is responsible for providing DC current to all your components, failure in the power supply causes sudden shut downs. This type of issue is usually solved by replacing or fixing the power supply of the computer
The second reason for your computer turning off without any warning is overheating. If you are noticing that the issue happens after or during a specific task then over heating is the most likely cause. The overheating can be caused by dust in your casing, faulty fan, problematic heat sink, and dried out thermal paste. This can be fixed by finding the exact thing that is casing your computer to overheat and then solving that problem.
Troubleshooting Computer Turning Off By Itself
The very first thing you need to do is to check whether it is your power supply or the overheating that is causing the issue.
Check your PC for overheating
To check if the problem is because of overheating, perform the following steps.
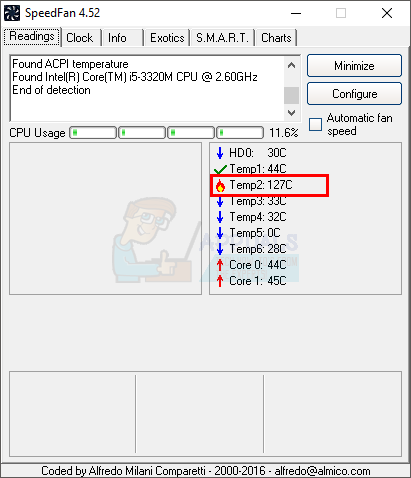
SpeedFan is a software that helps you keep an eye on the temperature and various other things of your Computer. You can use SpeedFan to check whether your PC is overheating or not. Go here and click on the SpeedFan (blue colored) under the download tab. Once it is finished downloading, run the setup and follow the screen instructions. Now run the SpeedFan and check whether the temperature is well within the allowed range set by your manufacturer. You can also guess by the indicators on the left side of readings.
Temperature readings from BIOS
Your BIOS also has a built-in hardware monitoring system that can give you the readings of your system. So if you can’t run the SpeedFan because your PC turns off very quickly then go into the BIOS menu by following the given steps
- Restart your computer
- Press F2 when your manufacturer’s logo appears. The key may vary depending on your manufacturer but mostly its F2 or F10 or Del. You will also be able to see the instructions on the corner of the screen like “Press F2 to open BIOS menu” when your manufacturer’s logo appears.
- Once you are in the menu, use your arrow keys to select H/W monitor or Status (this may also vary depending on your manufacturer) and press Enter.
- Now you will be able to see important readings regarding your hardware.
Troubleshooting Results
If your temperature readings are way off then that means there is an overheating issue with your computer. Follow the method 1 to solve overheating issues.
If everything is fine with the readings then the power supply might be faulty. In that case, follow the method 2 to check and replace power supply.
Method 1: Solving overheating issues
Open the side casing of your PC and try to turn on your computer. Check if the computer runs for a longer period of time. Also, make sure if your PC isn’t placed near a hot place like a heater or in direct sun light.
Clean the dust
Turn off your computer and open the casing of your PC. The side of your computer casing might have a latch or might have screws. The latched casing can be opened by sliding the side cover and casing with screws can easily be opened by a screw driver.
Look inside your casing to see if there is dust settled on the motherboard. If the inside of the PC is dusty then clean it (the most effective way would be to use a blower/compressed air cans). Don’t forget to blow the air from various different angles to make sure all the dust is cleaned. Once cleaned, try to turn on your PC and check if it turns off on its own.
Clean the heatsink and replace thermal paste
Check the fan and its heatsink for settled dirt/dust. The fan can be found on the motherboard. Take out the fan by disconnecting it from the motherboard. You will be able to see a wire coming out of the fan and going into the board. Take it out. If you can’t take out the fan then look for the instructional arrows on the fan.
Once the fan is out of the casing, clean it properly. A heatsink should be connected on the other side of the fan. Clean the heatsink as well. The easiest way of cleaning the heatsink would be an old tooth brush. Now remove the thermal paste from the processor. You can use a paper towel and rubbing alcohol to remove it. Just put some alcohol on the paper towel and rub the paper towel on the processor (you will be able to see dried out thermal paste), gently. Once the thermal paste is gone, apply the new paste on the processor. Follow the instructions given by the thermal paste manufacturers to properly apply the paste.
Once you are done applying the paste, put the fan back into its place and make sure it’s properly fitted. Connect the fan wires on the board and close the casing. Turn on your PC and check the temperature again.
Method 2: Check and replace the Power Supply
First of all, check the power supply for settled dust/dirt. The dust/dirt might be settled on the power supply fans which can cause overheating in power supply. Follow the steps given below to check the power supply for dust/dirt.
- Turn off your computer and unplug it
- Open the side cover of your computer’s casing either by unlatching or by unscrewing.
- The power supply will be attached to one of the corners in the casing. It looks like a box with a fan.
- Follow the given steps and take out the power supply
- Disconnect the wire of the power supply that are going in the motherboard. Remember where the cable were attached because you will be reattaching them
- Check if there are screws around the power supply. If there are screws then unscrew them otherwise there might be a latch. Unlatch the power supply and take it out.
- Look at the fan of the power supply and check if there is any dust on the fan or inside the power supply.
If there is a lot of dust on the fan or inside the power supply then clean it. Make sure you clean the power supply properly. Once you are done, put the power supply back in the case and connect the wires back to where they were originally connected. Now close the casing and plug in the computer.
Check the ratings
If you recently installed the power supply in your computer then make sure it is powerful enough for your system. You can see the ratings of your power supply on its box. Match the ratings of your power supply with your computer manufacturer (they usually recommend a range of power supplies that are suitable for your system).
Replace the power supply
If the issue isn’t resolved then repeat the steps from 1-4 to take out the power supply again. Now replace the power supply with another one. Make sure the new power supply is in working condition or is brand new. Connect the wires of the power supply and close the casing. Now turn on your PC and problem should be solved now.
NOTE: Make sure the new power supply is strong enough to power your computer. Check the ratings of the new power supply against the recommended ratings by your component’s manufacturer.