How to Fix PC Keeps Booting into BIOS Menu Issue? (6 Fixes)
Windows users encounter an issue when their PC keeps booting into BIOS instead of the Windows logo screen. The users then have to exit the BIOS menu every time they reboot their computer, which is of course time-wasting and annoying.
The main problem is that the Basic Input/Output System (BIOS) program is failing to recognize your hard drive, where the system files are stored. As a result, the BIOS is unable to launch Windows directly.
If you’re facing the same issue, set your hard drive as the foremost boot option in the boot priority section in BIOS. In case the HDD or SSD doesn’t show up as the boot device, check if they are properly connected or not. You can remove the hard drive and then insert it again.
We’ll be explaining six methods to get rid of this problem, and all of them work. Try them sequentially and see which one does the trick for you.
1. Set the Correct Primary Boot Device
Usually, the C drive is where your Windows components are stored. Now, this would either be an HDD or an SSD. The users need to make sure that their hard drive is set as the primary boot option. Because if it is not, you’ll keep going to the BIOS menu upon powering on your system.
The device order can be easily changed, and here’s how to do that:
- Click on Boot in the top menu bar of the BIOS program.
- There will be Boot Option Priorities on the left portion of the screen. It will be your hard drive or USB drive, and CD/DVD ROM.
- Verify that your hard drive is the main boot option in BIOS.
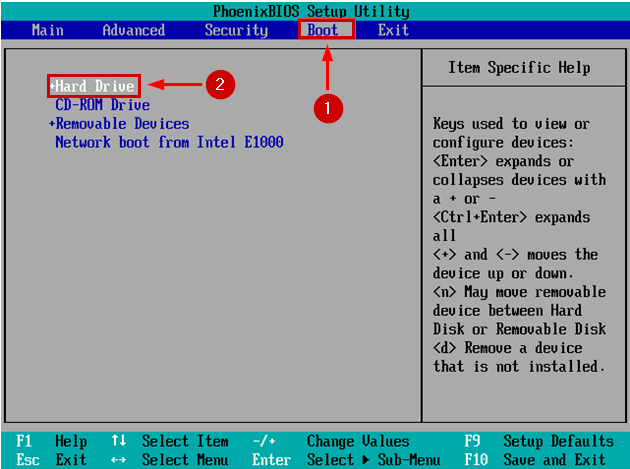
Boot option priorities in BIOS
- If it’s not, then use the up and down arrow keys, Enter key, and the +/- keys to select the desired option and change its position.
- Next, save changes and exit BIOS.
- Restart your PC now and the Windows load screen should appear.
2. Disable Fast Boot
Fast boot allows your computer to boot faster than usual. While enabled, it won’t shut down your system completely by closing all apps and drivers. Rather, it’ll put the PC in a hibernation state. So upon booting up your computer, you can save time.
However, the fast boot can also be the reason for our problem under consideration. Therefore, we recommend disabling the option and then restarting your PC.
Here’s how to disable fast boot in the BIOS:
- In BIOS, go to the Boot menu at the top.
- Go to Fast Boot and select it.
- Now select Disabled to turn off the fast boot.
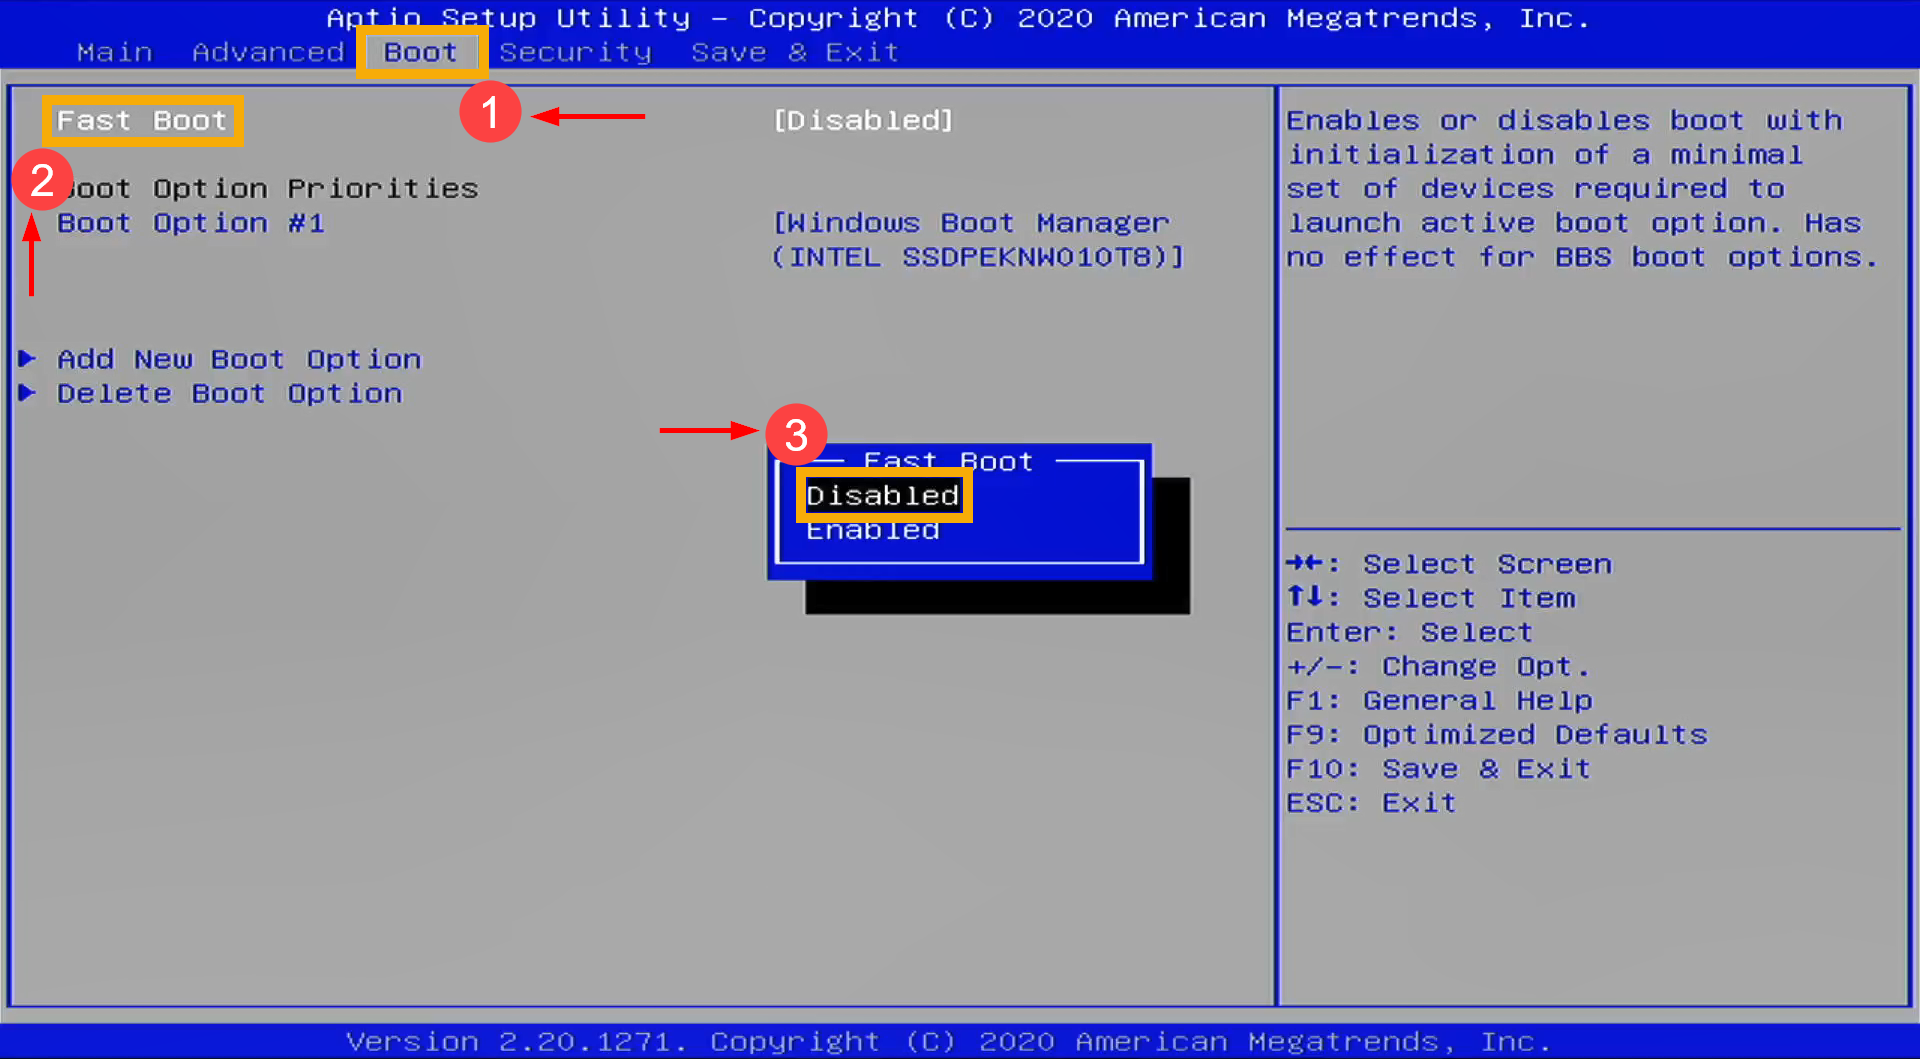
Disable Fast Boot in BIOS
- Save the changes with F10 and exit BIOS.
- Your PC will restart without a fast boot now and the issue will be resolved.
3. Ensure Proper Hardware Connections
Improper hardware connections are more often the reason why your PC keeps booting into BIOS. Either the hardware is not plugged in at all or it is wrongly plugged in. Instead of booting up Windows, both scenarios will take you to the BIOS menu.
Therefore, it is necessary to take a look at all the ports where the hardware is connected.
- Remove your keyboard, mouse, and external hard drive, and boot up the PC. See if it goes to BIOS or not.
- If it does, then it means one or more of your hardware was inappropriately connected.
- Carefully connect the hardware components again and restart your PC. The problem should be fixed now.
Alternatively, you can try the following method as well.
- Turn off your computer before removing all the cords.
- Afterward, discharge the PC’s power capacitors by pressing the power button for at least 60 seconds.
- Now reboot the system after plugging in the cords and see if it boots to the Windows load screen now.
4. Run Startup Repair
This method will require you to boot from a USB drive or a CD/DVD. They will act as bootable devices. From there on, we will be running the Startup Repair which will fix the problem that your system is encountering. Following that, the PC will no longer boot into BIOS.
Here’s how to perform the action:
- Download the ISO file to create a bootable device. Additionally, you can also create an installation USB with Rufus.
- Boot up the computer and quickly press F2 to enter the BIOS program.
Note: Different motherboard manufacturers have different keys to access the BIOS. It could be F2, F8, F10, F12, Esc, or Delete. Often, it’ll be F2. You can also search “how to enter BIOS (your model number)” to know the key.
- Go to the Boot tab and set your CD/DVD or USB as the primary boot option.
- Exit BIOS after saving the changes.
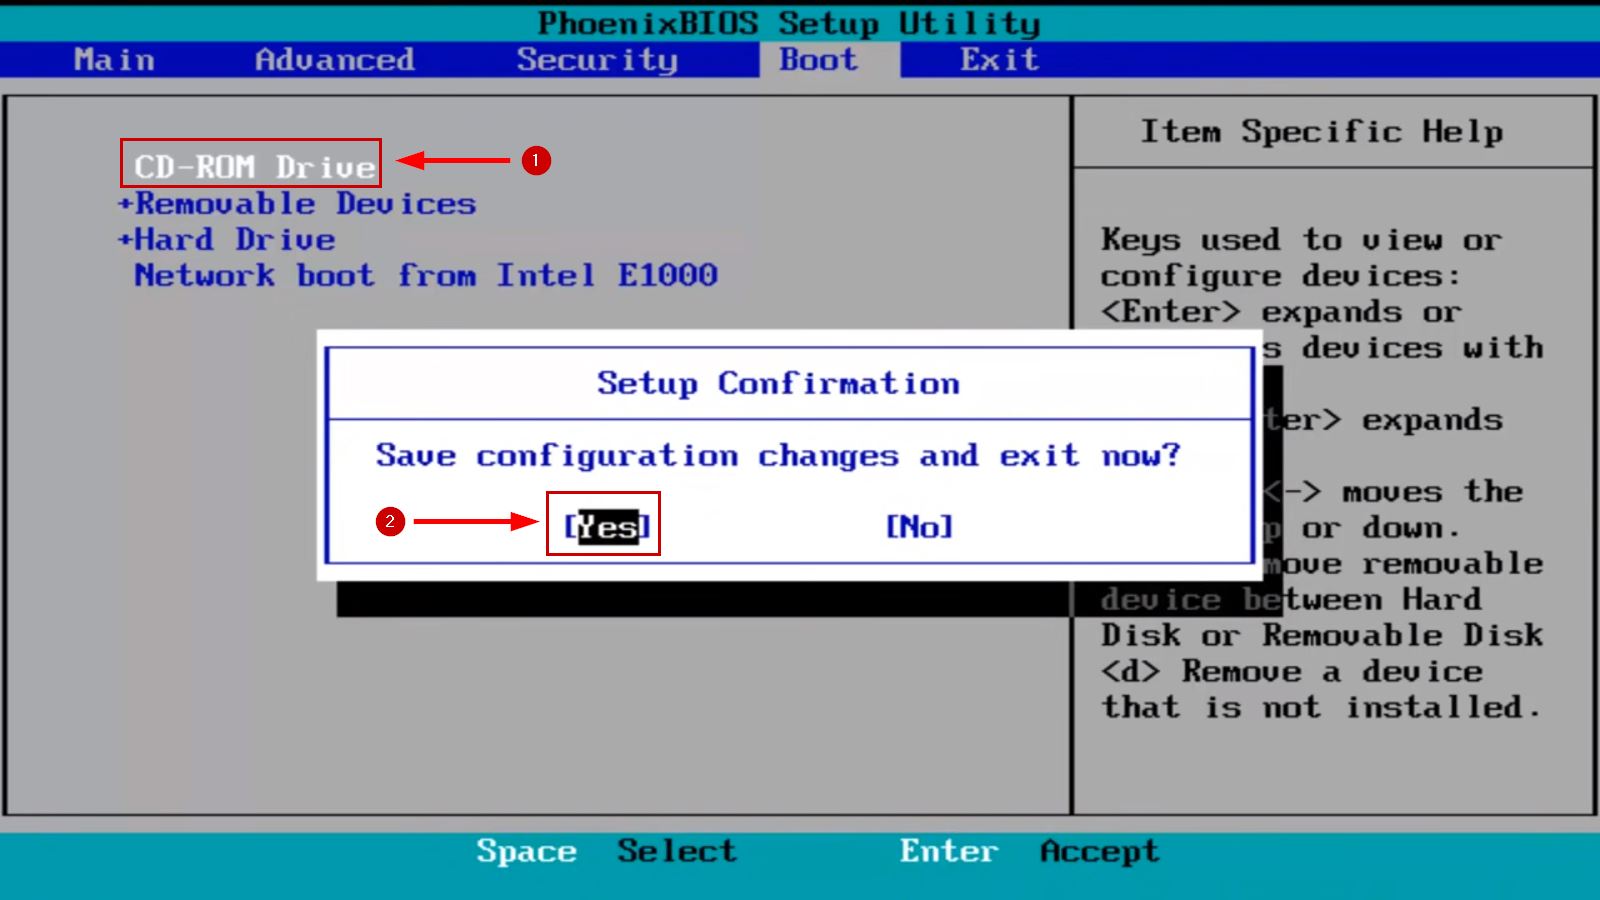
Set USB or CD/DVD as the primary boot option
- Now your computer will boot up with the installation media.
- Click Next after selecting your language and other preferences.
- On the Install Now screen, click on Repair your computer on the bottom left.
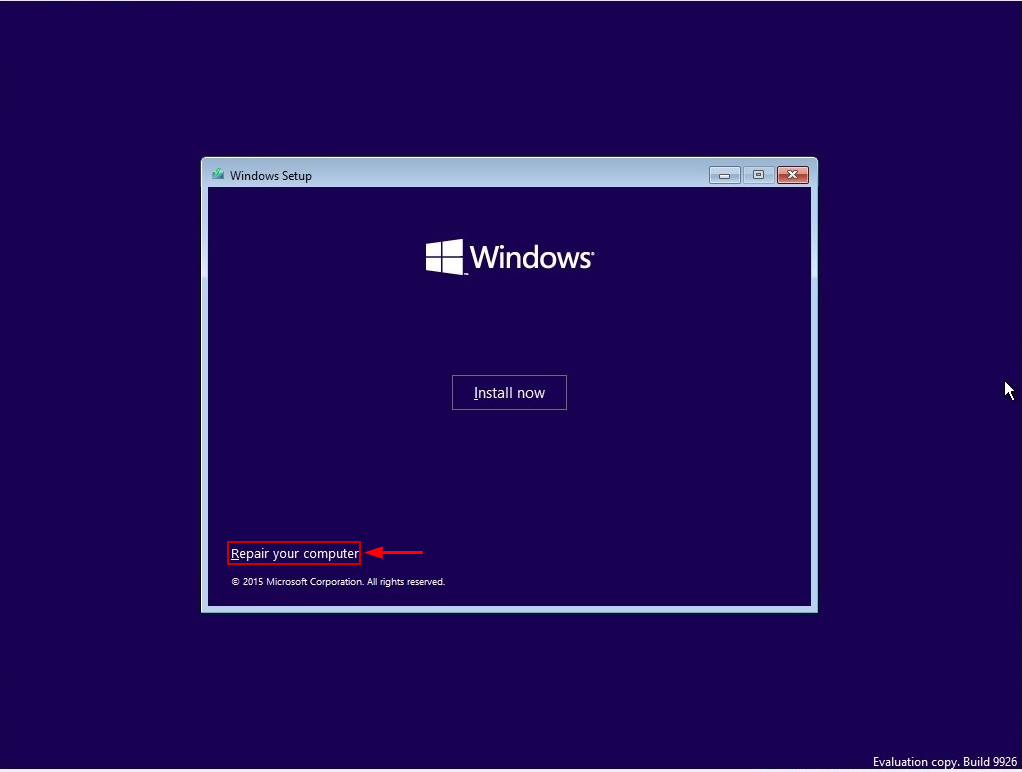
Repair your computer option
- Now from the Startup Option, go to Troubleshoot.
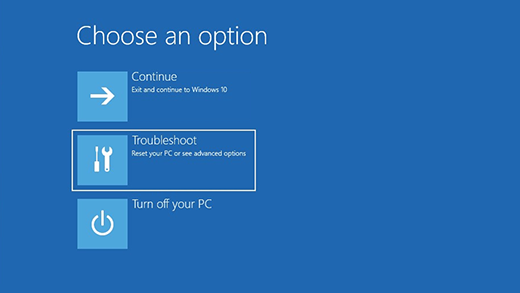
WinRE Troubleshoot option
- Next, navigate to Advanced Options > Startup/Automatic Repair.
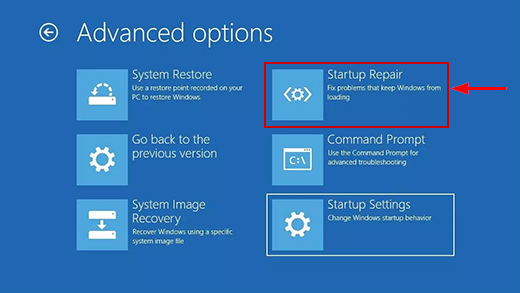
Startup Repair under Advanced Options
- Select your account and click on Continue.
- Wait for the Startup Repair to look for any issues.
- Follow the on-screen instructions next.
- Once everything is done, reboot your computer to check the booting status.
5. Change the CPU Fan speed settings
Sometimes the system fails to detect that the CPU fan is running. So to keep your computer from heating up, it keeps booting into BIOS instead of powering up. However, if you are 100% sure that there is no error in your CPU fan and it’s working perfectly fine, then simply ignoring the fan speed limit will fix the problem.
Again, you need to be absolutely certain that the fan is operating correctly. Because if it’s not, the PC will burn up. In this case, you’ll have to replace the fan, and the computer will boot up normally.
Now for changing the fan speed settings, follow the steps below:
- In BIOS, go to Advanced Settings.
- Now navigate to the Hardware Monitor/ Monitor section.
- Enable the CPU Q-Fan Control option.
- Now you’ll see the Fan Speed Limit option.
- Change the option to ignore and restart your computer.

CPU Fan Speed Low Limit options
- The system should start normally now.
6. Check the CMOS/BIOS battery
The CMOS/BIOS battery is responsible for powering up the BIOS firmware, which in turn powers up the system. In the event that the battery is dying or has already died, the computer will fail to boot up.
There are a few patterns that indicate that the CMOS battery is dying. Here are a few of them:
- The time & date on your computer will reset
- System drivers will stop responding
- Random shutdowns
- CMOS Checksum Error
Now, follow the steps below to check if the CMOS battery is the cause for your PC to keep booting into BIOS or not.
- Take out the CMOS battery for a minute or two and then insert it again properly.
- Start your PC and see if it still loads to BIOS or not.
- If it does, then it means that your battery is dead.
- Replace the CMOS battery and boot up your computer again.
- Now it should load the Windows screen directly.


