How to Fix the CMOS Checksum Error on Windows?
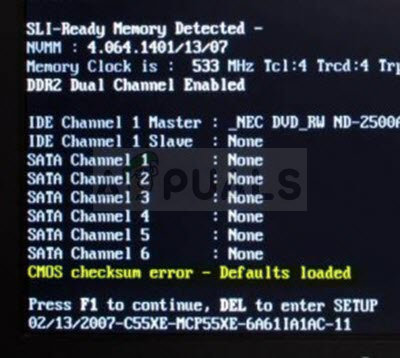
The CMOS Checksum Error is a problem which affects users of many different Windows versions and it often appears out of nowhere. The problem appears during the BIOS boot screen and it prevents your computer from loading the operating system at all.
The CMOS Checksum Error can usually be resolved easily enough but it certainly involves some more advanced troubleshooting. This is yet another reason to follow the instructions carefully in order to keep your PC safe from other problems. We have gathered several methods which have helped other users in the past so make sure you check them out!
What Causes the CMOS Checksum Error on Windows?
There aren’t many causes of this error and they are pretty much related to BIOS itself. Still, two distinct causes can be identified and all troubleshooting methods are based upon them:
- Your CMOS battery needs to be replaced – CMOS battery won’t last a lifetime and after several years, they are unable to provide the sufficient voltage needed to start BIOS and this problem appears. Considering replacing it for a new one.
- BIOS settings are corrupt – The problem can also be caused by wrong BIOS settings which may be related to new devices you might have added. Either way, loading BIOS defaults should be enough to resolve the problem.
Solution 1: Replace Your CMOS Battery
One of the major causes of this problem is the CMOS battery. If the battery is several years old, it won’t be able to provide enough voltage to CMOS and this problem is bound to appear. This is a clear sign that it’s time to replace the battery with a new one. These batteries are not expensive and you can’t boot your computer without them so make sure you follow the instructions below!
- Open the computer case and find the CMOS battery attached to the computer’s motherboard. If you are unable to find your CMOS battery, refer to your motherboard or computer documentation. You can also look it up on the Internet or contact your computer’s manufacturer for additional help.
Note: With some computers, you may need to disconnect cables, remove drives, or remove other parts of the computer to get physical access to the CMOS battery.
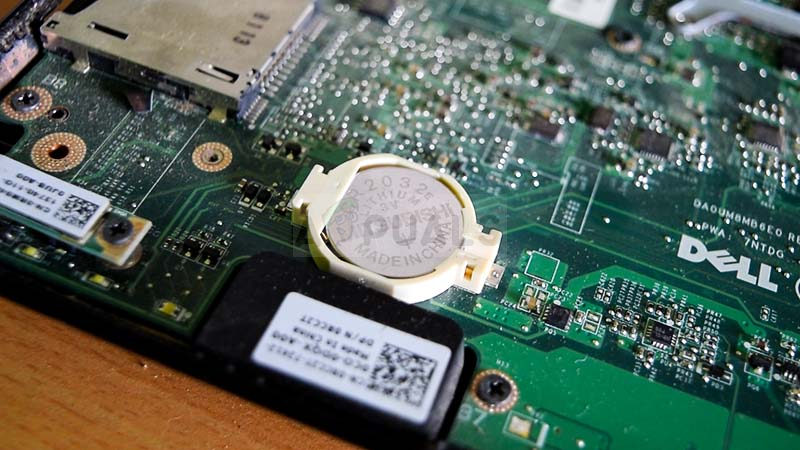
- If your computer is using a coin cell battery, removing the battery is relatively simple. Use your fingers to grab on the edge of the battery and pull it up and out of the socket holding it in place. Some motherboards have a clip holding the battery down and you may need to lift it up to pull the battery out.
- Let it stay removed for 10 minutes, take the other one, input it in a similar manner, and try to boot your computer. Check to see if the CMOS Checksum Error pops up!
Solution 2: Reset BIOS Settings to Default
Another major cause of this problem is faulty BIOS settings. BIOS settings don’t get corrupt too often and it’s always a problem when they do. It may have been caused by an incorrect BIOS update or it can even be caused by a malicious program. Either way, if you can access BIOS, resetting it to default should definitely resolve the problem!
- Turn your PC on and try to enter BIOS settings by pressing the BIOS key as the system is about to start. The BIOS key is typically displayed on the boot screen, saying “Press ___ to enter Setup.” or something similar. There are other keys as well. The usual BIOS keys are F1, F2, Del, etc.

- The option to load default settings can be present under two different places in the BIOS screen depending on the version of the BIOS on your Dell computer.
- At the initial screen of BIOS settings, if you see a Restore Settings button at the bottom, next to the Exit button, click on it and make sure you choose BIOS defaults before clicking OK. Click Exit and your computer will restart.

- If there is now such button, you may want to navigate to the Exit tab at the initial BIOS screen by clicking the Right Arrow on your keyboard until you reach it. Click the Down Arrow key until you reach the Restore Defaults (or Load Setup Defaults) option and click the Enter
- Click the Enter key once again when prompted to Load Setup Defaults and wait for your computer to boot. Check to see if the problem is gone now.
Solution 3: BIOS Recovery (Intel Desktop Boards)
Intel Desktop Boards have encountered a problem where a certain version BIOS simply starts displaying this problem after a while and the only way to resolve it is to perform BIOS recovery by installing the latest version using a bootable USB. Follow the steps below only if you have an Intel Desktop Board!
- Visit this link and locate the latest version of BIOS available for your setup. Make sure you enter relevant information about your setup in order to find the required file. Make sure you download it to your computer.
- Before copying the file to a USB device, you need to make sure it’s formatted as FAT32. Open your Libraries entry on your PC or open any folder on your computer and click on This PC option from the left side menu. If you are using an older version of Windows (Windows 7 and older), simply open My Computer from your Desktop.

Opening This PC from Libraries - Right-click on the USB Removable Drive you want to format and choose the Format… option from the context menu which will appear.

- A small window will open up named Format so make sure you click on the menu under File system and choose the FAT32 file system if it’s not already selected. Click on Format and be patient for the process to finish.

- Make sure you copy this file to a USB device. The file should be located in the root folder (the folder which opens when you double-click your USB device in This PC).
- Insert the USB device into the target computer’s USB port, shut down the computer, and remove the power cord. Open the case and remove the BIOS Configuration Jumper. Its location will be presented below.

- Power up your computer and wait a couple of minutes for the update to complete. The computer will either shut down automatically or you will be prompted to turn it off manually. Either way, remove the USB device and put the BIOS Configuration Jumper back into place (above – image to the right).
- Close the computer’s case and restart your computer to see if the CMOS Checksum Error still appears on your computer!


