What is: USB Selective Suspend in Windows
USB Selective Suspend is a Windows-specific feature that allows users to set their connected USB devices to a very low-powered state when they’re not in use. While this feature is definitely effective in prolonging the battery life of your laptop or notebook, it might also cause unexpected problems with certain devices connected to your PC via USB.
USB Selective Suspend is enabled by default in Windows XP, Windows Vista, Windows 8 and Windows 10.
Unexpected consequences
If certain circumstances are met, you might find that the USB Selective Suspend will have a negative effect on some of your USB-connected devices. This is more common on Windows 7 and Windows 8 than on Windows 10. Here are some of the most known symptoms that we managed to identify:
- Licence error message when starting a USB-eLicenser protected application.
- In some cases, a USB port that was selectively suspended will not get turned back on when needed.
- Error messages while working with various sound production suites when the USB port is suspended.
- When multiple devices are connected to the same USB hub, they might become unstable when one of them receives a wake request.
- Bugcode_USB_Driver blue screen error occurring with certain USB-connected devices when they are forcibly suspended.
USB Selective Suspend Explained
The mechanism is similar to when you put your whole system to sleep, only it’s a more localized process. Rather than completely powering on or shutting off a USB port, the selective suspend mode allows the OS to put a USB port into a low-power state (suspended state). But keep in mind that Windows will not suspend a USB port by it’s on. For this to happen, it needs to receive an idle request from the USB device driver.
Note: Don’t worry about this feature suspending your keyboard and mouse. Most (if not all) computers will include a BIOS setting that will filter out any critical USB-connected device.
Some USB devices such as printers, scanners, webcams and fingerprint scanners will only require power intermittently. For those devices, selective suspend is especially helpful since it conserves battery power and reduce the overall power consumption. The feature allows the OS to suspend a specific port individually, without affecting the delivery of power to the rest of USB ports.
Each USB-connected device that is not suspended will force the system to engage a data transfer protocol in the physical memory of the system. This will significantly increase the power consumption since the direct memory access transfers will prevent the CPU from entering a low-power state.
When to disable USB selective suspend
The selective suspend mode is not exactly necessary on a desktop machine that is plugged into power. As it turns out, the selective suspend feature doesn’t save that much power on a desktop, when compared to a laptop/notebook. This is why Microsoft included a way to disable the USB Selective Suspend mode.
As a rule of thumb, you should only disable USB selective suspend if you find that some of your peripherals are acting up. If you regularly see the USB device not recognized error message, you can probably blame the USB Selective Suspend feature.
 However, if you’re using a laptop/notebook and you don’t have problems with your USB ports, you shouldn’t disable USB Selective Suspend if you want to get the best out of your battery life.
How to Disable USB Selective Suspend
If you find that your USB devices are being affected by the USB selective suspend feature, it’s a good idea to turn it off. Here’s a step-by-step guide on disabling USB Selective Suspend:
Note: The following guide will work on any Windows version that supports selective suspension (Windows XP and ulterior versions).
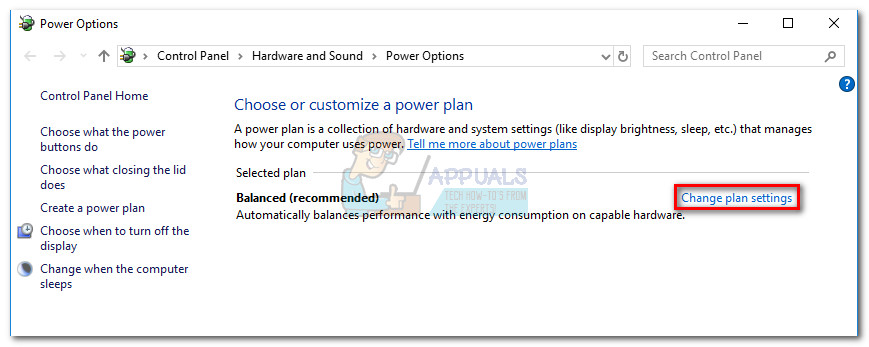
- Press Windows key + R to open a Run window and type “powercfg.cpl”. Press Enter to open Power Options.

- In Power Options, see which plan is selected and click on the Change plan settings associated with it.

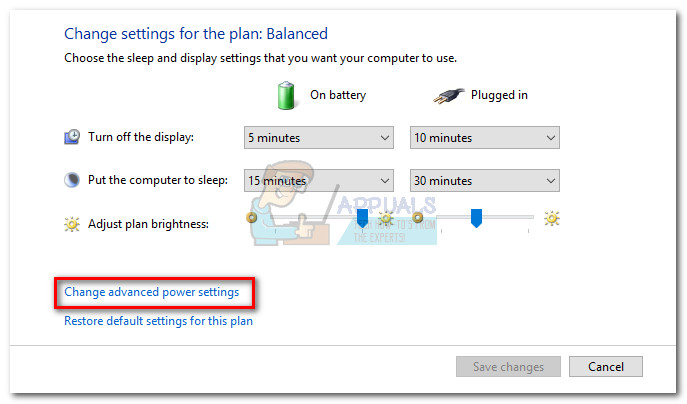
- In the Edit Plan Settings window, click on Change advanced power settings.

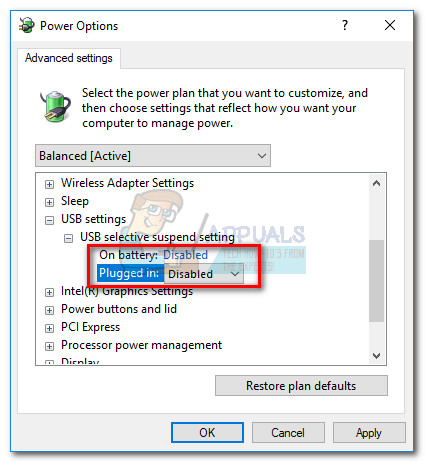
- In Advanced settings, make sure the active plan is selected and scroll down to USB settings. Expand the USB selective suspend setting and set the drop-down menus next to On battery and Plugged in to Disabled.
 Note: If you only want to disable USB selective suspend while your computer is plugged in, leave the On battery option Enabled.
 - Hit Apply to save your changes.
Once you complete these steps, your operating system will no longer power off USB devices connected to your computer automatically. This will fix any issue that might have something to do with this feature.
If disabling USB selective suspend does not fix the issue, you can reverse engineer the steps above to re-enable the feature.